The Battle of the P67 Boards - ASUS vs. Gigabyte at $190
by Ian Cutress on January 20, 2011 4:15 PM EST- Posted in
- Motherboards
- Gigabyte
- Asus
- P67
Board Features
| Gigabyte P67A-UD4 | |
| Market Segment | Performance |
| CPU Interface | LGA 1155 |
| CPU Support | i3/i5/i7 Sandy Bridge |
| Chipset | P67 |
| Base Clock Frequency | 80 MHz to 200 MHz in 0.1 MHz increments |
| DDR3 Memory Speed | 1333 MHz by default, 800-2133 MHz supported |
| Core Voltage | Auto, 0.750V to 1.700V in 0.005V intervals |
| CPU Clock Multiplier | Dependant on CPU |
| DRAM Voltage | Auto, 0.90V to 2.60V in 0.020V intervals |
| DRAM Command Rate | Auto, 1N to 3N |
| Memory Slots |
Four 240-pin DDR3 DIMM slots in dual-channel Regular unbuffered DD3 memory Up to 32GB total supported |
| Expansion Slots |
2 x PCI Express 2.0 x16 slots (PCIe 1 operates at x16 in single mode, PCIe 2 operates at x8 in single mode, or x8/x8 in dual) 3 x PCI Express 2.0 x1 slots 2 x PCI slots Supports ATI Crossfire Supports NVIDIA SLI |
| Onboard SATA/RAID |
a) 2 x SATA 6.0 Gb/s ports (white) supporting RAID 0, 1, 5 and 10 b) 4 x SATA 3.0 Gb/s ports (black) supporting RAID 0, 1, 5 and 10 c) 2 x eSATA 3.0 Gb/s ports from Marvell 88SE9128, RAID 0, 1 a) + b) are capable of cross channel RAID 0, 1, 5, 10 |
| Onboard |
4 x SATA 3 Gb/s w/ RAID 2 x SATA 6 Gb/s w/ RAID 2 x eSATA 6 Gb/s w/ RAID 1 x Front panel audio header 1 x S/PDIF Out header 3 x USB 2.0/1.1 headers 1 x USB 3.0/2.0 header via Renesas (NEC) D720200 chip 1 x Serial port header 1 x Clearing CMOS jumper |
| Onboard LAN | Gigabit Ethernet via Realtek RTL8111E |
| Onboard Audio | 7.1 channel Realtek ALC892 codec |
| Power Connectors |
24-pin EATX Power connector 8-pin EATX 12V Power connector |
| Fan Headers |
1 x CPU fan header 2 x System fan headers 1 x Power fan header |
| I/O Panel |
1 x PS/2 keyboard/mouse port 1 x Coaxial S/PDIF Out connector 1 x Optical S/PDIF Out connector 8 x USB 2.0/1.1 ports 2 x USB 3.0/2.0 ports via Renesas (NEC) D720200 chip 2 x eSATA 6Gb/s ports 1 x RJ-45 port 8-channel Audio I/O ports |
| BIOS Revision | F7 Beta |
In the Box
- I/O shield
- SLI 3-slot bridge
- 4 x right-angled SATA connectors
Compared to the ASUS P8P67 Pro, both boxes do not come with much in the way of extra peripherals. Here we get an SLI 3-slot bridge (compared to the 2-slot on the ASUS) but lose the USB 3.0 rear bracket, meaning that one will have to be obtained in order to use the USB 3.0 header on the Gigabyte board.
Software
Smart 6

Smart 6 tries to encapsulate a good portion of the myriad of software available in easy-to-use quick buttons, and is essentially identical to the X58 and P55 iterations of the software. The QuickBoot portion attempts to speed up boot times by bypassing the lengthy BIOS post, assuming there has been no physical hardware change. QuickBoost is a single screen overclocking utility, similar to the EasyTune6 front page. Recovery2 helps roll back the system to a previous set of settings without predefinition of a backup time flag, and also the TimeLock, which is almost superfluous given Windows7 has Parental Controls.
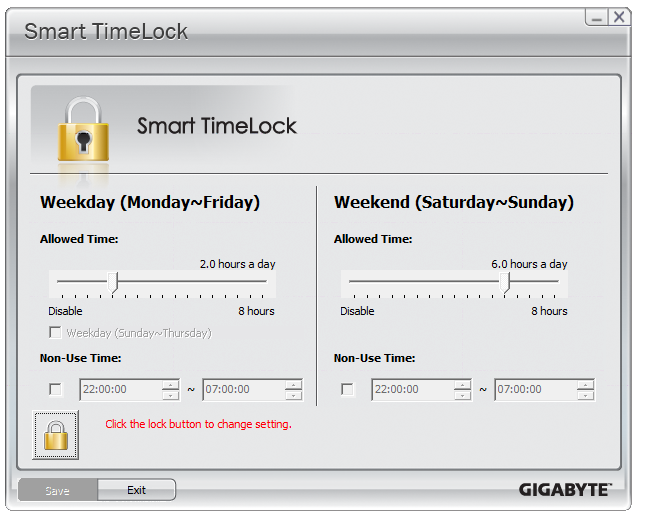
The idea behind TimeLock is similar to that on the Xbox360 parental controls – specify a certain number of hours per day (in this case, two different values for weekdays and weekends) for which the computer can be in use.
@BIOS
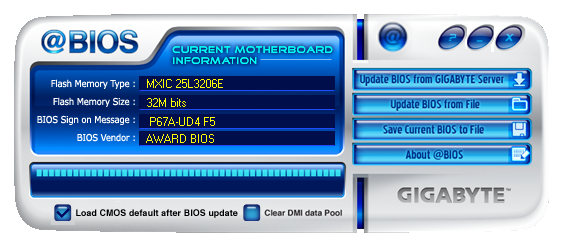
@BIOS is the staple Gigabyte BIOS update utility, and has been for a few iterations now. Users should note that to flash the latest BIOS files, the version of @BIOS on the CD is insufficient, and @BIOS 2.1 is required. 2.1 can be downloaded from the Gigabyte website.
Dynamic Energy Saver 2
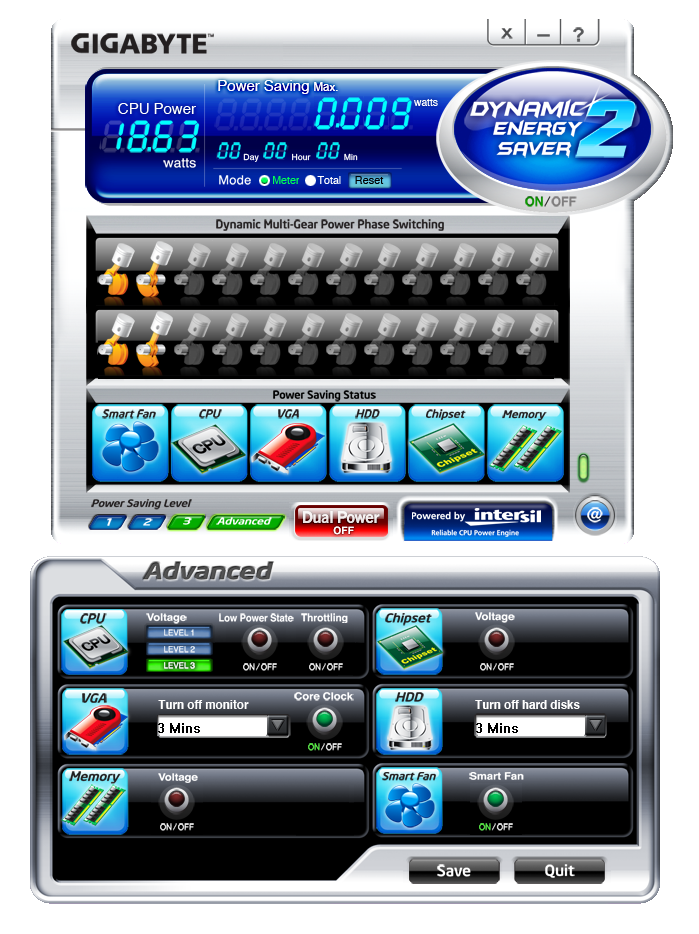
Another program that Gigabyte has been using on various chipsets is the Dynamic Energy Saver 2. As you can see from the picture, various power saving features can be enabled or disabled through user settings, or you can let the software determine the best course of action.
EasyTune6
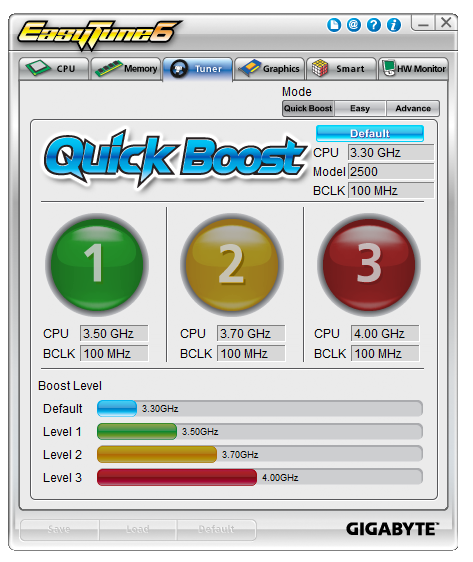
The OS overclocking tools are predominantly housed in EasyTune6. The front screen has those easy to use OC buttons, but only having three up to 4 GHz is somewhat limiting on the Sandy Bridge platform, given that most processors will happily do 4.4 GHz plus. There is no system of auto-overclocking detection similar to the ASUS boards.

Despite the software having an option for ‘real time ratio change’, of which there is an option in the BIOS to enable/disable, I could not get this to work. Upon setting a new multiplier, I was asked to reboot to apply it.
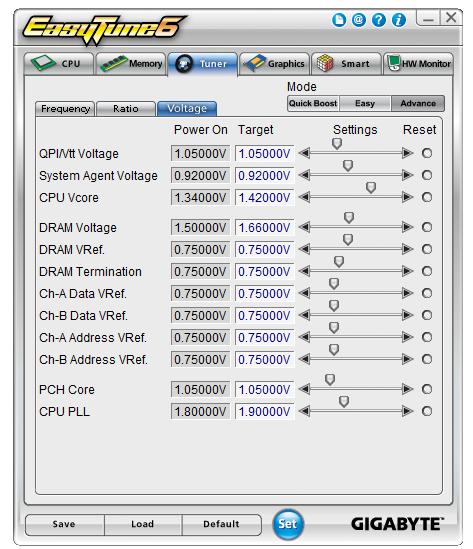
As always with EasyTune6, going to advance mode allows voltage manipulation. While it is nice to have such a wide variety of options, given that for Sandy Bridge all you really need is CPU VCore, DRAM and CPU PLL, it would have been easy just to include those in the ‘easy’ mode.

Fan control is basic in EasyTune6. Even in advanced mode, as shown above, you can choose where to put the initial and final ramp positions in terms of temperature against max RPM, but there is no option to define further points on the curve, or no determination of separate fans, so all chassis fans will be controlled by this one profile.


137 Comments
View All Comments
Tommieemict - Wednesday, June 10, 2020 - link
nude teen sisters on periods https://teenwebcams00.uno">teenwebcams00.uno chubby indian teen nude.CarsonJoine - Wednesday, June 10, 2020 - link
naked mature selfie tits https://maturewebcams00.space">mature wife fuck tube mature fucked at massage.milf sucking teen cock https://milfwebcams00.casa">milfwebcams00.casa homies fuck white milf dp.
amateur big tit teen casting https://amateurwebcams00.xyz">amateurwebcams00.xyz amateur good looking black couple fuck.
2018 black ameature porn in hd https://blackwebcams00.icu">blackwebcams00 black amateur guy fucking amateur mexican girl.
sexy mature latina porn https://maturewebcams00.space">maturewebcams00.space thick huge tit mature pics.
JamesSag - Thursday, June 11, 2020 - link
lesbian initiation rite video https://lesbianwebcams01.fun">lesbianwebcams01.fun vintage lesbian porn gifs.moms gone black porn https://blackwebcams00.icu">pimp wife black men porn lets fuck black pussy couple porn.
gay black porn inetrracil threesomes https://blackwebcams00.icu">blackwebcams00 black nude model art.
dick an jane mature couple tumblr https://maturewebcams00.space">maturewebcams00.space gay mature tumblr masturbation.
two teens caught in pool fuck https://teenwebcams00.uno">petite teen creampie porn curvy teen girl nude strip.
Michaelsok - Friday, June 12, 2020 - link
video asian milf seduces me sex https://asianwebcams00.host">indian boss kissing and sex with receptionist fuck unconscious japanese business woman video.BrianSat - Friday, June 12, 2020 - link
sexy lesbian mom footrub https://lesbianwebcams00.fun">lesbianwebcams00.fun lesbian bondage training porn.hd milf ffm porn https://milfwebcams00.casa">hot thick milf pinterest perfect boobs milf fuck.
fucking a drunk milf https://milfwebcams00.club">milf boss fucks male employee milf monster cock creampie.
Mature blonde gang-raped on a couch https://maturewebcams00.club">maturewebcams00 young old russian mature sex.
white ass black dick https://blackwebcams00.pw">blackwebcams00.pw sexy ebony lesbian threesome.
Steveunfah - Sunday, June 14, 2020 - link
indian wife nude orgy outdoor https://asianwebcams00.host">massive asian tits tumblr asian teen fucks boyfriends friend.mary jane scott college girls nude https://collegewebcams00.store">naked college girl sex college girl rides cock gif.
chubby anal bbc amateur https://amateurwebcams00.monster">amateurwebcams00 amateur milf riding big cock creampie.
milf big ass anal https://milfwebcams00.casa">milf wants young cock gif milf next door naked.
asian fucking for a long time https://asianwebcams00.host">hot naked japanese women thai lan hd sex.
JamesSmant - Monday, June 15, 2020 - link
big hairy college cock https://collegewebcams00.store">collegewebcams00.store college girl masturbation color hidden.