A Tale of Two Boards
In the one corner we had the MSI supplied board that, as one of MSI's engineers mentioned, no component (resistor) at position R127. There was one however at R126. This, according to the MSI engineer, was the "right board." Call it a hunch, but we figured that the board NewEgg sent us wasn't the "right board" and we bet that it would have a resistor at R127.

Finding R126/127
After close examination, our hunch was right; the NewEgg supplied board had a resistor at R127 but no resistor at R126. This board that was being sold was actually of a different board revision than the one MSI sent many reviewers, although the PCB revision numbers on the boards matched.
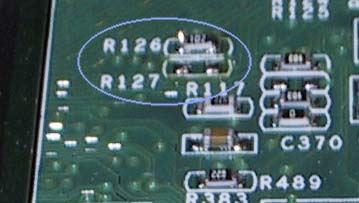
The MSI supplied board had a resistor at R126
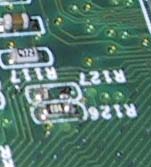
...with a little soldering, so did the NewEgg supplied board
Using the trusty soldering iron, we removed the extremely tiny resistor from R127 and moved it to R126. If you are going to attempt doing this on your own, be very careful as often times the incredible heat generated by the soldering iron is enough to ruin the resistor. You have to use the iron to heat the contact points at R127, remove the resistor (after the solder has liquefied) and move it to position R126. There is enough solder already at R126 to attach the resistor there without any additional solder. You will have to use a very small object (we used a thin paperclip that we bent out of shape) to hold the resistor in place while you solder it to its new home. We obviously can't take any responsibility for any damage done to your board if attempting this, but honestly you shouldn't have to do something like this to get the performance you paid for. We'll get to that later.


0 Comments
View All Comments