Gigabyte GA-7ZMM Socket-A KM133 micro-ATX
by Mike Andrawes on March 11, 2001 2:23 AM EST- Posted in
- Motherboards
Meeting Expectations
Expectations for a KM133 motherboard, which will generally be targeted at the budget market, should not be the same as those of a KT133(A) board that is meant for the high-end. Of course, we still expect high stability, but a number of features are likely to be cut out to lower costs. Of course, performance is not going to be the same when using the onboard video either.
The new VIA 8365 North Bridge is basically a combination of the good old VIA 8363 North Bridge and the ProSavage on-board video core. The ProSavage is the result of the VIA/S3 partnership that is a hybrid of the Savage2000’s 2D and the Savage4’s 3D. The 8365 still supports an external AGP 4X slot should you decide that the on-board video is too slow.
Just like the 8363 North Bridge, which is the core for the KT133 chipset, the 8365 also supports up to 1.5GB of PC100 or PC133 SDRAM. The memory controller allows you to run the CPU and memory asynchronously, so even though the processor is running at 100MHz FSB, you can choose to run the memory at 133MHz, boosting memory bandwidth from 800MB/sec to 1.06GB/sec.
However, the GA-7ZMM only features two DIMM slots, as opposed to three on the VIA reference board. Since each DIMM slot can only take up to 512MB RAM module, effectively limiting the memory size to 1GB of memory.
The GA-7ZMM uses the VIA 686B South Bridge, which is the successor to the older 686A. The main new feature of the 686B is its support for Ultra ATA 100 devices. Currently, no IDE hard drive actually has a sustained transfer rate of higher than 40MB/sec, so Ultra ATA 66 is sufficient right now. But with the growth of computers today, it will not be too long before we see the first drive to exceed 66MB/sec, making the Ultra ATA 100 channel useful.
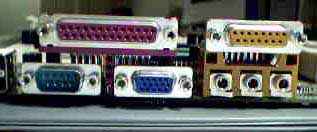
Like the 686A, the 686B also features a second USB controller. The first controller provides two USB ports, placed at the back of the motherboard in the ATX I/O panel. The second set of USB connectors is placed on the left edge of the motherboard, which can support another two USB ports. However, Gigabyte does not supply the necessary USB bracket with the board, so you’ll have to go out and buy it yourself to take advantage of all four ports.
The 3/1/0/1 (PCI/AMR/ISA/AGP) expansion slot configuration is pretty much the best you can get out of a micro-ATX board. The AGP slot provides some flexibility in case you do not want to use the on-board video, while the 3 PCI slots should be enough for most users to cover basic expansion needs. Gigabyte includes a locking mechanism for the AGP slot on the GA-7ZMM, because the external AGP cards, especially when OEM builders ship their systems, sometimes tends to loosen up from the slot, and the locking mechanism will make sure the card is locked in place. The AMR slot can be a very important feature for OEM builders, but is relatively useless in the do-it-yourself market.
 The
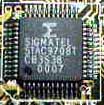
GA-7ZMM features the Sigmatel STAC9708T AC’97 CODEC audio. Like other software-based
sound solutions, this on-board audio provides some basic sound, but it is incomparable
to hardware-based PCI sound devices out there. Gigabyte also gives you the
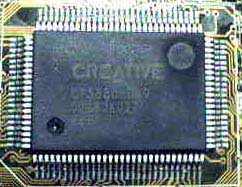
option to have hardware-based Creative CT5880 PCI sound right on board, which
is the basis for Creative’s SoundBlaster PCI soundcard line.
The
GA-7ZMM features the Sigmatel STAC9708T AC’97 CODEC audio. Like other software-based
sound solutions, this on-board audio provides some basic sound, but it is incomparable
to hardware-based PCI sound devices out there. Gigabyte also gives you the
option to have hardware-based Creative CT5880 PCI sound right on board, which
is the basis for Creative’s SoundBlaster PCI soundcard line.
Gigabyte also includes a utility they call “@BIOS.” As Microsoft is phasing out the DOS command prompt, the old method of updating BIOS using DOS will not be viable for too long. We have seen companies like MSI who implemented BIOS update utilities from within Windows. Now Gigabyte has also started to implement the same basic idea.

Further, in order to make overclocking easier, Gigabyte also includes a utility called “EasyTune III” with the GA-7ZMM, allowing you to change the FSB speed of the motherboard from within Windows using a GUI tool. Note, however, that it does not give you any more settings than what is already available from the motherboard and BIOS.

The manual that ships with the motherboard contains decent information on all the jumpers and connectors, so you should have no problem finding out information on the motherboard. It also goes through the steps for software and driver installation. Further, the manual also talks about the BIOS settings in details. However, it does not provide any information on hardware installation, including how to install the motherboard, CPU, and memory that could help novices considerably.


0 Comments
View All Comments