Multiwave Direct Digital Alpha
by Anand Lal Shimpi on February 19, 1998 6:17 PM EST- Posted in
- Systems
Taking a closer look at the design of the AOpen HX-45 case the Multiwave Alpha's 164SX motherboard was removed, to reveal the tray it was sturdily installed on. AOpen chose to differentiate the AT and ATX stand-off holes from each other by marking them with either an A, B or A/B for combination holes based on the individual specifications. While it will be difficult to come across another Digital Alpha motherboard in the mainstream market, if you ever do decide to drop the Alpha platform you can rest assured that the Multiwave Digital Alpha system is completely upgradable to an x86 processor/motherboard. For the sake of keeping the tests uniform, a Pentium II + AOpen AX6L combination was installed in the AOpen case for the Pentium II tests.
The 235W power supply in the case does a fair job of powering all of the devices in the case upon receiving it from Multiwave, however if you add a few more demanding peripherals in there (10,000RPM Hard Drives, etc...) you may want to consider a larger unit, ideally a 300W upgrade but a 250W minimum. The power supply itself has 6 power connectors sprouting out of it, 4 - 5 pin HDD style connectors and 2 - smaller floppy drive style connectors. From the warehouse, two of those 4 HDD connectors are already used up by the Western Digital drive and the AOpen CD-ROM drive, the Mitsumi Floppy drive takes up one of the two FDD PS connectors.
As you may be able to guess, at 533MHz the 21164PC does produce a considerable amount of heat, in order to dissipate this heat the 21164PC is packaged with a large heatsink/fan combo. Installing this combo requires a bit more than a simple attachment of two clips to the socket, luckily Multiwave will take care of this procedure at their warehouse. In order to install the heatsink, you must first place a thin thermal pad on the 21164PC processor itself (takes the place of the Thermal Compound used with most Socket-7 Heatsinks). |
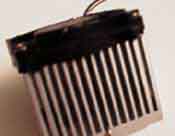 |
| Secondly you must remove the fan which is attached to the heatsink via 4 screws, and place the heatsink on top of the 21164PC allowing the 2 threaded cylinders atop the processor to pass through the corresponding holes in the heatsink. Using the 2 supplied nuts and 3/8" ratchet driver you must securely clamp the heatsink onto the processor, a torque wrench does help however it isn't necessary, just make sure you don't over-tighten. After clamping the heatsink securely onto the processor all that is left is to replace the 4 screws to reattach the fan, and plug the fan into the motherboard via the 3-pin connector. |
Configuring the motherboard for use with a Digital Alpha processor is probably an easier task than installing the heatsink. The 164SX can be completely configured by the use of a set of 8-dip switches, three of which control the actual Bus Speed/Clock Multiplier, the user's manual documents two settings (400MHz and 533MHz) however it states that all other combinations are reserved. All tests show than the 21164PC is a completely unoverclockable CPU, and is locked at the processor speed it is shipped at.
The last dip switch on the set of 8 that configure the 164SX enables/disables the Fail Safe booter, which is essentially a back-up BIOS if anything were to happen to the AlphaBIOS. Normally if you corrupt the BIOS (Basic Input Output System) of a system by either causing physical harm to the firmware, or by improperly reprogramming it, the only option you have remaining is to re-program the BIOS using specialized equipment, or by manually replacing the BIOS chip (there is another more unconventional method requiring you to hot-swap an identical BIOS on a running system with the dead chip and then reflashing the dead BIOS, however this approach is quite dangerous and I do not recommend it to anyone that hasn't done it before). The Fail Safe booter setting, when enabled, allows you to boot from a secondary image of the firmware, at which point you can re-install an image of your BIOS from a floppy disk, not a bad idea.


0 Comments
View All Comments