Original Link: https://www.anandtech.com/show/2513
Introduction
Set the sails, Corsair is coming. It took a long time for Corsair to get on track with higher performing power supplies, as until now the company only offered up to 750W of power with their TX series. Following in the footsteps of the successful HX series, Corsair now brings the HX1000W to market, delivering the expected 1000W of power as the name suggests,. The HX series consisted of the 520W and 620W until now, whilst the step between 620W and 1000W is covered by the TX750W. Corsair focused on bringing in one new high performance power supply, instead of several in-between sizes like an 800W or 900W. That's sensible, as it's difficult to imagine situations where 750W is not enough but 1000W is too much. Also of note is that the Corsair HX1000W is the first 1000W power to receive NVIDIAs Triple-SLI certification, as previously NVIDIA only certified 1200W+ power supply for Triple-SLI.
The HX1000W is our second article about a Corsair power supply, even though we have seen and tested most competing units before this. We tested the Corsair VX450W last year in a roundup of four 400W to 450W power supplies. At that time, the VX450W was our absolute favorite amongst the contestants. We will find out today if the HX1000W can impress us as much as the performance of the smaller brother did.
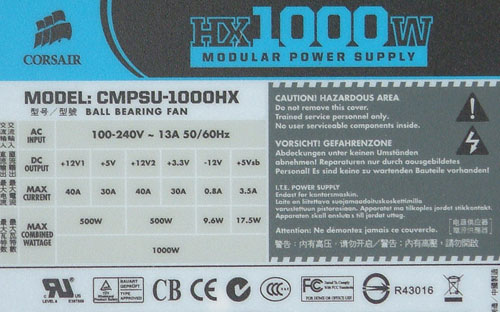
The label shows a CWT styled power supply similar to the ones we saw and tested from Xigmatek last week. The first 12V rail is combined with the 5V rail and the 3.3V rail is combined with the 12V2 rail. 12V comes from one of those combinations and the 5V standby rail is generated by its own circuit, similar in design to other switching power supplies in this field. Each side has a major 12V rail and a smaller voltage rail and the combined power of each side is 500W. In this configuration, it is very difficult to find a correct load distribution since the calculation from the ATX norm needs a combined power for the 5V and 3.3V rail together. Still, it is possible to load this power supply according to the norm and that is what we will be doing today.
Packaging
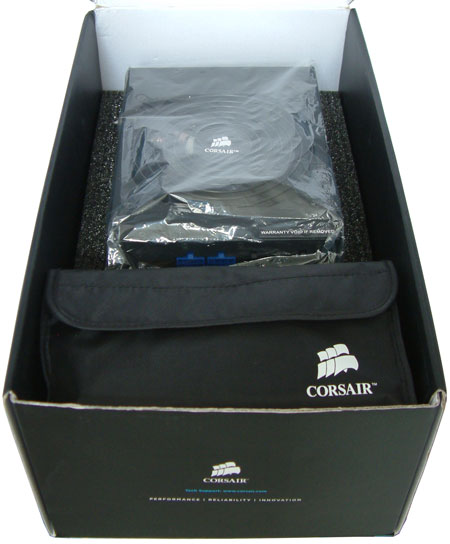
The power supply comes in a large box and is embedded in plastic foam that covers the whole power supply and secures it nicely against damage during transit. There is a big bag shown, lying in front of the power supply, which contains all of the cables that can be attached to the unit. The box itself has a lot of information for potential buyers in retail shops.


Appearance
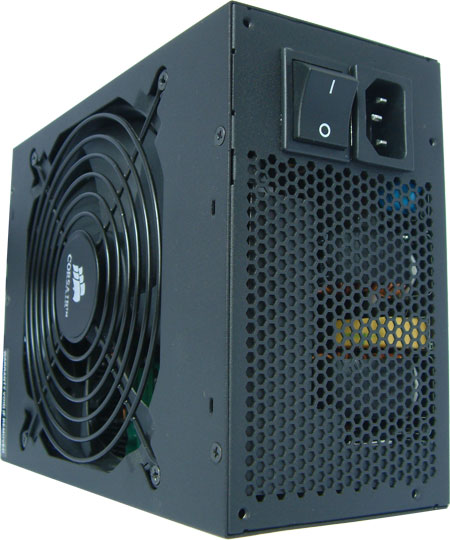
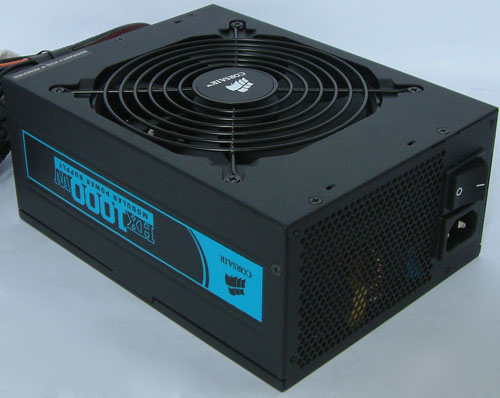
The power supply comes in black as is usual with Corsairs units. The surface has a rough texture, as if it was sandblasted before painting. The front has a perforated opening, two-thirds of the width of the unit, to exhaust the air and the last third contains the AC jack and a large power switch. On looking closer at the opening, it reveals black plastic foil covering half of the holes, mostly those in the bottom part, which is behind the fan. Corsair does this to direct the airflow through the coils and capacitors located directly in front of the holes. There is a little bit of the side blocked as well behind which the rectifier bridge is located. Not that it would really matter to have the lower parts blocked as the fan is located behind it and the air would not exhaust at this point anyway. Both sides are covered with a thin blue sticker that shows the name of the power supply.


Cable Management, Cables, and Connectors
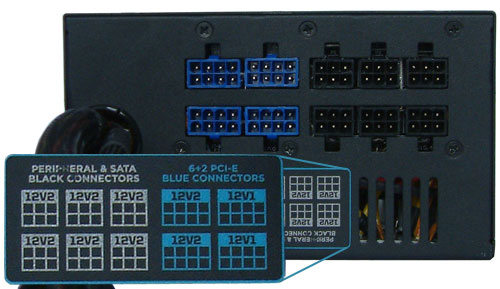
The front features the cable management, which consists of fixed cables (beside the enlarged sticker) and jacks to attach the cable harnesses. The sticker shows that the six 6-pin jacks will hold the peripherals and the four 8-pin jacks will power up the graphics cards. The peripherals will be powered by the 12V2 rail as are two of the PEG harnesses. Two of the jacks are connected to the 12V1 rail. There is no indication in the manual or on the power supply as to which of the rails the fixed cable harnesses are being powered up by, but as there are only two jacks in the back on the 12V1 the assumption is that the 24-pin, the extra 12V (P4), and both of the already attached 6/8-pin PEG connectors are connected to the 12V1 rail. We have measured this during operation with a voltmeter and found that the fixed cables are indeed 12V1.
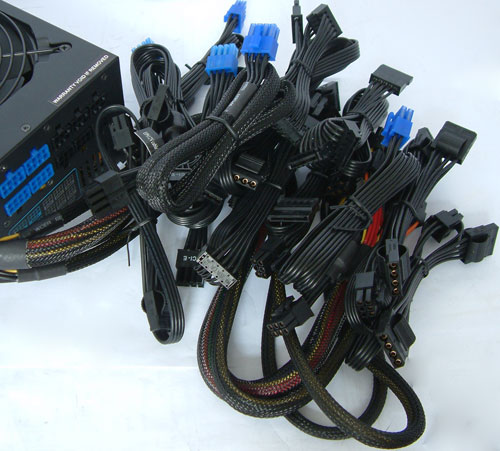
The attached cable harnesses are all sleeved with a black mesh. All of the cables that can be attached to the jacks in the back are connected flat against one another similar to normal IDE cables. Corsair maintains it has two 4/8-pin EPS connectors. One of these is already connected to the fixed harness and one belongs to the loose cables you can attach to the jacks in the front. If this additional EPS connector is used, there will be one less jack available for a PEG connector, which means using triple-SLI will not be possible in this configuration. Since Triple-SLI motherboards feature only one 8-pin EPS jack on the board and occasionally an additional Molex jack for additional power, they don't really need two 8-pin EPS jacks plus three PCI-Express slots for triple-SLI.
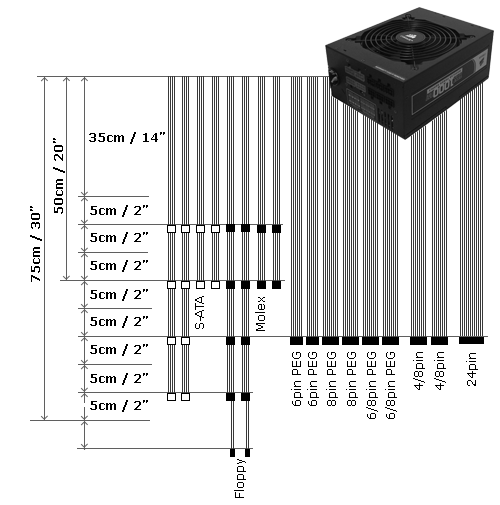
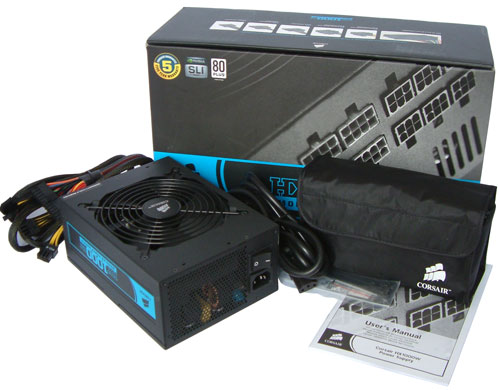
Looking at the above figure shows a large variety of cables and connectors available for use. There are not enough jacks on the power supply to use all the cables at the same time, but the user at least gets to choose the best harnesses for his system. The length of 70cm/28" might seem somewhat strange for such a powerful power supply, as we have seen lengths of up to 120cm/47" before, but Corsair didn't feel it necessary to go that far. All of the ATX and PEG connectors are 60cm/24" away from the power supply, which is a fair length, but peripherals come up short. In our opinion, it would have been nicer if Corsair had included at least one harness with a length of around 100cm/40". The distances between the connectors is good even though there is only 10cm/4" between them, as most users with more than two hard drives will have them close to each other in the mounting frame of the case. As the diagram shows, Corsair didn't include six 8-pin PEG connectors as stated on their website. There are two 6-pin, two 6/8-pin, and two 8-pin PEG connectors on board, which gives it a wide variety of connectivity for graphics card arrays.
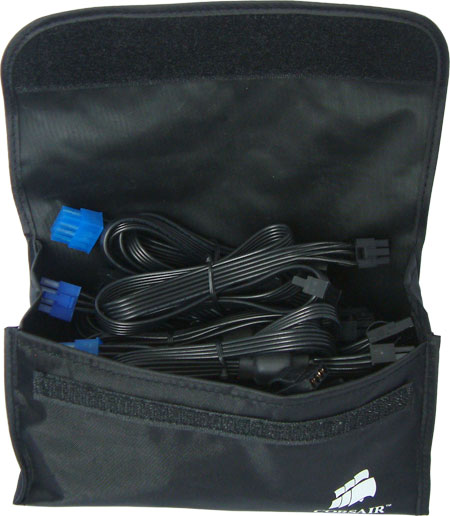
All other unused cables can be stored in this small bag, but beware of the girlfriend or wife who will be interested in using it for other things like storing make-up utensils.
The Fan
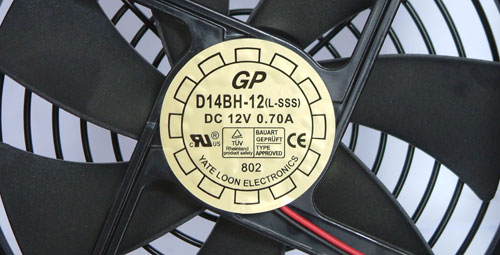
The installed 140mm ball bearing fan is manufactured by Yate Loon electronics and is rated at 2800RPM maximum rotation at 12V. It is supposed to be almost 50dB(A) at this speed according to Yate Loon, but Corsair will most likely not need to have the fan running at this speed. We'll find out later in the test.
Internals
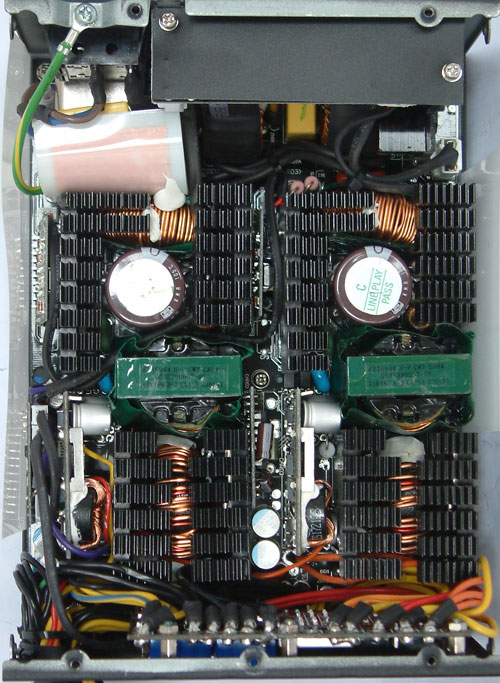
Opening this unit shows almost exactly the same interior as we have seen previously with Xigmatek or Thermaltake. Corsair changed a few things that are not necessarily easily visible. Let's first start with checking the layout. As we mentioned in the Xigmatek review, this power supply is in fact split into two halves. Each half acts as a completely independent power supply with 12V and a smaller voltage rail. The 5Vsb rail is generated within its own circuitry, which is located above the filtering stage on its own PCB. We have the filtering stage at the top with coils and capacitors and then we have a big rectifier bridge that has its own little heatsink in the top right corner of the picture. From there, the power supply splits in half and each side has its own primary stage containing amongst other things the PFC stage with some nice Japanese capacitors from Nippon Chemi-Con. Both are rated at 420V and 330µF at 105°C.


Each side has only one transformer where the 12V rail is generated. Each of the sides has a smaller rail of 3.3V or 5V split from each of the 12V rails. The difference from other similar units lies in the secondary stage. Competitors only have a few solid-state capacitors here, which are supposed to have a much longer life expectancy. Corsair has the complete secondary stage equipped with solid-state capacitors even for the smaller voltage rails. There are only two normal electrolyte capacitors hidden under the cables. The heatsinks are very small due to the lack of space, but they have a decent surface area through the use of many small fins. The inside looks very packed and there are some areas where the airflow will be restricted, but most of the parts will be cooled just fine.
Testing with the Chroma ATE Programmable Load
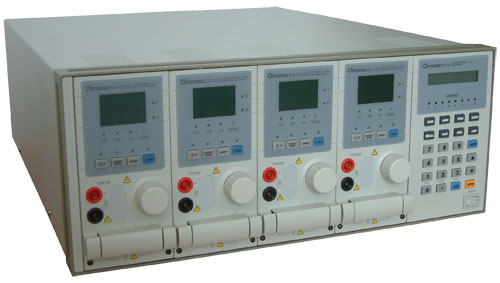
Our test equipment consists of two Chroma programmable DC Loads that enable us to test power supplies with an output of up to 1500W. The biggest advantage of the Chroma DC Loads is simply the high precision it provides. It can measure differences as small as 0.001V and 0.0001A, which will provide us with best-in-class results.
When programming the Chroma with specific amounts of load calculated according to the ATX norm, we are able to load power supplies to an exact percentage. We can now show results at every specific percentage needed. To get the best overview of a power supply, we load each unit with 10%, 20%, 50%, 80%, 100%, and 110% of the specified output. This is easy to calculate for a 1000W power supply: the 10% load is 100W and 110% load is 1100W. Remember that this is the amount of power the PSU delivers; due to inefficiencies, a power supply will actually draw more power from the wall.
Note: If you would like to know more about our testing methodology, equipment, and environment, please read our PSU testing overview.
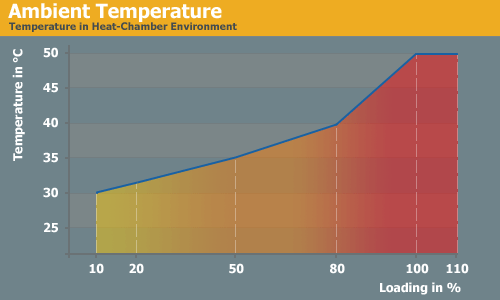
We have added an additional 10% on the highest load to see how the units perform with overload. This test will be performed in all future reviews. The overload test is performed at room temperature as well as under more stressful conditions; to ensure we are not too cruel to the power supplies, we will keep the ambient temperature at 50°C in the stress test. Experience shows that many units can stand the overload at room temperature but will experience problems with higher temperature and overload together. Only the best-built units will survive this.
The Testing Environment
There is one flaw in testing power supplies with programmable loads while trying to measure the sound pressure levels at the same time. Because the programmable loads get very loud, there is no chance to even hear the power supply on the test stand. In order to make accurate measurements of the noise levels we needed a way to separate the test unit and the programmable loads. Our solution was to build a very thick box around the unit.
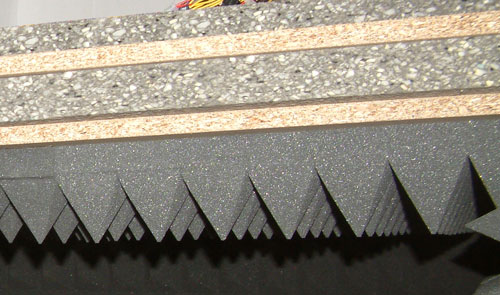
We concluded that a five-layer box with a total thickness of 6" (15cm) containing two layers of wood and three layers of special foam would suffice. It is designed as a box within a box. The inner box does not touch any part of the outer box, making it difficult for acoustic noise to pass through in the form of vibration. Each box is isolated on both sides with a layer of heavy foam that is normally used to insulate engines. On the inside we have an additional layer of 4" (10cm) thick pyramidal foam on every side of the box to eliminate the acoustic waves coming from the test object as well as we can.
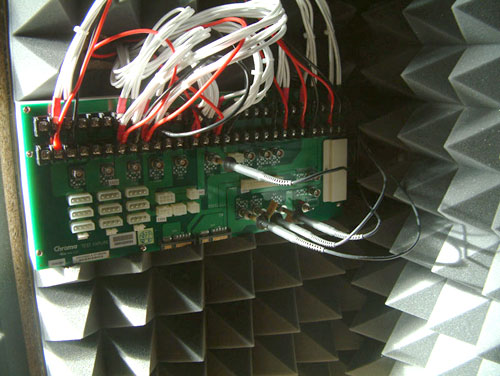
To ensure a completely closed system we installed the printed circuit board that the connectors of the power supply are attached to inside the anechoic room/box. In other box designs, you would need to put all the cables through the wall. Unfortunately, that would result in the inside of the box not being fully isolated anymore. Our design keeps everything that needs to be connected inside of the box and maintains isolation.
DC Voltage Stability and Quality
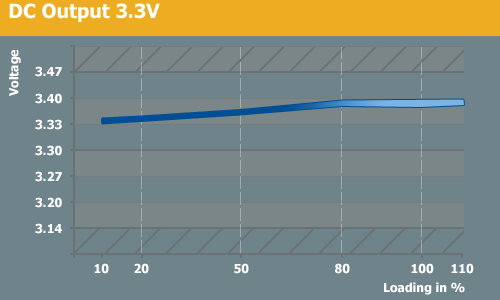
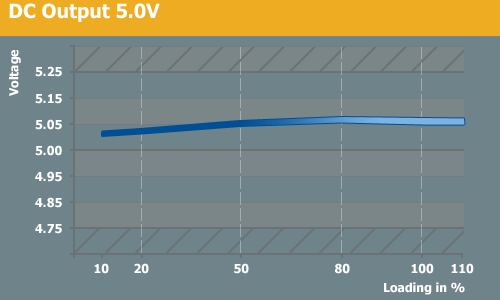
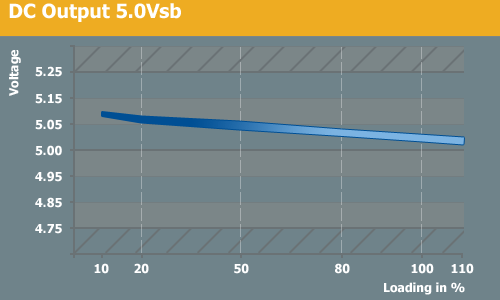
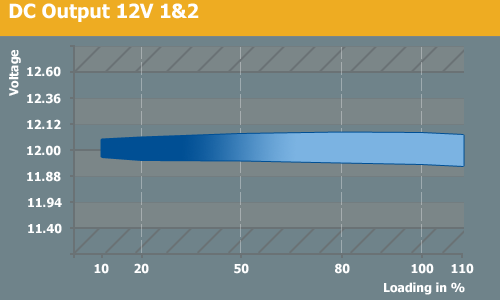
The DC voltage stability is amazing with the HX1000W. It doesn't matter which rail we are talking about; they all stay nicely within specs and at the ideal output of each rail. The two 12V rails do have different outputs, as the 12V1 lingers at 12.08V and 12V2 is at 11.94V almost regardless of load. Strangely, the smaller of 3.3V and 5V rails actually increase a bit during the imposed higher loading, which is the first time we've experienced that. From 800W, the 3.3V rail is at a constant 3.40V. The output quality is also very good from this unit. The 12V rails have less than 4mV variance during most of the tests and only go up to 16mV during stress loading. The 5Vsb rail at 25mV is a little higher than the others are, but it's still well within specs.
Efficiency
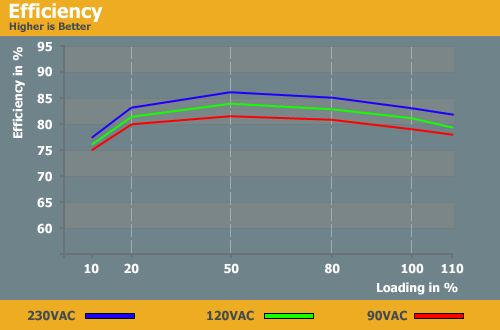
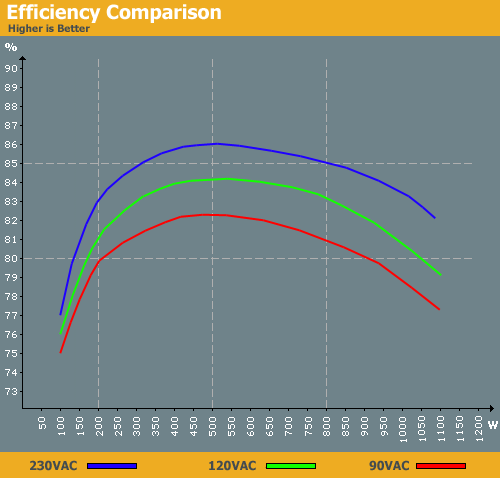
The efficiency ramps up very slowly on this unit. The efficiency with 100W of load isn't very good, but it improves at 200W. Then it slowly moves towards its zenith, which is reached at 50% load (500W). Efficiency is as high as 86% with an AC input voltage of 230V. That's a good result, though many high-end power supplies match that figure - we have seen 86% efficiency from most of the units tested lately. With 120VAC, the result is also very good as it is still very close to the 230VAC results. 84% efficiency is very good for the lower input voltage, ranking as one of the better results at this input to date. Still, the Corsair HX1000W cannot equal the recently tested Xigmatek NRP, which has a better overall efficiency rating.
Power Factor Correction
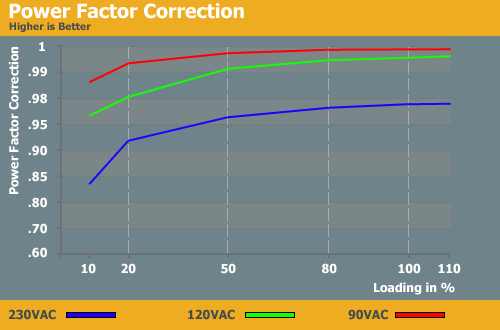
The PFC works the same as similar models built by CWT. It has very high and good results with lower input voltage and the folks over in Europe will need to be satisfied with up to .98 (PFC) tops.
Fan Speed and Acoustic Noise
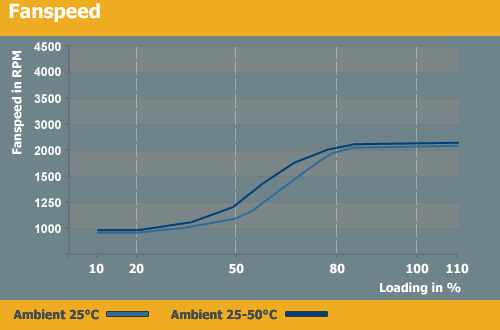
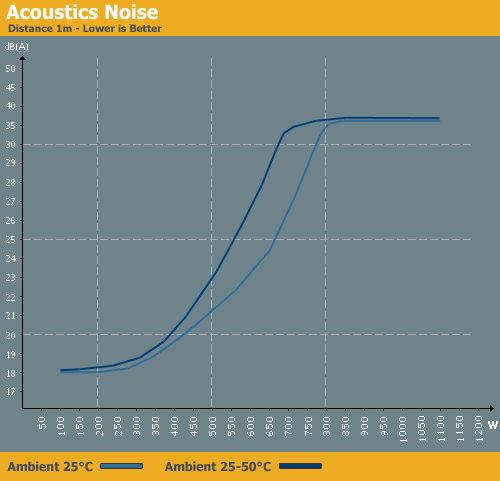
Looking at our figure and comparing it to Corsair's graphs on their website tells us something is up. Yate Loon states a maximum acoustic noise of 48.5dB(A) with 2800RPM spindle speed. Since this unit never reaches 2800RPM - we measured a maximum of up to 2070RPM at any temperature - the acoustic noise doesn't get as loud as stated. Corsair shows 44dB(A) on their website, which we could never reach under any scenario during our testing.
We appreciate the open and frank figure from Corsair, since other manufacturers would have probably shown much lower results. The fact that we have better results than the manufacturer states is a good thing and we are glad we didn't reach 44dB(A). Normally we see lower noise levels up to around 50% load (500W on this unit), but the fan already starts to turn faster at 250W, which is unnecessary. The unit does not really need any more cooling at such a low load, but Corsair wanted to have superb cooling in all situations so the temperature controlled fan starts spinning faster at a lower RPM. Maximum fan speed is unfortunately reached at 80% of load, bringing with it a noisy working environment, but if you imagine three high-end graphics cards connected to this power supply the additional 35dB(A) will not make any real difference to the overall sound levels.
Conclusion
Many users have waited for a higher power Corsair unit, and the HX1000W is finally in the market. It may be overdue, but with their 1000W power supply Corsair now offers power supply that can officially support the highest-end graphics configurations. Not many users will need such a power supply, but that's a topic we've discussed before. If you are building a 3-way SLI system, you will want a very good PSU, and the Corsair HX1000W warrants a look; for anything less it just doesn't make sense from the efficiency point of view.
The build quality is nothing less than we would expect, as Corsair has a deserved reputation for quality. The package is eye-catching and will stand out in a retail setting, and the power supply is held safe and secure inside its box to protect it from damage during transport.
The cables are a bit short overall, but in typical mid-tower cases there won't be any problems. Corsair includes a vast number of harnesses for the user to choose from, so you can tailor the harnesses to your needs. With ten SATA and Molex connectors, there will be enough for all kinds of users. The six PEG connectors are a very nice addition and as mentioned earlier the HX1000W is the first 1000W power supply NVIDIA has certified for triple-SLI use. That this certification of lower wattage power supplies is long overdue is clear, as we are running our test setup with 3-way SLI with an 860W Turbo Cool from PC Power & Cooling. Obviously, it's possible to run such a demanding setup with much less than a 1200W power supply.
 |
The performance shows a good use of the basic CWT design. The efficiency is very good but Xigmatek reaches one percent higher even though Corsair has a better component selection. The stability sets new standards however, as this unit has the best stability we have experienced so far and the output quality was as good as any we have seen. A low 25mV maximum deviation on the 12V rails was as bad as things got.
Coming to acoustic noise, this unit was far less noisy than we would have expected from the graphs shown on Corsairs website. The fan only reaches up to 2070RPM, so maximum noise levels top off at around 34dB(A); unfortunately this is from 80% onwards. With lower loads the power supply is clearly audible, and at 18dB(A) as the fan constantly produces a buzzing noise. It then goes quickly to a higher pitch as it turns faster with only 250W of power draw. Normally we see better results from Corsair here, but the similar builds from Xigmatek and Thermaltake don't increase fan speed until a much higher load. Going back to our 8kW Roundup where we compared eight 1000W units, we can see that the fans in those units also start turning faster at 500W (except the Enermax Galaxy) instead of 250W.
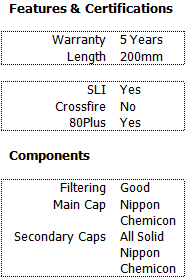
Corsair offers a 5-year warranty, which is quite good. Over in Europe users are used to at least a 2-year warranty, since that's the law, and most companies over there already have 3-year warranties. Corsair's 5-year warranty is only topped by PC Power & Cooling with their 7-year warranty for the Turbo Cool series. Buying a power supply with such a warranty represents a long-term investment; you never know what might happen, but at least with a lengthy warranty you know your high-end PSU isn't going to fail (without a replacement) for quite some time. For other components that are regularly upgraded every few years, that sort of warranty may not matter as much - for example, most users never have to deal with a broken graphics card after three years of use, since they've moved on by then. Power supplies stay in most systems until it's time for a completely new setup; like monitors, they are something you can keep using for half a decade or more. The price is $250 for this unit in the US and in Europe Corsair is offering this power supply for 170 EUR - approximately the same price with the current conversion rates. Seeing that competitors are offering a similar product for almost the same price but with a shorter warranty, the Corsair HX1000W definitely has an advantage over some of the competition.


