Original Link: https://www.anandtech.com/show/2079
Apple's Mac Pro - Upgrading CPUs, Memory & Running XP
by Anand Lal Shimpi on September 12, 2006 1:51 AM EST- Posted in
- Mac
Weeks have passed since Apple's announcement of the Mac Pro, and while we wanted to conclude our look at the Mac Pro much earlier, like many Mac Pro users we ran into some serious performance issues under Windows XP.
With the Mac Pro performance issues resolved and some more time with the system under our belts, we're able to bring you the final part in our Mac Pro coverage. This time we're focusing on upgrading the memory and CPUs in the Mac Pro, as well as looking at its performance as a PC running Windows XP.
As a high end Xeon based machine that can run both Mac OS X and Windows XP, the Mac Pro has the potential to be the power user's dream. Today our task is to find out just how upgradable this machine is and how well it runs XP, if it can truly be your only system if you're a Mac and PC user.
FBD Revisited
Thus far the only real downside we've seen to the Mac Pro is its use of Fully Buffered DIMM (FBD). As we mentioned in our initial article discussing the Mac Pro's specifications, the FBD spec calls for a serial interface between memory controller and memory modules, while allowing the chips on the memory modules themselves to be regular mainstream DDR2 devices. A FBD memory controller talks to an AMB (Advanced Memory Buffer) on each memory module, which acts as a translation hub and buffer for all communication between the DDR2 devices on the module and the requests from the memory controller.
The major benefit of FBD is the ability to feature more memory modules per channel (up to 8 per channel), offering greater capacity for high end servers and workstations than even registered DDR2. The downside to FBD is that there is significant overhead and latency introduced by using a packetized interface and using the AMBs to translate from one interface technology to another (FBD to DDR2).
As we mentioned and proved in our previous articles, the number and configuration of FB-DIMMs in your Mac Pro can affect performance. The Intel 5000X chipset in the Mac Pro features two 144-bit FBD branches, each being the width of two FB-DIMMs (effectively giving the chipset four "channels"). Therefore you need at least two FB-DIMMs in the system (the width of a single FBD branch), but ideally you'd need at least four to have a hope of attaining peak bandwidth.
As some of our readers (and Intel) pointed out, the story doesn't just end at needing four FB-DIMMs. The rank of the FB-DIMMs can impact performance as well, and ideally each of your FB-DIMM modules would be dual rank modules. The rank of a DIMM is determined by dividing the width of all of the devices on the module by the width of the module itself. For example, a single rank FB-DIMM would have 9 DDR2 devices each being 8-bits wide. A dual rank FB-DIMM would be composed of 18 DDR2 devices, each still being 8-bits wide. All of our 512MB FB-DIMMs are single rank modules, while our 1GB and 2GB modules are dual rank.
The story doesn't end with rank though. Because of the dedicated read and write lanes between the memory controller and the AMBs on FB-DIMMs, you can be reading from one FB-DIMM while writing to another. So in theory, if you're running an application (or combination of applications) that have a lot of concurrent reads and writes going on you could stand to benefit from having more than one FB-DIMM per channel.
Based on all of the above information, it would seem like your best bet is to stick as many dual rank FB-DIMMs as you can afford in your system, and if that were the case then we'd be able to move on from here. Unfortunately it's not, because as we mentioned in previous articles, the more FB-DIMMs you have in your system, the higher access latencies will be to those additional FB-DIMMs.
What we then end up with is a tradeoff between more bandwidth and higher latency, so which route do you take? We've done a lot of testing and most of our tests seem to favor the four dual-rank FB-DIMM module configuration, but the number/configuration of modules really depends on your particular needs. We're still testing to figure out what the tangible real world performance differences are between the multitude of memory configurations, but for now just know that if you need maximum bandwidth you'll want 8 dual rank FB-DIMMs, but if you want lower latency you'll want fewer modules. Whether or not you'll see a performance difference will depend mostly on the application(s) you're running.
Third Party Memory Modules
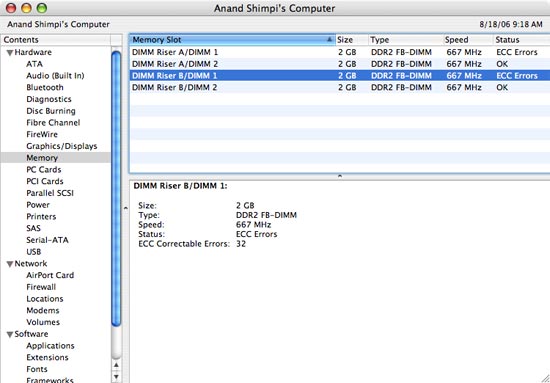
As we noted in our initial Mac Pro article, Apple's memory upgrades are pretty expensive and other than a fancy heatsink, they are standard DDR2 FB-DIMMs. We wondered if we could buy third party memory from companies like Crucial or Kinston, with much better prices, and use it in the Mac Pro. We got 512MB, 1GB and 2GB FB-DIMM modules from Crucial with standard heatspreaders and tried them in the Mac Pro. Thankfully the memory worked just fine, however we did have concerns about cooling. Apple clearly outfitted its FB-DIMM modules with a very large heatsink for a reason and it wasn't for bragging rights.
We had no problems running all of our benchmarks with the standard Crucial FB-DIMMs; however, if we ran a memory stress test for even just a short period of time the modules quickly reported correctable ECC errors. Apple's original modules did not generate any ECC errors, so it looks like the additional cooling is necessary under the most extreme situations.
In response to the issues, companies like Crucial have released revised FB-DIMMs that meet Apple's thermal specifications. We have yet to receive any for review but we're assuming that they will work fine given that Crucial guarantees proper operation in a Mac Pro. So although regular FB-DIMMs that work in other Intel 5000X based motherboards will work in the Mac Pro, we would suggest selecting modules that meet Apple's thermal specifications in order to be on the safe side.
Upgrading the Mac Pro's CPU
Now that Apple has completed the switch to Intel based processors, upgrading your CPU is a much cheaper and more accessible option for Mac users. In the past, upgrading your CPU required visiting an Apple specific vendor and paying quite a bit for a processor since the demand was honestly quite low. Now, with the Mac Pro and any other Intel based Mac that has a socketed processor an upgrade is just as easy as a trip to Newegg.
The Mac Pro we ordered was the slowest 2.0GHz configuration, since we wanted to try and upgrade it to faster parts to see if it was possible. By opting for the slowest CPUs, you can buy a cheaper overall computer and simply throw in faster CPUs once they drop in price - assuming the upgrades work of course.
By far the biggest problem with upgrading the CPUs in the Mac Pro is gaining access to them. While Apple made it very easy to upgrade memory, storage and PCIe cards in the Mac Pro, getting access to the CPUs is considerably more difficult. The entire process would be made much easier if we were able to remove the memory cage, but as we mentioned in our last article the standoffs that the cage is screwed into would not remain in place while we unscrewed the cage. To make a long story short, we weren't able to remove the memory cage without stripping the screws that held it in place, so we had to come up with an alternative solution; luckily we were able to do just that.
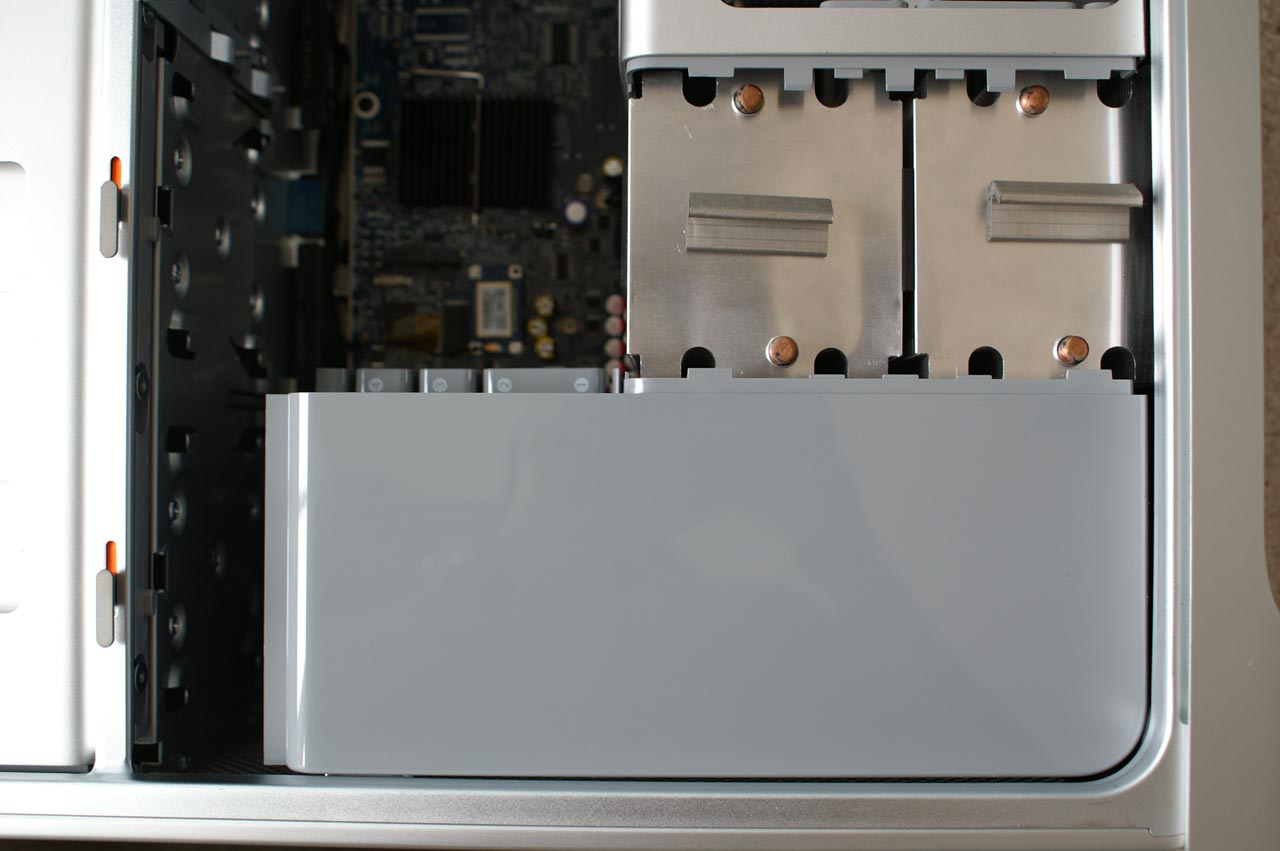
The first step is to remove the heatsink cover, which has latches along its sides that the fan assembly and part of the memory cage hook up to. With the memory cage in place, your only option is to pull back on the memory cage to unlatch it from the heatsink cover and slowly pull/rotate the cover off. This process is made somewhat easier by removing the two screws that attach the memory cage to the motherboard, since it allows the cage to move a little more freely. Obviously you'll want to remove both memory risers before doing this, but simply pulling the cage back towards the rear of the case and pushing the heatsink cover in the opposite direction should let you unlatch it.
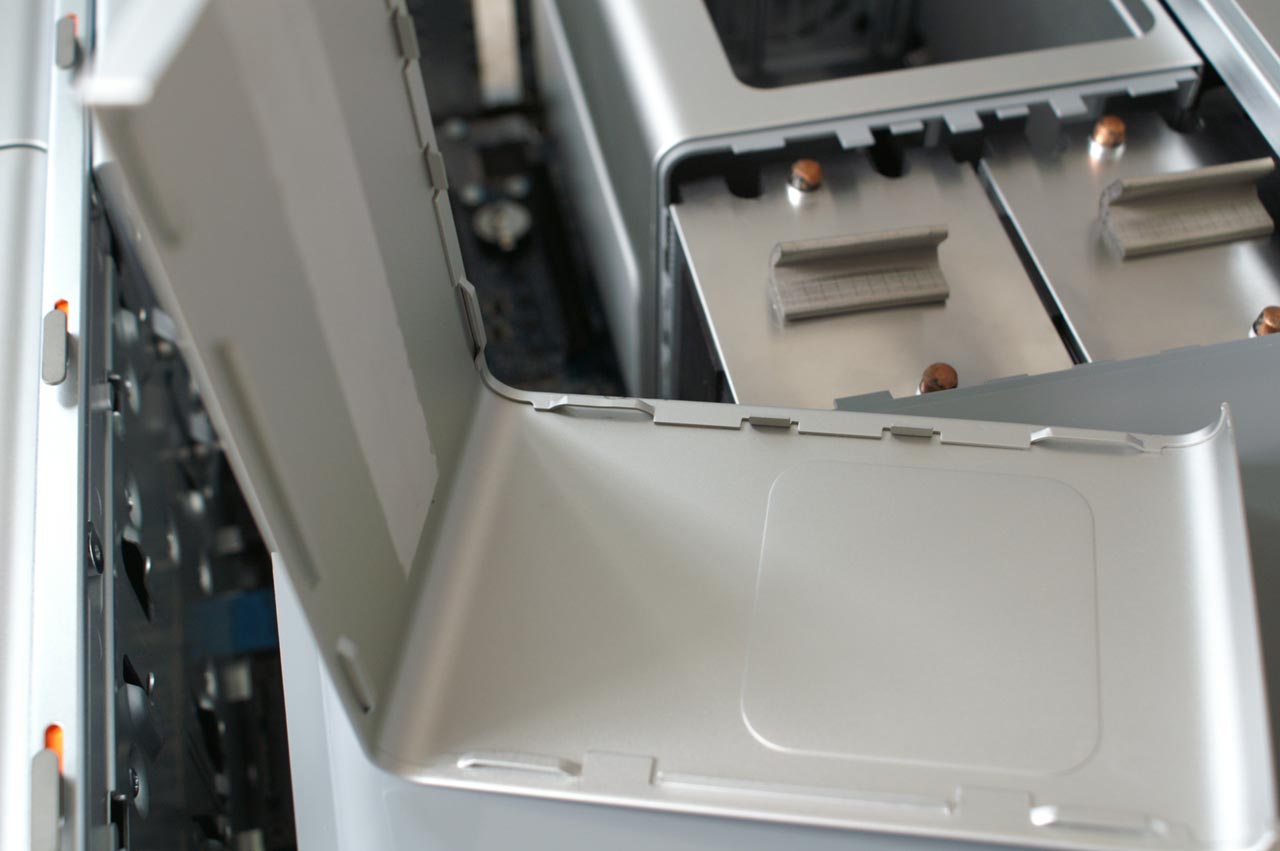
With the memory side of the heatsink cover unlatched, simply pull it away from the fan assembly being careful not to break the latches. After you've done this, the Xeon heatsinks should be exposed.
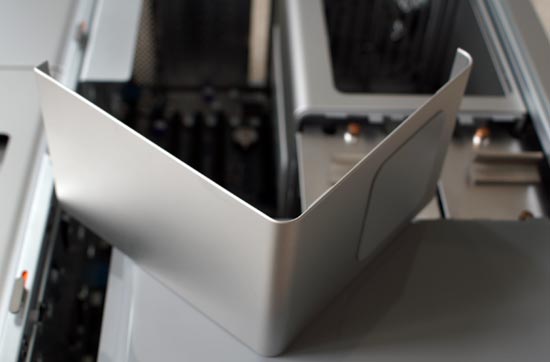
Next we had to remove the fan assembly, which we did by first removing two of the hard drive sleds so we could gain access to the lone screw that holds the fan assembly in place. Then, with a flexible putty knife we pulled the edge of the assembly away from the case and attempted to pull it out. The fan assembly will pull straight out, although we've found that it's a very tight fit and wiggling sometimes helps as you pull it out.
The fan assembly is made out of plastic so be careful as you're doing this; you'll want to put pressure on the less flimsy parts of the assembly to avoid snapping/cracking anything. Also be careful not to put pressure on the heatsinks as the aluminum is very thin and will bend very easily.
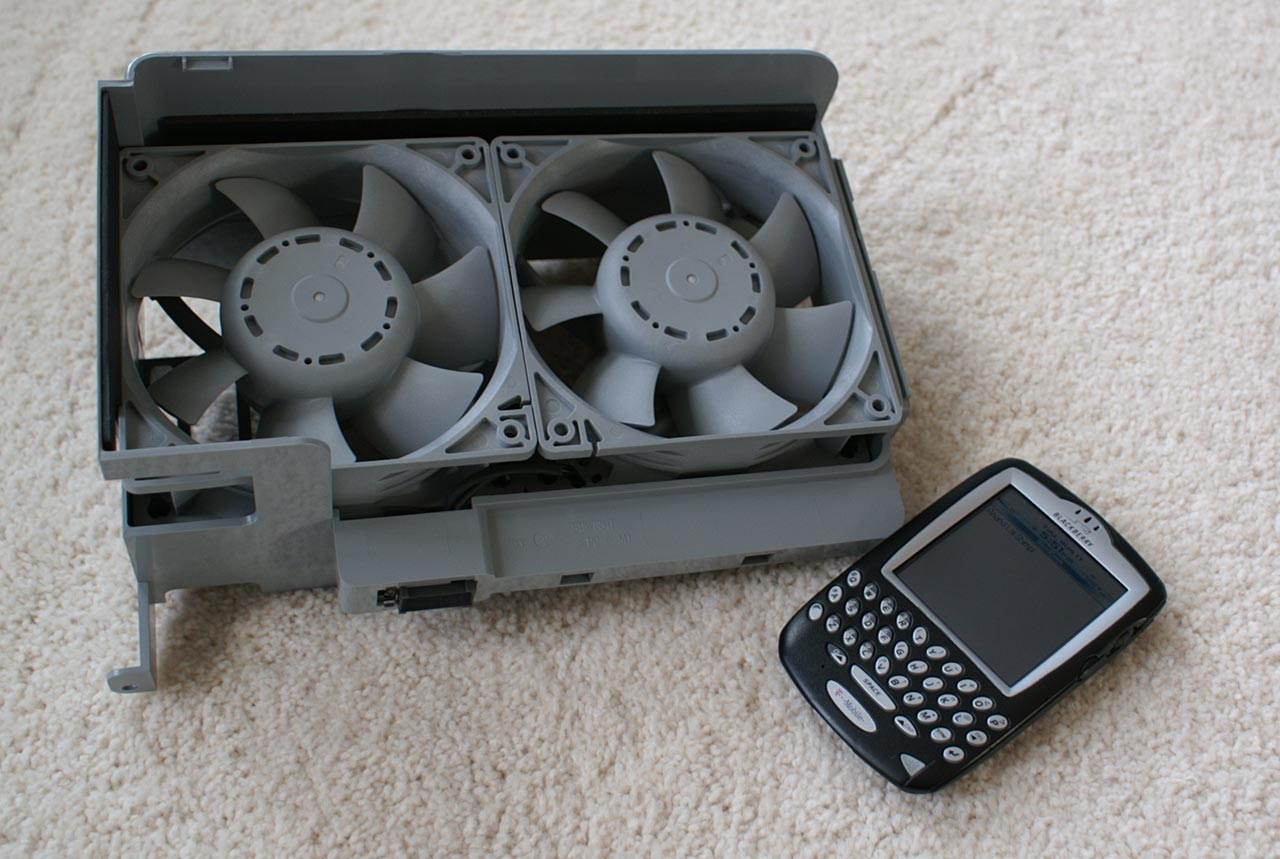
With the fan assembly out take a moment to marvel at how large and heavy it is, and then put it aside as we need to get one more thing out of the way before we can unscrew the heatsinks. If you can get the memory cage out then this next step isn't necessary, but if you're like us and can't get the thing out then this next step will make removing the heatsinks a lot easier.
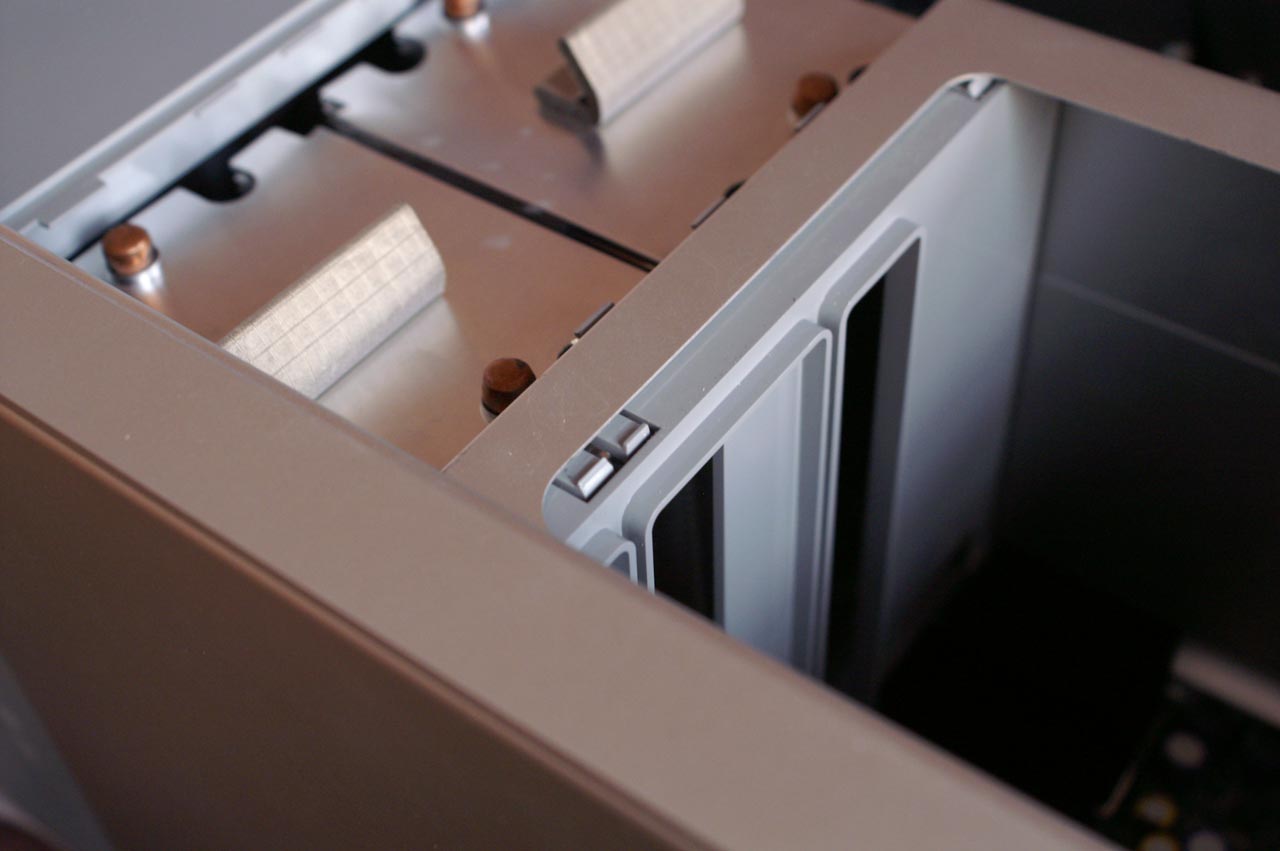
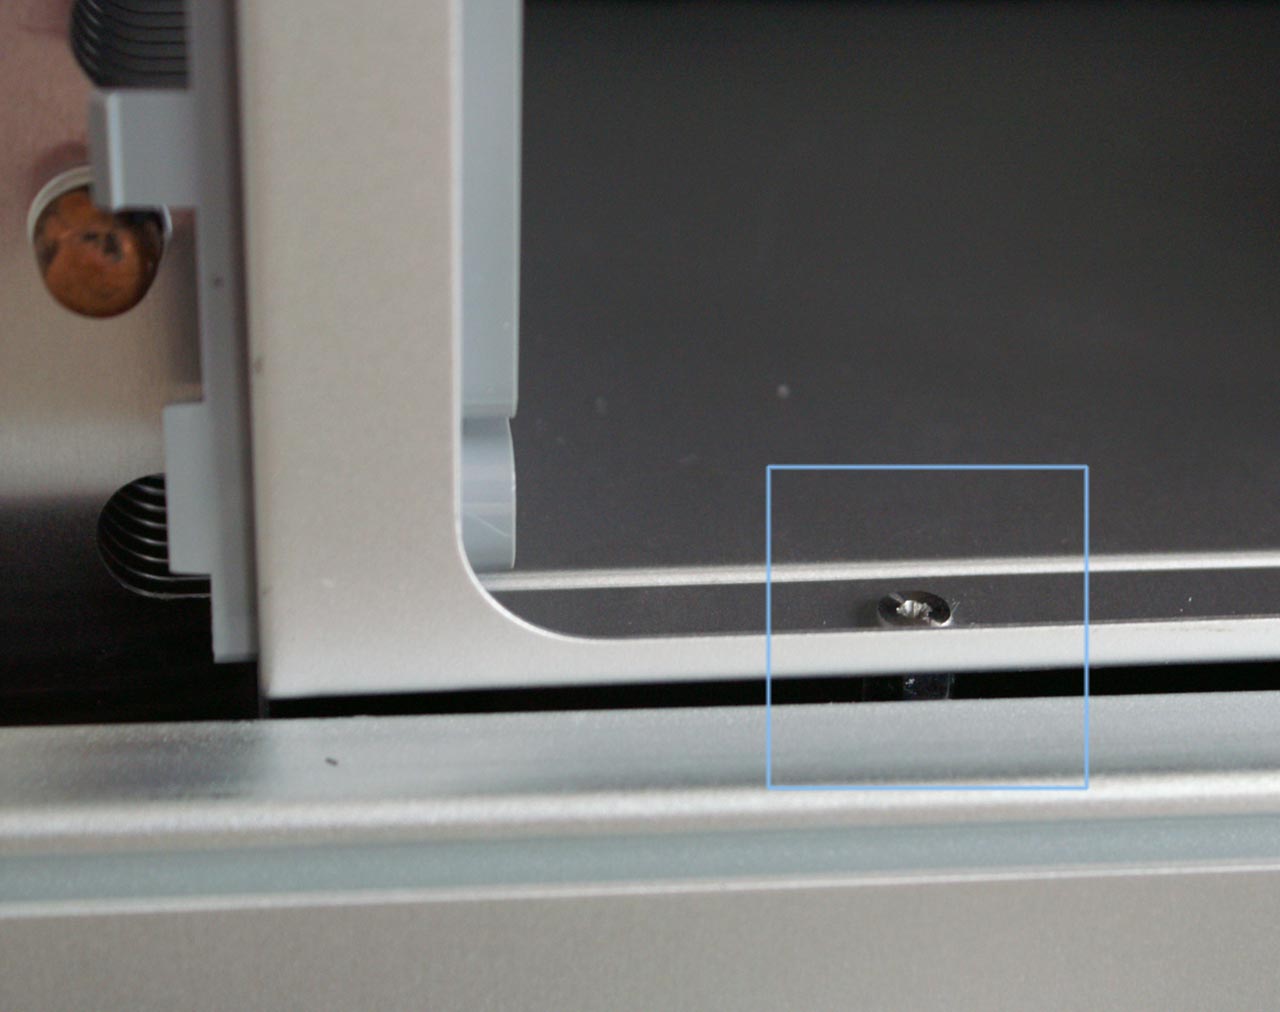
The plastic guard, pulled out slightly to expose the latches - Click to Enlarge
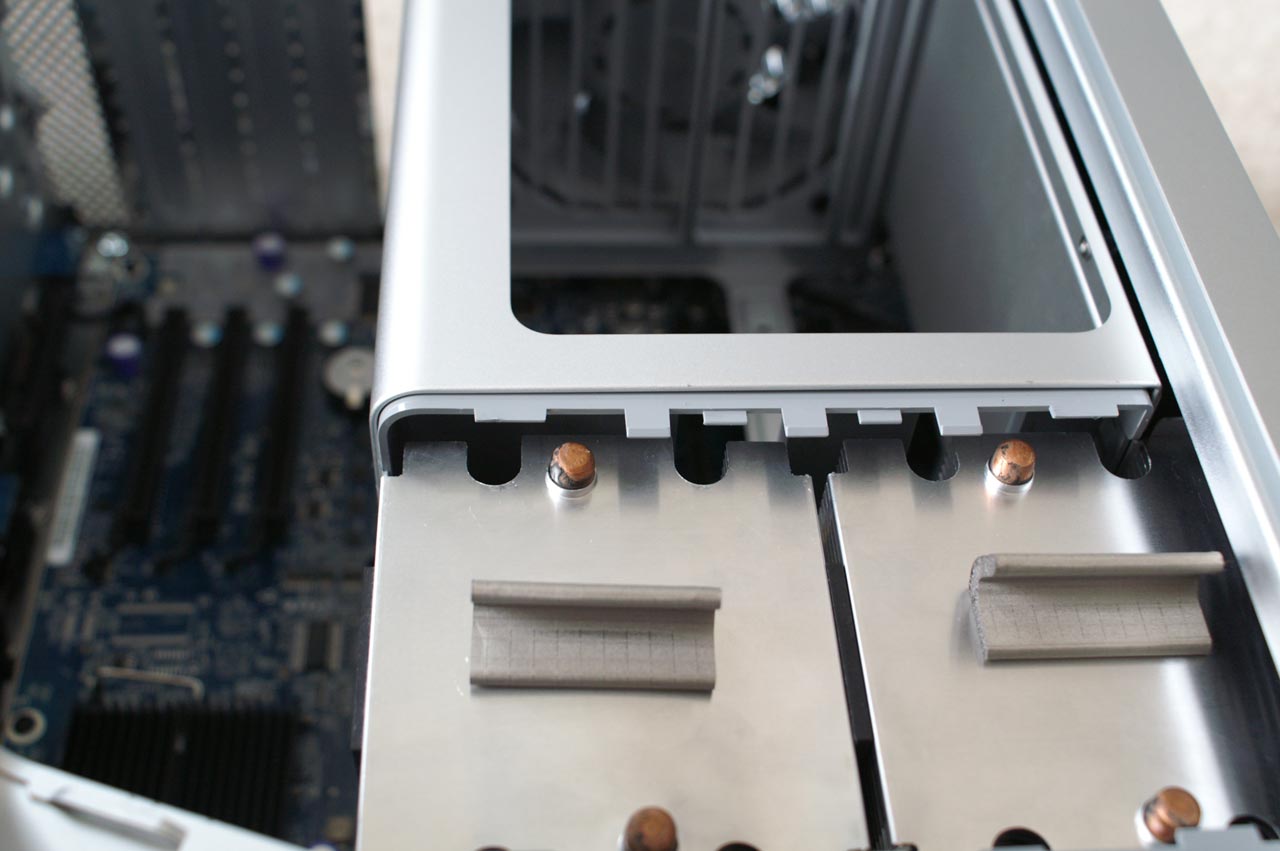
There's a plastic piece that sits in the left side of the memory cage; it's what the CPU heatsink cover latches on to on this side and it's also what helps the memory risers guide into place. This plastic piece can be removed fairly easily as it just latches into the memory cage itself, so break out the putty knife and let's get to it.
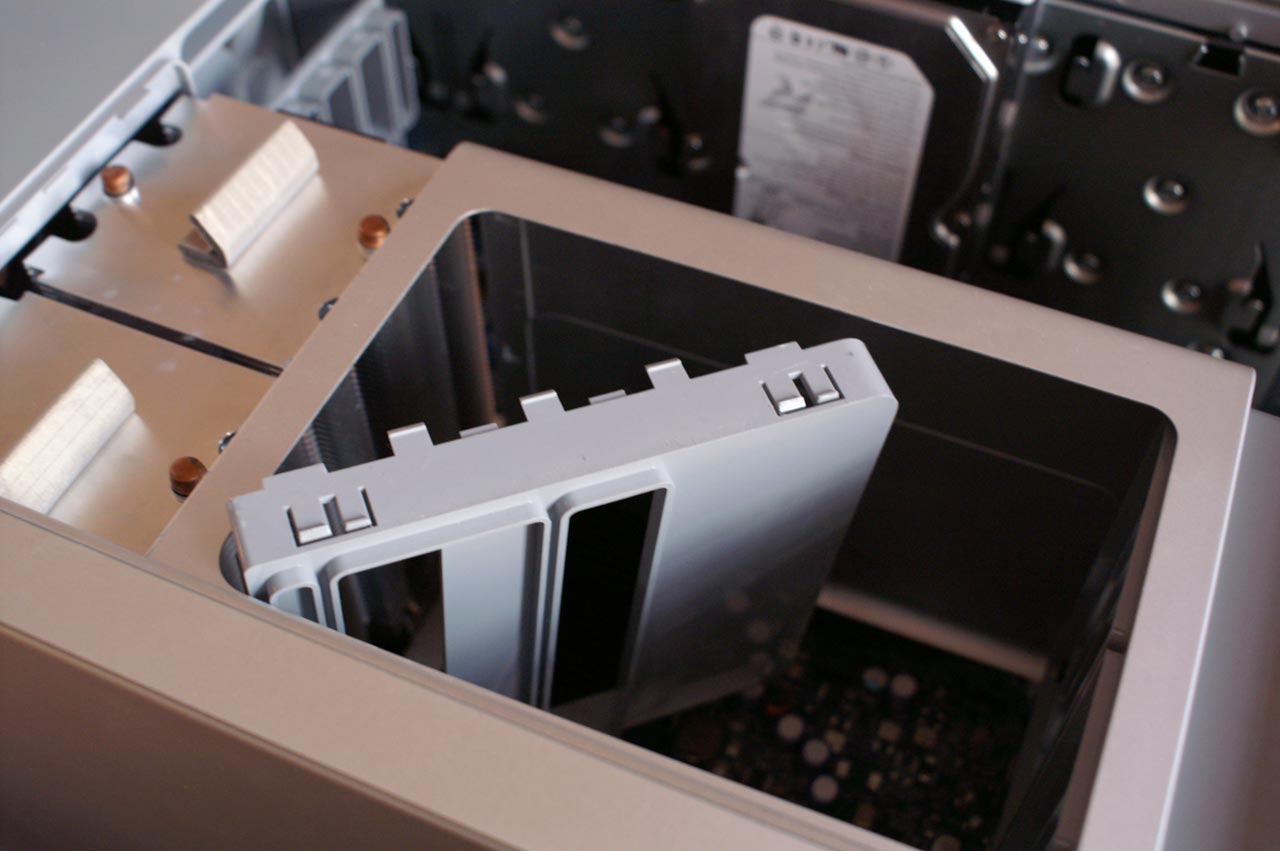
All you need to do is unlatch the plastic guard from the memory cage by sliding your putty knife between the cage and the guard. As you unlatch the plastic guard start pulling it away from the CPUs and eventually you'll get it off completely. Patience pays off here as you don't want to break any of the latches.
With the plastic guard off, it's now infinitely easier to gain access to the screws that hold the heatsinks in place. Each heatsink is attached to the motherboard by four allen screws; simply remove them (in an opposite side/opposite corner pattern) using a very long screwdriver (or a small allen wrench). We didn't have an allen wrench that worked so we attached two extenders to our screwdriver to get down to the screws.
With all of the screws undone for the first heatsink (the allen screws don't come off completely, they remain attached to the heatsink) you have to disconnect the thermistor cable that runs from the heatsink to the motherboard. Be sure to do this before you remove the heatsink as you don't want to cause any accidental damage to the cable.
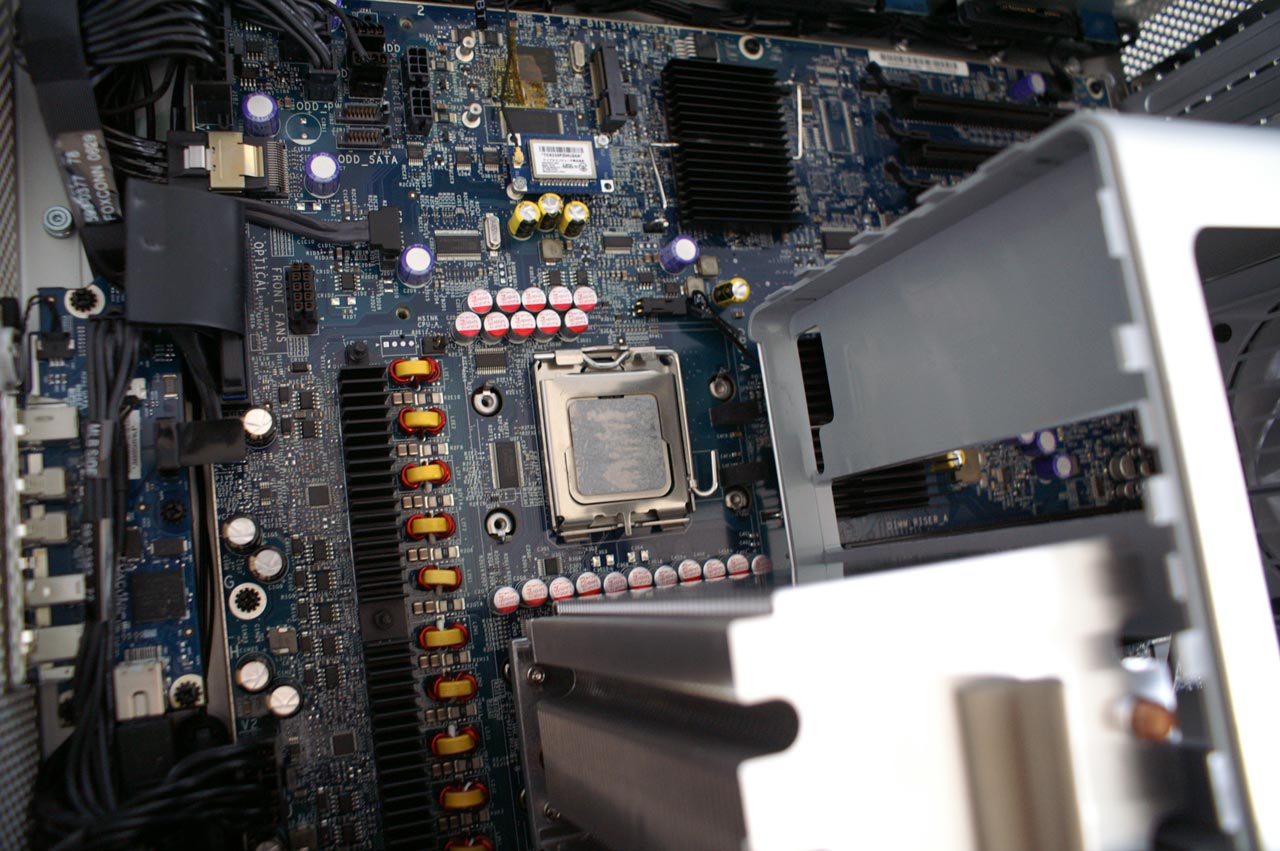
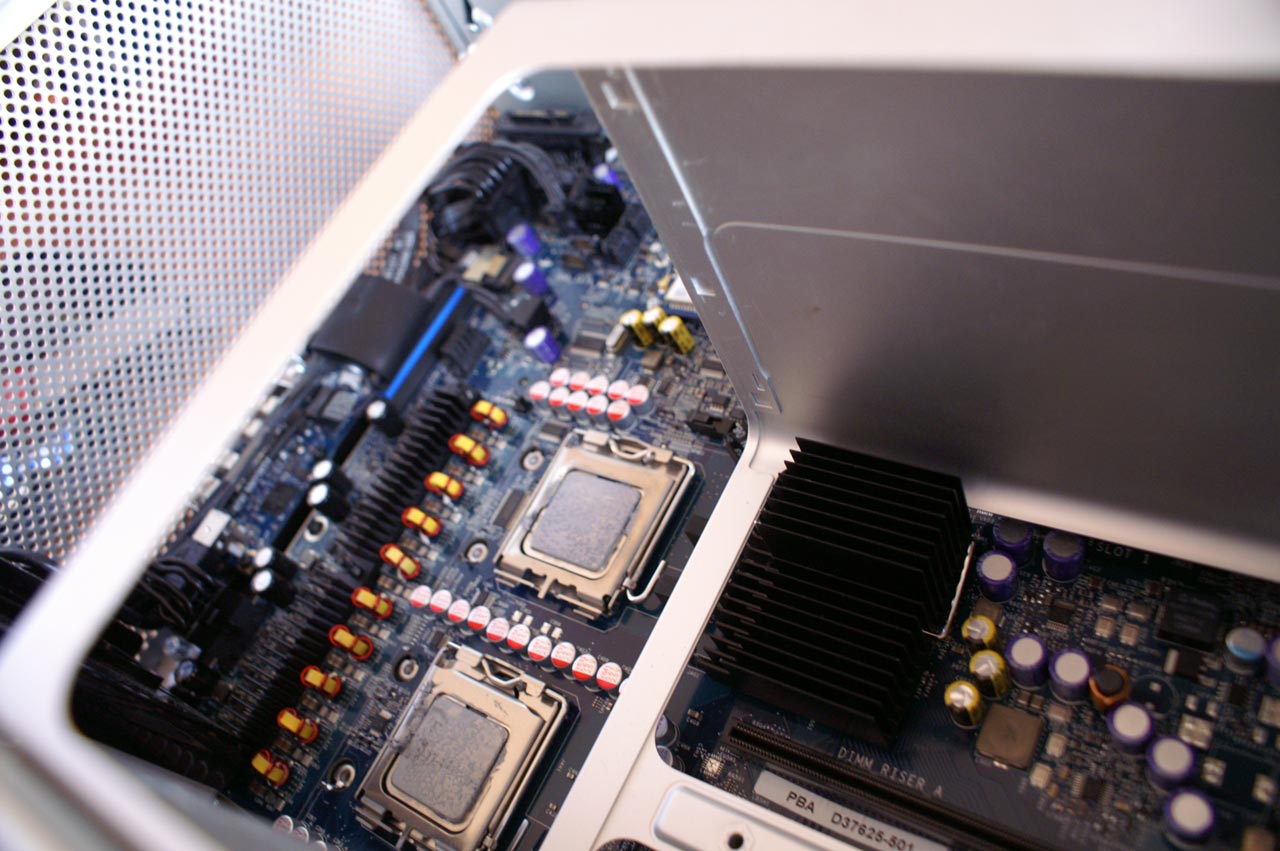
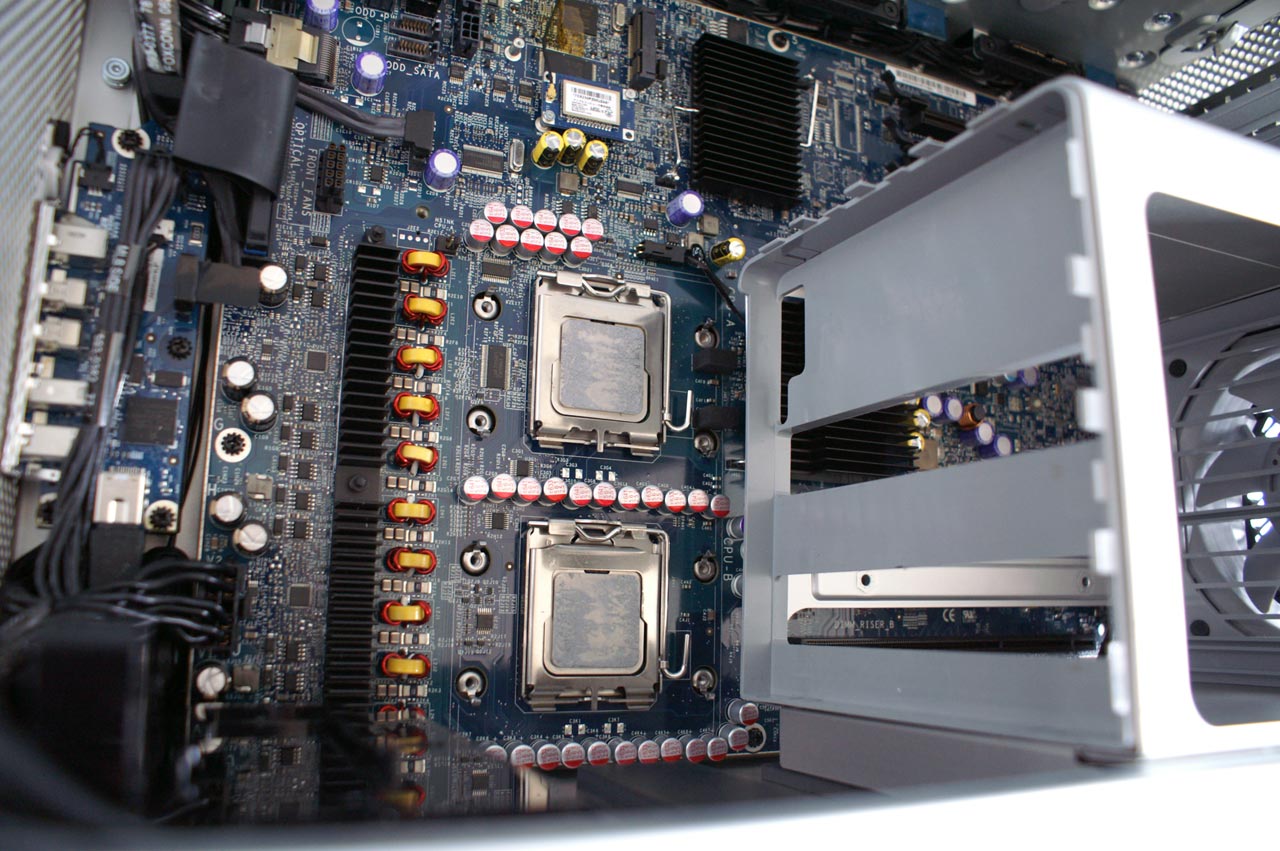
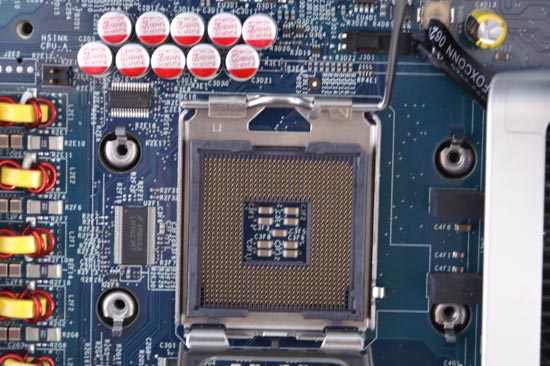
Finally you lift off the heatsink and set it aside, exposing the LGA-771 Xeon socket below. You can repeat the process for the second heatsink, also not forgetting to remove its thermistor cable (this one is actually beneath the memory cage) before pulling off the heatsink. With both heatsinks removed, it was time to swap processors.
Although the socket looks very similar to a desktop LGA-775 socket, it does have fewer pins and a different pinout so don't try to install a LGA-775 processor in these LGA-771 sockets. Thankfully only Xeon processors are LGA-771 so as long as you order the right CPU you should be good to go. We chose to go with the fastest CPU currently available, the Xeon 5160 that runs at 3.0GHz; the 5160 is also available as an $800 upgrade through Apple when you're ordering a Mac Pro.
Be extremely careful in removing/re-seating the Xeon processors in these sockets since all of the pins are in the socket itself and are a pain/virtually impossible to fix if they get bent. It's usually very easy to spot a bent pin just in case you do do something on accident.
Pay attention to the orientation of the CPUs that are in the Mac Pro when you remove them, and install the new ones in the same direction. You can also look at the contact points on the back of the CPU to confirm the installation orientation. As a final fool proof check there are also cutouts on the sides of the chip that will only let it sit flat in one direction. If you've never installed a chip into a LGA socket before, double and triple check you've got the orientation right before you pull that lever down. Of course you'll want to put some thermal grease on the new CPUs; be sure to keep the grease off of the pins in the socket and avoid using too much/too little.
With the new CPUs installed we mounted the heatsinks (don't forget to reconnect their cables) and installed the fan assembly. As a quick test to make sure that everything worked ok we didn't re-assemble the memory cage and did a quick boot into OS X to see if the new CPUs worked. Once we confirmed that they did, we completed the reassembly.
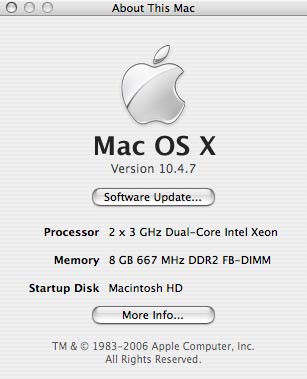
The Xeon 5160s were recognized properly by OS X and worked without a hitch, so it looks like there's a real, widely available upgrade path to Mac Pro owners down the line. As Intel processors are easy to come by, you shouldn't have any problems putting faster Xeons in your system.
What about Quad Core?
Later this year Intel will be introducing pin compatible upgrades to its Core 2 and Xeon lines, except instead of two cores these processors will feature four. Codenamed Kenstfield (Core 2) and Clovertown (Xeon), Intel's new quad-core processors will dramatically increase the amount of processing power you can have in a single system. Given that the Mac Pro features two LGA-771 sockets, you could theoretically drop two Clovertown processors in there and you'd have an 8-core Mac Pro.
Without a doubt Apple will release a quad-core version of the Mac Pro, either by the end of this year or early next year, but are users who buy the Mac Pro today missing out? While we're still a couple of months away from being able to test a retail Clovertown CPU in the Mac Pro, we wanted to see if the current engineering samples of the chip would work.
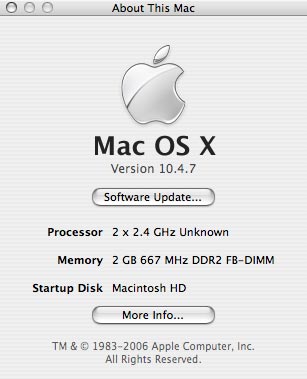
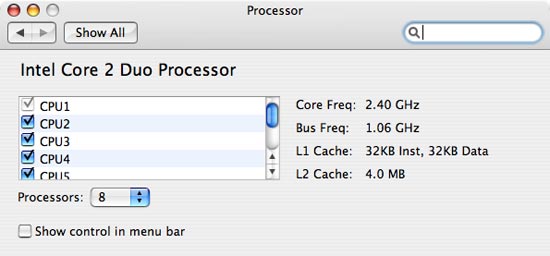
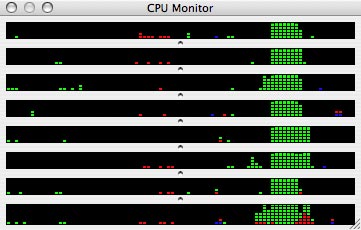
We grabbed a pair of 2.4GHz Clovertown samples and tossed them in the system, and to our pleasure, they worked just fine. Our samples used a 1066MHz FSB, although we're expecting the final chip to use a 1333MHz FSB, but the most important part of the test is that all 8 cores were detected and functional.
We ran a handful of stability tests on the Mac Pro equipped with two Clovertowns and didn't encounter any crashes with the processors, so it would seem that Clovertown will work in the Mac Pro's motherboard. We can't say with 100% certainty that you will be able to upgrade to Clovertown when it comes out, but so far the results are looking good.
For the performance of Clovertown you'll have to wait a bit longer as we're not allowed to disclose it just yet, but we wanted to let you know that so far it's looking like you'll be able to upgrade your Mac Pro to 8 cores in the not too distant future.
We are expecting there to be a trade off between clock speed and number of cores with the move to Clovertown, meaning that you'll be able to find higher clocked dual core Xeons than the upcoming quad core models. The current rumors suggest that on the desktop side, the highest clock speed quad core chip will be 2.66GHz while the fastest dual core CPU will run at 2.93GHz. We'd expect a similar situation with Clovertown in the Xeon lineup, meaning that unless you have a way of really stressing 8 cores, you may be better off with 4 faster cores in your Mac Pro. We definitely had a difficult time stressing 8 cores in the Mac Pro, but if you have a handful of well threaded, CPU intensive tasks then a pair of slower Clovertowns can easily outperform a pair of dual core Woodcrest based Xeons.
Installing Windows XP, the Right Way
When we first reviewed the Mac Pro, we of course tried to install Windows XP on it.
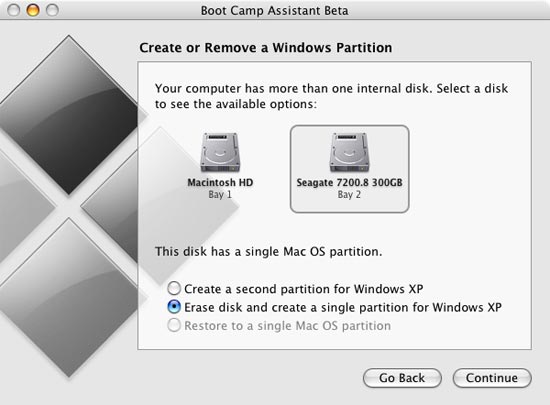
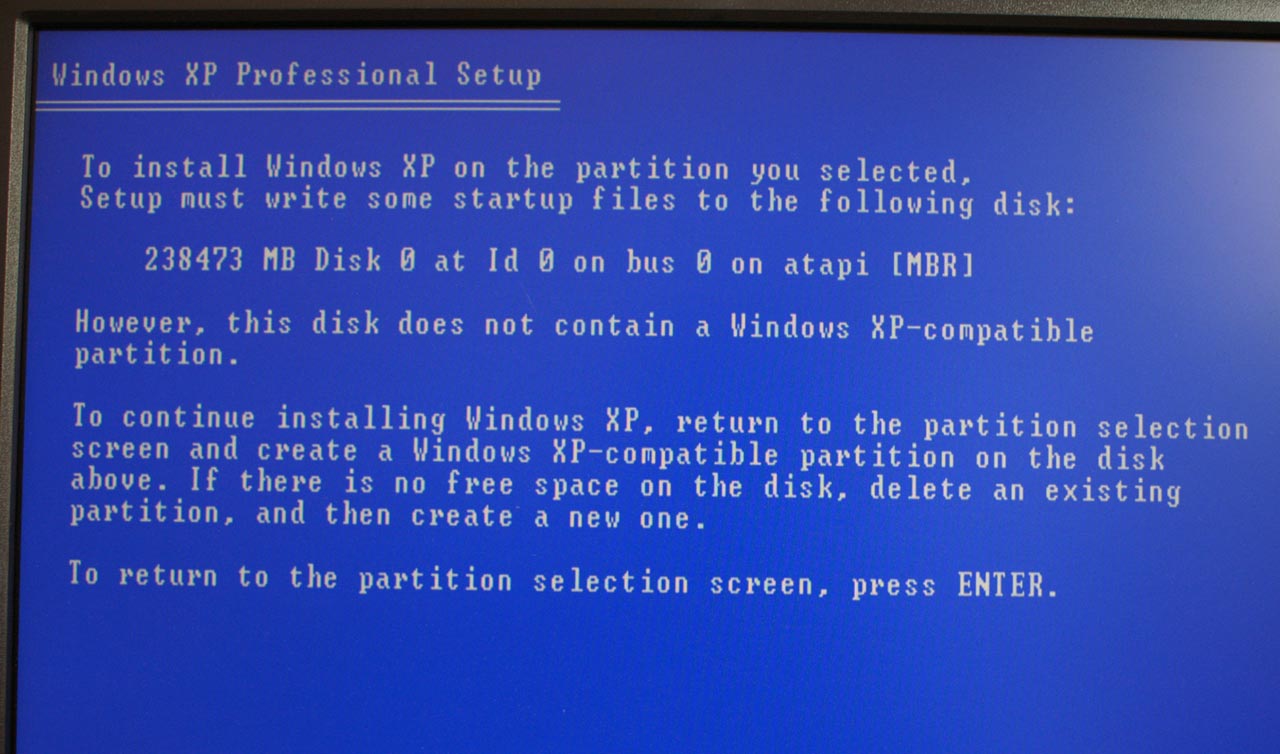
Although Apple's Bootcamp beta now allows you to install Windows on a separate hard drive, you'll need to physically remove your OS X boot drive before beginning the install process otherwise you'll be greeted with the following error:
Even with Apple's updated Bootcamp 1.1 beta release, we encountered serious performance issues with SATA drives under XP; the fastest transfer rate attainable, regardless of drive used, was only 3.9MB/s, which obviously made the system very slow. Video and CPU performance was fine, but with I/O performance so low the system was a very poor performer in most applications.

Thankfully, some clever OS X/XP users figured out the cause of the problem: the Intel 5000X drivers must be slipstreamed into the Windows XP SP2 install CD and loaded during Windows setup, not after, in order to avoid the problem. We couldn't find a reason why this was true, but after following the instructions posted here (and later mirrored here) our SATA problems went away.
The fix is simple; you need to download and extract the Intel chipset drivers for the 5000X, as well as the SATA drivers, and use a tool such as nLite to slipstream the drivers into your XP SP2 install CD.
If you've done it correctly, your SATA drives should now operate in Multi-Word DMA Mode 2 instead of PIO Mode when viewed in Device Manager.
With Windows XP now working at full speed on the Mac Pro, we run into another hurdle in making the Mac Pro the perfect XP/OS X workstation: the video card. Apple only offers three video card options for the Mac Pro: a GeForce 7300 GT, Quadro FX 4500 and a Radeon X1900 XT. The problem is that the first option is a fairly low end GPU, and the remaining two are fairly expensive upgrades at $499 and $399 respectively. It would be much nicer if we could simply use a PC video card in the system, as it would greatly expand the possibilities for upgrades and do so at much better prices.
PC video cards will actually work in the Mac Pro under Windows XP, they will not however work under OS X or during any of the pre-boot period of starting the machine (e.g. you will not be able to see the startup disk selection screen if you hold down the Option key while the system starts). If you install a PC video card in the Mac Pro you'll simply get a black screen until Windows starts loading, at which point everything will look normal. We used this fact to our benefit by running all of our Windows XP game tests with a regular ATI Radeon X1900 XTX. Interestingly enough, when we tried to use a Radeon X1900 XT 256MB, we got a lot of display corruption as you can see from the screenshot below:
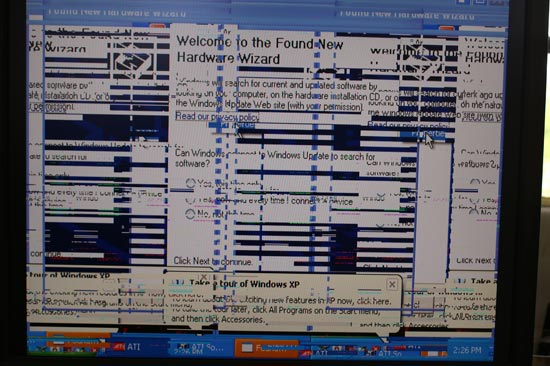
We couldn't do anything to get rid of the corruption, and aren't sure why it happened only with the 256MB X1900 XT.
On the OS X side, if you try to boot with a PC video card you'll simply get a black screen from start to finish. We've tried ATI's Radeon X1900 XT as well as the new GeForce 7900 GS (the GPU supports OS X, but the cards themselves do not) and had no luck in OS X. As soon as Mac versions of these cards are readily available, users should be able to rip the firmware off of one and work on putting it onto a PC card. Until then, your video card selection for the Mac Pro is going to be quite limited.
The Test
With our SATA performance issues solved, we could finally evaluate the Windows XP performance of our Mac Pro compared to a similarly constructed Core 2 Extreme PC. We ran our usual suite of CPU benchmarks on the Mac Pro as well as on our Core 2 CPU testbed, to see just how close to a Core 2 PC the Mac Pro would be in running Windows XP.
We ran the Mac Pro in two configurations, one in its default four core (2 x dual core Xeon 5160) configuration and one with only two cores enabled. The latter configuration was used to compare to our dual core Core 2 test bed, eliminating any performance advantages due to the extra two cores of the Mac Pro.
All gaming tests used an ATI Radeon X1900 XTX.
| CPU: | Intel Xeon 5160 (3.0GHz/4MB) x 2 Intel Core 2 Extreme X6800 (2.93GHz/4MB) Intel Core 2 Duo E6700 (2.66GHz/4MB) |
| Motherboard: | Apple Mac Pro Intel 5000X Motherboard ASUS P5W DH Deluxe (LGA-775) |
| Chipset: | Intel 5000X Intel 975X |
| Chipset Drivers: | NVIDIA ForceWare 91.47 Intel 7.2.2.1007 (Intel) |
| Hard Disk: | Seagate 7200.9 300GB SATA |
| Memory: | Corsair XMS2 DDR2-800 4-4-4-12 (1GB x 2) |
| Video Card: | 2 x ATI Radeon X1900 XT CrossFire |
| Video Drivers: | ATI Catalyst 6.8 |
| Desktop Resolution: | 1280 x 1024 - 32-bit @ 60Hz (1024 x 768 for games) |
| OS: | Windows XP Professional SP2 |
Application Performance using SYSMark 2004 SE
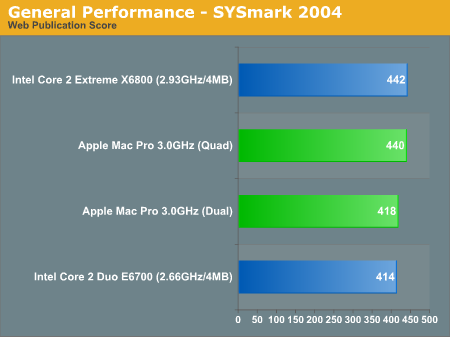
We'll kick off our look at general application performance with SYSMark 2004 SE and as always, and we'll look at the overall score as well as the scores in each of the two suites - Internet Content Creation and Office productivity.
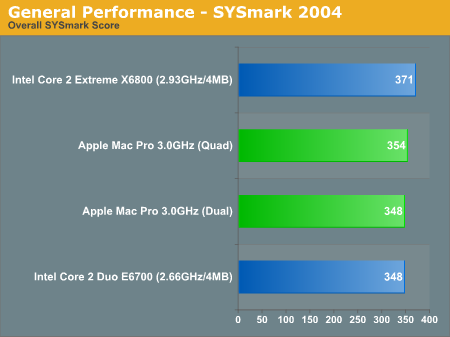
Overall SYSMark performance ends up being pretty close between the 3GHz quad core Mac Pro configuration and our dual core Core 2 Extreme X6800 test bed, with the latter holding on to just under a 5% performance advantage. The overall impact of going from two to four cores is negligable in the overall score as well, making the 3.0GHz Mac Pro about the speed of a Core 2 Extreme X6800 PC.
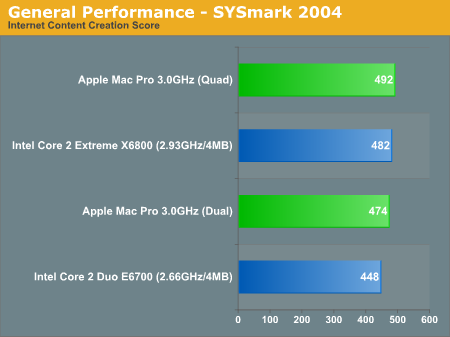
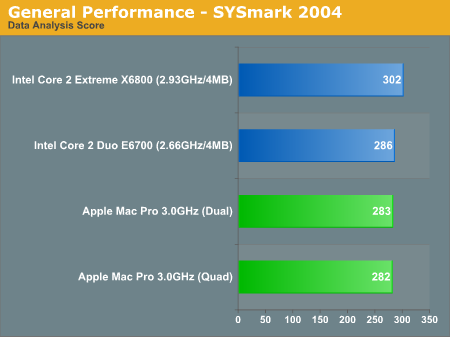
Looking at the ICC score, the quad core Mac Pro and the X6800 are virtually tied with only 2% separating the two. Once again we see no real benefit to having four cores over two on the Mac Pro in these tests and thus performance is about the same as a high end desktop PC.

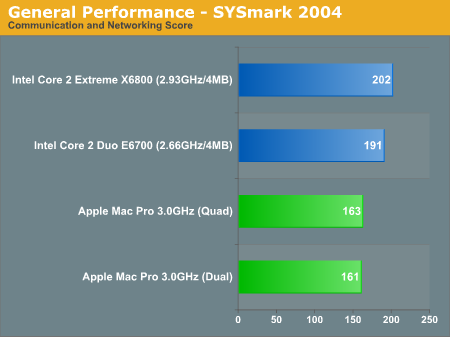
Thanks to its high latency FB-DIMM memory subsystem, the Mac Pro is about 10% slower than our Core 2 Extreme test bed in the Office Productivity tests. It's not a huge reduction in performance but there will definitely be times where there is a noticeable performance drop compared to a similarly equipped Core 2 system.
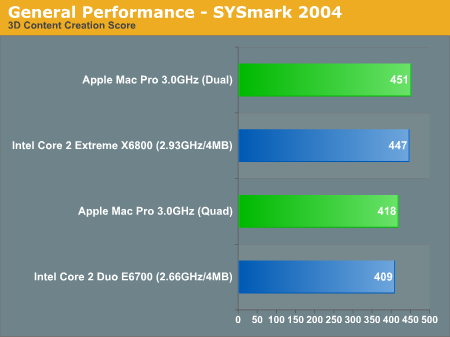
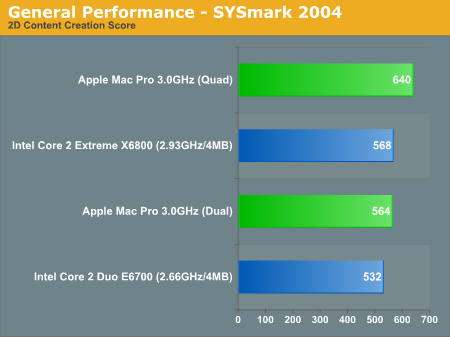
The breakdown of the SYSMark scores follows below, as you will see there are some benchmarks where the extra two cores really help the Mac Pro out and others where the memory subsystem is at fault for reducing performance. Overall, based on the SYSMark 2004 results, the Mac Pro at 3.0GHz ends up performing like a similarly clocked Core 2 machine, which isn't bad at all.

Application Performance using Winstone 2004
Winstone 2004 consists of two different benchmark suites; the Business Winstone test focuses on office applications, while the Multimedia Content Creation benchmark contains many audio/visual applications that are more CPU limited.
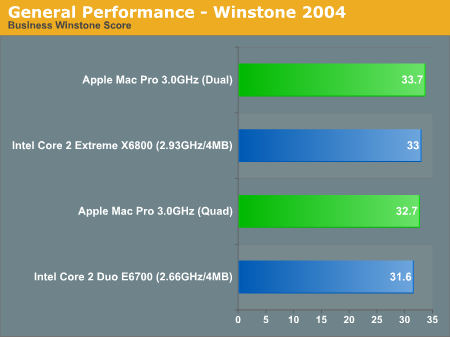
There's no real benefit to having four cores vs. two in Business Winstone 2004, so the Mac Pro 3.0GHz performs much like the Core 2 Extreme X6800.
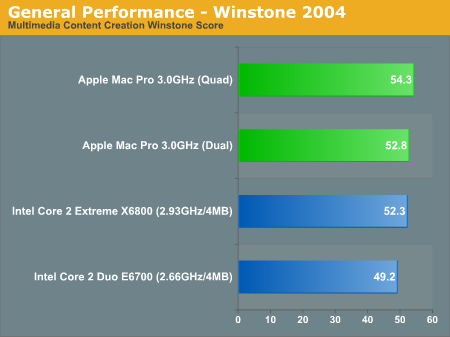
The MMCC Winstone 2004 test does have a highly multithreaded component, but the performance benefit from having four cores is less than 4%. Still, the Mac Pro at 3.0GHz ends up being slightly faster than the fastest desktop PC processor.
3D Rendering Performance using 3dsmax 7 & CineBench 9.5
We're looking at 3D rendering performance using two different applications: 3D Studio Max and Cinebench 9.5. Cinebench is a free performance testing utility based off of the CINEMA 4D R8 rendering package. Our scores from 3D Studio Max are a composite score from four rendering tests: CBalls2, SinglePipe2, UnderWater, and 3dsmax5 Rays.
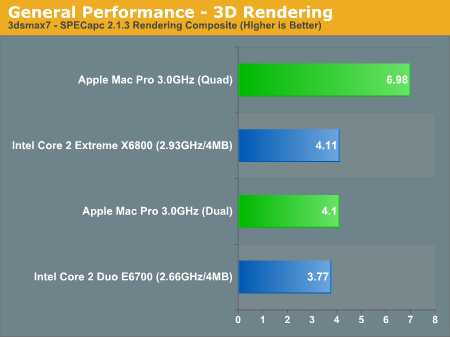
Given how much of a boost we saw going from one to two cores in 3dsmax, the incredible performance of the four core Mac Pro 3.0GHz is not surprising. When Intel releases its upcoming Kentsfield processor, you should be able to attain similar performance to the Mac Pro 3.0GHz in a single socket. Naturally, at that point you should also be able to upgrade the Mac Pro to eight cores. Dual socket PC workstations are also be available that compete with the Mac Pro in terms of CPU cores, though without OS X support.
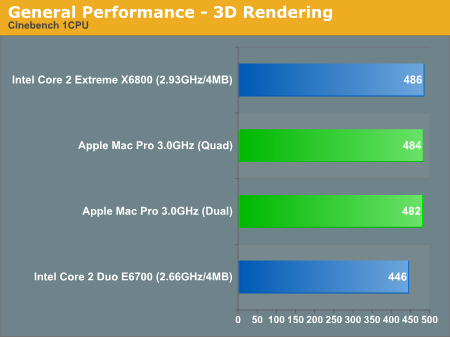
In CineBench's single threaded test, the Mac Pro 3.0GHz and Core 2 Extreme X6800 is virtually identical. The Mac Pro should be a bit faster thanks to its faster FSB and slightly higher clock speed, but the use of FB-DIMMs results in a bit of a performance penalty that ends up evening out the performance.
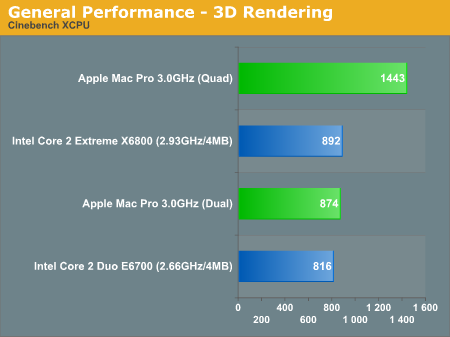
The multithreaded CineBench test shows us similar scaling to what we saw in 3dsmax; the move to four cores gives the Mac Pro a 65% boost in performance.
Encoding Performance using DivX 6.1, WME9, Quicktime (H.264) & iTunes
Multimedia encoding is typically a very good CPU benchmark, with performance that scales very nearly linearly with faster CPU clock speeds. Video testing was conducted using three popular codecs and applications: Xmpeg 5.03 with DivX 6.1, Windows Media Encoder with WMV9, and QuickTime 7.1 with H.264. The complexity of the encoding process increases as we move from DivX to WMV9, and H.264 encoding is in a league of its own in terms of the amount of CPU time required. Audio encoding performance was also tested using iTunes; MP3 encoding is less time-consuming and video encoding, but it continues to stress CPU performance.

With only two cores enabled the Mac Pro at 3.0GHz is about 5% slower than the Core 2 Extreme X6800, once again thanks to its high latency FB-DIMMs that erase any benefits the faster FSB and clock speeds would have provided. With all four cores enabled however, the Mac Pro manages to perform our encoding test in a mere 28 seconds - an improvement of almost 30%.
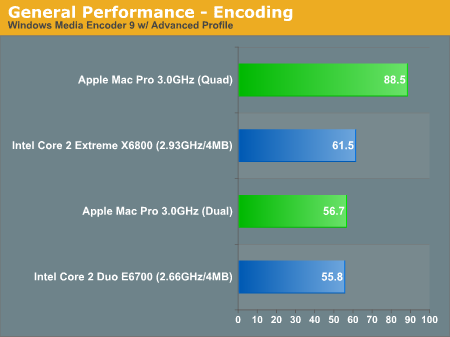
The same situation exists under WME9, where the Mac Pro with only two cores enabled ends up being a bit slower than a two core Core 2 Extreme platform thanks to its memory subsystem. But with all four cores enabled, WME9 performance skyrockets. For the PC users reading - this is the sort of performance you can expect to see from Kentsfield in the coming months, all in a single socket.
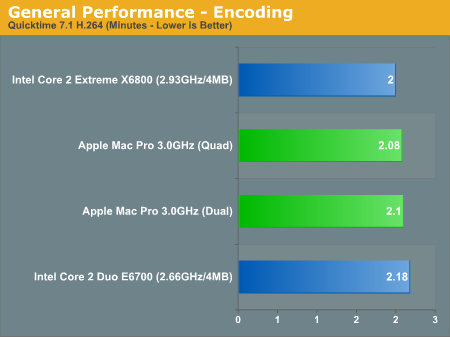
Our Quicktime test gets virtually no boost from having four cores, and thus both Mac Pro configurations end up a bit slower than the Core 2 Extreme for the same reasons as before.
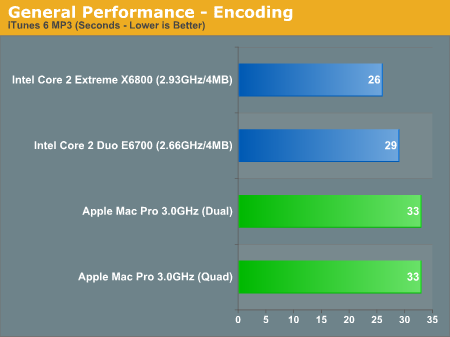
The iTunes tests show no advantage offered by the four core Mac Pro, so the FB-DIMM penalty makes both Mac Pro configurations slower than even our Core 2 Duo E6700 test platform.
Gaming Performance using Quake 4 & Half-Life 2 Episode 1
Our gaming performance analysis starts out with Quake 4 running at 1024x768 with High Quality visual settings. We used version 1.2 of Quake 4 and SMP was enabled:
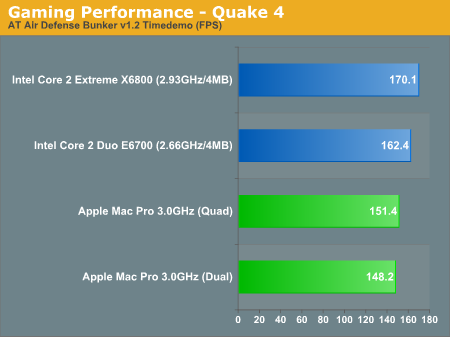
As you can expect, with most games being great memory bandwidth/latency benchmarks at more CPU bound resolutions, the Mac Pro ends up being significantly slower than the Core 2 testbeds. The 12% performance advantage the X6800 holds here will shrink as the resolution increases, but the point here is to look at what sort of FB-DIMM penalty we'll be paying.
Next up we've got the recently released Half Life 2: Episode 1, running at default quality settings with the exception of AA and aniso being disabled. As with all of our gaming tests in this article we tested at 1024x768:
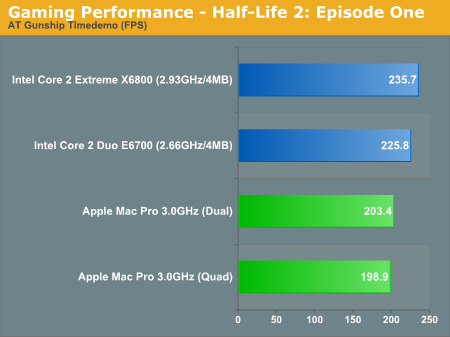
The story is no different under Half Life 2, but we did consistently see a drop in performance when going from two to four cores .
Gaming Performance using F.E.A.R. & Rise of Legends
Our F.E.A.R. test should be fairly familiar by now, as it is the built in performance test included with the game. Computer settings were left at "Maximum" while the graphics settings were set to "High" with the resolution set to 1024x768.
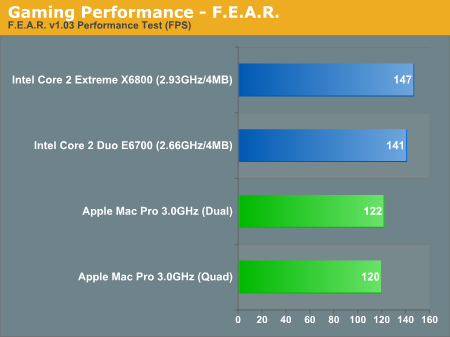
F.E.A.R. continues the trends we've established, and once again the dual core Mac Pro is a bit faster than the quad core version while the FB-DIMMs hold back performance.
Rise of Legends is a newcomer to our game benchmark suite and what an excellent addition it is. This Real Time Strategy game looks very good and plays well too. We ran with the resolution set to 1024x768 and the graphics settings set to the medium defaults. We recorded a custom playback of a 3 vs. 2 multiplayer battle and played it back at 4x speed, recording the average frame rate for 10 minutes of the battle. The 10 minutes we focused on contained a good mix of light skirmishes between opponents, base/resource management with very few characters on the screen and of course some very large scale battles. The performance variability between runs was fairly high in this test, mainly because of how disk intensive the playback can get. Differences in performance of up to 5% should be ignored.
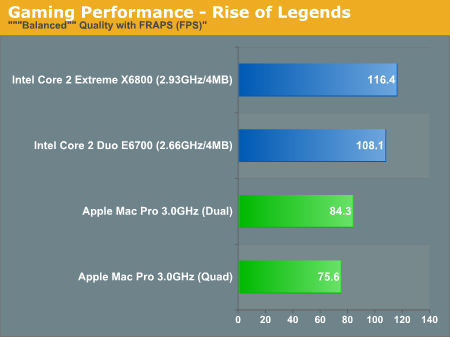
As with most RTSes, Rise of Legends is extremely CPU bound. Rise of Legends showed a bigger performance deficit than most games, with the X6800 scoring 38% higher than the dual core Mac Pro, and the dual core Mac Pro is 11% faster than the quad core version. In an ideal world, having more cores available wouldn't impact performance of games, but clearly there are other influences at work. With RoL being mostly CPU bound, there is a very noticeable performance impact regardless of resolution.
Gaming Performance using Oblivion
Will close out our gaming performing analysis with Oblivion. We ran at a setting that more or less corresponds to "medium quality", without antialiasing.
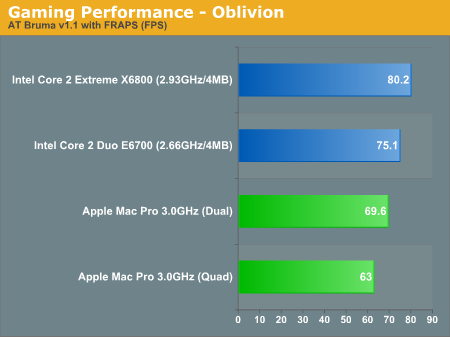
The performance story is no different under Oblivion, FB-DIMMs really hurt gaming performance on the Mac Pro when compared to standard DDR2 on a Core 2 Extreme system.
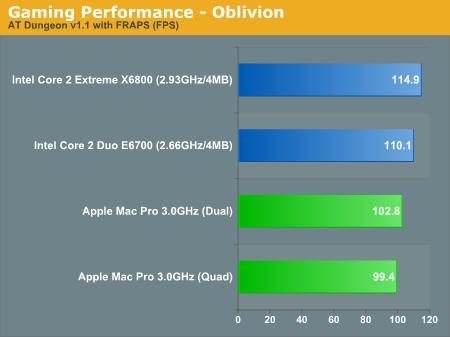
The performance deficit isn't as great in the Dungeon benchmark as it is in our Oblivion Gate test, but in both cases the Xeon setup offers lower performance than even an E6700, and quad core once again comes out at the bottom of the charts.
Final Words
As a computer running OS X, the Mac Pro is the best you can get, but even as a PC the Mac Pro is extremely competitive. For most tasks under Windows XP, the Mac Pro performs much like a similarly clocked Core 2 processor despite having a faster FSB and more cores. If you're running applications that are particularly well threaded, then a four core Mac Pro will obviously have an advantage over a single socket dual core system under any OS. It's particularly in latency sensitive applications such as audio/video encoding and 3D games that the Mac Pro's FB-DIMM memory subsystem really holds it back.
For gaming, before we can even begin to complain about performance, there's the issue of not being able to use cheaper and more readily available PC video cards in the Mac Pro (yet). If you're looking to the Mac Pro as the perfect hybrid OS X/gaming PC, you're either going to have to configure it with a Quadro FX 4500 or an X1900 XT, or wait for the first PC video card hacks to become available for this machine to be a real gaming PC. If and when the latter does happen, the Mac Pro truly could solve the age old problem of not being able to both work and play on your Mac. The FB-DIMM performance penalty in games is noticeable, but with a fast enough GPU it will still be a more cost effective option than buying a Mac Pro and a high end PC for gaming.
If you're not particularly interested in gaming, then the Mac Pro in its base configuration is ready to go and be one of the fastest desktop PCs money can buy. The impact of its FB-DIMMs is much lower in the majority of non encoding/gaming applications we ran, which means that for the handful of applications you need to run in XP the Mac Pro will perform just fine. While our hearts still yearn for a Core 2 based Mac, the Mac Pro will suffice as a good performer regardless of OS and application.
It is still worth noting that if Apple were to release a Core 2 (Conroe/Kentsfield) based Mac similar to the Mac Pro, it could end up outperforming the Mac Pro by being able to use regular DDR2 memory. The Intel 5000X chipset and its FB-DIMM memory are really designed for multi-user server and high end workstation workloads, where large amounts of simultaneous reads/writes are able to mask much of the latency penalty of FB-DIMMs. The problem is that the Mac Pro is the only high end desktop Apple offers without an integrated display, so inevitably it's going to attract a lot of users whose usage models aren't best serviced by the Intel 5000X chipset.
The upgrade path offered by the Mac Pro is particularly interesting, not because Macs weren't upgradable in the past (since they were) but because upgrades have never been so readily available. And based on our initial testing, it's looking like you'll be able to drop in a pair of Clovertowns and make the move from four to eight cores in the Mac Pro by the year's end. The combination of excellent OS X performance, good Windows XP performance and a more interesting CPU upgrade path than any prior Mac makes the Mac Pro particularly interesting. While many were worried that Apple's move to Intel would make the Mac more generic, it has simply made the Mac Pro more versatile and desirable.


