Original Link: https://www.anandtech.com/show/1864/inside-microsoft-s-xbox-360
Inside Microsoft's Xbox 360
by Anand Lal Shimpi, Kristopher Kubicki & Tuan Nguyen on November 16, 2005 5:09 AM EST- Posted in
- Systems
Update: If you're looking for instructions on how to disassemble the new slim Xbox 360 read our updated guide here!
Microsoft's first try at a gaming console amounted to essentially a very affordable PC. It used standard PC components, including a mobile Intel processor (a hybrid Pentium 3/Celeron), a desktop NVIDIA chipset, a Western Digital hard drive and relatively standard PC DVD-ROM. The original Xbox was such a PC in fact that there were quite a few users that wanted to mod it simply to have a cheap PC, not even for gaming - including ourselves.
Before the Xbox was launched, Microsoft was very concerned with users thinking of the Xbox as nothing more than a PC branded as a gaming console, so it went to great lengths to reduce the association. For example, the strict ban on keyboard and mouse support, despite the fact that the console implemented the standard USB interface.
With the Xbox 360, Microsoft gained some benefits of the original Xbox success. Xbox didn't win the sales battle against Sony's PlayStation 2, but the first Xbox was strong enough to cement Microsoft's name in the world of console gaming manufacturers. For their second time around, there is less worry of the Xbox 360 being viewed as a just a PC, so Microsoft took a bolder approach.
Honestly, with the Xbox 360, Microsoft could have put forth another PC in a black box and it probably would have done fine. But with their second gaming console, the target was growth -- and Sony. With an established name and fanbase, it was time to take the market seriously and start to exert some dominance and thus the Xbox went from being a clunky black box of a PC, to a stylish consumer electronics device.
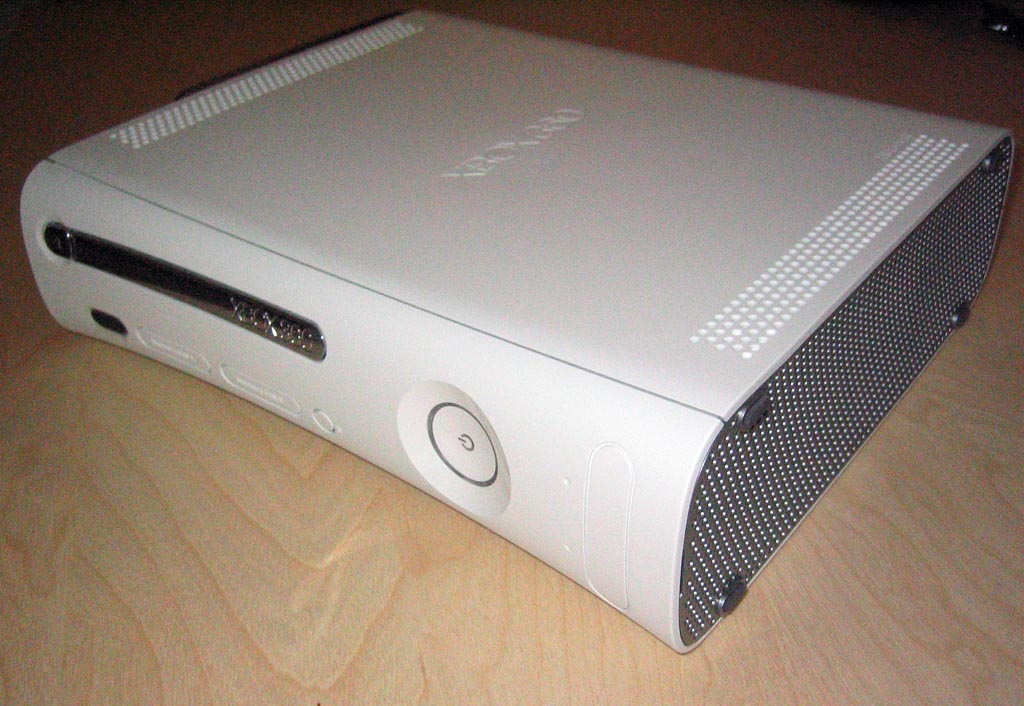
The Xbox 360 is smaller than the original Xbox, and its wireless nature makes it a natural fit in the living room - marking a thankful change from standard gaming consoles of the past. Despite looking like the offspring of an iPod and a DVD player, the Xbox 360 is still very much a PC on the inside. As such, it's got all of the components we're used to.
With less than a week to go before the retail availability of Xbox 360 consoles, we got our hands on one to give it the usual AnandTech once-over. And take it apart of course.
What's in the Box?
Our Xbox 360 system was the $399 unit, which comes with the following:
- Xbox 360 console
- 20GB Removable Hard Drive
- Wireless Controller
- Headset
- DVD Remote
- Ethernet Cable
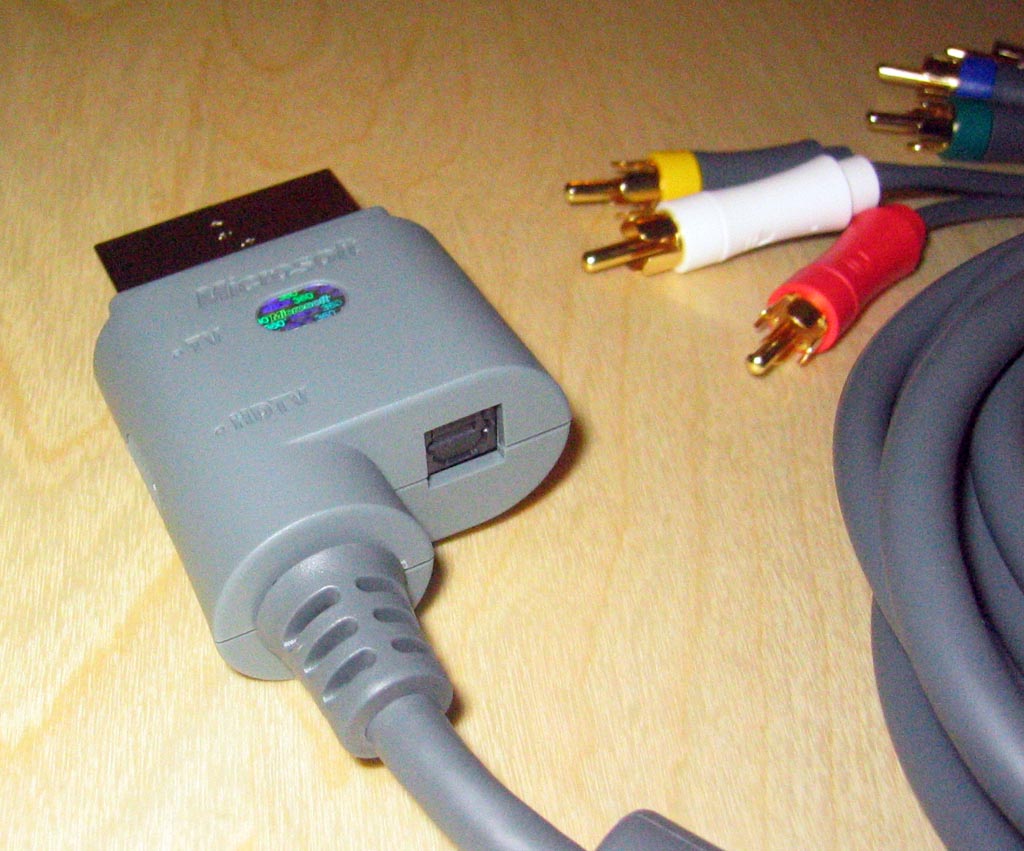
- Component AV Cables
- External Power Supply

The $299 core system gives you the same console (with a white DVD tray cover), a wired controller, and standard composite AV cables; there's no hard drive, headset or remote.
By now you have undoubtedly heard about the massive external power supply that comes with the Xbox 360 and you can see it in the lower left hand corner of the picture above. Remember that in the original Xbox, the power supply was internal. But with the power requirements of the Xbox 360 being significantly higher than its predecessor, while featuring a noticeably smaller case, the only solution was to take the power supply out of the Xbox 360.
What's in the Box, in the Box? (Taking it Apart)
Microsoft has shown the world that it's very swift when it comes to recovering from errors that it has made. With the original Xbox design, Microsoft was definitely testing new ground and thus had little experience when it came to protecting its intellectual property and hardware. The original Xbox was largely easy to open by most people with the most common of tools and was quickly adopted by the modding community as the ultimate "utility" console.
In an attempt to circumvent those with modified Xboxes, Microsoft added security and authentication features to its Xbox Live service that would detect whether an Xbox was in its original form or not. But the mod community did not sit idle and not long after, mod chips were introduced that were able to switch on and off between original BIOS mode and "modified" BIOS mode.
Microsoft has clearly announced to the public that it has designed the Xbox 360 from the ground up to thwart those who want to crack open the case -- even simply for a look inside. They have stated that the unit will be screwless (partially true) and be extremely difficult to disassemble -- unfortunately only partially true.
With a few simple tools we were able to disassemble the entire unit, removing every component from the system without any damage. If you plan to take apart your Xbox 360 -- and we must warn that doing so will void your warranty immediately -- the following tools are needed:
- Three torx screw drivers in the following sizes: T6, T7 and T12
- One small flat head screw driver or small and thin wedge
- A 2 inch long and thin (roughly 1.5mm thick) metal stick
- A 2 inch long and flat (less than 1mm thick) plastic or metal stick
- A pair of thin pliers
With those tools in hand, we're ready to disassemble the Xbox 360.
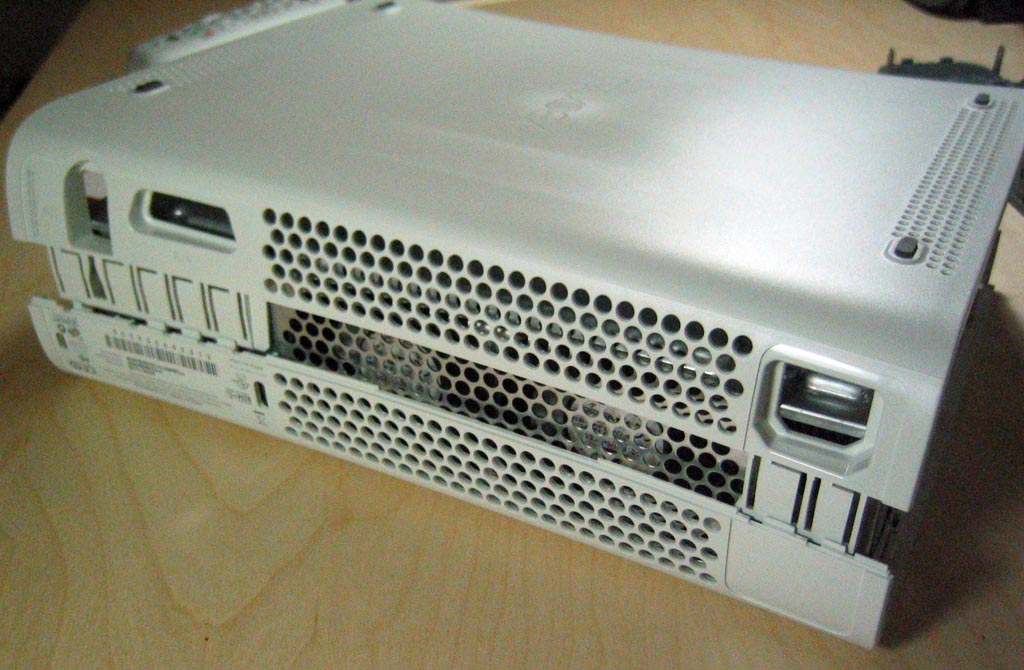
Removing the Outer Shell
The first step is to remove the outer plastic shell that conceals the innards of the system. To do this, you must start by removing the face plate. Take a look at the front of the Xbox 360 and insert your thumb into the door that covers the two USB ports on the right of the unit. With your other hand squeezing the upper and lower sides of the face plate, pull out the face plate with your thumb. With not much force, the face plate should pop right off.

After the face plate has been pulled off you will see a silver Microsoft sticker covering a gap; remove this. You will also see four small clips locking the top half of the plastic shell to the bottom half. Do not attempt to wedge the clips out at this point.
With some care, gently bend outwards, the right gray ventilation shield on the right side of the unit so that you can see a bit inside. You will notice that the gray side piece attaches to both the bottom and top white chassis. Now look through the holes on top of the unit to locate the areas where the gray side pieces attaches to the white body. What you need to do is take the long but thin metal stick and push down, through the white holes (located on both the top and bottom of the Xbox 360) where the clips of the gray side pieces connect. Slowly pull out the gray pieces away from the unit while unlocking the clips and eventually the gray piece will release itself.
To remove the left gray piece, you must first remove the hard drive unit by pressing the button located on the unit itself. Then apply the same procedure used to remove the right gray ventilation piece -- except when you reach the bottom clip of the piece, you most remove the rubber feet located directly below, to reveal a hole where you can insert the metal stick.
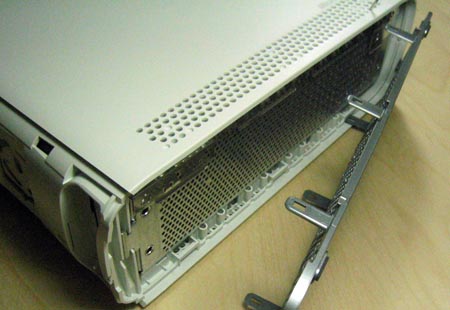
Once you have both side gray pieces removed, you have essentially removed the main locking mechanism that holds the top and bottom shells together. At this point, return to the front of the unit and turn the entire unit upside down. Using a flat head screw driver or wedge, gently pry up the 4 clips holding the top shell to the bottom. Once the clips are unlatched, slowly lift up the front of the bottom shell about an inch.
The last step to removing the bottom shell cover is to insert a thin and small plastic stick into the thin rectangular holes on the rear. The reason the front of the bottom shell needs to be lifted is to prevent the rear latches from reattaching themselves. Slowly insert the stick into each rectangular opening. You should hear a click sound for each clamp you unlatch. Once complete, you may lift off the bottom shell covering.
Looking inside the unit, you will notice that there are 14 silver screws (6 of which are long) and 8 black screws. Using your torx screw drivers, remove the silver screws using a size T12 screw driver and the black ones using a size T7. Once you have all the screws removed, flip the Xbox 360 right side up and lift up the top plastic shell. You should now be greeted with the internals of the Xbox 360.
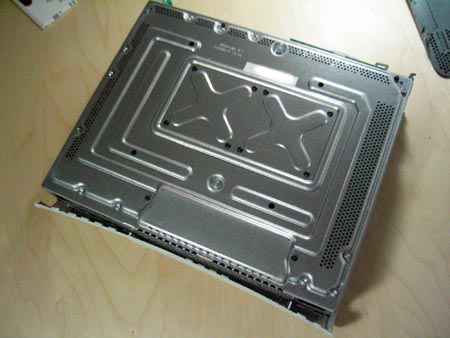
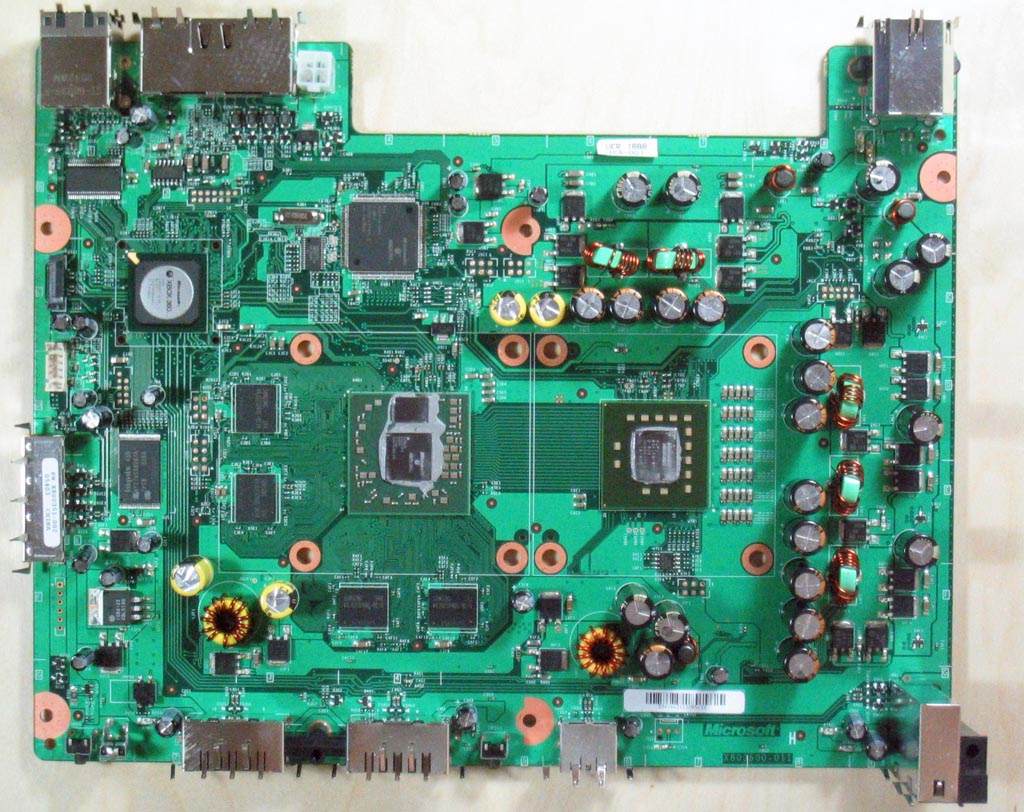
Disassembling the Internals of the Xbox 360
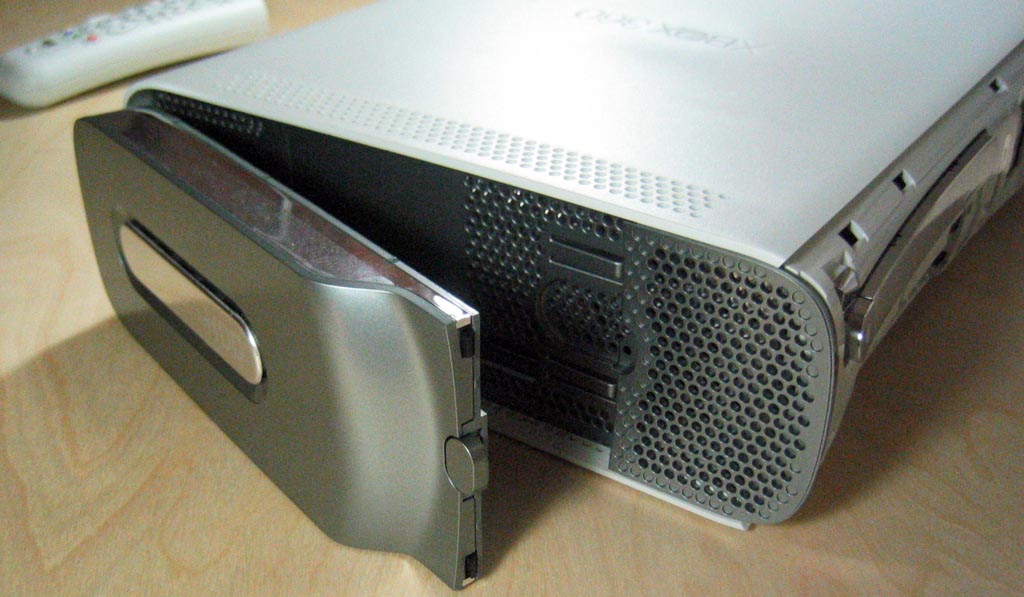
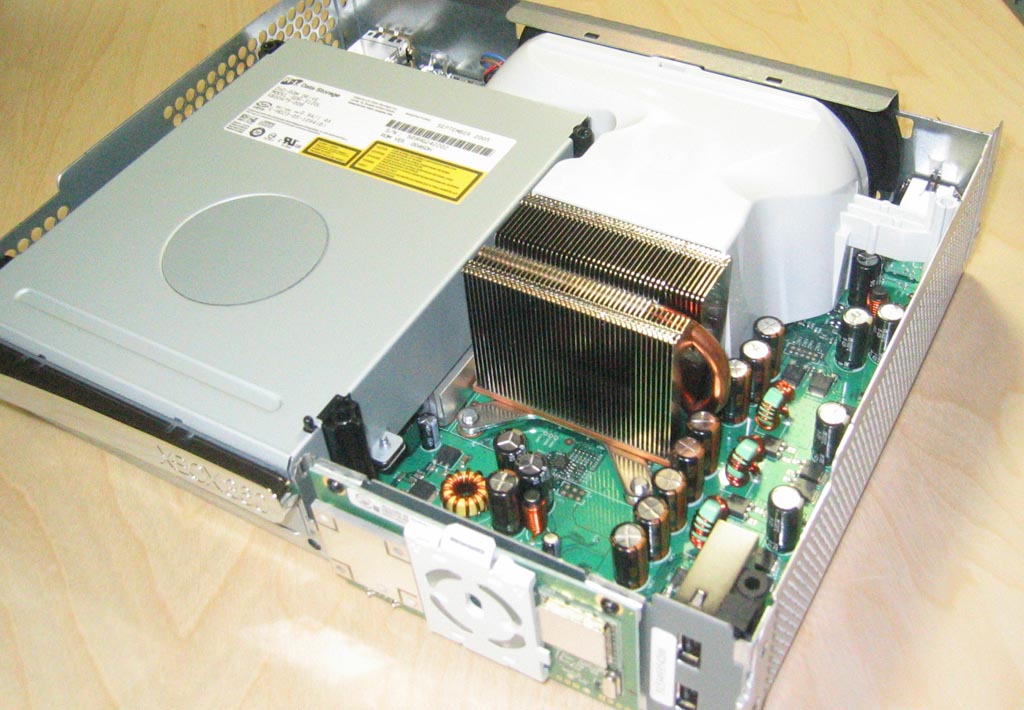
To continue further, you will need to first remove the DVD drive. Simply hold the drive and lift up. You will notice that the Xbox 360's DVD drive uses a Serial ATA interface which keeps things very tidy compared to the original Xbox. At this point, remove both the power supply cable and Serial ATA cable from the DVD drive and then from the motherboard.
The fan shroud can now be removed by simply twisting the cover until it pops off. The shroud is held in place by one clamp that attaches to the actual fans. Just be careful at this point not to break the clamp.
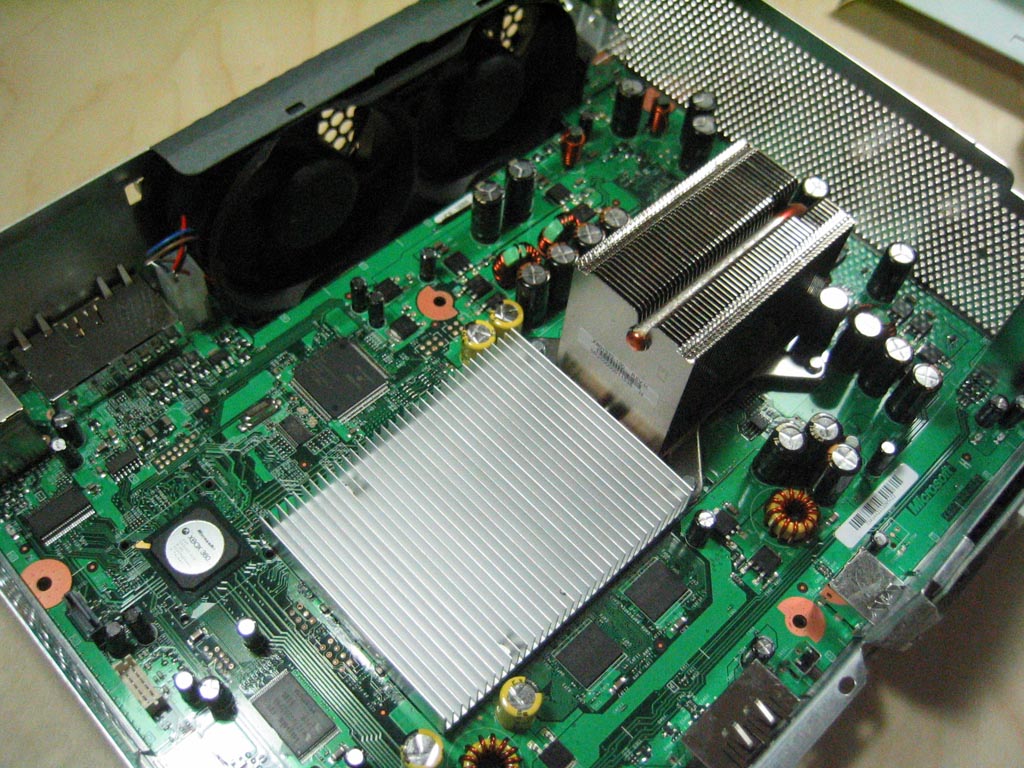
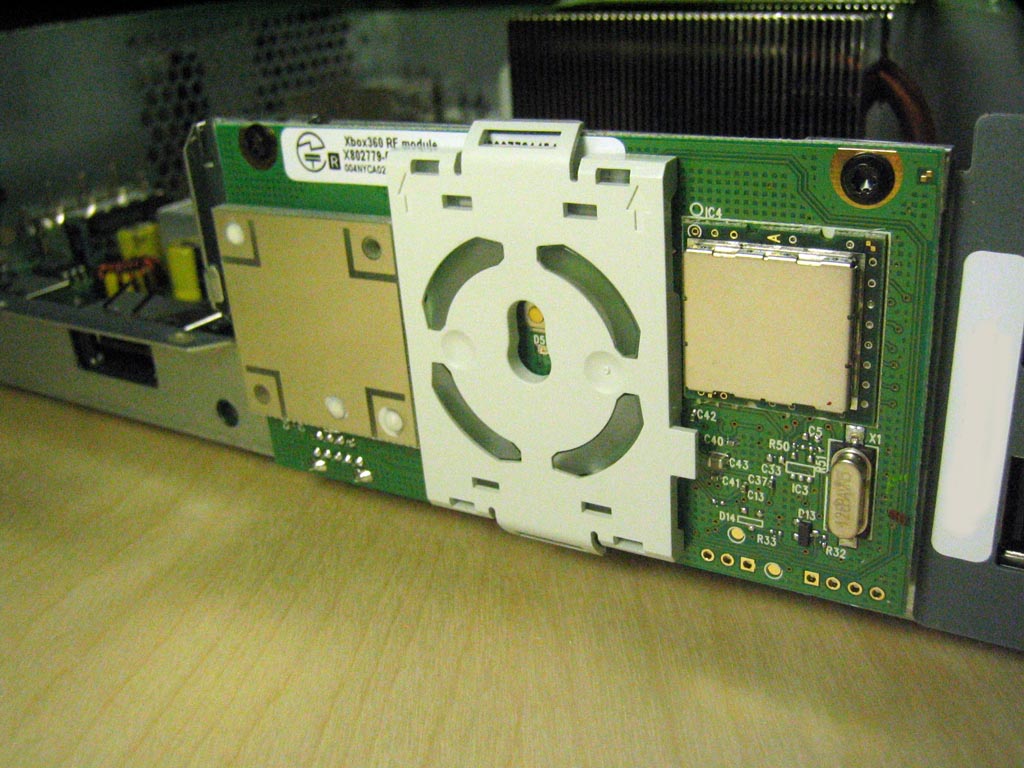
Next, remove the RF unit at the front of the Xbox 360 by removing the small black torx screws using a T6 screwdriver. Then you must remove the plastic cover on the front of the RF unit by unlatching the top and bottom of the plastic cover. Once you have done this, you will reveal the third screw holding the RF unit to the chassis. Remove the last screw and pull out the RF unit. Lastly, remove the power connections for the fans. You can now lift the motherboard out of the metal chassis.
As a reminder, the Xbox 360 is a delicate equipment and must be treated with care at all times. Ensure that you frequently ground yourself to discharge any build up static which can severely harm your Xbox 360.
Disassembling the Xbox 360 HDD unit
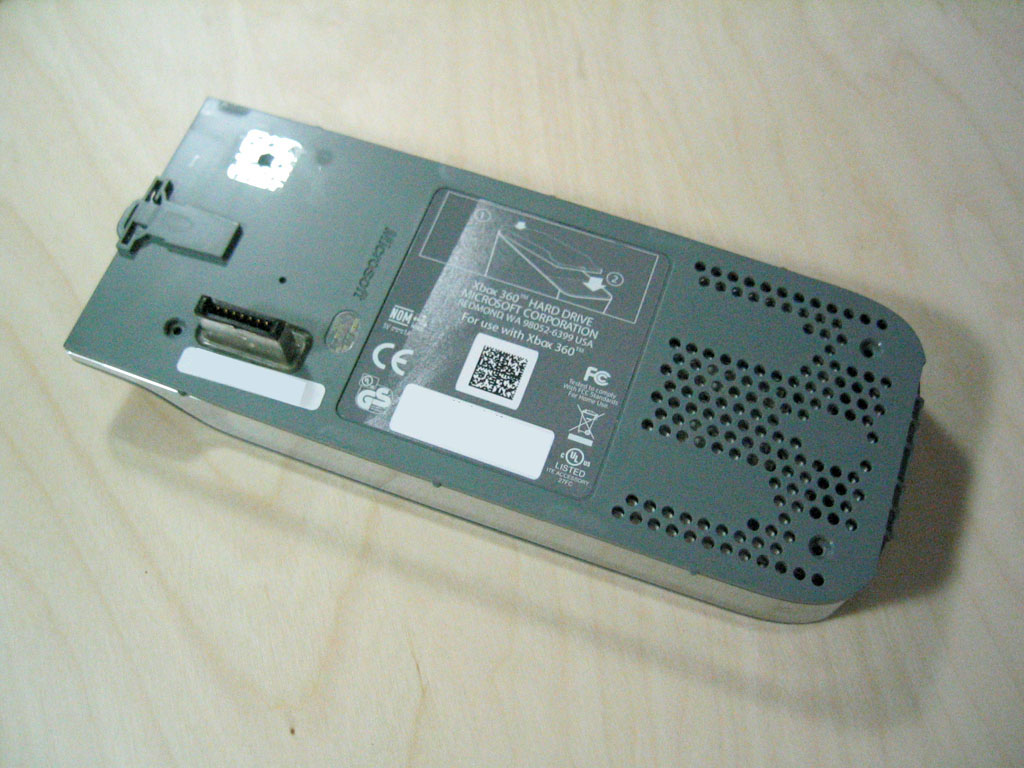
The Xbox 360's HDD unit only currently comes if you purchase the $399 Xbox 360 system. For those who purchase the core system, no hard drive is included. However, if you are interested in finding out just exactly what Microsoft has offered in terms of storage, the following are instructions on how to disassemble the Xbox 360's HDD module.
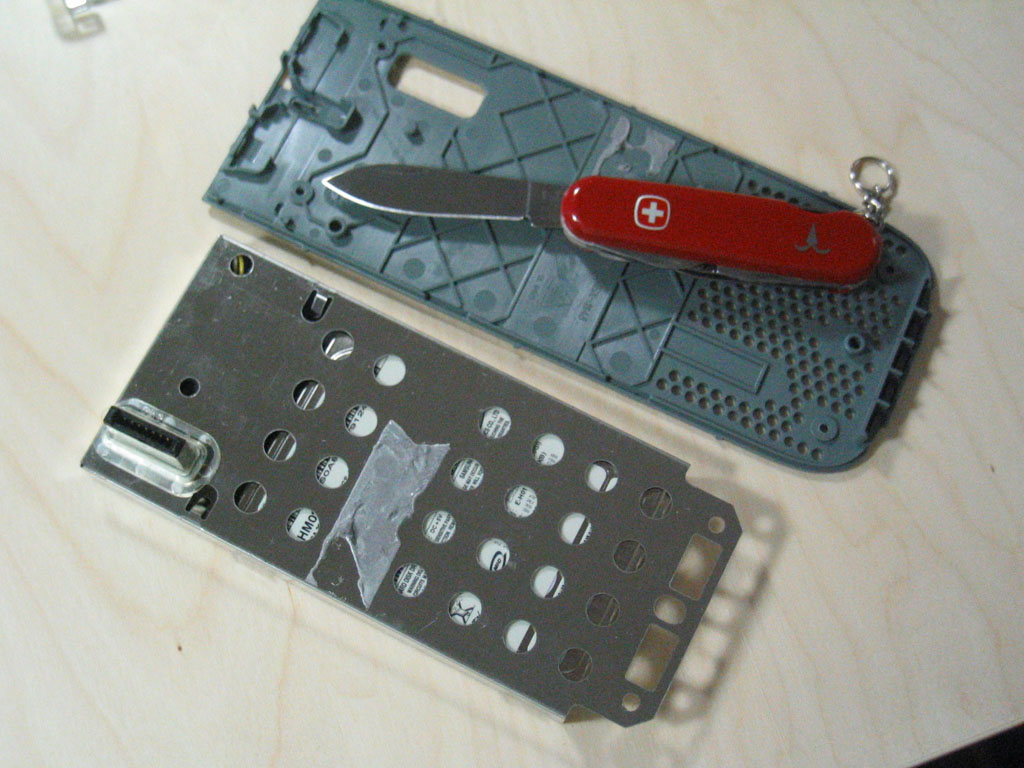
Start off by first removing the HDD unit from the Xbox 360 main console and lay it flat with the connector side facing upwards. You will see 3 screws. The 4th screw is located underneath the silver "Microsoft" sticker -- removing this sticker instantly voids your HDD unit's warranty.
Once you have removed all 4 screws, lift up the plastic cover while being careful that it is latched onto the button-release end of the unit. You'll want to be careful as not to pop the spring loaded button and lose the tiny spring.
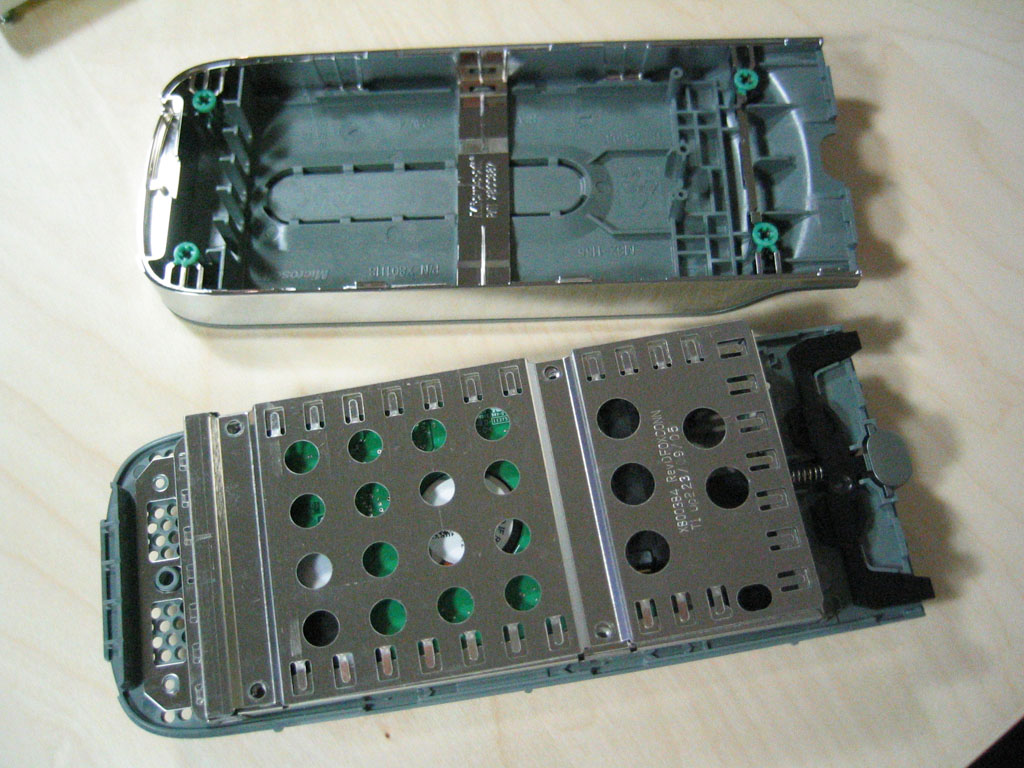
Once open, you will see the 2.5" Serial ATA notebook hard drive encased in a metal shell. Lift off the cover of the protective shell by first removing the four black screws holding it down. To proceed further you will need to have a thin knife. The metal casing is attached to the plastic shell by a very strong adhesive, and to remove the actual hard drive from the housing, you must first pry off the plastic shell from the metallic HD casing. Simply insert a thin knife and slowly "saw" away at the adhesive. Shortly after you will be left with the following:
Once this is done, you can simply remove the attached Serial ATA data cable from the HD and slide out the drive.
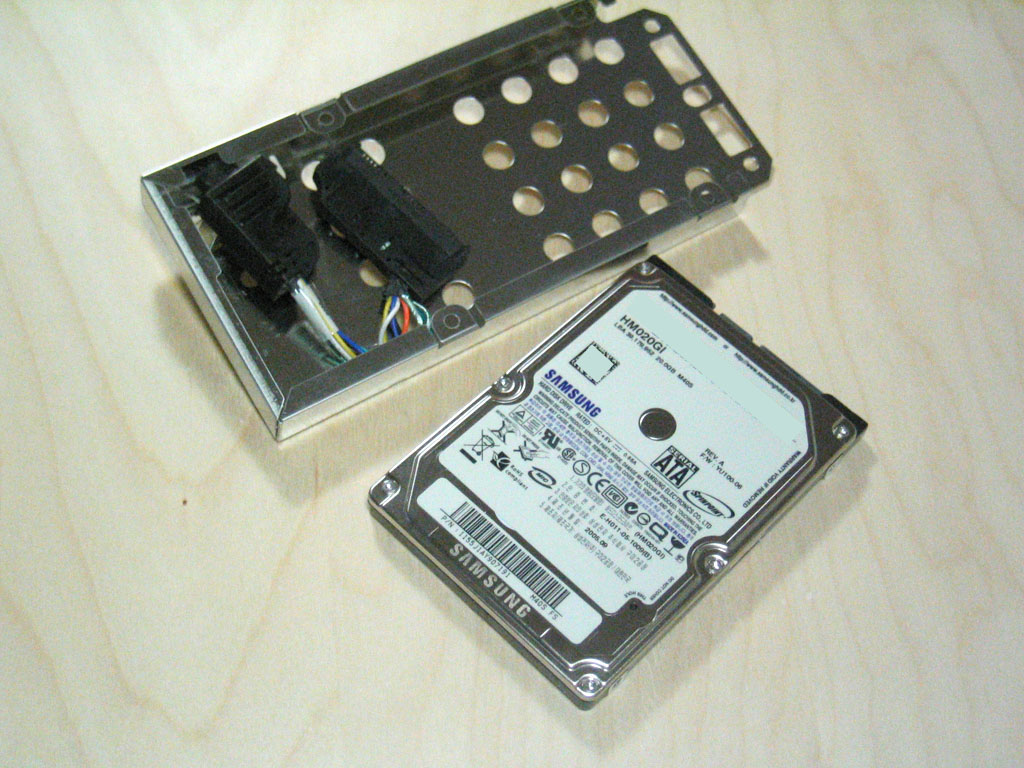

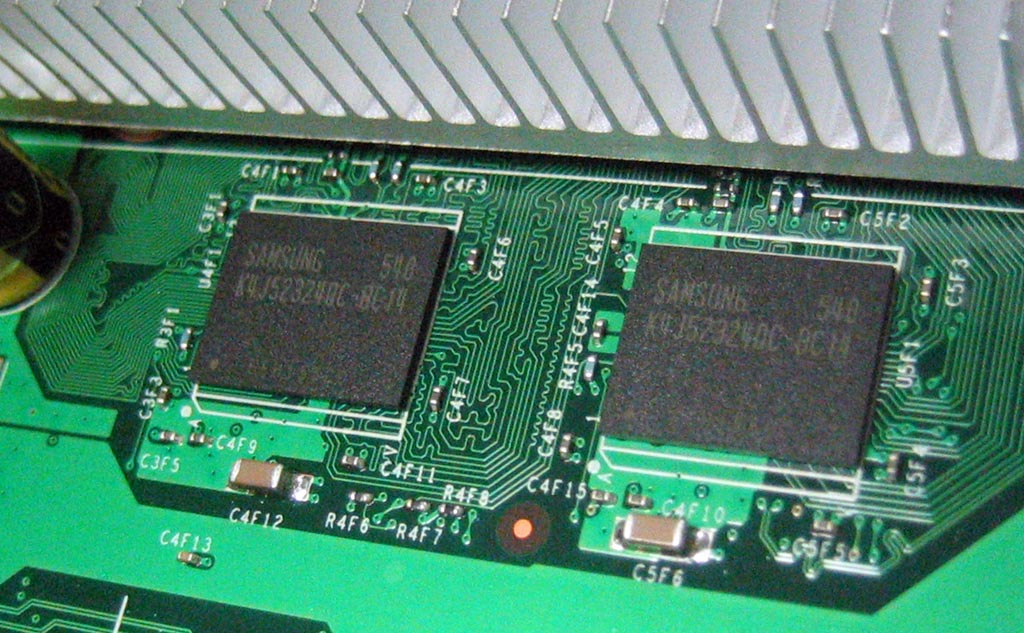
Microsoft previously used a regular 3.5 inch desktop drive in the old Xbox but this time has chosen a smaller unit that is separate from the main console. We're quite certain that this move allows them to offer upgrades for those who want to add more storage capacity to their systems as upgrades become available. Currently, the HDD that ships with the Xbox 360 Premium package is a 20GB drive running at 5400RPM. The drive is manufactured by Samsung although it isn't listed on their website as it is an OEM drive for the Xbox 360. The drive itself uses a standard Serial ATA connector (both data cable and power cable) so attaching other drives or the Xbox 360 drive to a computer for data transfer is very possible.
Removing the Heatsinks from the Motherboard
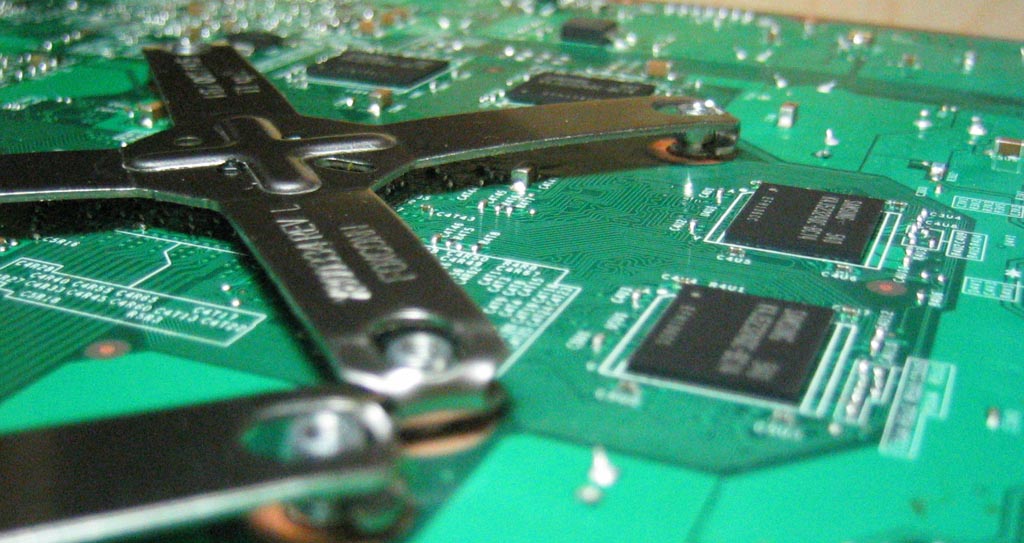
Removing the heatsinks from the GPU and the CPU will require a great deal of patience as to avoid damaging the motherboard. Flip over the Xbox 360's motherboard. You will see two X clamps grasping the ends of the screws that hold the heatsinks into place. Without removing the X clamps, you cannot remove the heatsinks. Microsoft has done a clever job in terms of securing the unit from prying eyes and removing the heatsinks from the Xbox 360 can be a trick for a lot of people.
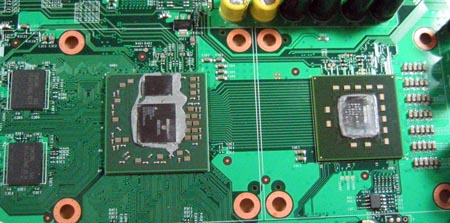
Take a pair of small pliers and gently pry off each corner of the clamps. After two corners have been lifted, the rest of the clamp springs loose and can easily be removed by hand. Once both X plates have been removed, you can turn the motherboard over and simply pull the heatsinks off to reveal the GPUs (two dice on the chip) and CPUs (single die, 3 cores on the chip).
You now have a fully disassembled Xbox 360.
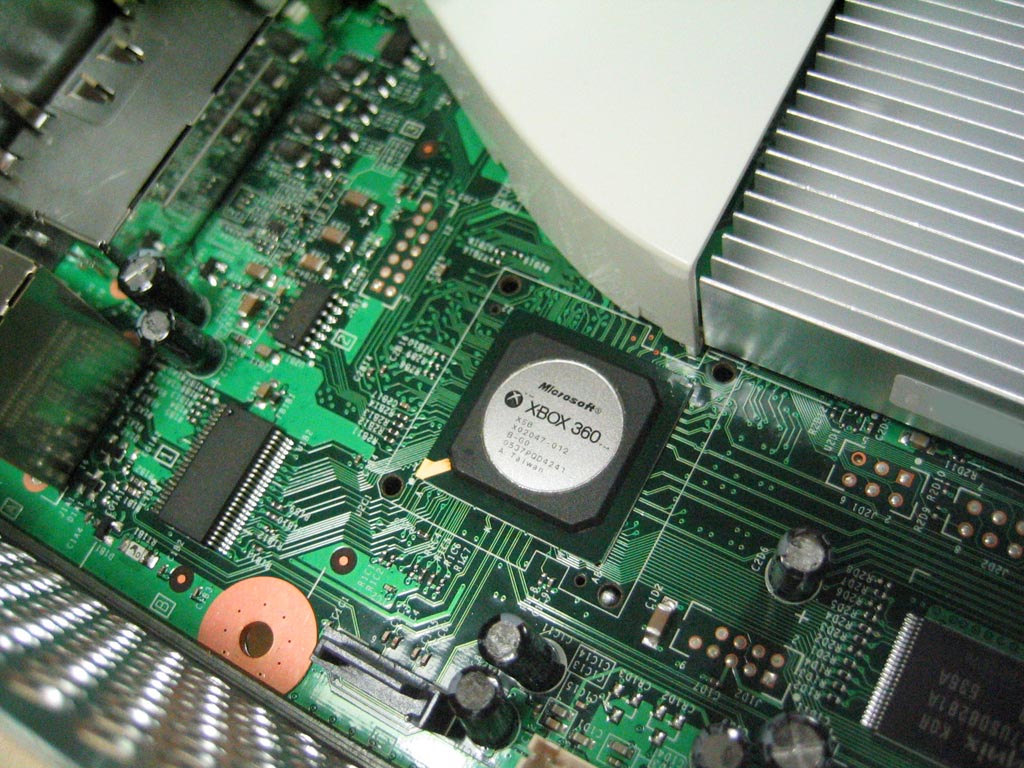
The Xbox 360 CPU
The original Xbox used a hybrid mobile Pentium III/Celeron processor, but for the 360 Microsoft went to IBM and got the rights to a PowerPC core. The move to the PowerPC instruction set meant that there would be no direct binary compatibility with older Xbox titles, but the sacrifice was obviously deemed necessary by Microsoft.
The CPU itself features three of these PowerPC cores and is currently manufactured on a 90nm process, however Microsoft will most likely be transitioning to 65nm as soon as possible in order to reduce the die size and thus manufacturing costs. Remember that a die shrink from 90nm down to 65nm will cut the size of the CPU in half, and should be possible for Microsoft sometime before the end of next year.
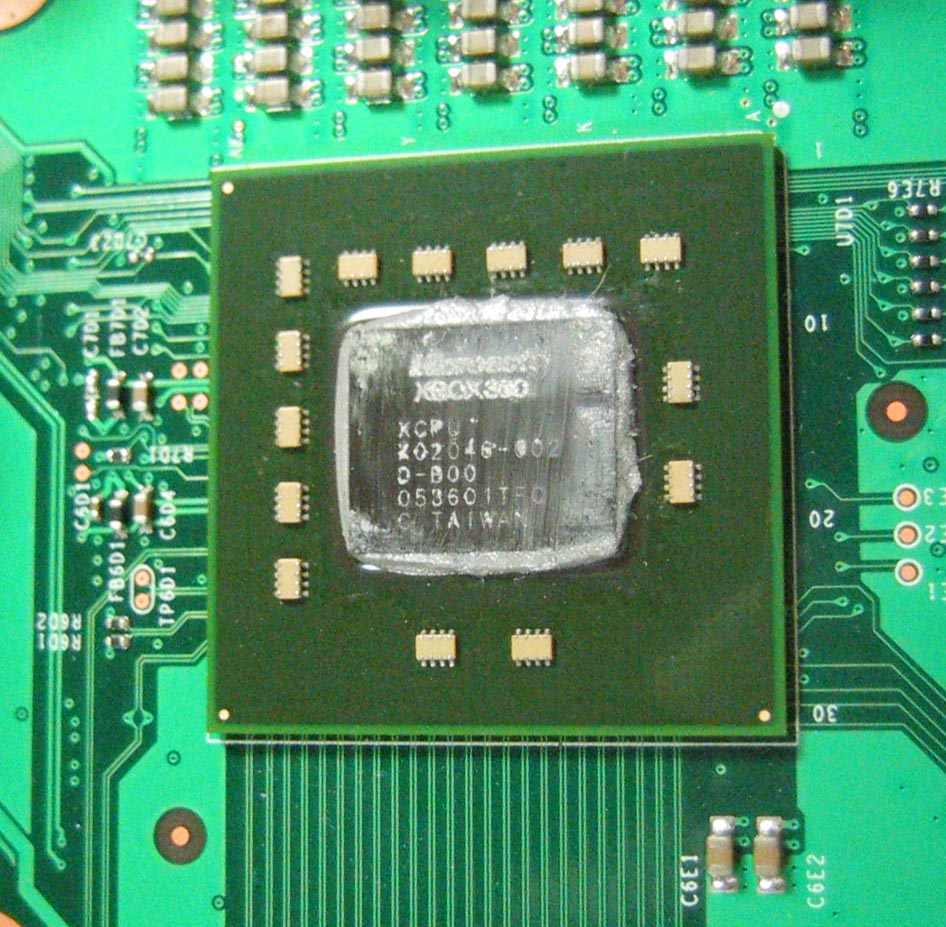
All three cores are identical and feature a 2-issue pipeline and can only execute instructions in-order; we've already discussed the reasoning behind this decision here. The impact of the in-order execution cores is generally a negative one on current game code, but by going with a much simpler core Microsoft was able to stick three of them on a die with hopes of making up for lost performance by enabling some pretty serious multithreading.
Not only does the Xbox 360's CPU feature 3 cores, but each core is capable of executing two threads at the same time, making the CPU capable of simultaneously executing 6 threads. Unfortunately, most titles appear to be only using one or two threads for the majority of their game code, with the remaining threads being used for things like audio encoding/decoding, real-time decompression of game data off of the DVD-ROM and video decoding.
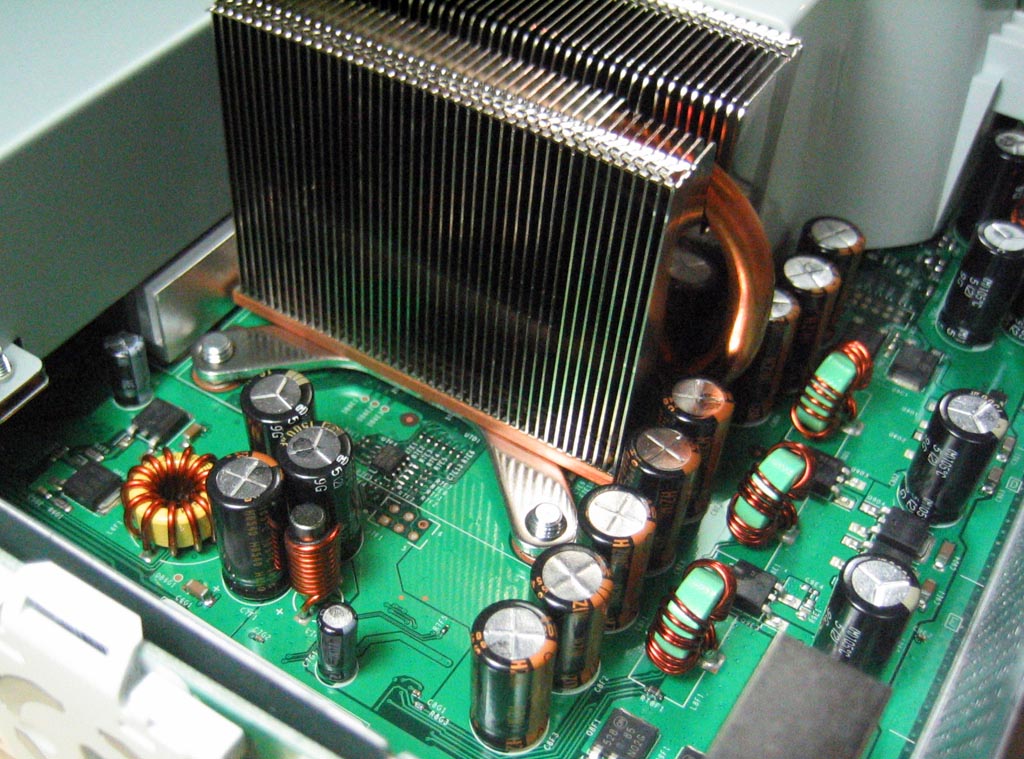
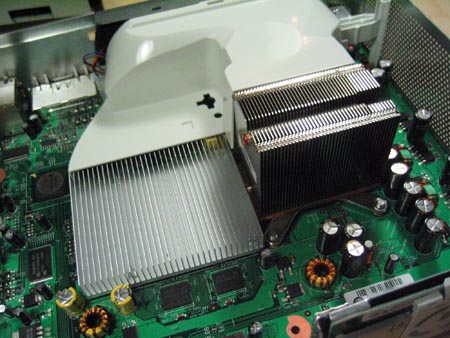
Microsoft has their own license to use and manufacture the CPU used in the Xbox 360, and thus we see their logo on the chip itself. Microsoft cools the 3-core CPU using a fairly beefy heatsink outfitted with heatpipes (pictured below):
Airflow is supplied by the two rear fans in the Xbox 360; the air is channeled over the GPU and CPU heatsinks using a duct. The larger heatsink on the right is atop the CPU, the smaller heatsink is for the GPU:
We have previously discussed the Xbox 360's CPU in much greater detail, which you can read about here.
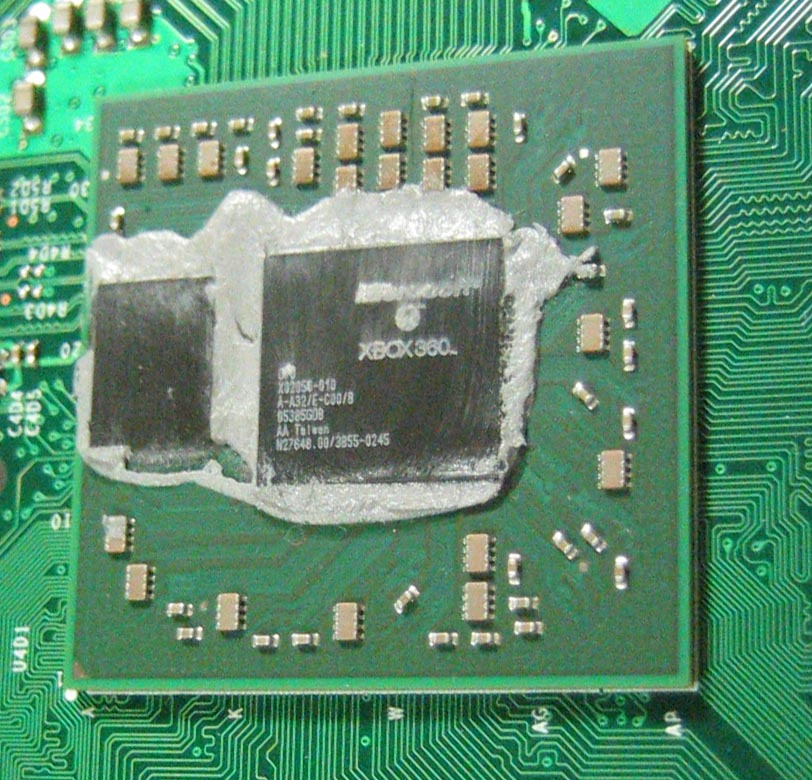
The Xbox 360 GPU
While Microsoft's focus on the CPU was efficiency, with the Xbox 360's GPU, it pulled out all the stops. Designed by ATI, Microsoft controls the IP of the GPU; meaning, Microsoft can manufacture and do what it wishes with Xenos (although we're assuming that they can't stick it on graphics cards and start selling it to the public).
The GPU also acts as a North Bridge in the system, but we'll get to that role a little later. Like the Xbox 360 CPU, we've talked about the GPU in great detail in the past, but we'll briefly go over the highlights here.
The buzzword that was around the Xbox 360 GPU's announcement was of course, its use of a Unified Shader Architecture. Modern day PC GPUs feature separate pixel and vertex shader units, which are collections of execution units and associated logic to handle pixel shader and vertex shader instructions. The Xbox 360's GPU features a single set of execution units and logic that can execute both pixel and vertex shader instructions. The benefit of a unified shader architecture is greater efficiency, as we mentioned in our original piece on it: "The unified shader architecture that ATI chose to use in their Xbox 360 GPU allows them to pack more functionality onto fewer transistors as less hardware needs to be duplicated for use in different parts of the chip and will run both vertex and shader programs on the same hardware."
There are 48 shader units in the Xbox 360 GPU, but given that we're dealing with a unified shader architecture, you can't compare that number directly to the 24 shader pipelines of the GeForce 7800 GTX for example. We roughly estimated the shader processing power of the Xbox 360 GPU to be similar to that of a 24-pipeline ATI R420 GPU.
The other big feature of the Xbox 360 GPU is its dual die construction. The 332 million transistor GPU is split into two separate dice, the larger of which looks like a conventional GPU, and then a smaller die (aka daughter die) that is a 10MB block of embedded DRAM (eDRAM) combined with the hardware necessary for z and stencil operations, color and alpha processing, and anti aliasing. The daughter die connects to the larger die via a 32GB/s on-package interconnect.
The logic and embedded DRAM on the daughter die is what allows the Xbox 360 GPU to essentially offer "free" anti-aliasing, which Microsoft enforces through requiring developers to support a minimum of 2X AA in all Xbox 360 titles. Although we were originally told back at E3 that all Xbox 360 titles would support 4X AA, it seems that the statement has since been revised to 2X or 4X AA. We're not certain why the change was made, as 2X and 4X are both effectively "free" on the GPU, but there may be something we're missing.
On a smaller manufacturing process, the dice could be unified, as they are only separated right now in order to improve yields. Impressively enough, the GPU is cooled by a fairly low profile heatsink, with the two rear case fans in the Xbox 360 providing all the airflow over the heatsink's fins.
For a more in-depth look at the Xbox 360's GPU, head over to our original coverage of the architecture back at E3.
Backwards Compatibility
With a completely different CPU ISA (Instruction Set Architecture) and a GPU from a different manufacturer the Xbox 360 is a very different beast than the original Xbox, thus backwards compatibility had to be done via software emulation.
Microsoft recently announced the 212 original Xbox titles that would be backwards compatible on the Xbox 360 at launch, you can view the entire list here. In order to take advantage of the backwards compatibility you need to have the removable hard drive attached to the Xbox, as a software patch will have to be downloaded from Microsoft's servers. The download process will happen automatically and you will be alerted if the title you're attempting to play does not yet have a patch available for it.
HDTV Support
With the Xbox 360, Microsoft hopes to usher in the era of HD gaming, first and foremost by requiring all Xbox 360 games to support 720p (1280 x 720). Unfortunately, we have yet to hear from Microsoft if this means that all games must be internally rendered at 1280 x 720 or if they can be rendered at a lower resolution and upscaled later on. There have been discussions involving at least one Xbox 360 game (Project Gotham Racing 3), rendering internally at a lower resolution and having the Xbox 360's TV encoder upscale it to 720p.
You don't have to have a HDTV, but obviously owning one will give you better overall image quality. The Xbox 360 supports all of the most popular video formats: 480i, 480p, 720p and 1080i.
There is no out of box DVI or HDMI support, nor is there any Microsoft support for either of those video interface standards at this time, although Microsoft has indicated that they may offer HDMI support when it makes sense to. There is, however, an optical output, but the cable is not included.
If you don't have a HDTV but you have a VGA monitor that you'd like to use, Microsoft does offer a VGA cable that will allow you to connect your Xbox 360 to a VGA monitor. If you don't have a HDTV or a monitor but still want a higher quality output, Microsoft also offers a S-Video AV cable.
The Xbox 360 Chipset
As we mentioned before, the Xbox 360's North Bridge is integrated into the GPU, similar to most PC chipsets with integrated graphics. The North Bridge is on the main die of the GPU and shares the same 128-bit GDDR3 memory controller that the graphics core uses to access the Xbox 360's 512MB of memory. This bus runs at 1.4GHz offering just over 22GB/s of bandwidth to main memory.
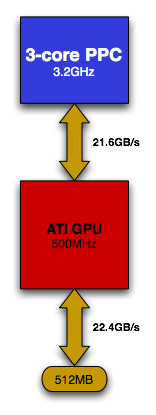
On the other side of the North Bridge there's the CPU's FSB interface, which offers 10.8GB/s of bandwidth in each direction (21.6GB/s total). You can see the serial FSB laid out in the image below:
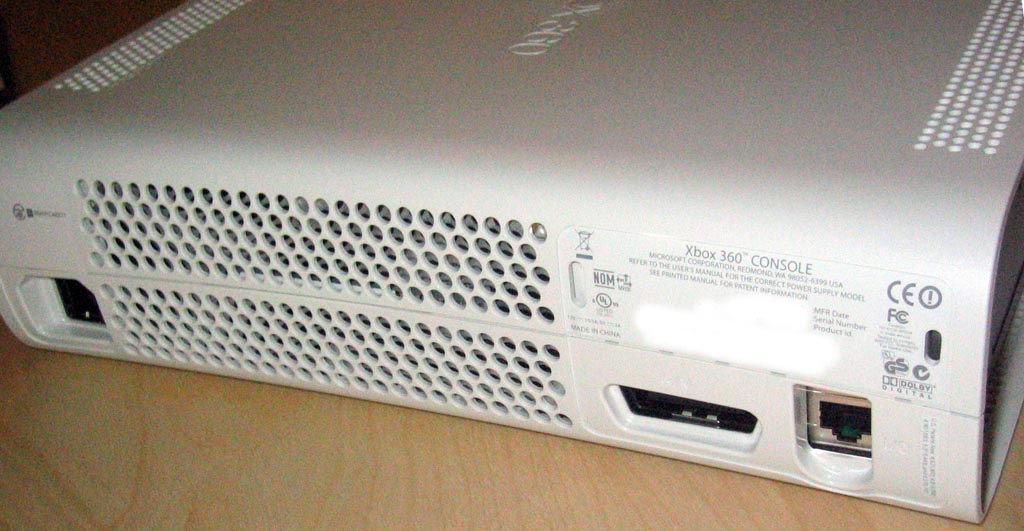
The North Bridge also features a 500MB/s interface to the Xbox 360's South Bridge, which was designed by SiS (pictured below).
Once again, you don't see any non-Microsoft logos on any of these chips. It's clear this time around who the IP belongs to. The South Bridge is responsible for communication with the audio codec, storage devices, USB ports, controllers, and any other I/O devices.
The Wireless Controllers
Microsoft implemented a proprietary 2.4GHz RF protocol for use with wireless controllers and the Xbox 360. The $399 Xbox 360 comes with a single wireless controller, while the $299 core system features a wired controller; regardless of what it comes with, all Xbox 360 units feature support for up to four wireless controllers.
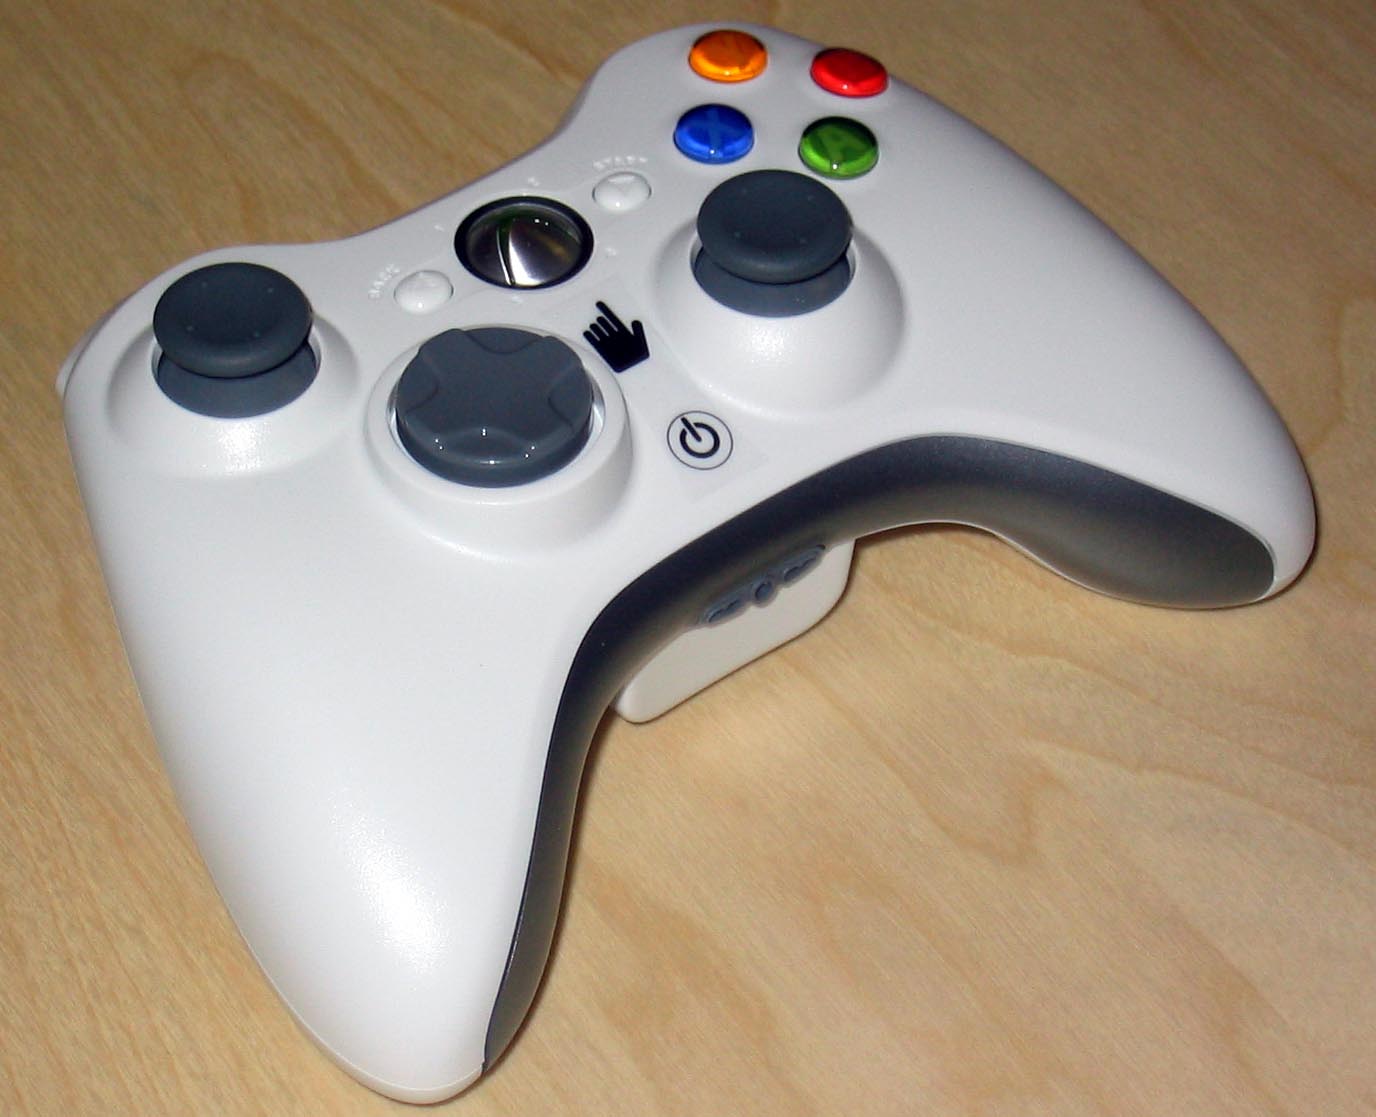
Amazingly enough, even loaded with a battery pack, the wireless Xbox 360 controllers are lighter than the smaller Xbox S controllers. The new controllers are extremely well designed and mark a true evolution from the original gargantuan Xbox controllers that debuted 4 years ago.
The RF transmitter and receiver antennae are located at the front of the Xbox 360, behind the power button:
Storage Devices
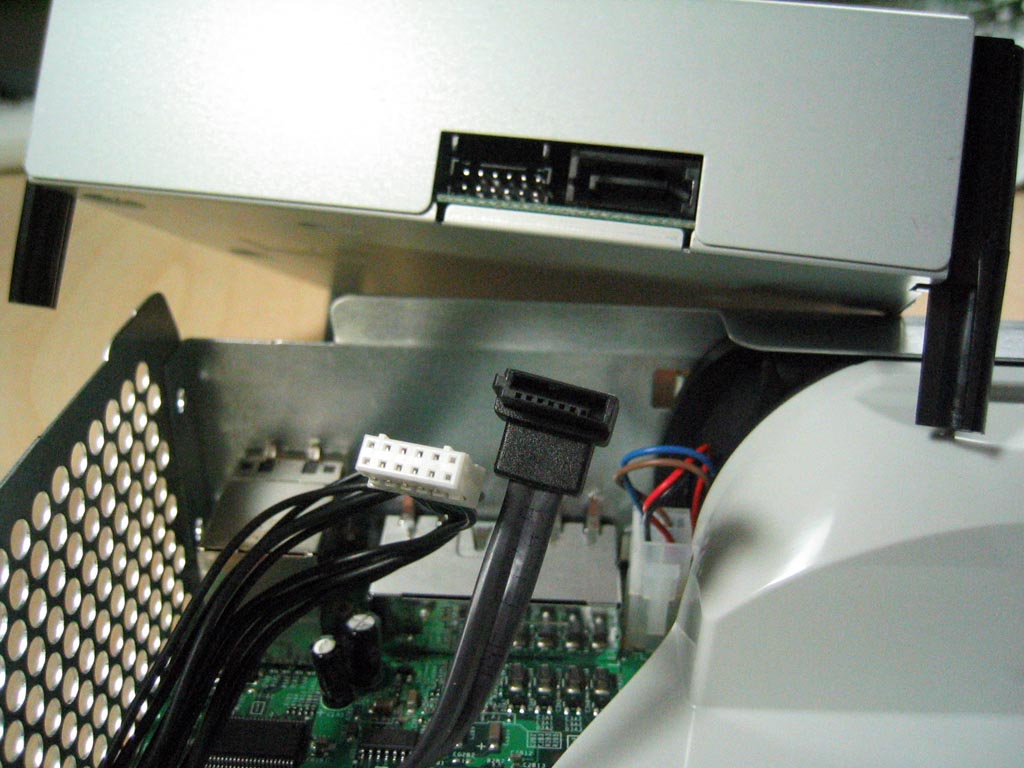
The Xbox 360 ships with a standard dual layer DVD-ROM drive, our unit had a drive manufactured by Hitachi-LG.
The drive features a standard SATA interface, but like the DVD-ROM drive in the original Xbox, the 360's DVD drive also features a proprietary power connector as you can see from the picture below:
Since we're still dealing with a dual layer DVD drive, disc capacity hasn't grown since the release of the original Xbox, which may serve as a limitation for future games (potentially forcing them to multi-disc releases). Generally speaking, original Xbox titles used less than half of the 9GB DL-DVD capacity, leaving some room for growth for Xbox 360 games.
Microsoft has also reduced the size of the data that is required to be on each disc by a few hundred megabytes, combine that with the fact that larger game data can be compressed further thanks to more powerful hardware and game developers shouldn't run into capacity limitations on Xbox 360 discs anytime soon.
The $399 Xbox 360 system ships with a removable hard drive by default, which can be used by game developers to enable disk caching to reduce subsequent load times, as well as for content to be downloaded onto from Xbox Live. If you wish to play any original Xbox games, you will need to have a hard drive present, as that is where the emulation data is stored since original Xbox games are not directly compatible with the Xbox 360's hardware.
Final Words
And there you have it, four years since the original Xbox launch, Microsoft is back with part 2 (or 360 if you prefer). While many doubted that they would last beyond the first installment, Microsoft has proven its worth and credibility in the console gaming industry.
While we do have tons of long term questions about the architecture and platform of the Xbox 360, only time will answer them. Until then, the Xbox 360 launch is less than a week away so if you're eagerly awaiting one to be delivered, at least now you don't have to worry about taking yours apart - happy gaming!


