Original Link: https://www.anandtech.com/show/1640
Introduction
NVIDIA just launched the nForce4 chipset towards the end of last year, and only now are we beginning to see a large number of motherboards in the retail channel that use the chipset. The SFF market often lags even further behind in terms of supporting the latest and greatest chipsets, except for the market leader Shuttle. February 22 marks the launch of their latest offering, and we figured that many of our readers would love to find out more about it.Amazingly, socket 939 SFF systems are not at all plentiful – in fact, Athlon 64 in general is not as well represented as Pentium 4 in the SFF arena. Considering the better thermal characteristics of the latest AMD processors relative to their Intel counterparts, we would have thought that more companies would be supporting them. The Intel name still carries a lot of weight, particularly in the world of chipsets, so perhaps that's part of the story. The lack of chipsets with integrated graphics could be playing a role as well, as only the outdated VIA K8M800 is currently shipping. Whatever the cause, the fact remains that there are few socket 939 SFFs on the market.
In our future SFF reviews and roundups, we'll include the benchmark results for the SN25P. For now, the latest addition really doesn't fit in with any of the other categories, at least in terms of features. Let's get on to the details. If you haven't checked out our last roundup, you should at least read our SFF Reviewing Guidelines to understand our approach. We'll be talking more about where the latest XPC fits in with those criteria in a bit.
Note: This is really an extensive review of the Shuttle P series chassis as well as the SN25P in particular. The SB81P and SB95P use the same basic setup, only with different motherboards and chipsets. We will be referring back to this article when we look at those two SFFs in the future.
Aesthetics
Shuttle pioneered the SFF market back in 2001 with their first XPC, and they've continued to refine and improve their design over the years. There were many fans of the G2 series in particular, and more recently, the G5 has turned a lot of heads. The G5 is their smallest design yet, and while it does not include all of the options that some would like, it does work very well as a standard computer. The front is attractive and conservative, and performance - both in speed as well as in noise levels - is very good. |
 |
| Click on images to enlarge. | |
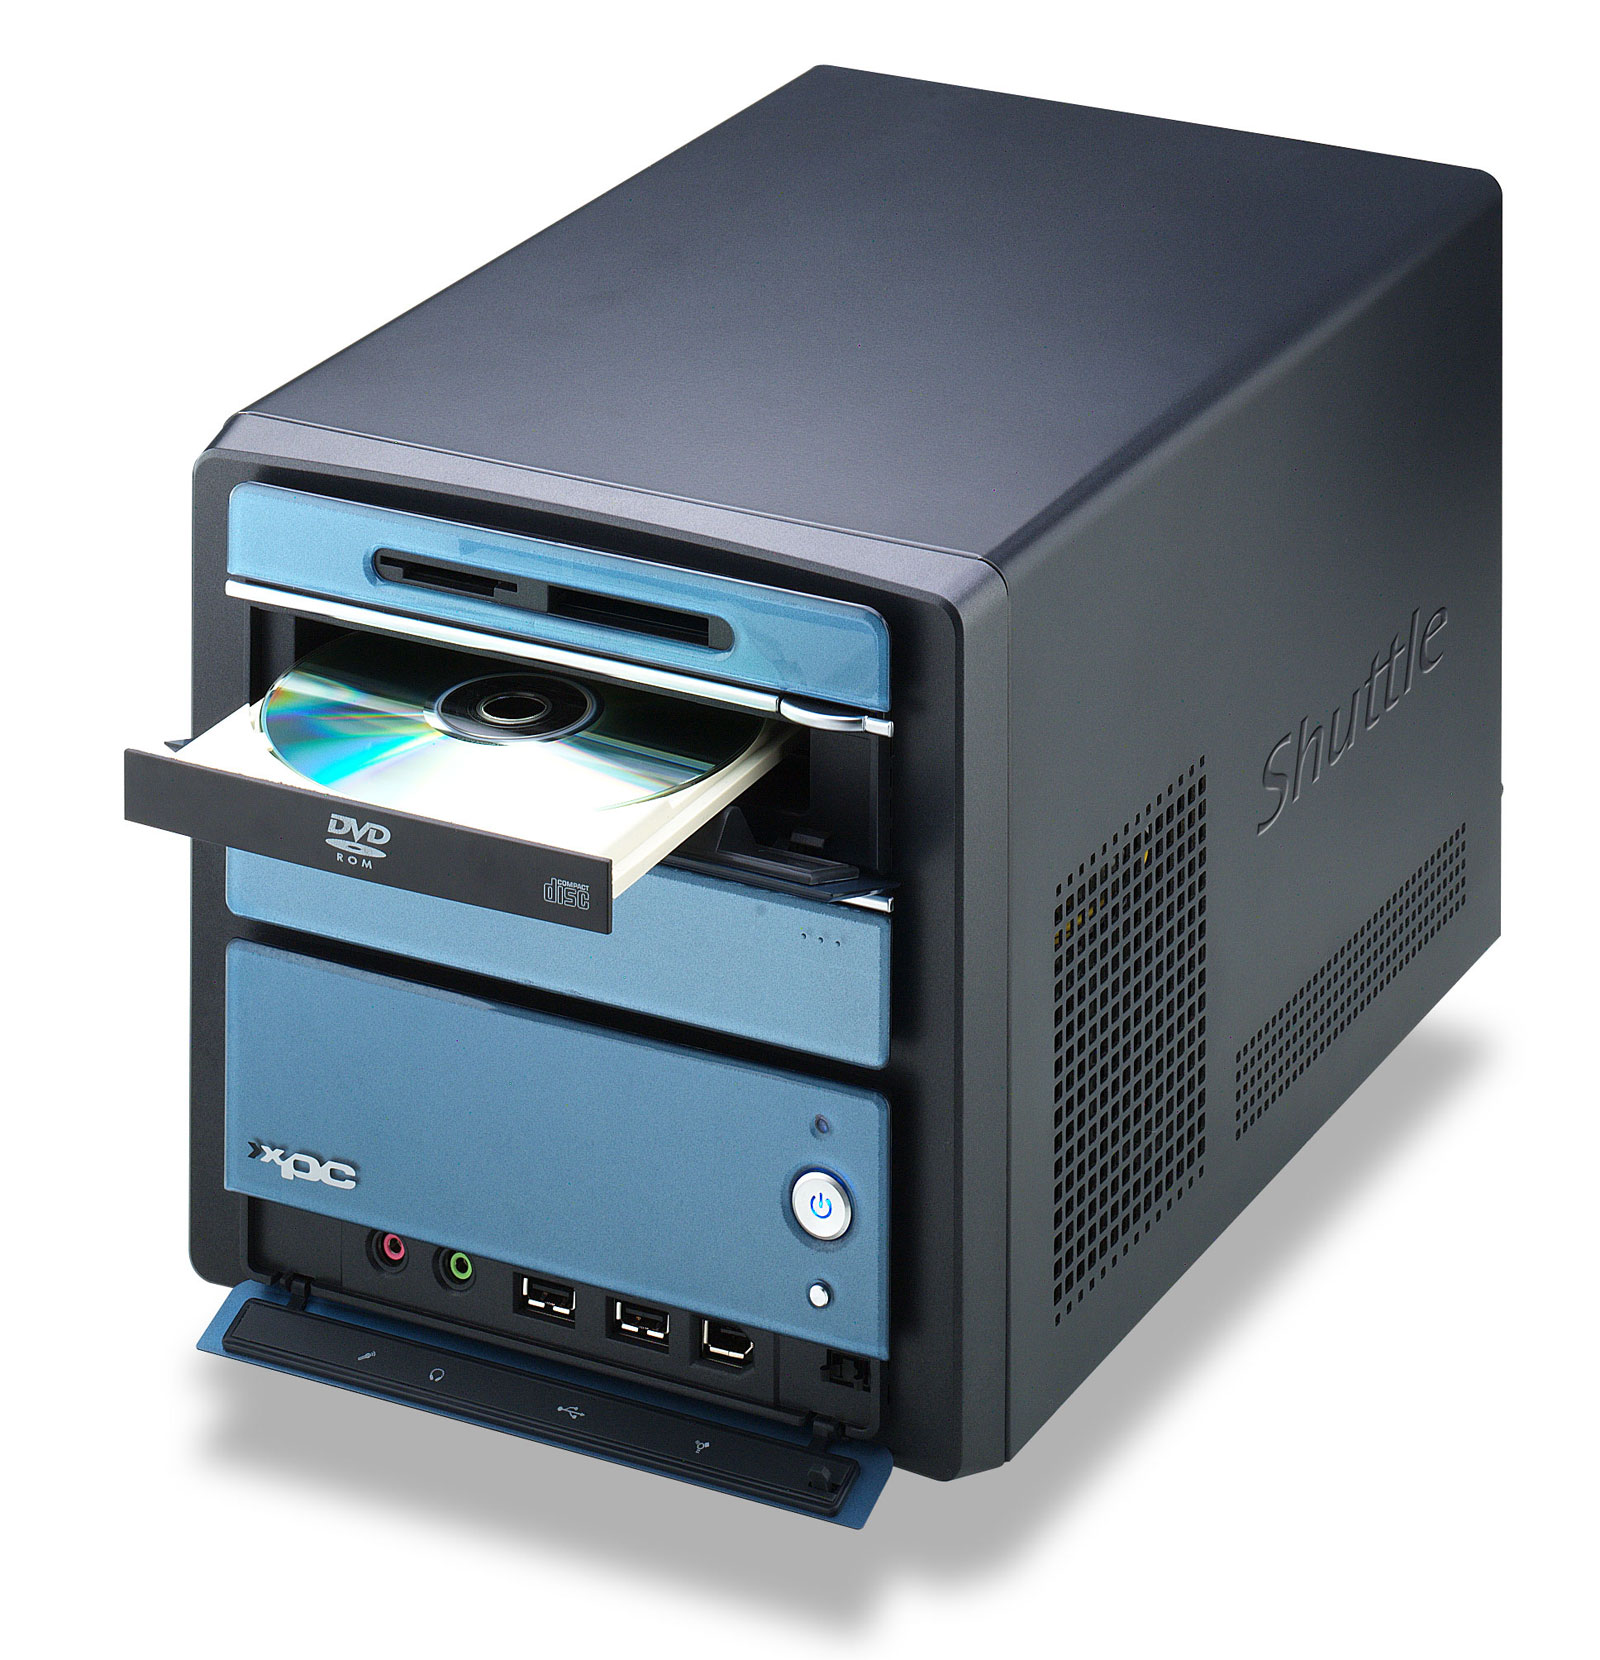
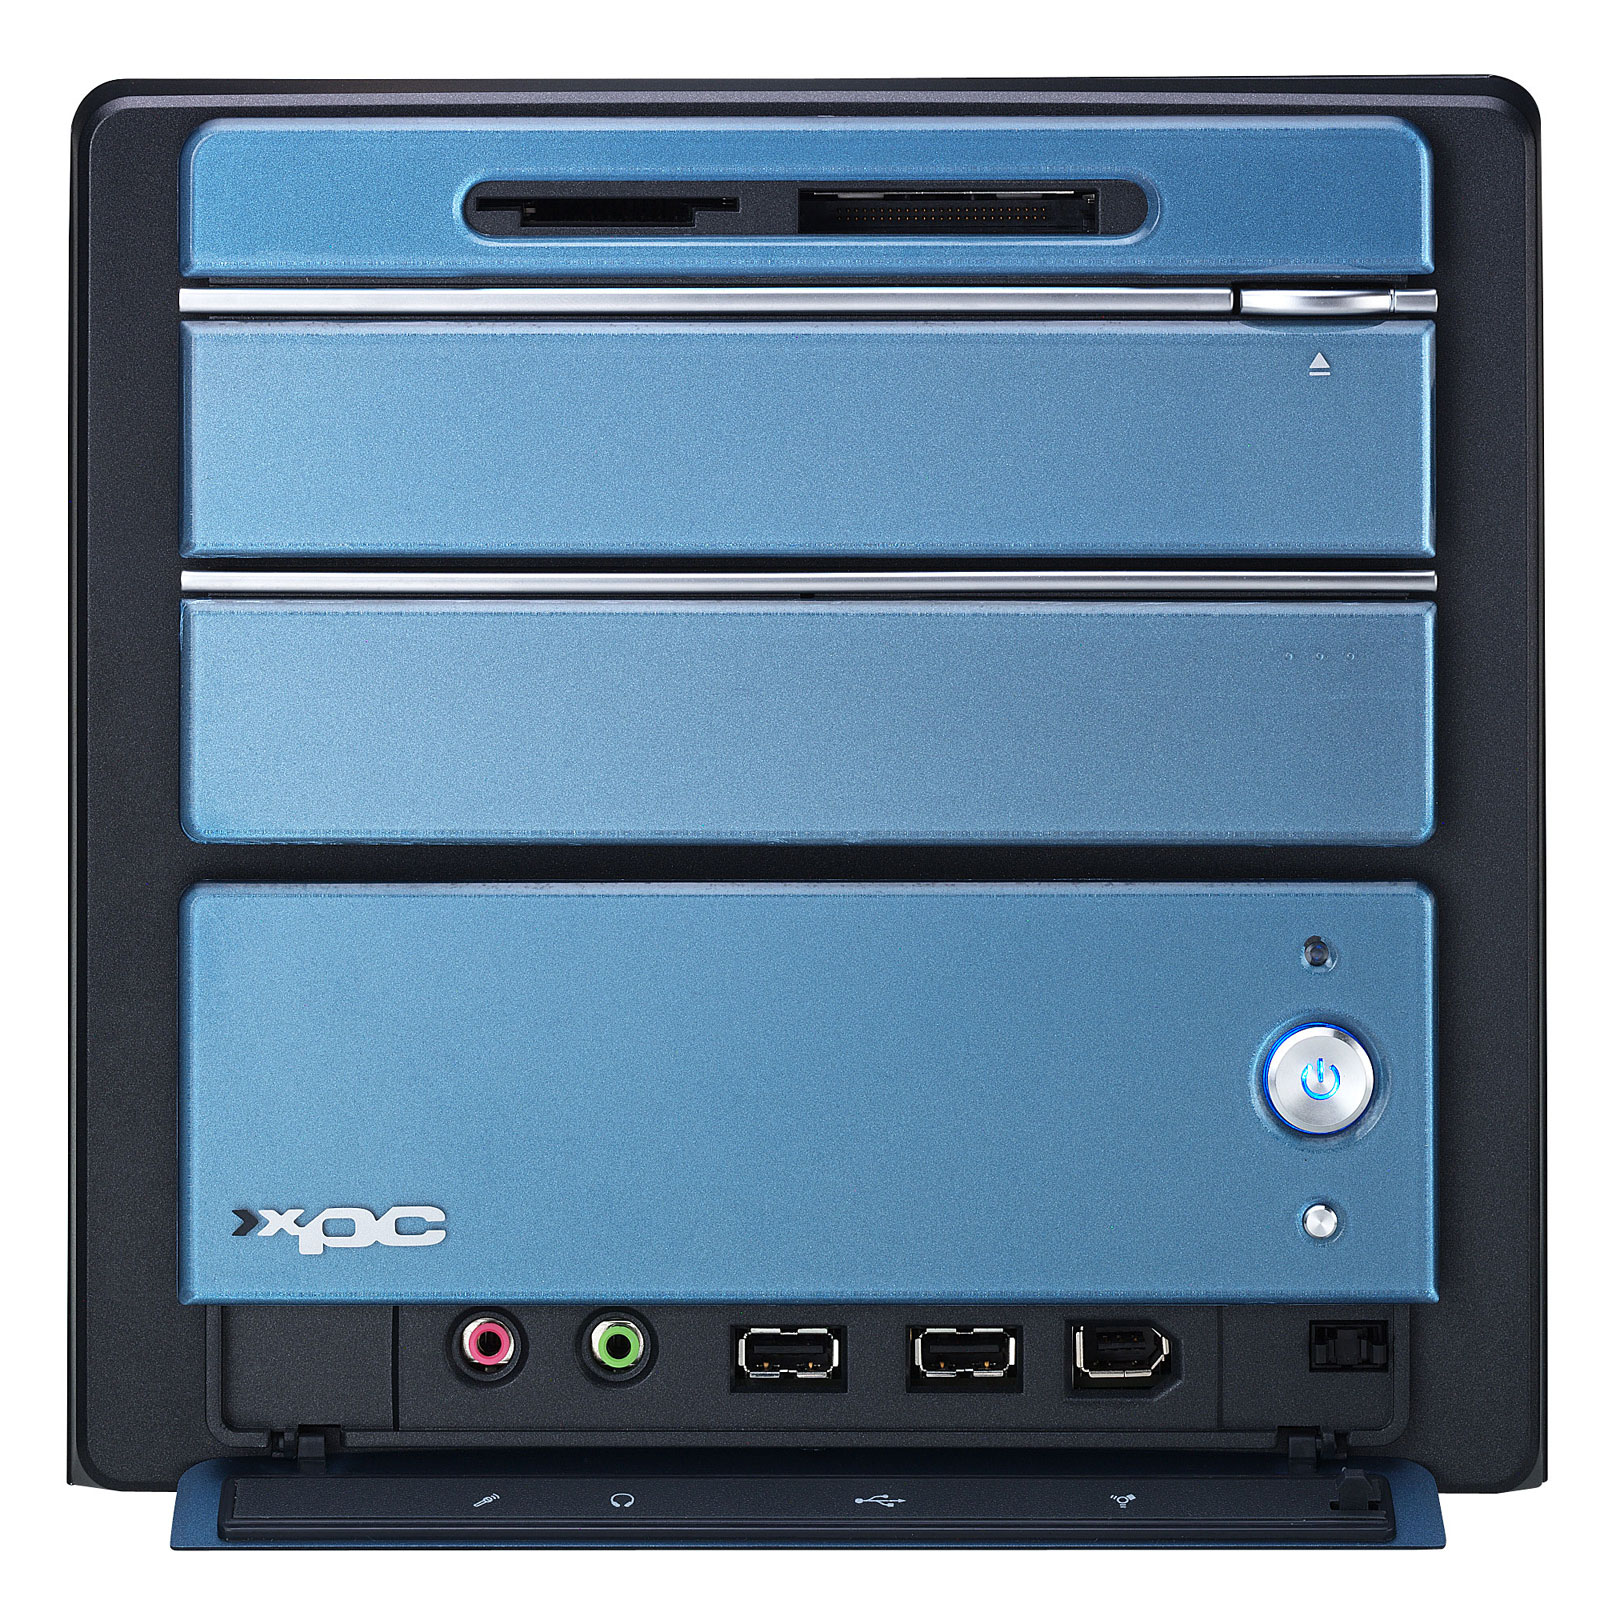
Taking a look at their latest P series, Shuttle has departed somewhat from the "smaller is better" philosophy of the G5 and is catering more towards the performance and enthusiast crowd. Externally, the front of the case is a silver/gray/blue finish with fold-down doors obscuring the 3.5" and optical drive bays. The SB81P and SB95P have a similar front panel, although in different colors. Starting at the top, we have the slots for flash memory, then the door for the optical drive; next is the floppy/3.5" door, and at the very bottom is a door for the front ports. The region containing the power and reset buttons is fixed, if you were wondering.
 |
 |
| Click on images to enlarge. | |
For those interested in a minimalist design as far as lighting goes, the SN25P is great. The power button lights up with a faint blue glow, and above it is the HDD activity LED. There are no other lights or indicators to distract you. Some people might like more pizzazz from their computer, but most of us are fans of a more conservative approach. The SN25P is an attractive case that would work very well in a home or office environment.
There are a couple of small items that we would like to see addressed. First is the lack of a cover on the 3.5". If you use it for a hard drive or leave it empty, even though the door obscures it from view, we would like to have a cover in place. (Shuttle may include such a cover once the units start shipping to retail, but one was not present with our review unit.) The second may be a make-or-break deal for potential buyers, and that's the color of the front panel. We like it more than the shiny black of the SB81P, but others might prefer some other color scheme. At present, we are not aware of any alternative panels for the P series, so if you would like something other than the grayish-blue coating, you'll either have to do that on your own or you'll have to wait. These are admittedly very minor points, but for a case such as this, we expect everything to be "perfect".

Click to enlarge.
SN25P Features
In the features department, the SN25P is stuffed to the gills with useful options. See for yourself.|
Shuttle XPC SN25P
|
||
| Dimension | (w)210 mm x (h)220 mm x (d)320 mm | |
| CPU Support | AMD Socket 939 up to FX-55+ | |
| Memory Support | PC1600/PC2100/PC2700/PC3200 up to 2GB; 2 DIMM slots | |
| Motherboard | FN25 (proprietary) NVIDIA nForce4 Standard Chipset 1X-5X (200-1000MHz) HyperTransport 8-bit/8-bit to 16-bit/16-bit HT Width |
|
| Flash Reader | CF I/II, MD, SM/SMC, SD, MMC, and MS/MSP | |
| Expansion Slots | 1 x PCIe X16; 1 x PCIe X1 | |
| Power Supply | 350W Silent X Power Supply 2 x 4-pin Molex; 1 x 4-pin FDD; 3 x SATA 2 x 6-pin Proprietary |
|
| Internal Connections | 4 x SATA; 1 x IDE; 1 x FDD; 1 x LPT | |
| Audio | VIA Envy 24-bit, 7.1 channel | |
| LAN | 1 x 10/100/1000 Mbps | |
| Drive Bays | 1 x 3.5 External 2 x 3.5 Internal (HDD) 1 x 5.25 External (CD/DVD) |
|
| Front I/O | 2 x USB 2.0 1 x IEEE1394 (6pin) MIC, Head-phone Power & Reset buttons Power on & HDD LED indicators |
|
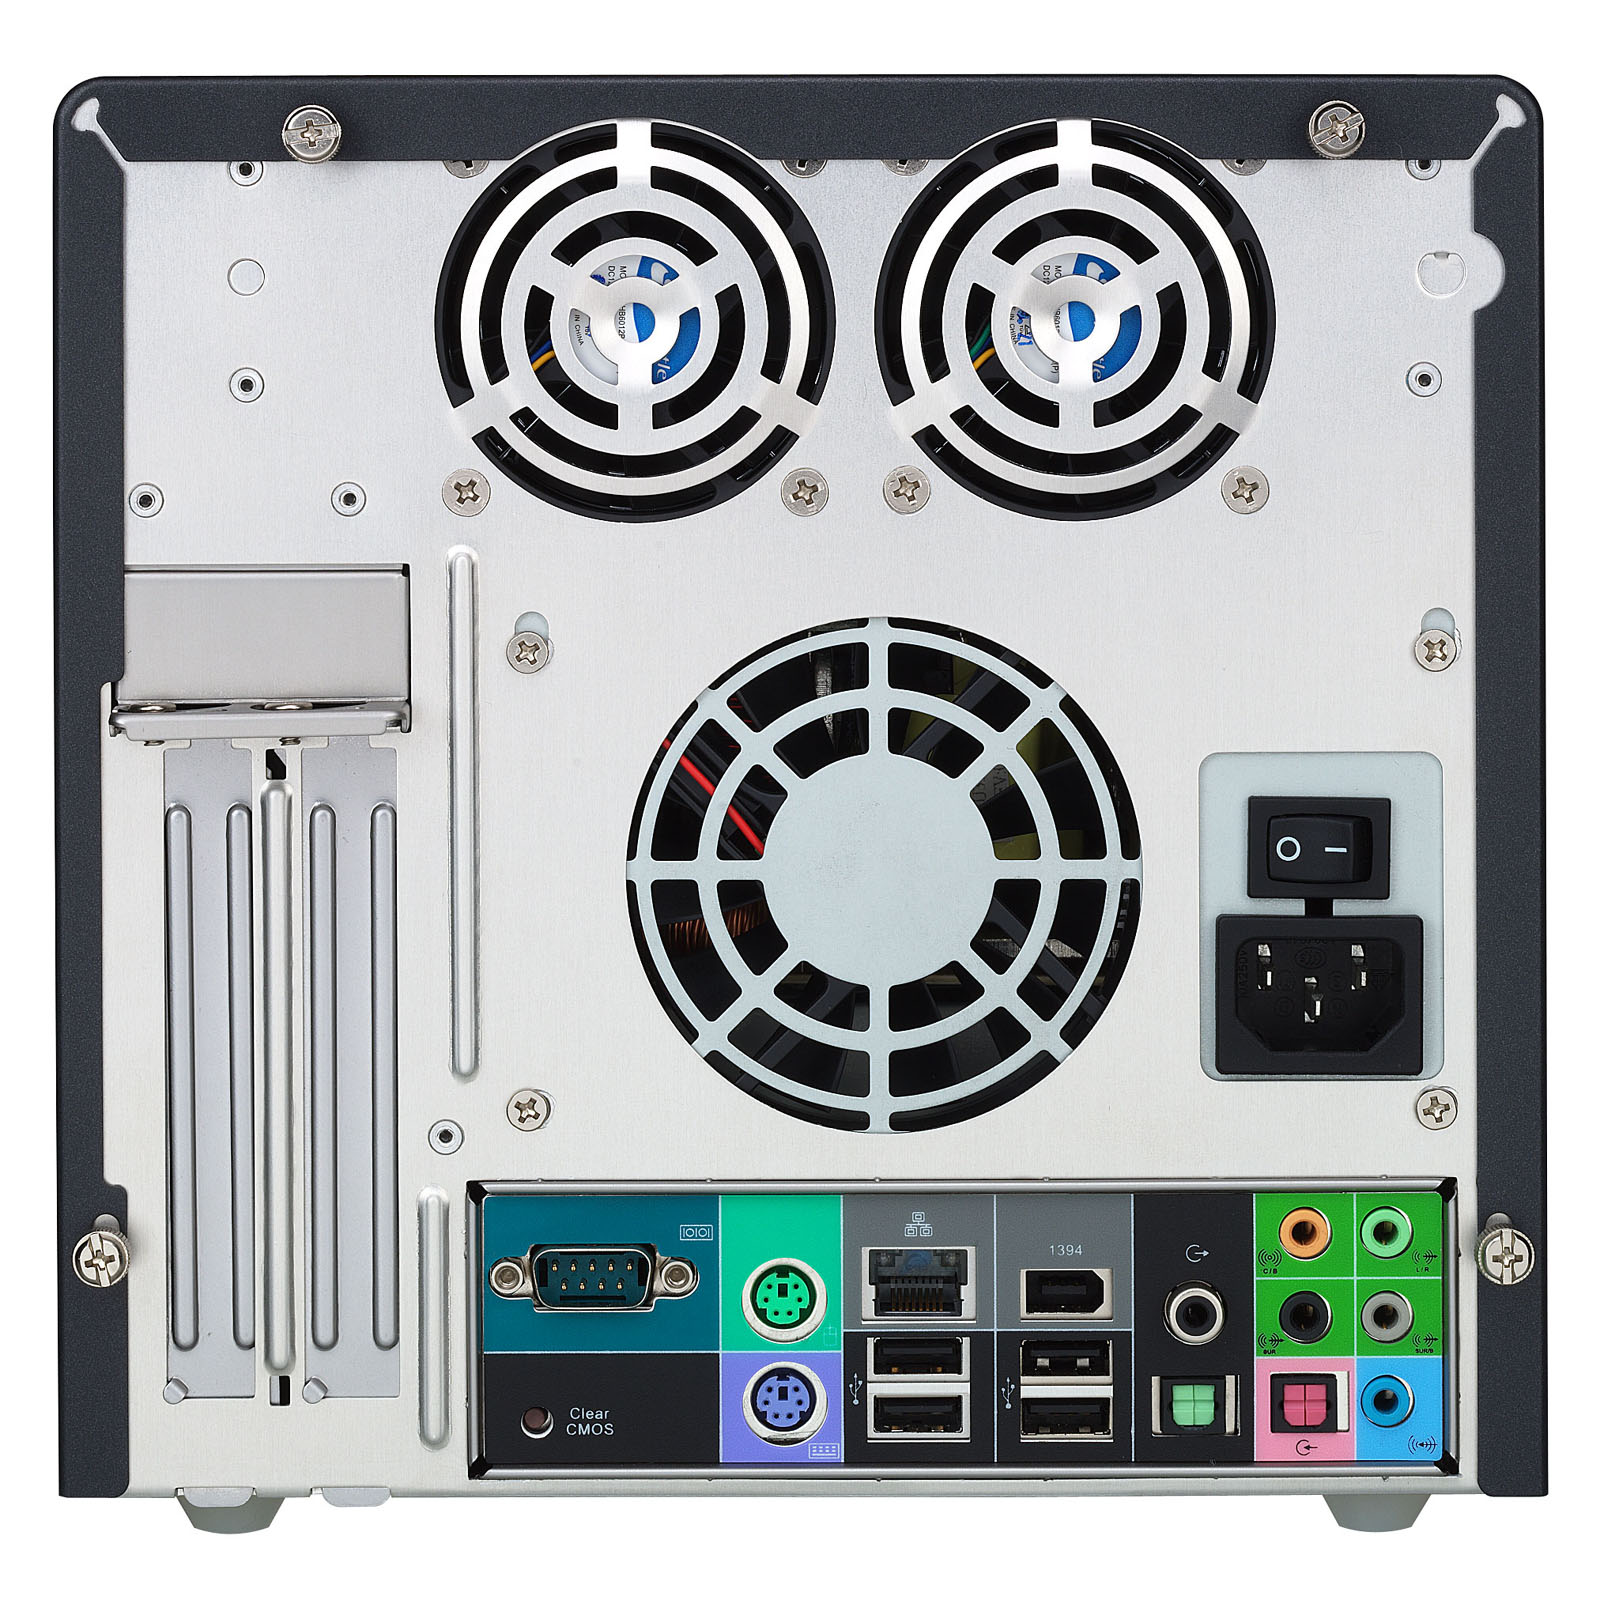
| Rear I/O | 4 x USB 2.0 1 x IEEE1394 (6pin) PS/2 KB, PS/2 Mouse Serial port RJ-45 LAN Port (10/100/1000Mbps) Line-in, S/PDIF In Optical S/PDIF Out Optical & Coax Center/Sub, L/R Front, L/R Surround, L/R Surround B Clear CMOS Button |
|
| Overclocking | CPU 200-250; CPU Ratio 4X-Max; Northbridge 1.60V-1.70V Vcc 0.800-1.700V; DDR Auto, 2.70-2.90V |
|
| Extras | ICE cooling | |
| Full Image Set | Shuttle SN25P Pictures (9.6MB) | |
| Manufacturer Link | Shuttle XPC SN25P | |
We, of course, have the standard support for Firewire, USB2.0, front and rear audio with digital connections, gigabit Ethernet, and internal SATA and IDE connections. The flash card reader is also relatively common, with support for Compact Flash I/II, IBM Microdrive, Smart Media Card, Secure Digital, Multi Media Card, Memory Stick, and Memory Stick Pro. Or, if you prefer acronyms, it supports CF I/ II, MD, SM/SMC, SD, MMC, and MS/MSP. The only common format that's missing is XD. Something else that you may find useful is the presence of a CMOS clear button on the rear of the case that can be pressed using a small object like a pen. If you want to try overclocking, this button can come in handy, since getting at the CMOS battery or jumpers in a fully assembled SFF is difficult at best. None of these features are exceptional, but they are all nice to have.
|
 |
| Click on images to enlarge. | |
More noteworthy features include the 7.1 VIA Envy 24-bit audio, which is used on several mid-range sound cards such as the M-Audio Revolution 7.1. It may not target the gamer market as well as something like an Audigy, but in testing, the unit was crystal clear on the audio front - welcome news for those who dislike noise and static. Also worth noting are the eight audio ports on the back (as well as the standard headphone and microphone jacks on the front). It is not uncommon to see three 1/8 inch jacks for 5.1 audio, and the two S/PDIF optical connections are on most SFF systems. The coaxial S/PDIF connection isn't quite so common, but if you actually use a microphone, this is one of the few SFF systems that allows 7.1 audio support simultaneously with a microphone.
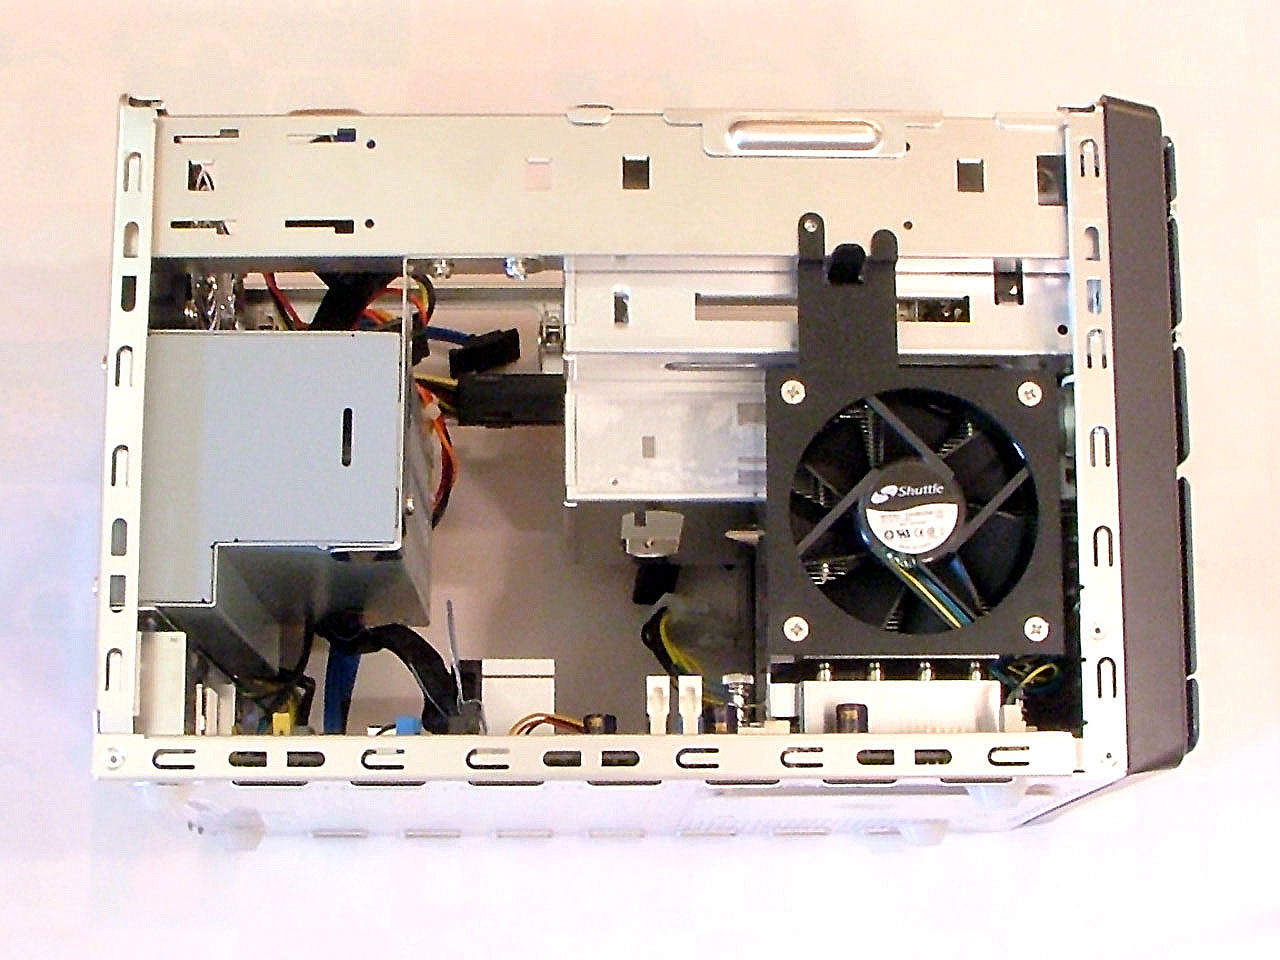
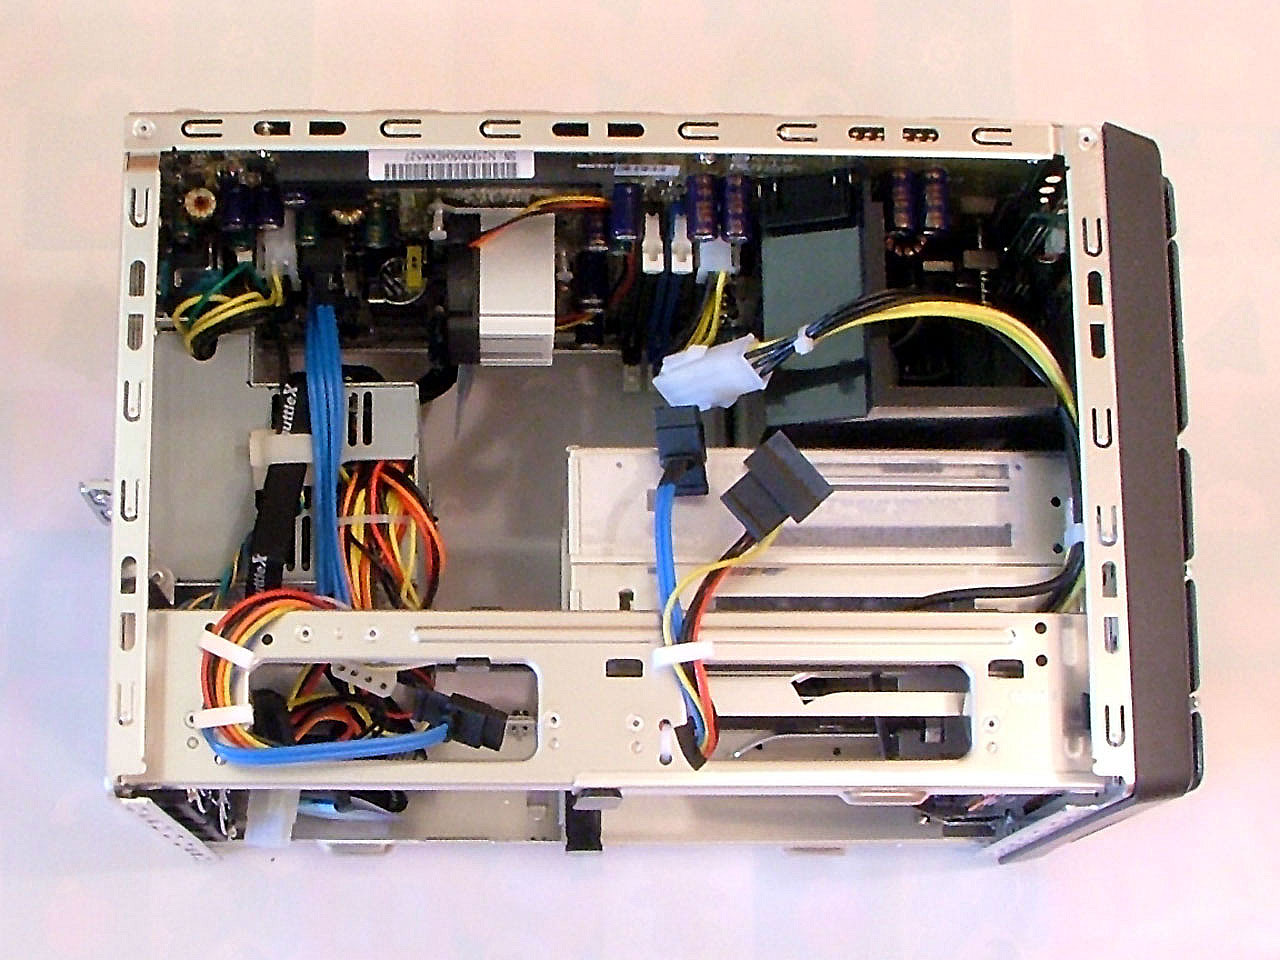
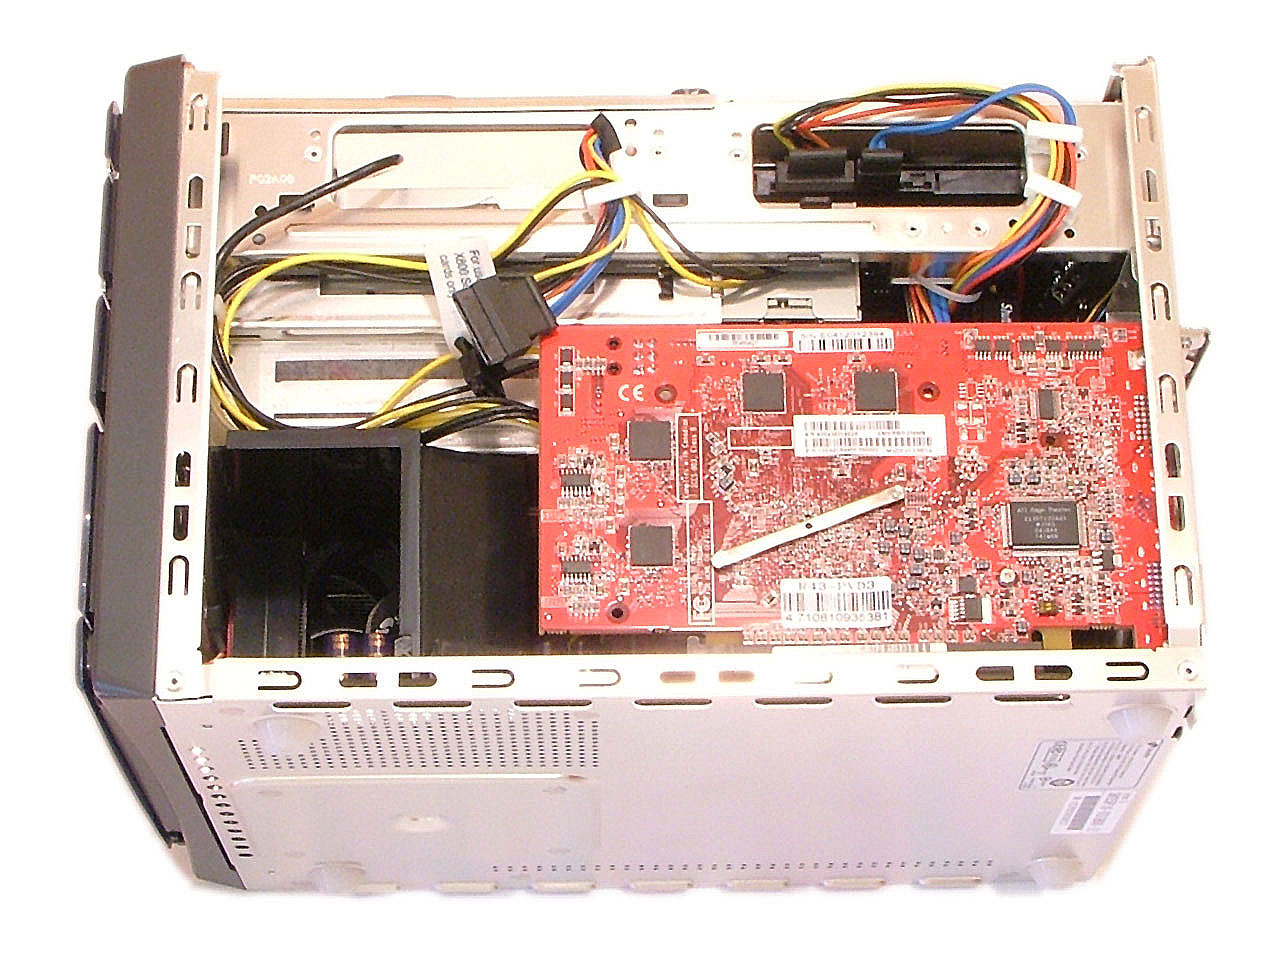
Internally, there are even more features worthy of mention. First, we have all of the cables for the hard drives pre-installed and routed to appropriate locations. Only the floppy cable or a third SATA cable would need to be manually installed. A third SATA cable, you ask? That's right; the P series chassis is capable of running three hard drives at the same time! With so many options on the hard drive front, it is not surprising that RAID support (courtesy of the NF4 chipset) is also provided.
Just to make sure that there is ample power for such a configuration, Shuttle has increased the power supply rating from 240W to 350W. When you consider that the 240W SilentX PSUs in previous Shuttles were capable of running a high end graphics card and two HDDs, the 350W model should have plenty of power for a maxed out configuration. While our SFF lab doesn't really have enough parts on hand to punish the PSU, we have confirmed with Shuttle that they have conducted stress/validation testing of the PSU with an ATI Radeon X850XT PE, two Western Digital 74GB Raptors, a 250GB 7200 RPM drive, DRD+RW, and 2GB of RAM, all paired up with a Pentium 4 570J (Prescott 3.8GHz). Considering that the Athlon 64 requires quite a bit less power than the Prescott, a maximum configuration using the SN25P should not present any troubles.
Another noteworthy addition to the P series chassis is that the design is almost completely tool-less. We'll have more to say on this in the section about setup and installation, but it's certainly a useful addition. The cooling solution is, as usual, a "smart" design, so fans will spin down when temperatures are low, helping to reduce the noise levels. We were surprised to find five fans as the standard configuration for the case - and that's not even counting the potential for a sixth fan on the graphics card. Luckily, the fans seem to be there to help run a loaded configuration safely and when equipped more moderately - i.e. with a single hard drive - the fans were nearly silent. The fan on our X800 Pro graphics card was actually more noticeable than the five case fans. That could change with extended use, as dust can clog up fan bearings and increase their noise levels, but proper care and cleaning should avoid such problems. We really wish that fewer, larger fans could have been used instead, since our past experience with the smaller 40mm to 60mm fans indicates that they have a higher failure rate (and fail sooner) than larger fans.
Shuttle uses the nForce4 "Standard" chipset instead of the Ultra or SLI in the current model. To be honest, the differences between the Standard version and the Ultra version are very slight. NVIDIA lists some minor difference in the networking support, and the Ultra includes SATA-II hard drive support. SATA-II shouldn't dramatically alter HDD speed in most applications, as we're typically bound by the sustained transfer rate.
The graphics card support is of course PCI Express, given the chipset. This can be either good or bad depending on what you're after. PCIe is more future proof, as you know systems in the coming years will continue to provide X16 PEG slots for quite some time. The loss of a standard PCI slot, however, will cause some difficulties if you want to add in something like a TV tuner or other expansion card. Over time, this will become less of a concern, as current PCI card technologies should eventually migrate to X1 PCIe cards. One interesting aspect of the switch to PCIe is that the fan of the graphics card will now face the interior of the case rather than the outside. This has the potential to reduce cooling efficiency, but again, the five fans should help out. More interesting to us is that two-slot graphics cards can now be used, including models with larger heat sinks (like the X850XTPE that we mentioned above).
One last area to mention is the support for overclocking. As this is a more modern platform, we will actually test the feasibility of overclocking. It certainly isn't a requirement for most people, but with the focus on performance rather than minimal size, overclocking features will appeal to the enthusiasts out there.
As usual, no SFF design is going to be "perfect" for everyone. We mentioned some potential concerns that you might have with finding a use for the X1 PCIe slot, and there are other similar concerns. A parallel port is not provided, but there is a connection for a cable on the motherboard. Unfortunately (should you need to use such a cable), you will have to place a mounting bracket in the unoccupied PCIe slot as there is no punch-out on the rear of the chassis. Another very small omission is integrated graphics. You must purchase a PCIe graphics card in order to use this system. If that's important to you, the SB81P includes the GMA900 graphics, making it perhaps more suitable for a business environment. A future P series chassis with one of the ATI or VIA PCIe chipsets and IGP is something that we would like to see. The last point on which we would like to caution potential buyers is that there is only one IDE socket, supporting two IDE devices. Due to the length of IDE cables, if you want to use an IDE drive, you will need to use the 3.5" bay where a floppy could reside otherwise.
These are all minor criticisms, and we list them as things that users should be aware of rather than as serious problems. If you're purchasing an entirely new system, IDE hard drives are rather pointless, as are LPT printers. Similarly, if you're looking at this new SFF and seriously thinking about buying it, you're probably more interested in performance features than integrated graphics. Some may find the few omissions to be a real problem, but for most users, the feature set is going to be more than enough.
Construction

Click to enlarge.
We mentioned before the tool-less design of the chassis; this is a two-edged sword as far as construction goes. Tool- less designs are generally more difficult to make and require some additional R&D, but with the use of plastic clips for many of the snap-on devices, there is a greater potential for the parts to wear out. If you don't plan to upgrade frequently, this should not be a problem, but if you were to open the case on a weekly basis and move parts around or whatever, the plastic parts could wear out. Still, we'll take a well done, tool-less approach over screws any time! With the otherwise tool-less design, we would have liked to see them address the expansion card retention mechanism as well.
 |
 |
| Click on images to enlarge. | |
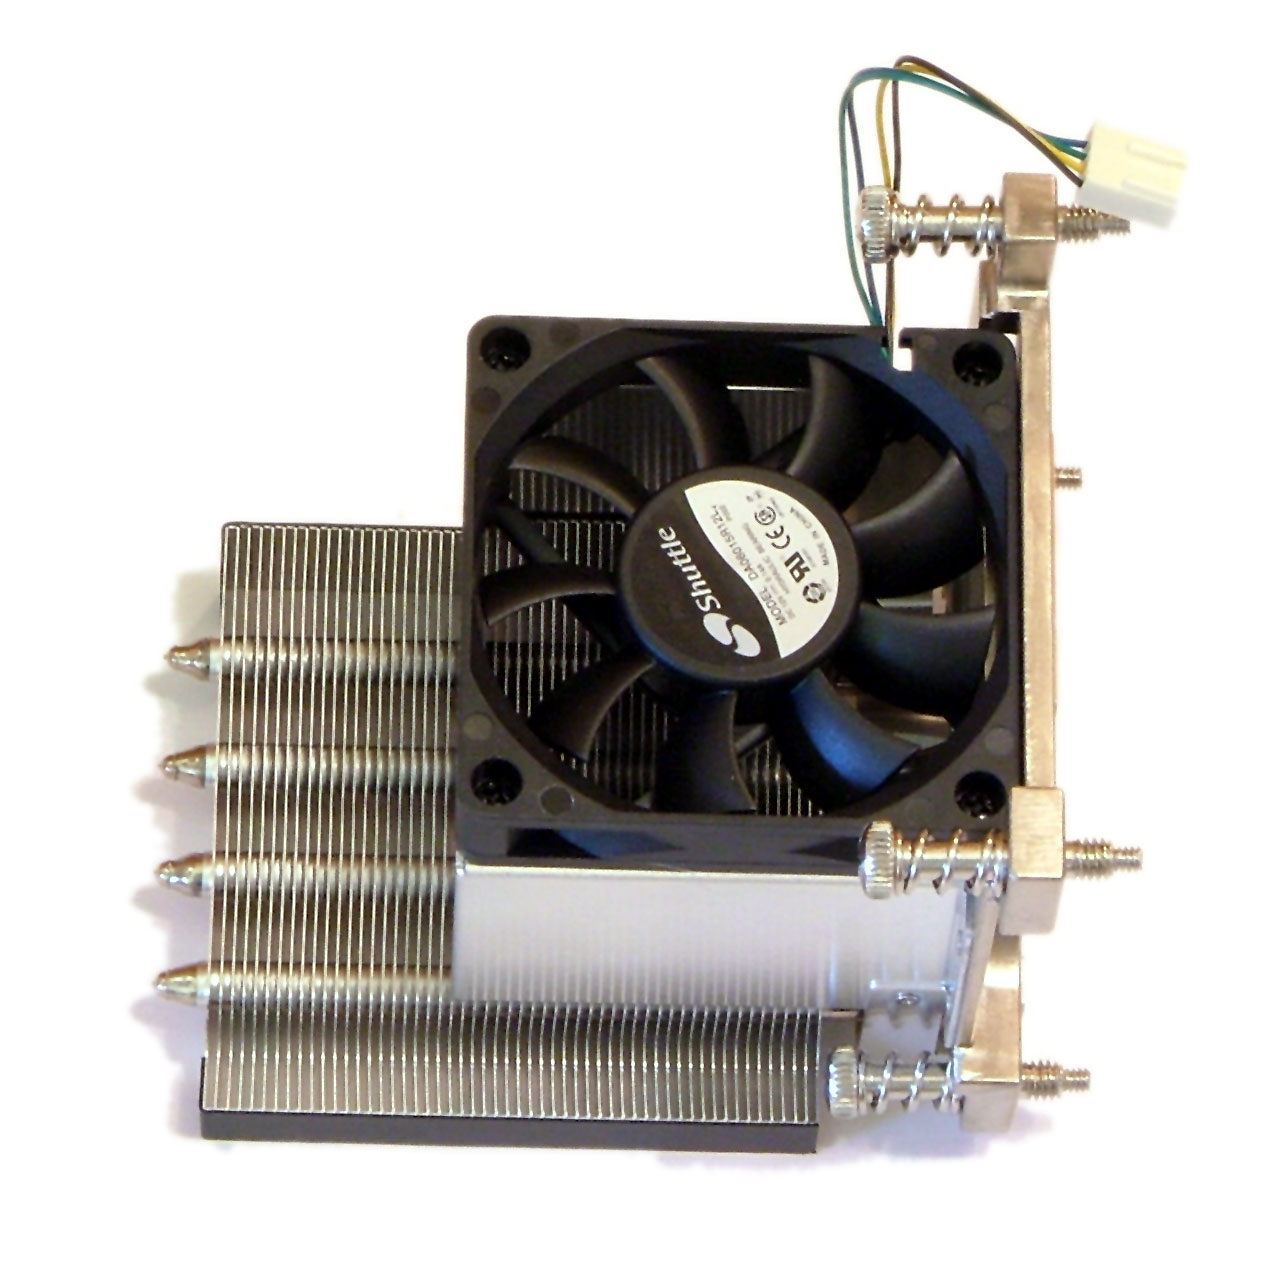
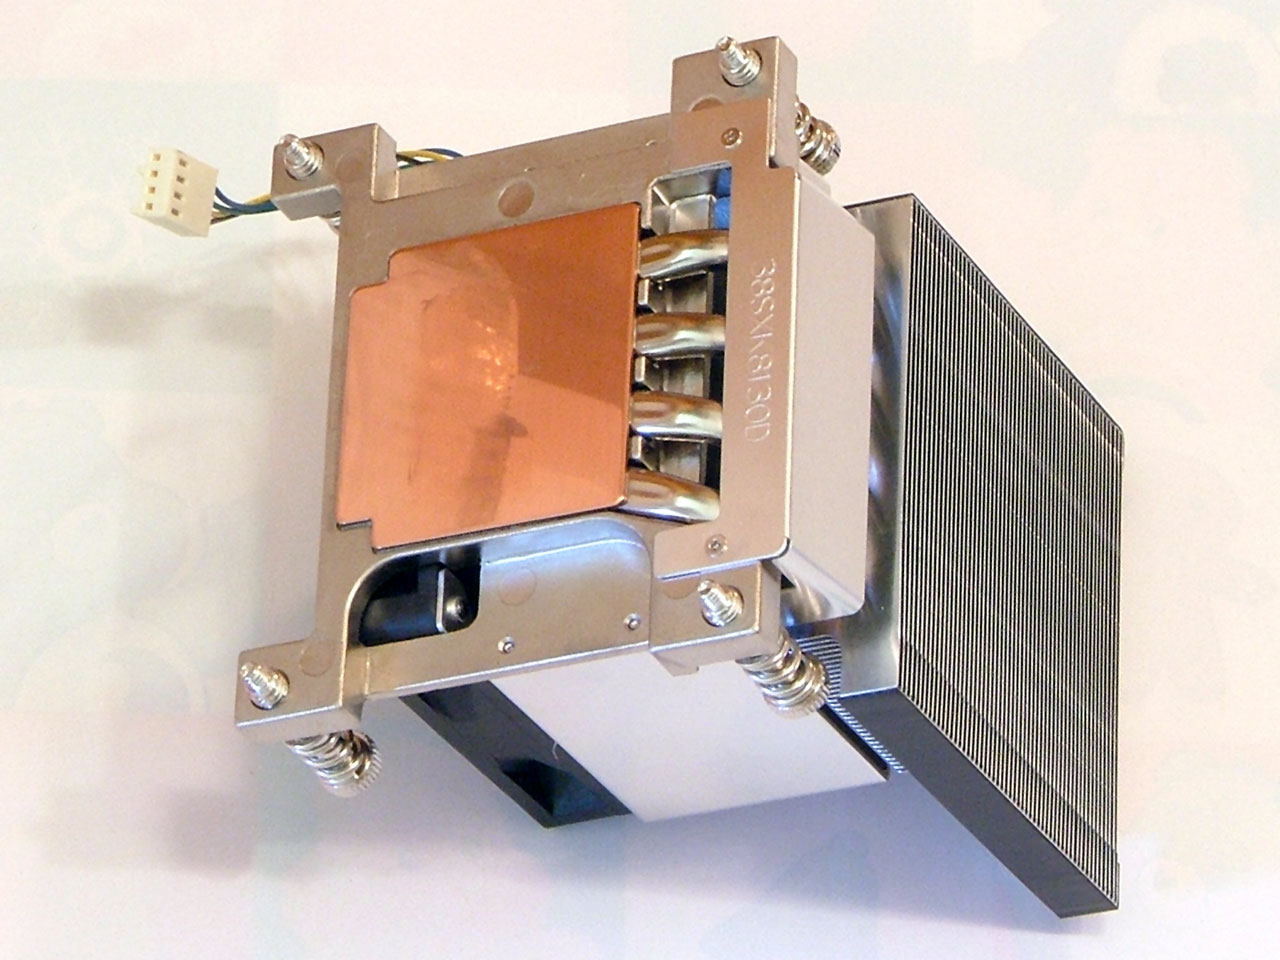
The HSF of the SN25P is composed of a copper base with heatpipes connected to the radiator fins. Previous XPC cases have used a much longer heatpipe design located at the rear of the case. The new version consists of a smaller HSF with a "wind tunnel" located toward the front of the case. There are two fans directly cooling the HSF: one is attached to the HSF, and the other is a larger fan mounted on the chassis. With both being temperature controlled and powered by 4-pin connections, noise and cooling should be more than adequate. The overall design is rather reminiscent of some of the concepts that the BTX form factor is supposed to bring to desktop PCs.
We have a few last comments on the construction of the SN25P, focusing on the front panel. Overall, it is well done and shouldn't present any serious problems. The plastic covers are relatively thick and the optical drive door opens and closes as the tray goes in and out. The doors could be broken off by careless handling, of course, so pay attention to them if you're moving the case around. The plastic can also be scratched, especially with anything sharp, and such a mark would be very noticeable. Such concerns are common for most SFF designs, so as long as you pay attention to what you're doing, there shouldn't be any difficulties.
Hardware Setup
We mentioned already the tool-less design of the case. In practice, this helps to shave a few minutes off of the time required for assembly. Realistically, it's not a huge advantage, but we do like the feature. There are a couple of areas that continue to require a screwdriver, however. First is the expansion card mounting bracket. Not only do they require a screwdriver, but we really don't like removing both screws just to add one card. The other area that still required a screwdriver was the HSF mounting. True, it does include thumbscrews, but unless you have Gumby fingers crossed with the strength of the Incredible Hulk, you won't be able to get at the two screws located near the front of the chassis, as they are blocked by the HSF. In fact, even using a screwdriver was a little difficult to get the screws back in place.First, let's start with a reminder to anyone out there who thinks that they're too good to read a manual: save yourself some time and have the Installation Guide next to you while you set up the SN25P. Due to the tool-less design as well as the air-flow shrouds around the CPU, you'll save yourself some time and confusion by referring to the manual. We had a few moments of confusion when assembling the case and the Guide was very clear and methodical in going through the entire installation process. Shuttle has clearly put some effort into making their manual both concise as well as accurate. Every one of the "gotchas" that we encountered in dismantling and assembling the case was covered, as well as several that we would have overlooked.
 |
 |
| Click on images to enlarge. | |
As for the assembly process, we start by removing the cover as usual. Doing so is easy enough, as you simply unscrew four thumbscrews. Next, we pull out the drive cage. There are two plastic plugs holding it in place, and pulling those out and sliding the cage back will get it out of the way. From here, things get a bit trickier. Looking at the CPU socket, it's clear that you want to remove the HSF, but the exact means to do so are not immediately obvious. The manual explains that you need to remove the air guide first by "gently lifting up on it." Well, it might require a bit more effort than being "gentle", but popping out the plastic clips at the front of the case first makes it pretty easy. Finally, the CPU HSF is secured by four thumbscrews, but two of them are rather difficult to reach. We used a screwdriver to loosen the two at the front of the case, while the other two were loosened with our fingers. Then the HSF comes out and you have access to the CPU socket.
 |
 |
| Click on images to enlarge. | |
At this point, you can also swing out the fan on the left side of the case, which makes it extremely easy to insert the CPU itself. The next step is crucial, however: snap the fan back into place before mounting the HSF on the CPU. If you don't do this (we didn't initially because we were stupid and didn't read the manual), you can't get the fan back in place. The air guide for the HSF can be reinstalled after the HSF is screwed down. Installing the RAM at this point also makes sense, and you could even do that before putting the HSF back in; it really doesn't matter much.
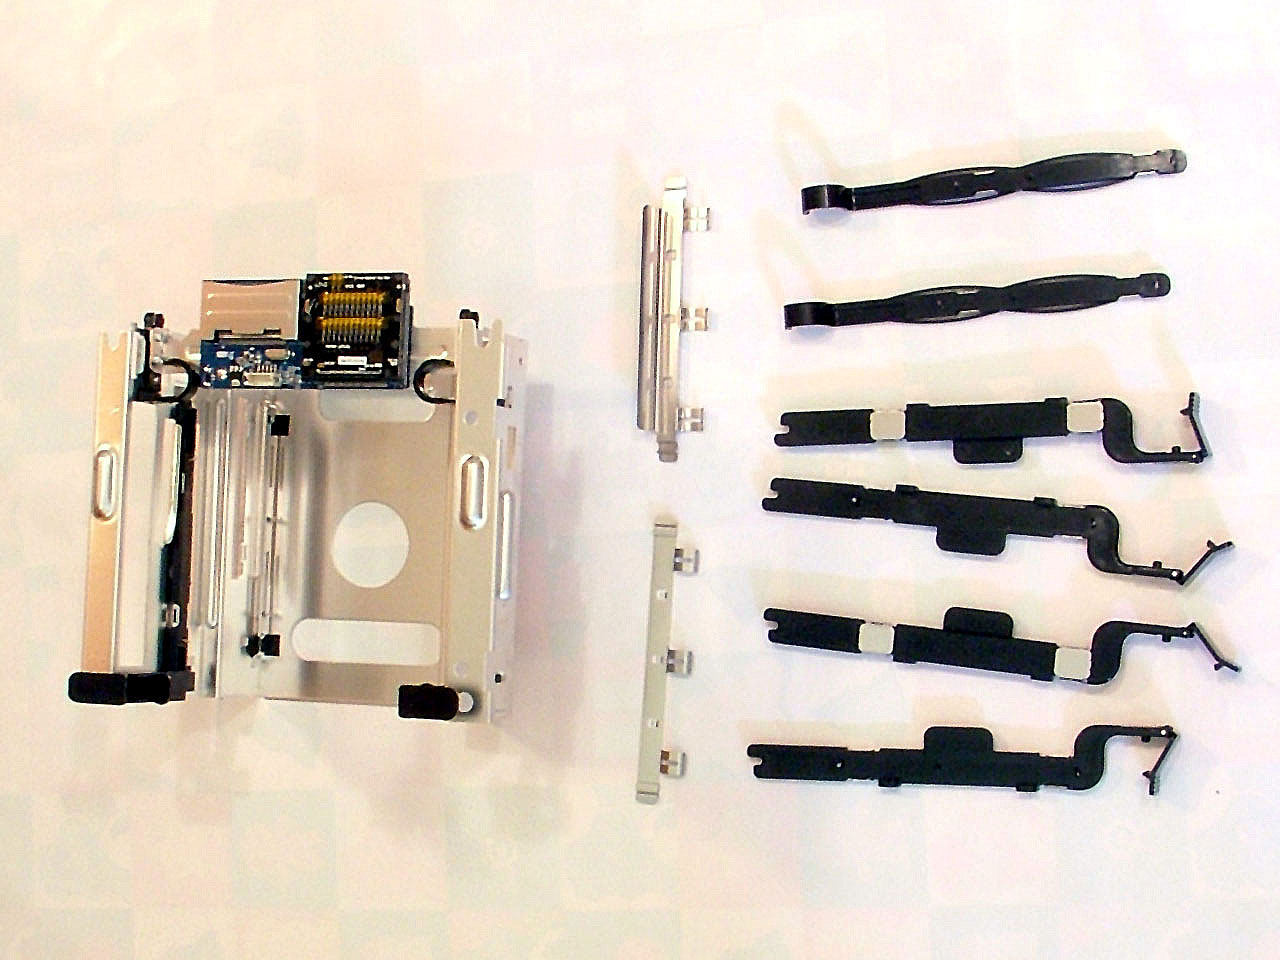
With the drive cage removed from the case, it's time to install your drives. First, remove the plastic rails and snap them into place on the sides of your optical drive. Before sliding the drive back into place, you may need to install an IDE/SATA hard drive or a floppy drive. For the HDD, four metal prongs stick up from the bottom of the cage and you simply press the HDD into place over these points. The floppy drive uses plastic drive rails and slides into place instead. If you use a HDD in this lower location, there are four rubber "vibration dampeners" that should be placed on top of the HDD. These will hold the HDD in place once the DVD is inserted above, which is the final step in assembling the drive cage.
Shuttle mentions that the rubber pads help to reduce noise from system vibration, but as far as we can tell, they are there to prevent the drive from lifting up off the pegs. Also included are two metal "EMI shields" that snap into place just below the optical drive and at the top-front of the 3.5" bay. These didn't really "snap" very well, and came loose after we installed the DVD into the cage. We're not sure if they really help all that much in reducing EMI, and since we ended up removing the HDD from this drive bay and moving it up top, we took out the EMI shield.
With the drive cage fully prepped, it can then be placed back into the case and secured via the two plastic plugs. There are also plastic clamps that will hold the DVD in place when the plugs are pressed down. We would like to mention that some users may find the space at the rear of the optical drive to be slightly cramped, particularly if they are using a longer drive. Most modern CD/DVD drives are shorter than models manufactured several years ago, and while either will fit, the newer models leave more room for the cables and such. (We used an older, longer CD-RW drive, which is why we noticed this.)

Click to enlarge.
 |
 |
| Click on images to enlarge. | |
With everything installed, you can now connect the cables to all the devices and get ready to power up the system. We installed the graphics card as the final step, and we were sad to see the return of the typical metal door and two screws for securing the expansion cards. With all the effort that went into the design of the rest of the case, we wish that something could have been done to carry on the tool-less installation to the graphics card. It wasn't overly difficult, but after the hard drive and optical drive rails, it stands out.
We've gone into a lot of detail on the setup process not to make it sound difficult, but to try and help you visualize the whole installation process. Just looking at the pictures, some of the design may not be immediately clear. All told, it really is an intelligent design. Again, we just wish that the expansion slots had received some further attention, as installing the graphics card was disappointing after dealing with the rest of the case.
BIOS and Software Setup
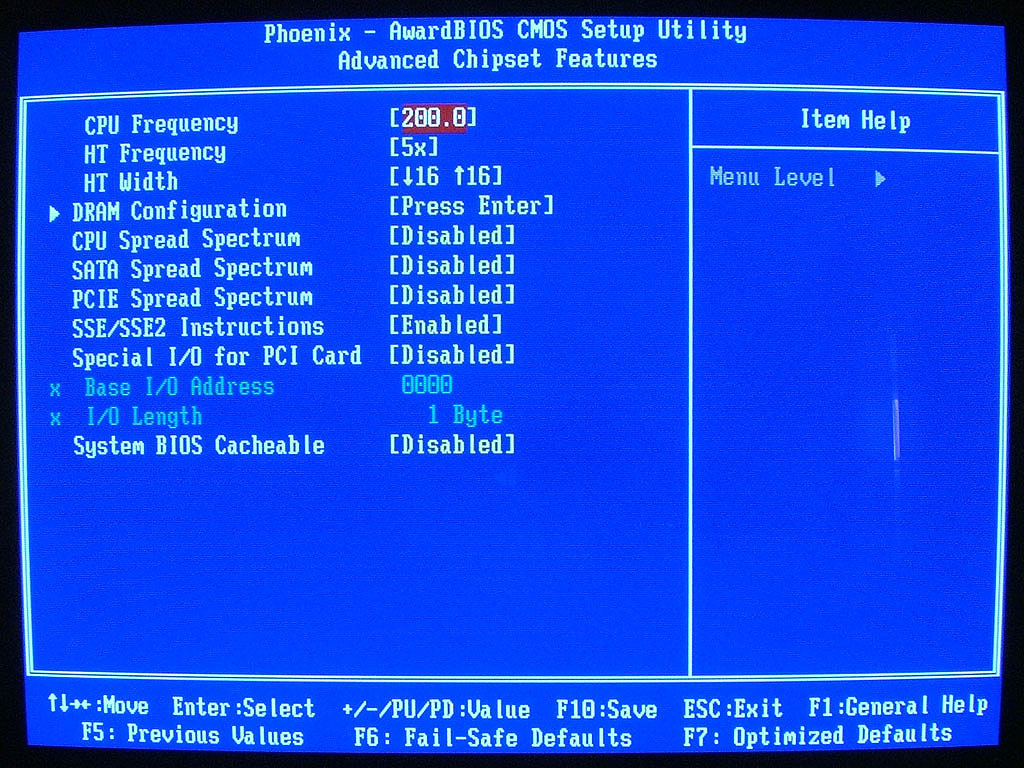
Note: Shuttle sent us several updated BIOS versions. The first enabled 1T command rates, but then the timings were locked at 2-3-3-5 (regardless of what you specified in the BIOS). They sent us an updated version, FN25S904.BIN, which allowed proper adjustment of the memory timings. 1T command rates have improved scores noticeably in the past, so we would recommend that anyone interested in the SN25P should make sure to get the latest BIOS from Shuttle. At present, they are up to BIOS revision FN25S906, which improves overclocking stability, but we only received that after this article was written.With the components all installed, the system is now ready to be powered up. We start by checking out the BIOS screens and features. The standard and advanced BIOS screens are pretty standard for a Phoenix/Award BIOS. Moving on to the advanced chipset features, we start to encounter some of the more interesting options.
 |
 |
| Click on images to enlarge. | |
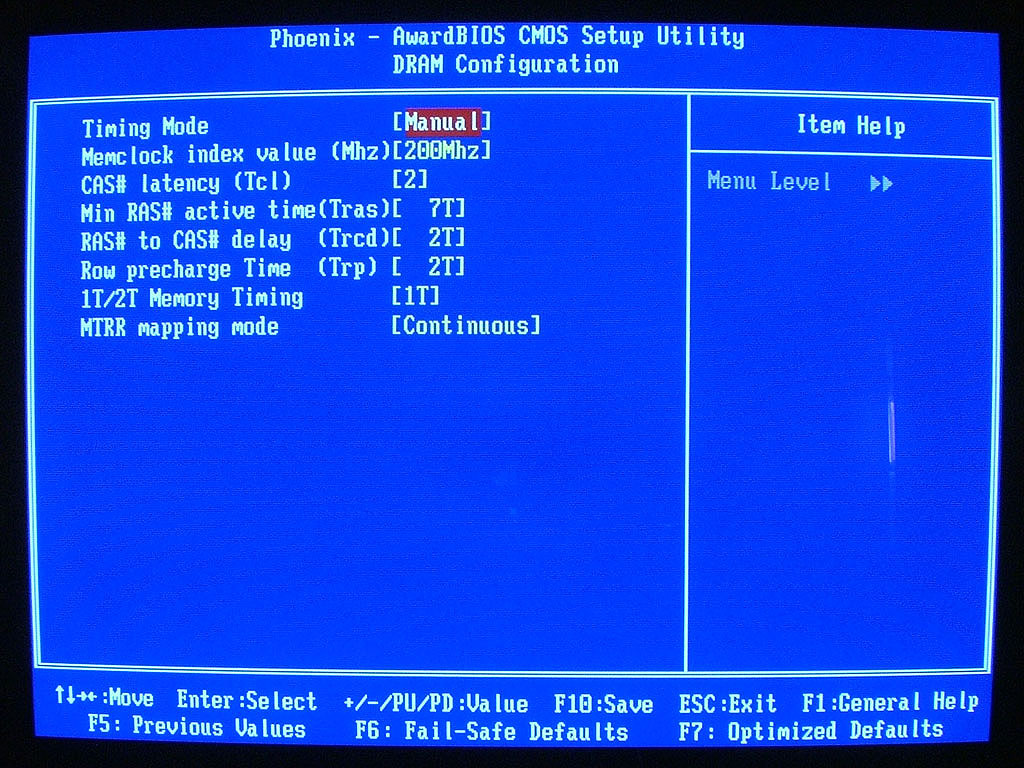
Here, we find the controls for the CPU bus speed as well as the HyperTransport bus. A submenu contains the DRAM Timings, which are sometimes necessary in order to tune your system for optimal performance. In our system, the RAM (Samsung TCCD 2-2-2-5) was not detected properly and defaulted to 2.5-4-2-8 timings. We set it to 2-2-2-7 before continuing. (Wes' memory tests have shown a tRAS of 7 to produce the highest performance on nForce4 chipsets.)
 |
 |
| Click on images to enlarge. | |
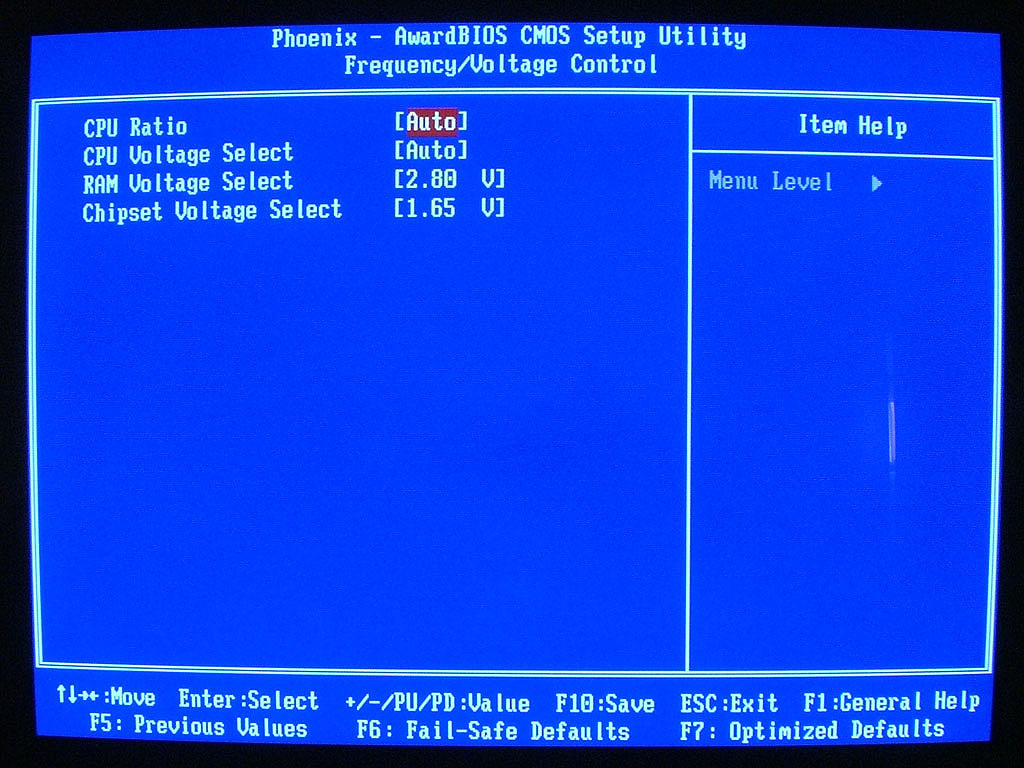
The Frequency/Voltage screen will also be of interest to enthusiasts. The CPU bus speed can be set from 200 to 250, although even with the tested BIOS revision, we were unable to make use of most of the available settings. Serious overclockers would like the ability to run the bus at least to 300 MHz. However, before such a feature becomes meaningful, we'll need to be able to actually reach the high bus speeds. Shuttle has informed us that they are working on an updated BIOS that will allow for higher bus speeds, hopefully up to 300 MHz, but our tested version had difficulties as you'll see in our overclocking results.
We have included pictures of the remaining BIOS screens just to be complete, and those interested in seeing the other options should download the full image set.
After the BIOS is set up the way that we like it, we move on to installing Windows XP. There isn't much to talk about until the OS installation is finished - at which point, we need to install the chipset and audio drivers. Shuttle includes a CD for this purpose, along with utilities like WinFlash and Adobe Acrobat Reader 6. A second CD includes a copy of Trend Micro PC-cillin 2004 Internet Security - an anti-virus and firewall program - along with Muvee autoProducer 3.1 CE, a video editing package. We didn't really pay much attention to the Muvee product, but Trend Micro is a well-known anti-virus firm, and a free copy of their software is a decent extra. It is a full year subscription, which is even better, as opposed to a 30 or 90 day trial version.
Worth noting is that the audio drivers by default do not run in hardware accelerated mode. In order to activate this, open the VIA Envy control panel, click the "Advanced" tab, and check the box for "Sound Effects/3D Gaming Support". It will be necessary to reboot the system for this to take affect. If you fail to do this, sound in several games loses some of the advanced 3D effects. 3DMark03/05 will also disable the audio acceleration tests and report the hardware as being capable of supporting 0 hardware accelerated 3D streams. Once you've enabled the feature, you will get the proper sound support, and the drivers will report the ability to accelerate 64 3D audio streams.
That takes care of the system setup. After installing our standard benchmarking software, we're ready to see how the system actually performs in day-to-day use.
Testing Configuration
As this is our first socket 939 SFF review, we don't have results for any similar SFF systems with which to compare . In an ideal world, we would benchmark every single system configuration and simply compare results, but that is unfortunately not practical. Our SFF system uses a slightly slower CPU than what we run at some of our other labs, along with a slower graphics card. All SFFs tested during the coming year or so should continue to use these same components. So, going forward we will include additional systems to each platform.In order to provide a baseline performance reference, we have included a couple of 939 system results from our recent Pentium 4 6xx article. We're not concerned about differences of a few percent; we just want to make sure that the results are reasonably close to that of desktop systems. Here are the test system configurations.
| Performance Test Configuration | |
| Processor(s): | AMD Athlon 64 3800+ (2.4GHz 512KB cache) Socket 939 |
| RAM: | 2 x 512MB OCZ PC3200 Platinum Rev. 2 |
| Hard Drive(s): | Seagate 80GB 7200 RPM SATA (8MB Buffer) |
| Video AGP & IDE Bus Master Drivers: | nVidia nForce 6.39 |
| Video Card(s): | PowerColor X800 Pro PCIe VIVO |
| Video Drivers: | ATI Catalyst 5.2 without CCC |
| Operating System(s): | Windows XP Professional SP2 |
| SFF Systems: | Shuttle XPC SN25P |
As you can see, we are using an X800 Pro PCIe card from PowerColor. This card is equipped similarly to our X800 Pro AGP card, so when we add other 939 systems – be they AGP or PCIe – the results will be comparable. If you are interested in a new graphics card for the SN25P, you con now actually find higher performing X800XL PCIe cards from PowerColor and others at a lower price than the X800 Pro (although that will hopefully drop in the coming months)! However, we have intentionally kept our platforms as close to the same as possible, and the X800XL is not (yet) an AGP part.
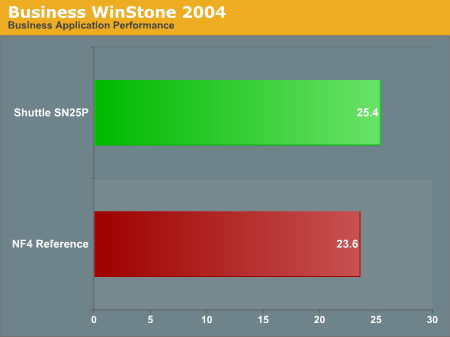
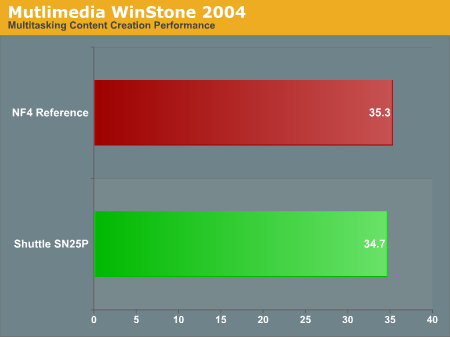
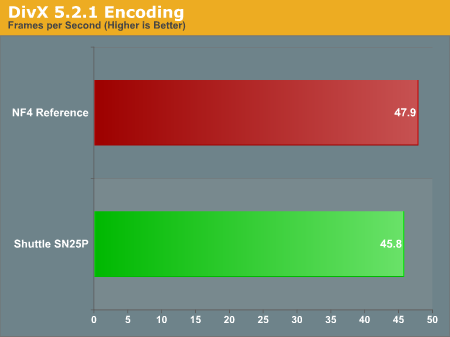
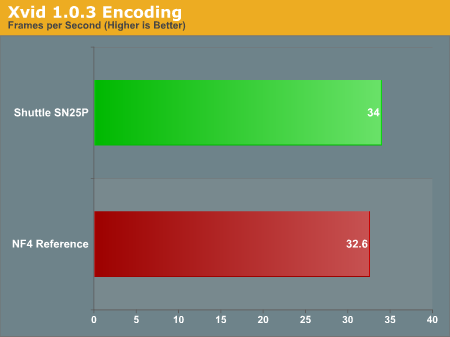
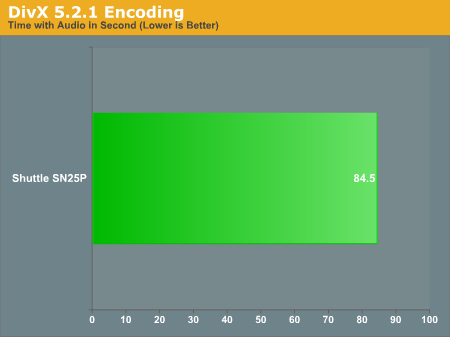
General Performance and Encoding
We can compare WinStones scores for the SN25P directly with our 3800+ desktop results. The real world application of these scores is dubious, as most business/office applications tend to spend most of their time waiting on the user. However, we include them as a general indication of system performance.

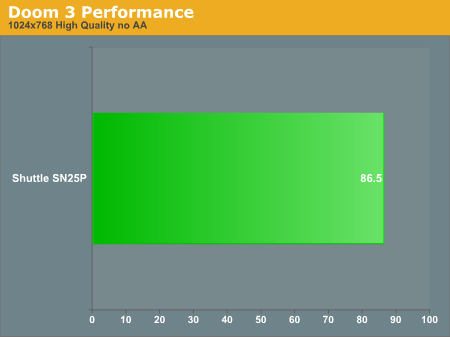
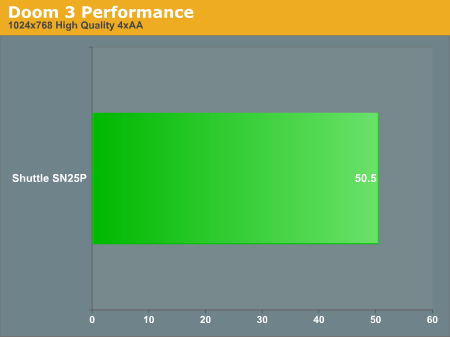
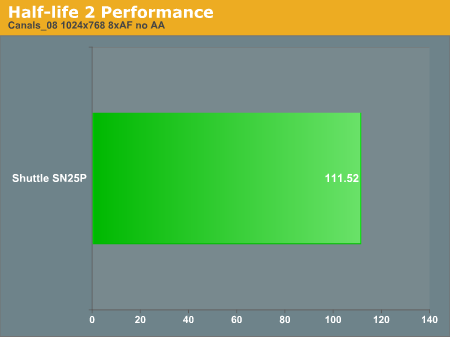
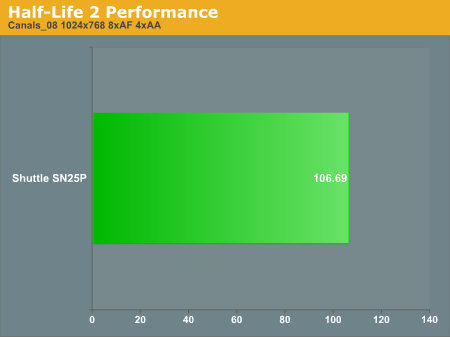
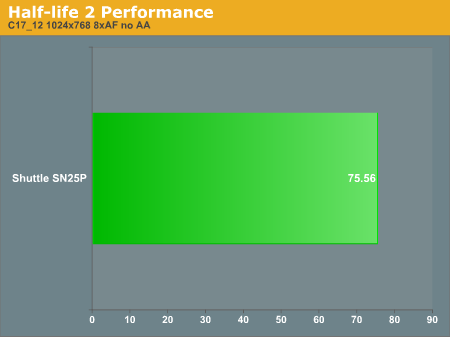
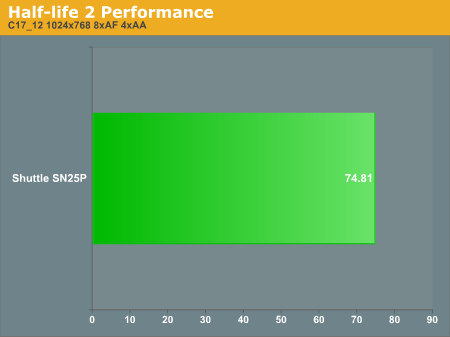
Gaming Performance
In gaming performance, we do not have any similarly equipped systems with which to compare the SN25P As we include additional socket 939 SFF systems, the graphs below will update. For now, however, we suggest you check out the scores from our recent X800XL article to see how it stacks up. The system in that article uses an FX-55 CPU rather than a 3800+, as well as an ASUS A8N SLI motherboard, so the scores are not directly comparable. Particularly in CPU limited tests like HL2, the FX-55 will help out a lot, while in Doom 3, the performance should be more dependent on the GPU.
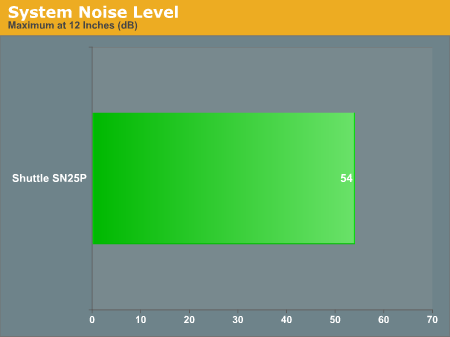
Noise and Heat
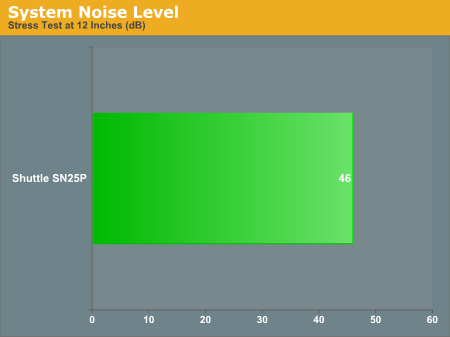
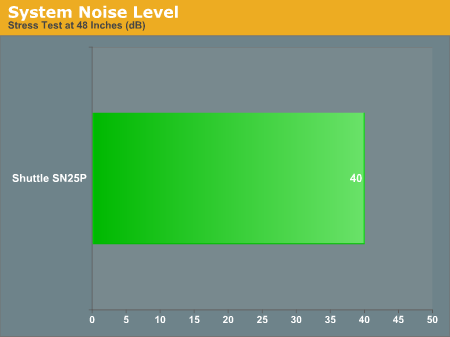
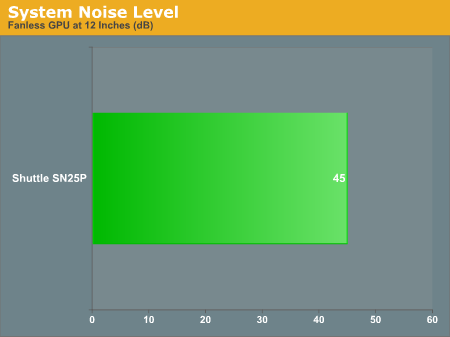
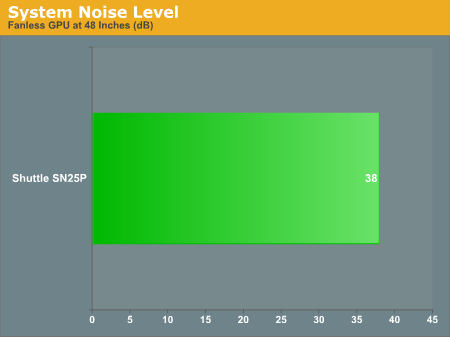
We run two sets of noise tests, in order to provide a more comprehensive picture of how loud each SFF is. Our standard test uses the same setup as our performance benchmarks. For our low-noise test, we install a fanless GPU into the system, or for systems with integrated graphics, we will use those. Mid-range to high-end graphics cards can contribute substantially to the amount of noise that a system emits, and using a lower performing graphics card will frequently reduce noise levels to the point where our SPL meter can no longer produce accurate readings. In such a case, we will simply put 30 dB as the value, and for most people, this will be close enough to silence that the system will not be noticed. Here are the results for the SN25P.

For the heat test, we use a laser thermometer to record the temperatures of various key components. It is important to note that these are surface temperatures only and not a reliable means of determining core temperatures. Most system BIOSes report temperatures for the CPU, but in the past, we have found that differences in BIOS programming can cause a difference of 10° C or more. What is really important with a SFF unit is that the system functions as advertised. Slightly higher system temperatures are often accompanied by lower noise levels, which we feel is a fair compromise.
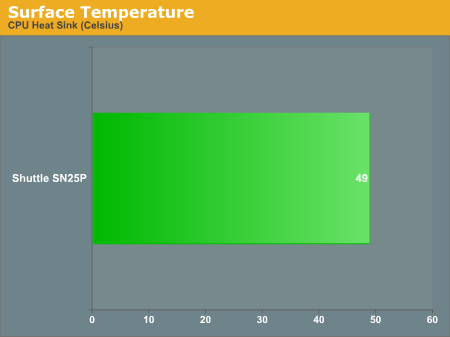
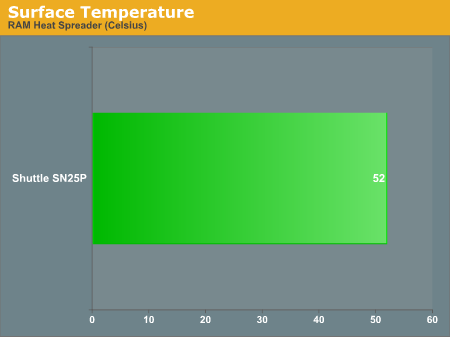
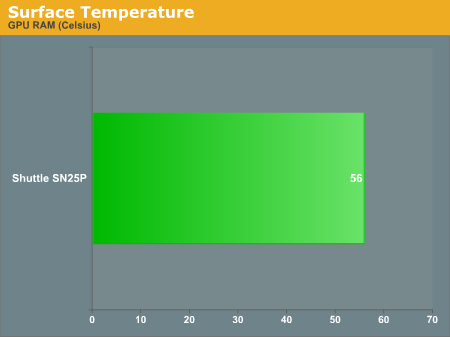
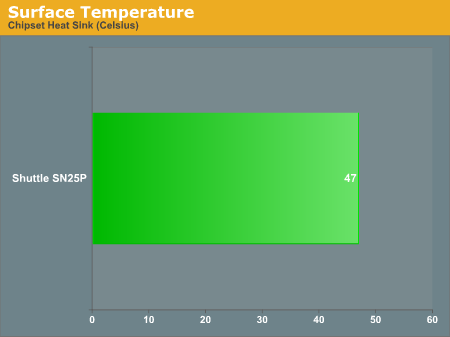
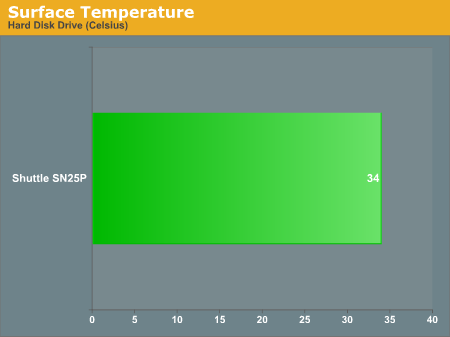
The heat levels of the SN25P were more than acceptable. We did not experience any issues during testing, and even with three HDDs installed, the design appears to provide sufficient cooling. (Loading up the system with three HDDs will typically increase noise levels, however.)
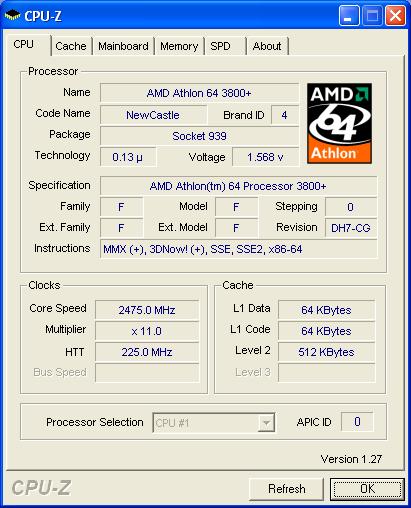
Overclocking
With Athlon 64 processors being downward multiplier unlocked, overclocking options are abundant. We have a 3800+ CPU running at 2.4 GHz with a 12X multiplier. In theory, then, a 10X multiplier and a 240MHz bus would give us the same 2.4GHz. That doesn't necessarily translate into dramatically improved performance, but at least it should let us know whether or not the motherboard can properly run with a higher bus speed. Here are the overclocking results that we attained with the current BIOS revision.Maximum FSB
Maximum CPU
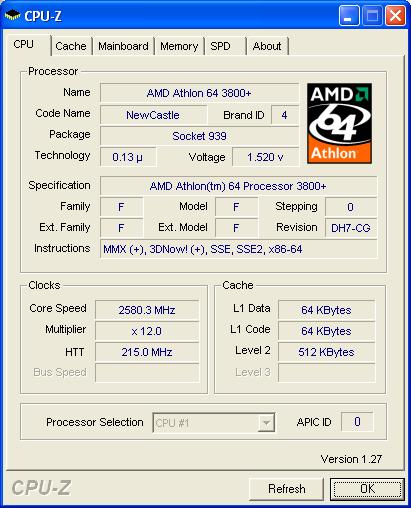
Latest BIOS (FN25S906.BIN)
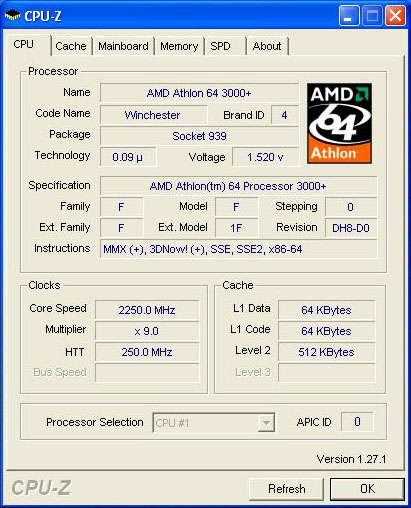
If you're looking for a really great overclocking SFF, the SN25P appears to be able to deliver. Given the early nature of the product that we're reviewing, future BIOS and motherboard revisions should continue to improve the situation. The initial BIOS that we received didn't allow proper adjustment of memory timings, and later versions were unable to run beyond a 224 MHz CPU bus. Once again, we see that for overclocking support, proper BIOS programming can make or break a system. We still have some reservation about the overclocking worthiness of the SN25P, but assuming that they can get stable support up to 300 MHz, it will be one of the best - perhaps "only" may be the better term - overclocking platforms for socket 939 among SFF systems.
Conclusion
To conclude this review, there are two things that we need to look at. The first item of interest is how the P series chassis stacks up to the competition. Simply put, it is a larger Shuttle chassis that includes more features as well as one of the largest - if not the largest - power supplies that we have seen in a SFF case. Unfortunately, for some people, the increased size will be a deterrent, as it is an inch or two larger in most dimensions than the Shuttle G5 chassis.On the other hand, for those looking at running RAID configurations with the latest graphics hardware while also keeping noise levels and size to a minimum, the P series chassis is a great design. Street prices range from $400 to $450 depending on model, so they're certainly not cheap. Shuttle has told us that the street price of the SN25P should actually come in closer to $375 rather than $450, which is certainly good news. However, if you're serious about performance and features, but you don't want a large case, there are a few other options that can compete with Shuttle's P series.
 |
The only potential drawbacks are the not-yet-final overclocking support, the relatively high price, and the increased size (relative to models like the G5). The overclocking and size are items that may either concern you greatly or not at all. If the size is an issue, you'll be glad to hear that Shuttle is working on a G5 chassis with PCI Express support, the ST20G5. It will use the ATI Radeon Express 200 chipset and we will be looking at that in the near future. As for the price, as Apple has demonstrated on numerous occasions, exclusivity and design are features that add value for many people. Membership has its privileges.


