Original Link: https://www.anandtech.com/show/1578
How to Set up a Source Control on Windows without spending a dime.
by Jason Clark on December 28, 2004 9:00 PM EST- Posted in
- IT Computing
Every project, whether it's developing a software application or just about any other computer related task that generates files, needs some level of organization. How often have you been working on a development project and needed to get at a piece of code that was written at a certain time on a certain day? Could you build a version of your application that is 6 months old? Can you get the differences between versions of a piece of code? If you answer "no" to any of these questions, read on. We're going to show you how to solve these problems without spending a dime.
Version control software has been around for quite some time. CVS (Concurrent versions system) has been around since 1986 and is open source software, licensed under the GNU license agreement. CVS was based originally on UNIX shell scripts and over the years, it has matured into a production-ready application that manages a large number of software projects all over the world. Although CVS is used typically to manage projects that contain source code, it can be used to manage just about any file that you want. CVS accepts files in either binary or text format, so you can manage just about any type of file out there.
Although CVS has been predominantly a tool used by the UNIX world, there is a windows port that is quite mature. CVSNT started off as a port of CVS v1.10 in 1998 and then 1.11 to Windows. The project blossomed from there and now runs on just about every major development platform out there: Windows NT/2000/XP/2003, Mac OS X v10.2.6-10.3.x, RedHat, Sun Solaris, and HPUX. AnandTech has been using CVSNT on Windows 2000 for quite some time, to manage our source code, and it has been rock solid since day one.
Installation
Installing CVSNT is a breeze - we'll cover a basic install and some of the configuration screens that you should take a look at after installation. First off, let's download a copy of CVSNT by going to this link and selecting the version for Windows. Once the download is complete, open the downloaded file and install the software, and just leave all the defaults selected throughout the install.Once the install has completed, open the Service Control Panel from the CVSNT program group in your start menu.
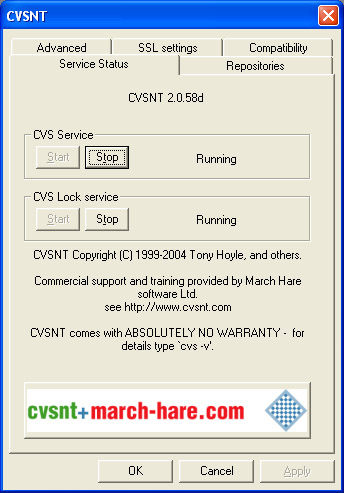
If your install went well, the CVS service and CVS lock service will both be running.
Creating your repository
A repository is simply a location in which to store your files. The repository will contain all of your modules, which we'll explain later on. In the Service Control Panel, click on the Repositories tab. Next, click the Add button and we'll create your repository. After clicking the add button, you will be asked to specify a location and name for your repository. The name is simply a descriptive label for the repository, and the location is where all of your files will be stored. After selecting the location and name, click "OK". You will be alerted that the location you chose is not a valid CVS repository. Just click "yes" and CVSNT will initialize the directory that you chose. After the repository has been created and initialized, click "OK" to close the Service Control Panel.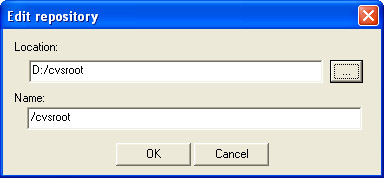
In our example, we created a directory called "cvsroot" on our d: drive and used that as our repository.
Customizing CVSNT Settings
The "Advanced" tab in the Service Control Panel allows you to customize the various settings that CVSNT offers. The defaults work quite well, but there is one particular setting that you may want to adjust. CVSNT, by default, runs on port 2401. If you want, you can change this to a different port. If you want to be able to manage your files remotely, you'll want to open a port on your firewall for the port that you select.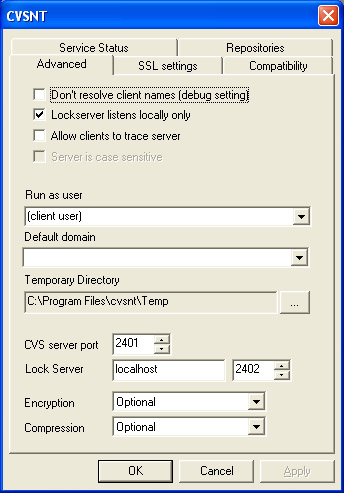
CVSNT Security
Security for the files that CVSNT manages is controlled by Windows. If you are installing CVSNT on a remote server that all your windows clients will use, we recommend that you use a NTFS partition for security and file integrity. The recommended protocol for Windows clients to connect to CVSNT is SSPI. There are other options for non-windows clients, which are covered in the CVSNT documentation.Depending on your network configuration, you'll need to assign the users/groups that you want to access the repository folder for which you created. When your users connect to CVSNT to manage their files, they will be challenged based on their Windows credentials if you use the SSPI protocol.
Tortoise CVS
CVSNT is the server side component of our new source control installation. Now, we need a client interface to allow us to manage our files. Tortoise CVS is an open source version control client that allows you to work with your files in CVS/CVSNT. Tortoise CVS integrates into Windows Explorer and makes managing your files incredibly easy. Tortoise CVS works in Windows 95, 98, ME, NT, 2000, 2003 and XP.Installing Tortoise CVS
To install Tortoise CVS, navigate to this link and download the latest build. After the download is complete, install the software, and accept the defaults throughout the install process. Once the install is complete, Tortoise will require a reboot because it has to integrate into your Windows Explorer shell interface.Creating your first "Module"
CVS organizes files into "Modules". Modules are top level containers for your files - think of them as the projects that you want CVSNT to manage. For example, we're working on a project called MyWebSite and we want to check that project into CVSNT. We first navigate to the top folder that contains all of our files; in our case, it's called MyWebSite. Then, we right click on that folder and select "Make new module" under CVS. You will be presented with the screen below.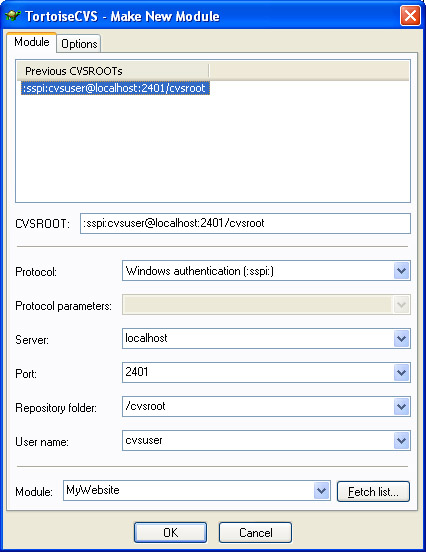
The "make new module" screen will ask you for connection information for your CVS server. In our case, the CVS server is on our local machine and we are connecting using SSPI with a local windows user. The port is the port number in which we set the Service Control Panel. The Repository folder is the name of the folder that we created when we created the repository. In our case, it was /cvsroot. After you have filled in your connection information, click "ok" and Tortoise will create a new module for you in CVS. After the module has been added, click "ok" in Tortoise. You will notice that the folder that contains your files now has a green box on it.

Adding files to the new Module
Now that we have a module created in CVS, let's add our files to the module. Once the files are added, CVS will now manage any changes, additions, or deletions to the files. To add files, right click on the folder that we added to CVS and choose "CVS Add contents". You should see a window similar to the screen shot below.
| Tortoise will list the files and folders that are in our top level folder. It also lists Type and Format of the files. You can double check that Tortoise detected your file type correctly, although I have yet to see an instance where it did not detect the file type correctly. After your files have been added, click OK. Your files should now look something like the screenshot on the right, with an orange cross box on each file. This indicates that the file has been added, but still needs to be committed to CVS. | 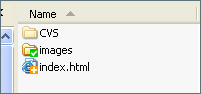 |
Committing & Updating Files
Anytime you add a new file or change a file, you need to perform a "commit". Committing the file essentially takes the changes that you've made on your local machine and commits them to the CVS server. Prior to doing a commit action, it is considered good practice to perform a CVS Update, which will update your files with any changes that have been made while you were working on your files. In a team-based development environment, this will happen regularly. CVS is intelligent enough to merge changes into your files during the update process. If there are any conflicts, CVS will notify you that there was a conflict that you have to resolve. After you have performed a CVS Update, you can then do a commit of your files by right clicking on your top level folder and selecting CVS Commit.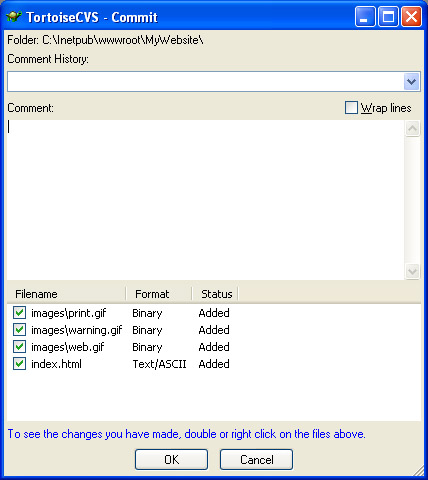
After selecting CVS Commit, a window will pop up with a list of the files and their status. You also have the ability to insert a comment for this commit action. Comments are very useful - if you are detailed enough, they will help you when you ever have to go back a few days to look at a change that you made. Comments can also be used to store bug numbers for those who have a bug tracking system and the commit that you are doing is to fix a certain bug number. After you have entered your comment and pressed OK, your files will then be committed to CVS. You will notice in your folder that all of your files now have a green box on them indicating that the files are in CVS.
Changing Files
The whole purpose to CVS is to track changes to your files. If you make a change to a file, Tortoise will update the color of the file to let you know that you have to commit the change made. To change a file, simply open it and make the change and then save it. You will notice that the file now has an orange arrow box on it, which indicates that the file has been modified. You should now perform a CVS Update, and then a CVS Commit to update the file in CVS.Deleting Files
Files change during development, but sometimes they can also be removed if something is deprecated. To remove a file in CVS, right click on the file that you want to remove and under CVS, choose Remove. Tortoise will now remove the file from the directory and place it in the Recycle bin. The file has been removed from your local source code, but you still need to commit that change to CVS by performing a CVS Commit.Checking out a Module
Once a module is checked into CVS, you can check it out at anytime, and depending on your network configuration, from anywhere. To check out a module, simply right click in a folder and choose the Module to check out. Once you click OK, Tortoise will check out a clean version of your module into the folder you selected.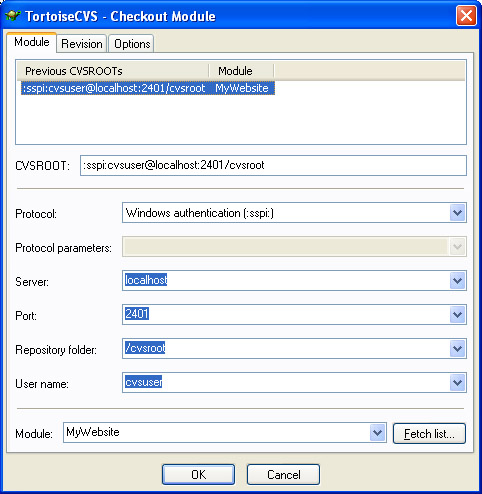
Checking out a Module or Files by date
At some point during your development, you may need to get an older version of a file or module. To do this, follow the instructions above on checking out a module, and before clicking OK, click the "Revision" tab. The revision tab allows you to check out files by Branch or Tag. This is beyond the scope of this tutorial. For more information on Branching and Tagging files, read the CVS Documentation. You can also choose to check out files by Date by either using the calendar or by typing in a date and time for Tortoise to use.Viewing the history of files
CVS keeps track of every change to a file. These changes, including who made them and when they were made, can be very useful when you run into issues or have questions about a change that was made. Tortoise allows you to view the history of a file by right clicking on the file and selecting "History" under CVS. You will be prompted with a history of the file along with any comments for each change.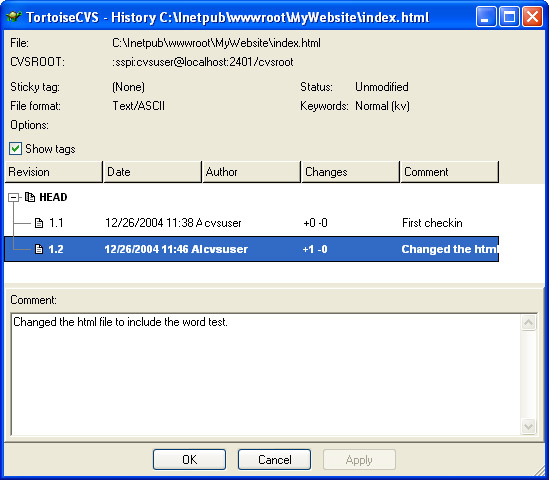
ViewCVS
In a team-based environment, being able to view changes on files and compare versions of files can be incredibly useful. ViewCVS is a web-based application that runs on either UNIX or Windows and allows developers to use a browser to view the CVS source tree. You can obtain the windows port of ViewCVS here, and the instructions for installing ViewCVS on windows are located here. Once installed, you should see a listing of your modules when you navigate to viewcvs.cgi.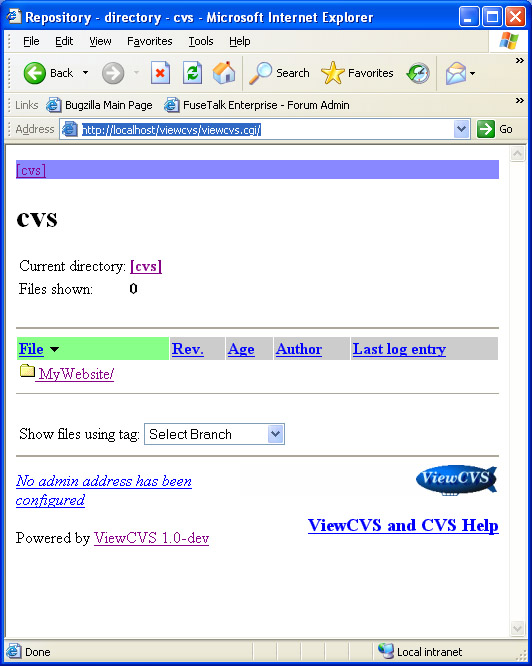
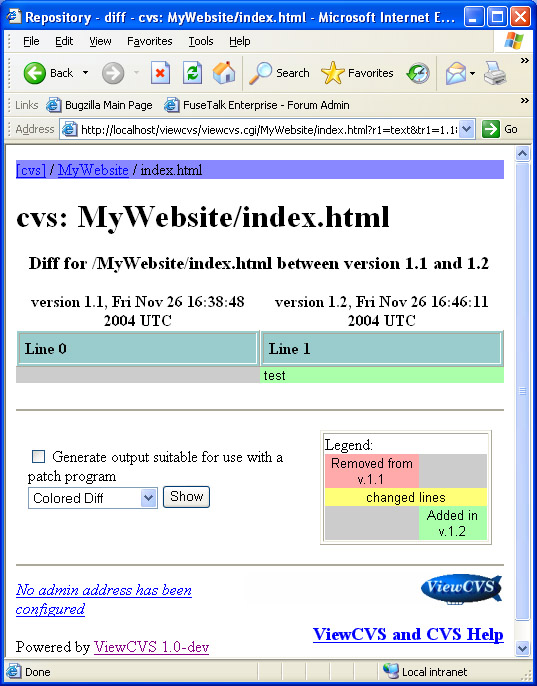
You can then drill down on the module and get a listing of the files in your module. ViewCVS will list the file, its version, age, and last comment. If you click on the file, ViewCVS will list all the revisions to that file, when they were made, by whom, and the comment associated with each change. The most useful feature in ViewCVS is [select for diff]. By doing this, you can compare versions of the selected file and see what changes were made (see below).
IDE plugins
Although Tortoise CVS is a very slick piece of software, developers may want to connect to CVS from within a Development Environment such as Visual Studio, Dreamweaver, Eclipse, etc. Below is a list of some popular Development Environments and links to tutorials on getting CVS integrated into them. If your Development Environment isn't listed, do a search on Google. Chances are that someone has found a way to get CVS integrated.Microsoft Visual Studio
http://www.codeproject.com/macro/CVS_with_VSNET.asp
http://www.kryptonians.net/cvs/wincvs_and_ide.html
Eclipse
http://dev.eclipse.org/viewcvs/index.cgi/platform-vcm-home/docs/online/cvs_features2.0/cvs-faq.html?rev=1.2
http://help.eclipse.org/help30/index.jsp
Macromedia Dreamweaver
http://www.grafxsoftware.com/product.php?id=22


