ASUS Maximus V Gene vs. Gigabyte G1.Sniper M3 Review
by Ian Cutress on May 13, 2013 10:00 AM EST- Posted in
- Motherboards
- Gigabyte
- Asus
- MicroATX
- Z77
Gigabyte G1.Sniper M3 In The Box
Over the past 24 months, it has been somewhat exciting looking into the minds of manufacturers if you purely look into their bundles. You can tell when a manufacturer is skimping on the extras to meet a lower price point – less SATA cables is a big giveaway, or not including a USB 3.0 bracket when two USB 3.0 headers are on board. Gigabyte in the past usually split their bundles – anything below a UD5 is usually short of items, but UD5 and above (including the gaming ranges) has plenty to say for itself.
In the G1.Sniper M3 we get:
Rear IO Shield
Driver Disk
User Guide
Two Gigabyte Posters, Glossy
Six SATA Cables
Flexi SLI Bridge
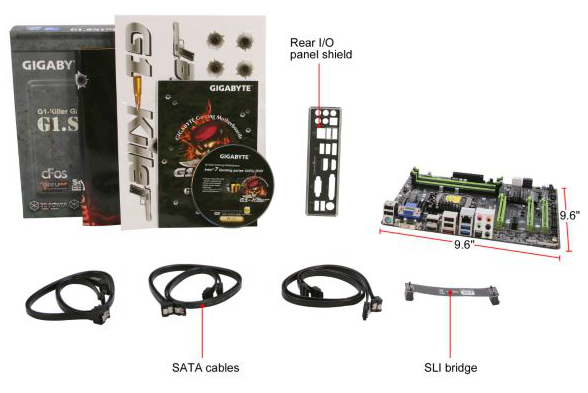

Obviously the things that strike out are the posters. I could image a freshman student in college putting these on the wall, but anything other than that and it seems a bit odd. Being in my late twenties and married, I personally would not want to put these on the wall even if I was allowed to!
Gigabyte G1.Sniper M3 Overclocking
Note: Ivy Bridge does not overclock like Sandy Bridge. For a detailed report on the effect of voltage on Ivy Bridge (and thus temperatures and power draw), please read Undervolting and Overclocking on Ivy Bridge.
Experience with Gigabyte G1.Sniper M3
Much like overclocking with the ASUS Maximus V Gene, we have three automatic overclock options to choose from in the operating system, along with BIOS options for manual overclocks. The Gigabyte does not offer the automatic options in the BIOS, but they do have an additional OS mode to test for an overclock, dubbed ‘Automatic Tuning’.
For the automatic overclocks, the EasyTune6 software packed in plenty of voltage, using both a higher than stock fixed voltage with an offset. As a result two of the three settings were stable, although the temperature under load was a cause for concern. Due to our relatively bad CPU, the more extreme third setting and auto tuning were not able to perform.
Manual overclock options on the G1.Sniper 3 are split between those in ET6 (which are enabled at boot time when the software is loaded) or those that are set in the BIOS. In the BIOS the options are spread around a few menus – the important ones of CPU multiplier, CPU voltage and Load Line Calibration are in all different menus to add to the confusion. Despite this, overclock performance was reasonable, matching the ASUS MVG.
Methodology:
Our standard overclocking methodology is as follows. We select the automatic overclock options and test for stability with PovRay and OCCT to simulate high-end workloads. These stability tests aim to catch any immediate causes for memory or CPU errors.
For manual overclocks, based on the information gathered from previous testing, starts off at a nominal voltage and CPU multiplier, and the multiplier is increased until the stability tests are failed. The CPU voltage is increased gradually until the stability tests are passed, and the process repeated until the motherboard reduces the multiplier automatically (due to safety protocol) or the CPU temperature reaches a stupidly high level (100ºC+). Our test bed is not in a case, which should push overclocks higher with fresher (cooler) air.
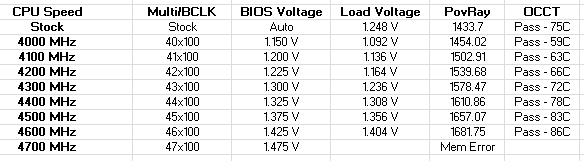
Automatic Overclock:
Using EasyTune6, CPU Level 1 attempts a 41x102 overclock (4182 MHz) and applies 1.295 volts to the CPU along with a +0.150 volt offset. This setting was stable, giving 1.392 volts on the CPU at load, a score of 1519.50 in PovRay, and a peak temperature of 85ºC in OCCT.
CPU Level 2 attempts a 43x103 overclock (4429 MHz) and applies 1.300 + 0.150 volts on the CPU. This setting was stable, giving 1.404 volts on the CPU at load, a score of 1615.00 in PovRay and a peak temperature of 86ºC in OCCT.
CPU Level 3 attempts a 45x104 overclock (4680 MHz) and applies 1.345 + 0.150 volts on the CPU. This setting was not stable, giving 1.476 volts on the CPU at load, causing a memory error in PovRay and a BSOD in OCCT.
Auto Tuning in ET6 tries 43x105 (4515 MHz) at 1.400 volts, but this setting causes a BSOD on boot.
Manual Overclock:
Starting at our base settings of 4.0 GHz on the CPU and 1.100 volts, stability was tested to find the minimum stable voltage as the multiplier was increased. Results are tabulated thus:


31 Comments
View All Comments
Speedgod66 - Thursday, May 16, 2013 - link
as an owner of the g1 sniper m3 I have to say some of your comments are valid -should have more sata ports very annoying , pciex 8x x8 layout is brilliant no card overheating running 2 evga 680 classifieds -but the sound for gaming is underestimated it is fantastic and gives you positional awareness of your enemy better than the Asus I have the maximus 1V genieZ and Maximus 1V extreme Z in other systems -love the extra features -but still anyone looking the sniper is great for gaming -posters a waste of time