Antec P280 Review: When Enthusiasts Are Engineers
by Dustin Sklavos on November 15, 2011 10:20 AM EST- Posted in
- Cases/Cooling/PSUs
- Antec
- P280
Assembling the Antec P280
If you ever dreaded assembling or working in Antec's P180 series, the P280 is going to seem like a breath of fresh air. The interior is incredibly spacious, but not just that...Antec has produced an enclosure that is nearly as easy to work inside as any of Corsair's (still the standard for ease of assembly as far as I'm concerned.)
The two side panels are held on by thumbscrews and are extremely easy to remove. From there, Antec has included six mounting screws for the motherboard and includes the rest in a kit with the enclosure. Our I/O shield snapped into place easily enough, and the board went in without any fuss. Wiring things up was a little bit trickier; it would've been nice if Antec had routed the cables through the motherboard tray in the first place and bound the motherboard headers together, but once you do it yourself the inside feels a lot cleaner.
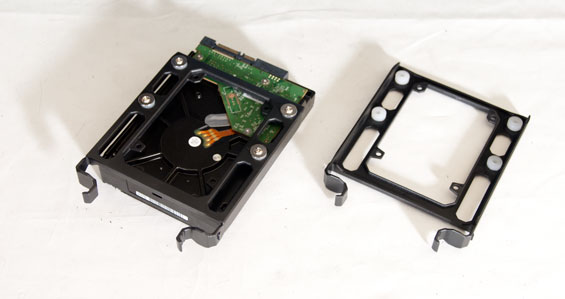
As for mounting drives, that's more of a mixed bag. I had to pretty much jimmy the optical drive in, applying force until it eventually just went all the way in. On the flipside, the toolless locking mechanism is incredibly secure (although you can still use screws if you're so inclined.) This is still a big improvement over having to manually attach rails to the ODD. The 3.5" drive trays are sturdy enough, though remember to stash the screws in a safe place for when you want to add additional drives. Where things do get a bit tricky is in the 2.5" toolless cage: SSDs slide in pretty firmly (I'd really recommend against putting a mechanical drive in here), but it doesn't feel super secure, and you'll want to route cables through the cage ahead of time as it's difficult to access the back of the drive from the other side. There's no locking mechanism either, just the pressure of the cage on the sides of the SSD, although you can use a screw to mount them in place. If you're not a fan of this approach (and I wouldn't fault you), it's worth mentioning 2.5" drives can also be mounted on the drive trays.

Mounting the power supply and video card was easy enough; there's a healthy amount of space inside the enclosure, and things lined up just fine. Where Antec has made their biggest gains, however, is in cable organization. The P180 really pioneered cable management back in the day but by modern standards it's pretty dire. That's not the case with the P280, where there's nearly enough space behind the motherboard tray to stand up a molex connector on its side. Wiring up the P280 was very easy, with copious space above the tray for the AUX 12V line, and plenty of space around the motherboard to squeeze in the side-mounted SATA cables. I also plugged the three included fans into the set of headers in the back of the case, and routing the single molex power cable was a breeze.


Honestly, the P280 is just tremendously roomy and easy to work in, the polar opposite of its predecessor. With the tremendous amount of space behind the motherboard tray, sliding the back panel on required none of the force it usually does with most other enclosures. This is a design that was clearly put together by engineers who also happened to be enthusiasts, and it really shows.


164 Comments
View All Comments
Toshio - Tuesday, November 15, 2011 - link
Thanks Dustin for the great article! Of all the sites I read every day, Anandtech is the only one with consistent quality, thanks for the effort guys!Back on topic, I like most of the changes in the P280 (compared to my good and aging P182). I only find a couple things to improve: covers for unused ventilation holes (as previously mentioned) and I'm not sure if I like the HDD arrangement, you need to take off the right panel to replace a disk. P182's 3.5" lower cage is a pita to work with, but you only needed to take out the right panel.
Question: compared to P18x, does the construction feel solid enough? are the new acoustic panels on par with the old generation?
lvang - Tuesday, November 15, 2011 - link
Nicely revised from it's predecessor, a little surprised at the overall temperatures though. Either way, it wouldn't hurt to sport one of these!Etern205 - Tuesday, November 15, 2011 - link
A proper Antec case! It looks simple, sleek, and elegant.Did they canned that guy who design cases for 12 year olds?
Note that Antec 300 wasn't that bad, except wire management sux.
Zoomer - Tuesday, November 15, 2011 - link
It's also $40. IMO it needs to be updated for usb3, ssds and a not so bright blue led and it'll be good for another 5 years. Seriously, the blue led is ridiculous. I took a back sharpie to it and it's still kinda bright.romany8806 - Tuesday, November 15, 2011 - link
Hey Dustin, thanks for the review. Tempting case - I abandoned my P180 because it was horrible to work in and the door hinge eventually gave out because of the constant wear and tear to access power, ports etc.I'm running a Cooler Master 690-II Advanced at the moment and love it, but wish I had an 8th expansion slot. Curious to see how the two compare performance-wise. I don't suppose you've got access to one for testing?
Belard - Tuesday, November 15, 2011 - link
I checked newegg....It looks very much like the case I need for a build.
GhostMagic - Tuesday, November 15, 2011 - link
I've owned two antec cases, but for my next build I'd been looking at corsair just because it felt like Antec's cases were standing still. This one looks nice, maybe I'll win one?KDu - Tuesday, November 15, 2011 - link
Nice case, glad they updated the Sonata seriescorvisrex - Tuesday, November 15, 2011 - link
good, review, it is nice to see the reviews themselves giving actual numbers relating to sound dampening and noise. Major issues for me when case hunting, and too often merely observational, rather than real data.EliteOrion - Tuesday, November 15, 2011 - link
Man this case looks slick!!!