Lian Li PC-TU200: On the Road With Lian Li
by Dustin Sklavos on October 31, 2011 12:45 AM EST- Posted in
- Cases/Cooling/PSUs
- Mini ITX
- Lian Li
In and Around the Lian Li PC-TU200
If you've been keeping up with my case reviews since I started hammering them out a few months ago, you'll know I'm a proponent of enclosure designs that find newer, sometimes smarter ways to work. At the very least, I can respect any company that's willing to tinker with conventions and experiment with their designs: that's why I have such a soft spot for SilverStone, and it's why I'm developing one for Lian Li. But there's a major difference between the two: SilverStone experiments a bit with their designs, but Lian Li oftentimes seems like their engineers have started entirely off the grid to begin with.


Externally, the TU200 seems pretty self-explanatory. The front features a single 5.25" drive bay with a bay cover so as not to mar Lian Li's trademark all-aluminum design. Below it are the power button and reset buttons, followed by the massive front vent for the 140mm intake fan. Making sure to keep with the times, the bottom of the enclosure sports an eSATA port and a pair of USB 3.0 ports, along with the standard headphone and mic jacks. The corners of the enclosure are covered in molded aluminum bumpers while the top has a handle built into it, not so quietly suggesting that the TU200 is meant to spend its time on the road instead of buried under your desk.
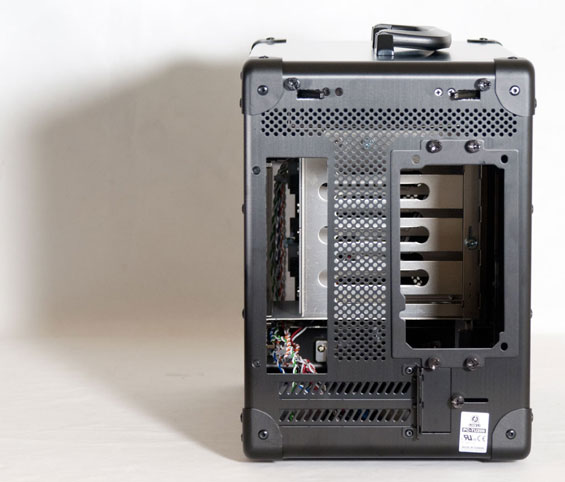
Pop over to the back, and you'll notice two major clues that all is not normal in Lian Li's world: two levers at the top, locked into place with thumbscrews, that are designed to pop out the side panels. Below them is a healthy amount of ventilation, the power supply mounting plate, and the openings for the motherboard I/O cluster along with two ventilated expansion bay covers.
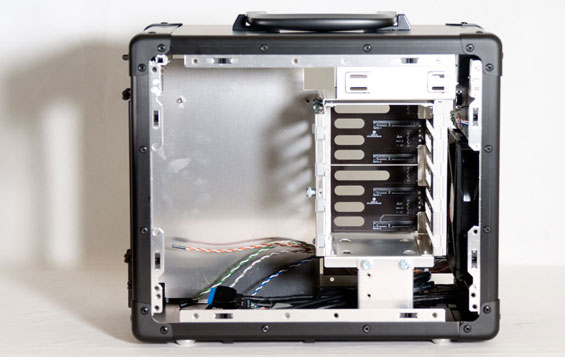
When you do open up the TU200, everything is where you'd expect it to be...sort of. There's a fairly healthy sized drive cage to the right able to support four 3.5" drives (or three 3.5" drives and a single 2.5" drive that mounts to the bottom); that cage is held in place by the top cage for the 5.25" drive and a small plate that secures into both the cage and the bottom of the enclosure with thumbscrews. If it wasn't clear from the outside that quarters in the TU200 were going to be cramped, it should be abundantly clear now. Thankfully the standoffs for the motherboard are built into the tray.
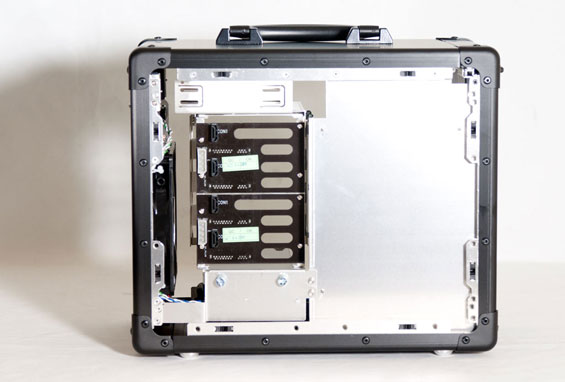
Speaking of the motherboard tray, you'll notice that behind it there's virtually no gap between it and the side panel; any cable organization has to be done behind the drive cage backplane. And while that backplane is very much appreciated, it has a couple of minor flaws. The first is that Lian Li inexplicably includes molex power connectors instead of SATA power. I've mentioned this before: molex needs to go the way of the dinosaur, period. The second has to do with the mount at the bottom of the cage used for the 2.5" drive: it just doesn't line up with the bottom connectors. Given that Lian Li has to use custom grommets and screws to mount a 2.5" drive to the bottom of the cage anyhow, I feel like some allowance could or should've been made for this.
Quarters in the TU200 are pretty freaking cramped. That's to be expected from an enclosure this small and designed with these parts in mind. While the front intake fan theoretically provides airflow for the entire system, it also can potentially run into trouble from the drive cage blocking the air, and it's too high to bring in cool air for the video card; for that there's ventilation in the bottom of the case, but as you can see in the photos the TU200's feet don't lift it off the ground very much. On carpet this gap will be completely closed.


53 Comments
View All Comments
lorribot - Monday, October 31, 2011 - link
The USB logo goes up on every USB socket except Dell Optiplex front connectors which for some reason have always been upside down.No one at Dell has ever been able to tell me why.
7Enigma - Tuesday, November 1, 2011 - link
Hmm, so since 90% of USB cables I seem to use are vertical rather than horizontal, is that to the left or the right? :)Golgatha - Monday, October 31, 2011 - link
Remove the drive cage entirely, put in a 4x2.5in to 5.25in adapter at the top of the tower, and make sure the main system fan is blowing over it. 7200rpm mechanical 2.5in HDDs are plenty fast for this type of application (especially if you put 2 in RAID0 or RAID1) and a bay for a SSD would be welcome. Optical drives are rarely needed anymore and you can bring an external USB optical drive with you if you end up needing one anyway.These major changes would allow for a full sized PSU and a high end graphics card, and you wouldn't have the heat issues to deal with due to more room for airflow. A 2x120mm fan configuration in the front and single 120mm fan in the back (the second 120mm fan in the back would be in the PSU) would be cool, quiet, and effective for any system you could dream up. I 2nd the idea of creating an Anandtech "by the enthusiast for the enthusiast" company. Let's do it and make millions.
superccs - Monday, October 31, 2011 - link
So what are the obvious things you do in the case of an ultra portable laptop?1 small HDD.... check.
no optical drive.... check.
Since this is not a laptop 2 HDDs sounds good (2.5 SSD + 2-3TB drive). A standard ATX PSU makes total sense since they are infinitely available and their added size is worth the stable and reliable power they provide.
Optical drive really? If you are trying to make a compact as possible box, make a half height 5.25 drive bay, or can the whole bay and let them plug in a USB drive if they need to.
Anyone want to go in to the case making business? I think that there are some definite opportunities. Lian Li keep trying.
Death666Angel - Monday, October 31, 2011 - link
I like the drive cage with the back plane, that's a nice touch. But I do ask myself, who here would use 4 3.5" drives in such an enclosure. If it were me, I'd pop the drive cage out and use it for something else. Best usage would be to install a radiator with the 140mm fan. Unfortunately, there is no AIO water cooling solution with 140mm radiators (as far as I know).Still, I always appreciate a small case. But I'd always go mATX in this day an age. Maybe when we hit 10nm CPU/GPU and a system uses 100W tops I can go with something this small. Until then I'll need the extra space for some quieter cooling. And I like to keep my options open of using an Intel PCIe NIC, sound card etc. Just 'cause.
miteethor - Monday, October 31, 2011 - link
I have two Lian-Li cases and they are hands down the best I've ever owned. I just feel bad that the first to Lian-Li's reviewed by this site are super-compact and apparently cumbersome and poor performing, because working in the larger chassis is pure pleasure. Maybe you should get one of the larger models to compare because it would be a shame for the last 2 reviews to be representative of this company.Dustin Sklavos - Monday, October 31, 2011 - link
I actually have two bigger Lian Li cases in house waiting to be reviewed, so things should pick up there.Knifeshade - Monday, October 31, 2011 - link
Any more smaller cases after those? I'm personally wondering what you think of the V354.martmann - Wednesday, November 2, 2011 - link
Good review, in general, but seeing as your review motherboard did not have a 20 pin USB 3 header for the front ports (just like most current mini-ITX boards), you would think it would be worth mentioning that there is no way to use the front USB 3 ports (except as USB 2 ports).You did point out enough faults to keep most from buying this case, but you missed that pretty big one. I bought a replacement front port cable that had 2 Male type A USB 3 connectors (to run to the back panel ports of my motherboard) to correct this, but it cost around $30 (shipped) LL P/N: PW-IE5H550.
TheGoodGeek - Thursday, November 3, 2011 - link
...Newegg didn't even have pics on the product page yet. I completely agree that this was the hardest (and most expensive) case I've ever used in a build. On the plus side, my spouse decided to put the quality to the test, and ran into the USB extension cord for the keyboard when I was testing the hookup to the big TV - a 3 foot drop onto concrete floors, and the only damage was to one of the side panel clips. No dents, no part failures. THAT's true durability, just what you need for travel. (And yes, I've now got a bluetooth keyboard!)I did, however, have to go back to the drawing board when my temps were simply unacceptable with the initial build. I switched to a modular Silverstone power supply with shorter cables, and swapped out the CPU cooler, and now it's fine.
I've been on about an hour and a half, and currently the system as at:
Chassis Fan 976 rpm
CPU fan 1687 rpm
Motherboard 31C
CPU 28C
I took a lot of pics during the build and re-build, but have been too lazy to post them in the forum. I'll get to work.