Biostar TPower i55 – Super Middle Weight Contender
by Rajinder Gill on November 25, 2009 12:00 PM EST- Posted in
- Motherboards
Board Layout and Features
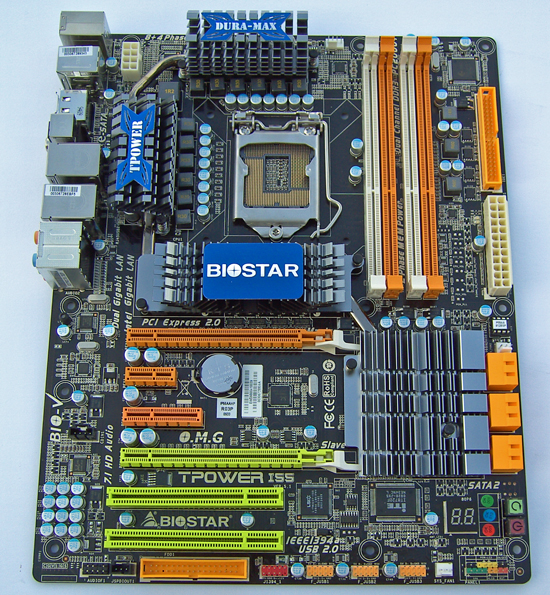
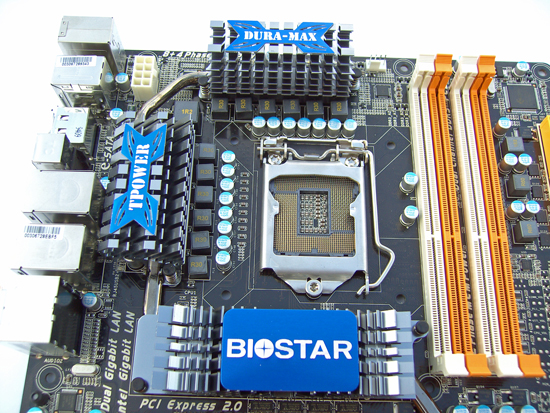
The heatsinks bearing the TPower and DURA-MAX logos provide cooling for the 8-phase uPI CPU PWM circuit, with an additional 4 phase supply for VTT (the integrated memory controller). The IR FET’s are specified at around 30 amps each, which should allow for ample overclocking headroom. The two CPU PWM heatsinks are connected by a heatpipe which also links to the BIOSTAR logo heatsink you see in the bottom of the picture. This pipe extends further to the PCH heatsink, allowing the entire assembly to be cooled with a single fan. All heatsinks are fastened with push-pins rather than screw fittings, although we found contact pressure was sufficient in this instance.
Despite the bulk used in these heatsinks, were going to recommend users to apply active cooling across the central heatsink when overclocking, especially if ramping PWM switching frequencies for heavy load testing. On the subject of heavy loads; BIOSTAR is using revised FOXCONN sockets on their boards. We’ve had no socket related problems during the course of this review and have not heard of any user reports thus far using BIOSTAR boards.
We’re a little surprised to find that there are only three onboard fan headers, one of which is assigned to the CPU. This leaves two (actually one) additional headers for active board cooling should high temperatures become a hindrance to overclocking. Do note; the SYS_FAN 2 header at the right side of the board will not be accessible if you plug a long GPU into the primary PEG slot. We’d like to have seen BIOSTAR put a little more time and consideration with regards to the number of headers and their placement on this motherboard given the target audience.
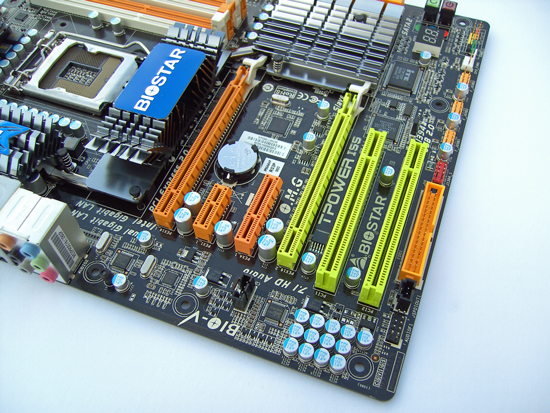
Expansion slot layout from the top down is comprised of, PCI/e x16 (x8 if the second x16 slot is filled), PCI/e x1, PCI/e x4, PCI/e x8 and two PCI slots at the bottom. You lose access to the PCI/ex 1 slot as soon as you put a GPU with a dual slot cooler in the first PEG slot, although you can use the PCI/e x4 slot instead. Running dual GPU’s will also limit users to one PCI slot, although we don’t see that as a huge deal breaker these days.
While we’re on the subject of expansion slots, we found the PCI/e retention latches to be a pain when trying to remove our 4870X2 GPU from the board. The lever does not protrude far enough to allow access easily, especially if the board is placed in a case. We had to use a set of long-nose pliers to grab the latch and force it downwards so that we could remove the GPU from the slot.
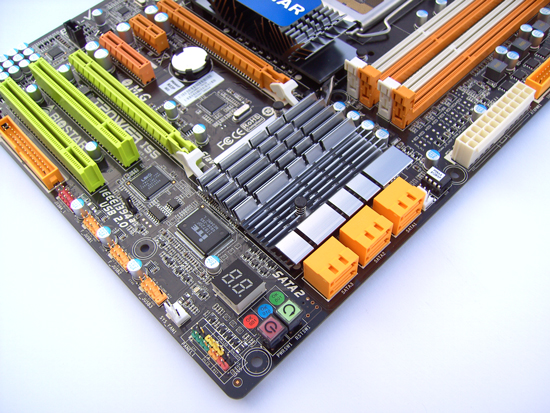
Six right angle SATA ports are available via the Intel P55 PCH. A LED hex post code reader and power/reset switches are located in the lower right corner for open test bed users. A single DIL socket BIOS chip is located above the SATA ports, while the associated CMOS clear jumper is located to the right of the last PCI slot. CMOS clear access is certainly going to be hampered somewhat if the last PCI slot is occupied, but we never needed it. Unfortunately there is no rear I/O panel CMOS clear switch, which will leave users pulling side panels off cases should the board fail to post after changing BIOS settings.
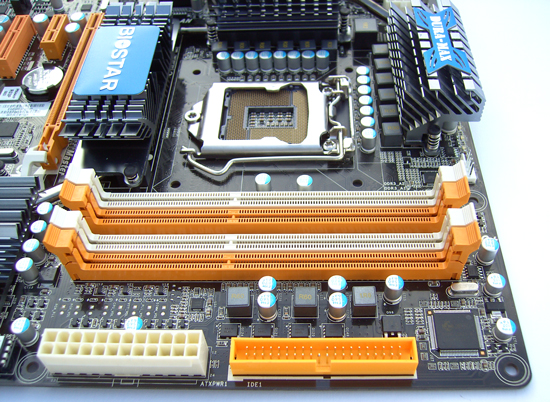
ATX 12V and IDE connectors are placed along the right edge of the board. A full spread of voltage reading pads are provided, and located between the ATX 12V connecter and the last DIMM slot. DIMM voltage is supplied by a 2-phase PWM circuit, which is pretty much the norm for boards in this price range and should certainly be more than adequate for the platform.

Rear I/O options include: 1 PS/2, 8 USB, 2 E-SATA, 1 IEEE-1394a, 2 RJ45 LAN, 1 S/PDIF & 1 Optical out and finally 6 AUDIO out jacks (Realtek ALC888).


39 Comments
View All Comments
treesloth - Monday, December 7, 2009 - link
I first used the internet when the main protocol was IP over smoke signals, so keep your fancy "flexibility" off my lawn!Seriously, though, good points. I also have to compliment Anandtech on basing their article layouts on visitor convenience, as opposed to the many sites that seem to try to herd as many visitors as possible into as many page views (and ad impressions) as possible.
Rajinder Gill - Thursday, November 26, 2009 - link
Yes, the summary/conclusion is on the first page. For the exact reason that Bull Dog mentions. We've had a lot of requests from people that want 'bare all' on the first page, so here it is. Saves you having to trundle through every page picking up tidbits here and there of what the board can or cannot do. We know it won't appease everybody, but then appeasing everybody is impossible anyway..lolregards
Raja
poohbear - Thursday, November 26, 2009 - link
I think it doesnt make sense. who says u hafta "trundle" through every page to get to the conclusion?? u just click the drop down menu & go to the conclusion. A site for computer enthusiasts & the readers can't even figure out how to use a drop down menu????Devo2007 - Thursday, November 26, 2009 - link
I agree - the new layout is confusing.What I'd suggest is a small summary of the article (either Pros/Cons, or small highlights of the product being reviewed. That way, people can get a quick overview of the product, and delve into the article more if they wish.
Putting the full-fledged conclusion on the main page just doesn't seem to fit right.
Rajinder Gill - Thursday, November 26, 2009 - link
I'll try and find a happy medium that does not confuse people too much..loltreesloth - Monday, December 7, 2009 - link
Put the conclusion right in the middle-- page 10 of a 20-page review. Oh, and since programming languages can't seem to settle whether indexing should start at 0 or 1, we'll compromise and start at .5.Seriously, though, I think people will get a little confused exactly once, figure it out, and never have another problem. I like the new way.
sonci - Thursday, November 26, 2009 - link
Its called abstract,its used on medical articles..
Rajinder Gill - Thursday, November 26, 2009 - link
Whichever way you look at it; you click on the review, read the first page for everything relevant and then if it interets you to lo at the figures, read on. Can't get much simpler than that.later
Raja
Bull Dog - Wednesday, November 25, 2009 - link
First/second page conclusion.Kinda wierd but I like it over the standard "go through 11 gazillion pages of nearly meaningless numbers."