Silverstone Fortress FT01
by Christoph Katzer on November 10, 2008 5:00 AM EST- Posted in
- Cases/Cooling/PSUs
Interior
The side panels are attached with three screws; once these are removed, you need to lift up the lever to unlock the panels. To secure the chassis for LAN parties or similar gatherings, you can lock the lever with a small lock (not included with the chassis). Once you lift up the lever, the side panel releases and you can remove it easily.
The inside shows a very sleek design with the hard drives in the bottom of the front directly behind the 180mm fan. The optical drives sit in the top and are secured with a tool-less mounting system that we will describe later. Despite the size of the chassis, there is only space for a standard ATX form factor (or smaller) motherboard, since there isn't a lot of space on the right side of the case.
Each hard drive has its own drive bay together with a plastic frame. To get the frame out of the bay you will need to lift up the small lever on the right side and pull it towards yourself. There are two main frames for these drive bays; the lower one contains three mounting slots and the upper one four, allowing you to easily install up to seven hard drives. The side of the main frame contains large openings through which the air can flow. Since a large fan is right in front of the drives, it is necessary to leave enough space for the air to come through. The drives mount backwards, which means the jacks go in first. You will need to open the second side panel to attach cables and connectors to the hard drives. You can then guide the cables through the three long openings "behind" the drive cages.
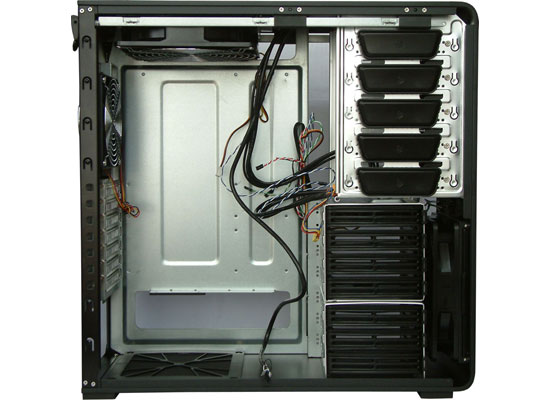


Both intake fans have a filter installed right in front of them, which is one of the benefits of the positive pressure cooling design. Both filters appear to be easily accessible and therefore easy to clean. That's especially important given the large fans, since they will move lots of air and dust. The problem is, only the front air filter can actually be removed without some extra effort. The front filter simply slides out the side, but to get at the top filter you need to remove two screws, slide the fan towards the front, and then it will drop out -- at which point you can access the filter and clean it. Depending on what components you have installed in your system, however, getting at the two screws that need to be removed could prove difficult short of uninstalling some of the other components.
It's possible to route some cables behind the motherboard tray, but we couldn't fit all of the cables back there. We managed to put the fan cables there, but the cable for the 8-pin EPS12V connector was unfortunately too thick. There's a reason for the lack of space, however: acoustic dampening foam attached to both side panels. This should reduce noise emissions, and it should be particularly useful for those looking to build silent/near-silent systems. However, it doesn't help us much when you install a high-end (and loud) system like our test configuration.
The optical drives are secured with an easy screw-less mechanism; you just press the top of the button for each bay and it releases the drive. Of course, this may not work as well with nonstandard 5.25" options like fan controllers, so be warned that the mounting mechanism is primarily targeted at full size 5.25" devices. Screwless mounting of devices is possible, should you desire.
The power supply has another large opening right below it, which is good if you are running a power supply with a fan on the bottom. Silverstone also includes a filter here, which will help reduce dust buildup inside the power supply (at the cost of some airflow). It also means the power supply should run cooler, since it will have direct access to a fresh air supply. If you use such a power supply, it will not facilitate cooling of the main compartment, but the positive air pressure within the chassis means that shouldn't be a problem. That doesn't apply for users running a power supply with an 80mm fan, but we would generally recommend against that for this particular case.


22 Comments
View All Comments
billt - Monday, November 10, 2008 - link
Good looking case. But then I am partial to Silverstones; have a TJ09 and a SG03 (neither overheat). Wish they had made this case 1-2" deeper.MrX8503 - Monday, November 10, 2008 - link
I think antec might of been the first ones to have the psu at the bottom, but what silverstone did to their psu is ingenious!I like how the psu fan is flushed to the bottom hole of the case with a filter on it. This lets the PSU suck air from the outside of the case and is separate from the entire case air flow.
SilthDraeth - Monday, November 10, 2008 - link
What amazes me, is you can get a bling bling case for $50. But if you want a simple case like this it will cost you around $200.I know quality of craftsmanship is one thing, but there is no reason you shouldn't be able to get aesthetics like this in a $50 case. It could look similarly, but maybe have a few sharp edges that need to be filed by the purchaser.
Vidmar - Wednesday, November 12, 2008 - link
That hard drive cage is a real problem with airflow. For what this thing costs I would expect a high end power supply as well.For my $$$ this Rosewill R6AR6-BK case has almost all of the features of that case, cooler performance and at 1/4 of the cost!
http://www.newegg.com/Product/Product.aspx?Item=N8...">http://www.newegg.com/Product/Product.aspx?Item=N8...
Sunrise089 - Monday, November 10, 2008 - link
The TJ-07 model from Silverstone is a popular case for watercoolers. Does this case replace the TJ-07, or is there an even larger 180mm equipped case in the pipeline?Cardio - Monday, November 10, 2008 - link
I have had 3 of their cases and while well made, they all had extremely poor thermal performance. Could only run one of their expensive HTPC cases with the top removed! Very poor engineering as far as I am concerned. Never again they must not even test these things!HOOfan 1 - Monday, November 10, 2008 - link
Looks a little like the Coolermaster RC-690HOOfan 1 - Monday, November 10, 2008 - link
also it is nice for a change to see a black case with a black back panel....strikeback03 - Monday, November 10, 2008 - link
For reversed fan flow measurements, did you reverse all the fans? So that the rear 120 would be the only intake, and most airflow from it would be sucked right back out by the 180 on top? How would a more Antec-like configuration, with front intake and both rear and top exhaust, work? Also, would the stock fan configuration have any negative impact on air flow around a larger tower style cooler?Also, you mentioned that you wouldn't recommend using a PSU with an 80mm fan, why is that?
Christoph Katzer - Monday, November 10, 2008 - link
No, just the large one on top (then according to ATX spec) to see the difference. No 80mm-fan-PSU because one with 120mm fan can get fresh air through the bottom.