Cooler Master Hyper 6+: Universal Heatpipe Tower
by Wesley Fink on February 14, 2007 12:02 AM EST- Posted in
- Cases/Cooling/PSUs
Cooler Master Hyper 6+
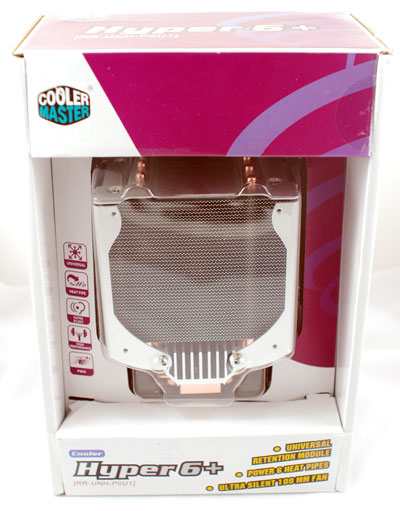
The Cooler Master package provides a good view of what you will get with the Hyper 6+. The cooler itself is featured in an acrylic clamshell that showcases the copper base, the aluminum heat fins, and the 6 heatpipes.
Cooler Master ships the Hyper 6+ with a 100mm fan, but it is not mounted. This allows you to clearly see a few of the tower design features
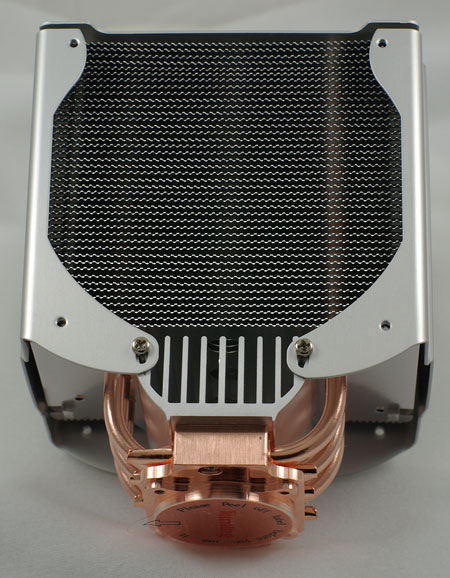
This includes the serrated fin design which significantly increases the surface area of the fins. The hybrid copper and aluminum base is also distinctive, using copper for the CPU plate and cast aluminum fins for first-stage cooling.
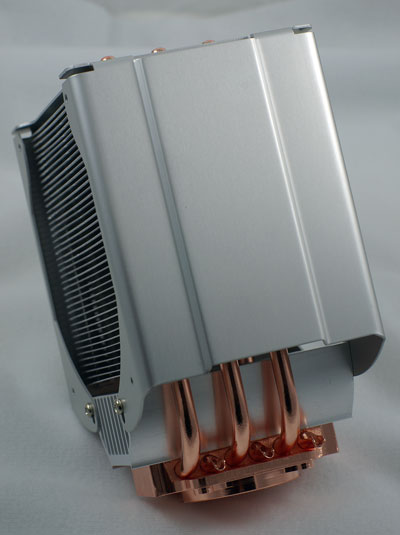
Heat is moved from the copper base to the fin tower with six copper heatpipes. The design mounts three pipes on each side of the tower and attaches the serrated fins to the heatpipes to remove heat.
Early designs of this cooler used a powerful and somewhat noisy 100mm fan. The current shipping fan does not move as much air but it is promoted as "Ultra Silent". A more powerful fan is available from Cooler Master if needed, but the odd 100mm fan-size makes finding other fans difficult. Standard sizes in this area are 92mm and 120mm.
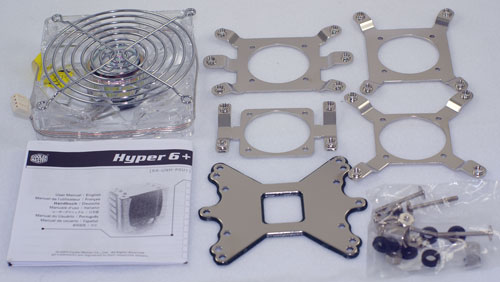
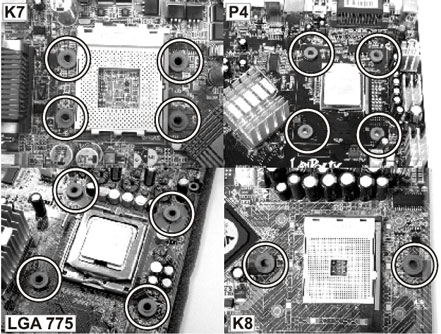
Inside the box you will also find zip bag with the four adapter plates and the universal back plate. There is also a small bag of parts with the screws and washers needed to mount the fan, attach the adapter plate, and mount the cooler. Inside the bag you will also find a small packet of thermal compound and mounting instructions. The instructions are frankly awful. If some technical writer had just spent one paragraph describing the concept everything would have been much easier to mount.
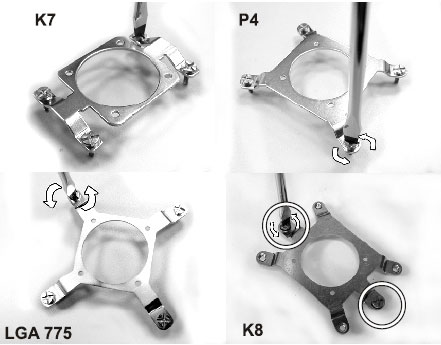
Basically you choose the right adapter plate, attach the mount screw to the plate, turning counterclockwise to screw the upper part of the attachment screw to the adapter plate. You then screw the plate onto the cooling tower - around the round CPU plate - with the small countersunk screws.
The large and small washers or pads are misidentified in the instructions. We also found the use shown in the instructions was not the easiest. The large hole soft pads fit best around the screws that will go though the motherboard on the adapter plate. They have an adhesive side so they can stick and not move all over the place when you mount. We found this easier than placing the washer pads on the motherboard as suggested in the instructions.
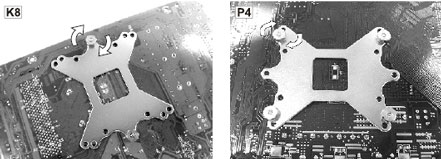
After mounting the adapter and sticking on the large washers you apply thermal compound to the cooler copper plate and turn the motherboard upside down. The screws you attached to the adapter fit though the motherboard holes. Then place the other washers on the protruding screws, and attach the back plate - securing it with the provided nuts. There is also an included Phillips/flat blade nut driver that can be used with your screwdriver to attach the nuts on the bottom of the motherboard. The back plate is only needed for some CPU sockets, and Socket 775 is not one of them. However, it still fits on 775, and it still has mounting holes that will fit the 775 holes, so we used it to reinforce the board and further distribute the 2 pound weight of the Hyper 6+.
It is all but impossible to install this HSF on a partially mounted motherboard. The best way to attach the assembled HSF is to stand the Hyper 6+ on its top, lower the upside-down motherboard on the HSF, and secure the HSF from the back. Once you understand how the adapters and HSF work together installation is pretty easy. It would be even easier if the installation instructions clearly communicated this concept.
Specifications
Our test system is Intel Socket 775, but the Cooler Master Hyper 6+ will mount on a wide range of systems with various CPU sockets. All the needed hardware is included to fit the variety of supported sockets
As already mentioned, the Hyper 6+ is a bit smaller than the Tuniq Tower 120, which should allow it to fit in situations where the Tuniq is just a little tight. There should be no problem mounting it in most mini, mid, or full tower designs, or in most full desktop cases. However, micro ATX and Media Center cases may or may not be able to handle the Hyper 6+. It is big and you should measure carefully if you have a small case.
While the Hyper 6+ is a little smaller it still weighs about the same as a Tuniq Tower 120 when the fan is attached. That is it approaches a kilogram (2.2 lbs.) in weight. The back plate spreads the weight over a larger area, but this is still much heavier than either Intel or AMD recommend. Use caution if you plan to move your PC a lot - or choose a smaller, lighter weight design like the Scythe Katana, which is a much smaller and lighter heatpipe tower. The smaller designs do not cool quite as well but they are normally within manufacturer recommended weights and should be safer if you move your PC a lot - as in carrying it back and forth to LAN parties.
The Cooler Master package provides a good view of what you will get with the Hyper 6+. The cooler itself is featured in an acrylic clamshell that showcases the copper base, the aluminum heat fins, and the 6 heatpipes.
Cooler Master ships the Hyper 6+ with a 100mm fan, but it is not mounted. This allows you to clearly see a few of the tower design features
This includes the serrated fin design which significantly increases the surface area of the fins. The hybrid copper and aluminum base is also distinctive, using copper for the CPU plate and cast aluminum fins for first-stage cooling.
Heat is moved from the copper base to the fin tower with six copper heatpipes. The design mounts three pipes on each side of the tower and attaches the serrated fins to the heatpipes to remove heat.
Early designs of this cooler used a powerful and somewhat noisy 100mm fan. The current shipping fan does not move as much air but it is promoted as "Ultra Silent". A more powerful fan is available from Cooler Master if needed, but the odd 100mm fan-size makes finding other fans difficult. Standard sizes in this area are 92mm and 120mm.
Inside the box you will also find zip bag with the four adapter plates and the universal back plate. There is also a small bag of parts with the screws and washers needed to mount the fan, attach the adapter plate, and mount the cooler. Inside the bag you will also find a small packet of thermal compound and mounting instructions. The instructions are frankly awful. If some technical writer had just spent one paragraph describing the concept everything would have been much easier to mount.
Basically you choose the right adapter plate, attach the mount screw to the plate, turning counterclockwise to screw the upper part of the attachment screw to the adapter plate. You then screw the plate onto the cooling tower - around the round CPU plate - with the small countersunk screws.
The large and small washers or pads are misidentified in the instructions. We also found the use shown in the instructions was not the easiest. The large hole soft pads fit best around the screws that will go though the motherboard on the adapter plate. They have an adhesive side so they can stick and not move all over the place when you mount. We found this easier than placing the washer pads on the motherboard as suggested in the instructions.
After mounting the adapter and sticking on the large washers you apply thermal compound to the cooler copper plate and turn the motherboard upside down. The screws you attached to the adapter fit though the motherboard holes. Then place the other washers on the protruding screws, and attach the back plate - securing it with the provided nuts. There is also an included Phillips/flat blade nut driver that can be used with your screwdriver to attach the nuts on the bottom of the motherboard. The back plate is only needed for some CPU sockets, and Socket 775 is not one of them. However, it still fits on 775, and it still has mounting holes that will fit the 775 holes, so we used it to reinforce the board and further distribute the 2 pound weight of the Hyper 6+.
It is all but impossible to install this HSF on a partially mounted motherboard. The best way to attach the assembled HSF is to stand the Hyper 6+ on its top, lower the upside-down motherboard on the HSF, and secure the HSF from the back. Once you understand how the adapters and HSF work together installation is pretty easy. It would be even easier if the installation instructions clearly communicated this concept.
Specifications
Our test system is Intel Socket 775, but the Cooler Master Hyper 6+ will mount on a wide range of systems with various CPU sockets. All the needed hardware is included to fit the variety of supported sockets
| Specifications | |
| Model | RR-UNH-POU1 |
| Socket Type | Socket A/370/462/478/754/939/940/LGA 775 Note: only compatible with Socket A motherboard which includes mounting holes |
| Heat Sink Dimension | 118x82x143 mm |
| Heat Sink Material | 6 heat pipes, aluminum and copper alloy |
| Fan Dimension | 100x100x25 mm |
| Fan Speed | 1800 ~ 3600 R.P.M. (Control by PWM) |
| Fan Air flow | 31.33 ~ 72.14 CFM |
| Fan Air Pressure | 0.96 ~ 4.46 mmH2O |
| Fan Life Expectance | 50,000 hrs |
| Bearing Type | Rifle Bearing |
| Voltage Rating | 12 V |
| Noise Level | 20.6 ~ 46.4 dB(A) |
| Connector | 4 pin (PWM) / 3 pin (without PWM) |
| Weight | 795.3g (without FAN) |
| Thermal Resistance | 0.25 ~ 0.36 K/W (Testing with Intel Pentium 4 570J) |
As already mentioned, the Hyper 6+ is a bit smaller than the Tuniq Tower 120, which should allow it to fit in situations where the Tuniq is just a little tight. There should be no problem mounting it in most mini, mid, or full tower designs, or in most full desktop cases. However, micro ATX and Media Center cases may or may not be able to handle the Hyper 6+. It is big and you should measure carefully if you have a small case.
While the Hyper 6+ is a little smaller it still weighs about the same as a Tuniq Tower 120 when the fan is attached. That is it approaches a kilogram (2.2 lbs.) in weight. The back plate spreads the weight over a larger area, but this is still much heavier than either Intel or AMD recommend. Use caution if you plan to move your PC a lot - or choose a smaller, lighter weight design like the Scythe Katana, which is a much smaller and lighter heatpipe tower. The smaller designs do not cool quite as well but they are normally within manufacturer recommended weights and should be safer if you move your PC a lot - as in carrying it back and forth to LAN parties.


25 Comments
View All Comments
JarredWalton - Wednesday, February 14, 2007 - link
For straight air cooling? Not likely. The Tuniq 120 already stays pretty cool, and for the most part it's at the point where temperatures aren't the limiting factor in stuff like OC'ing. The only way to get better in terms of temperatures would be water or phase-change (or TEC). In terms of noise levels, it's already very quiet, but maybe an even larger HSF could do a bit better. Really, at this point the case will start to have as much of an impact as any further HSF changes.Now, if someone can come up with a way to make heatpipes work even better or something, we might see incremental improvements, but basically air cooling is pretty topped out I think. From here, we just want lower prices, lower noise, smaller, etc. but you can't usually get more than one of those at the same time.
yyrkoon - Wednesday, February 14, 2007 - link
Speaking of size, what is a good low profile cooler ? In my case (no pun intended), I'm using a Lian-Li PC-G50, PSU sits right over the CPU, and I would like to find a good low profile CPU cooler . . .katastrophe - Wednesday, February 14, 2007 - link
Shouldn't the graph on page 5 be titled as Mhz, or the values changed to reflect Ghz?Wesley Fink - Wednesday, February 14, 2007 - link
Yes. Corrected to be more consistent.thatdjsnow - Saturday, August 24, 2019 - link
Perfect! I'd been checking out this older blog at https://compareheatsinks.blogspot.com for a good heatsink comparison but it only has a few Cooler Masters! Womp Womp.. 😂This was much more helpful, thank you!