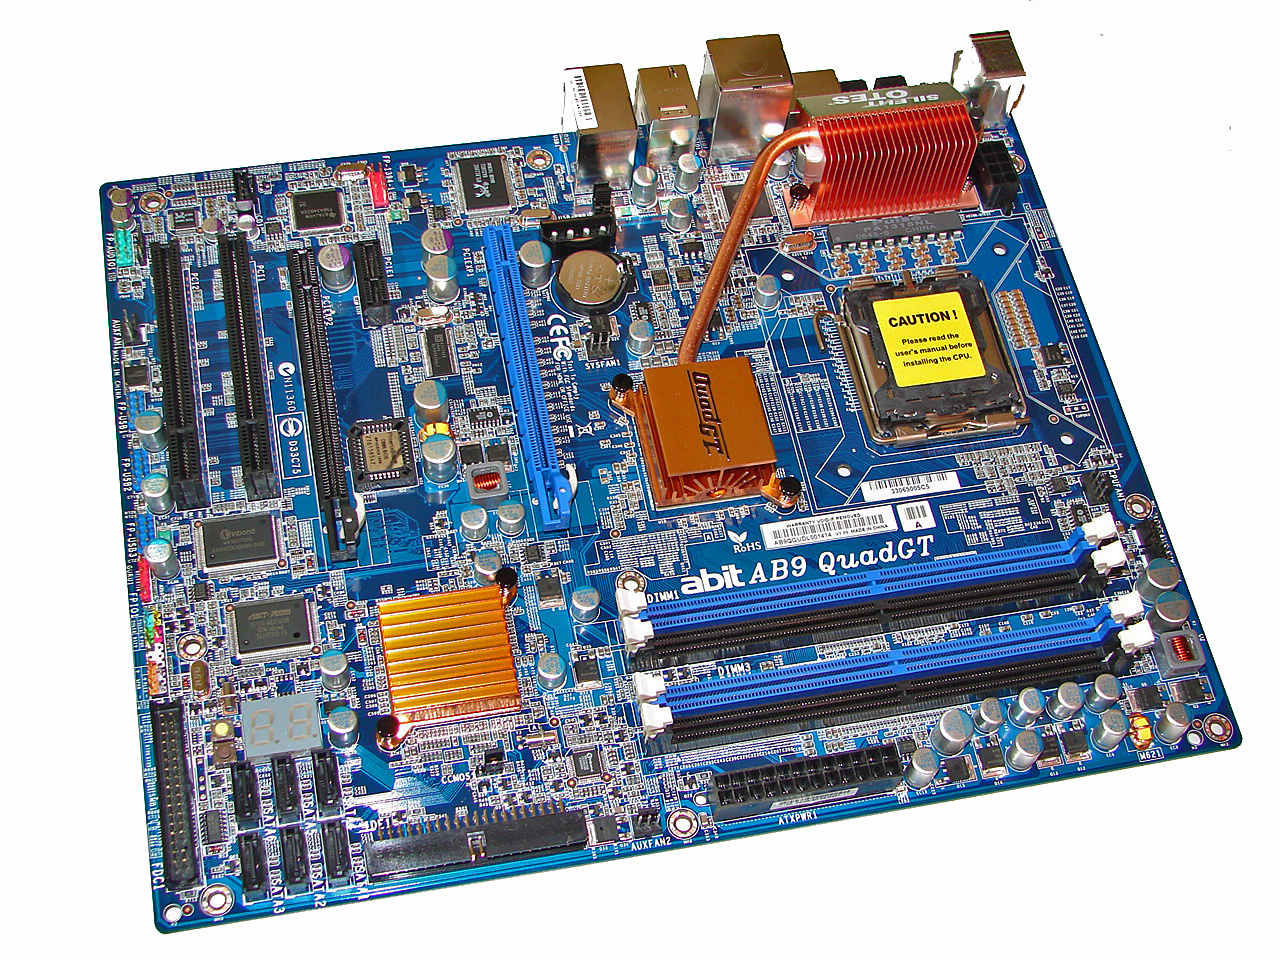
Board Layout and Features
abit really did an excellent job with the layout of this board and the color combination is elegant when compared to some of the more garish schemes we have seen recently on other boards. The board was very easy to install in our Cooler Master CM Stacker 830. Cable management was excellent with our only concern being the location of the floppy drive connector at the bottom of the board. The board features a total of five fan headers that are controlled via µGuru. The board also includes a digital PWM controller and 100% Conductive Polymer Aluminum Solid Capacitors that provided absolutely superb stability throughout testing.
The DIMM module slots' color coordination is correct for dual channel setup based upon the premise of installing DIMMs in the same colored slots for dual-channel operation. It was very easy to install memory modules with a full size video card placed in the top PCI Express x16 slot. abit places the CPU and two auxiliary fan headers above and to the right of the first DIMM slots respectively. The 24-pin ATX power connector is located below the number three and four DIMM slots.
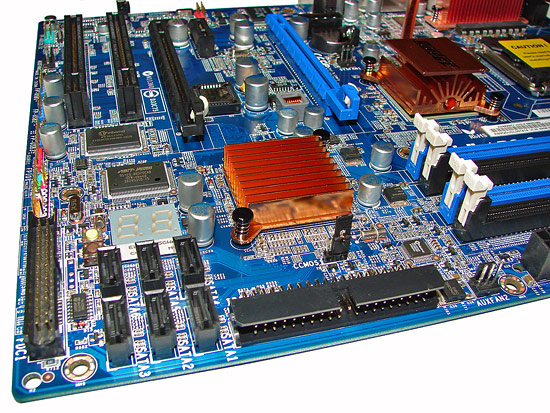
The six Intel ICH8R SATA ports are black and are conveniently located between the IDE and Floppy drive connectors. The SATA ports feature the newer clamp and latch design. We found the positioning of the SATA ports to be very good when utilizing the PCI or second PCI-E x16 physical slot, although we had to bend our SATA cable a little when using the first and second port with our X1950XT video card and we would expect similar issues with other dual-slot GPUs.
The ICH8R is passively cooled and remained cool to the touch throughout testing. abit includes an LED based POST code display and power and reset buttons. The standard clear CMOS jumper is located below the ICH8R chipset with another fan header being located between the IDE and 24-pin ATX connectors. We really would like to see more companies replace the CMOS jumper with a button instead, as it can be very difficult to access the jumper with expansion cards installed, and luckily abit did just that, as we'll see in a moment.
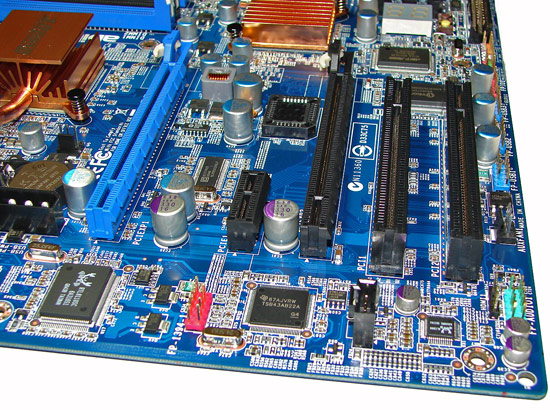
The board comes with one PCI Express x16 connector, one PCI Express x4 (x16 physical), one PCI Express x1, and two PCI 2.3 connectors. The layout of this design offers one of the better dual x16 connector designs we have worked with to date. Only the first PCI slot will be physically unavailable if you use a double slot video card in the second PCI Express x16 physical slot. There is a four-pin 12V Molex connector that is required for dual graphic card operation. We confirmed the PCI Express x4 slot can be used with a wide variety of x1, x2, and x4 cards.
Something else worth noting are the audio features. The black three pin header next to the number two PCI slot and the green front panel audio header is an HDMI Audio header that allows output to a HDMI capable video card. A few HTPC enthusiasts might find that feature to be useful.
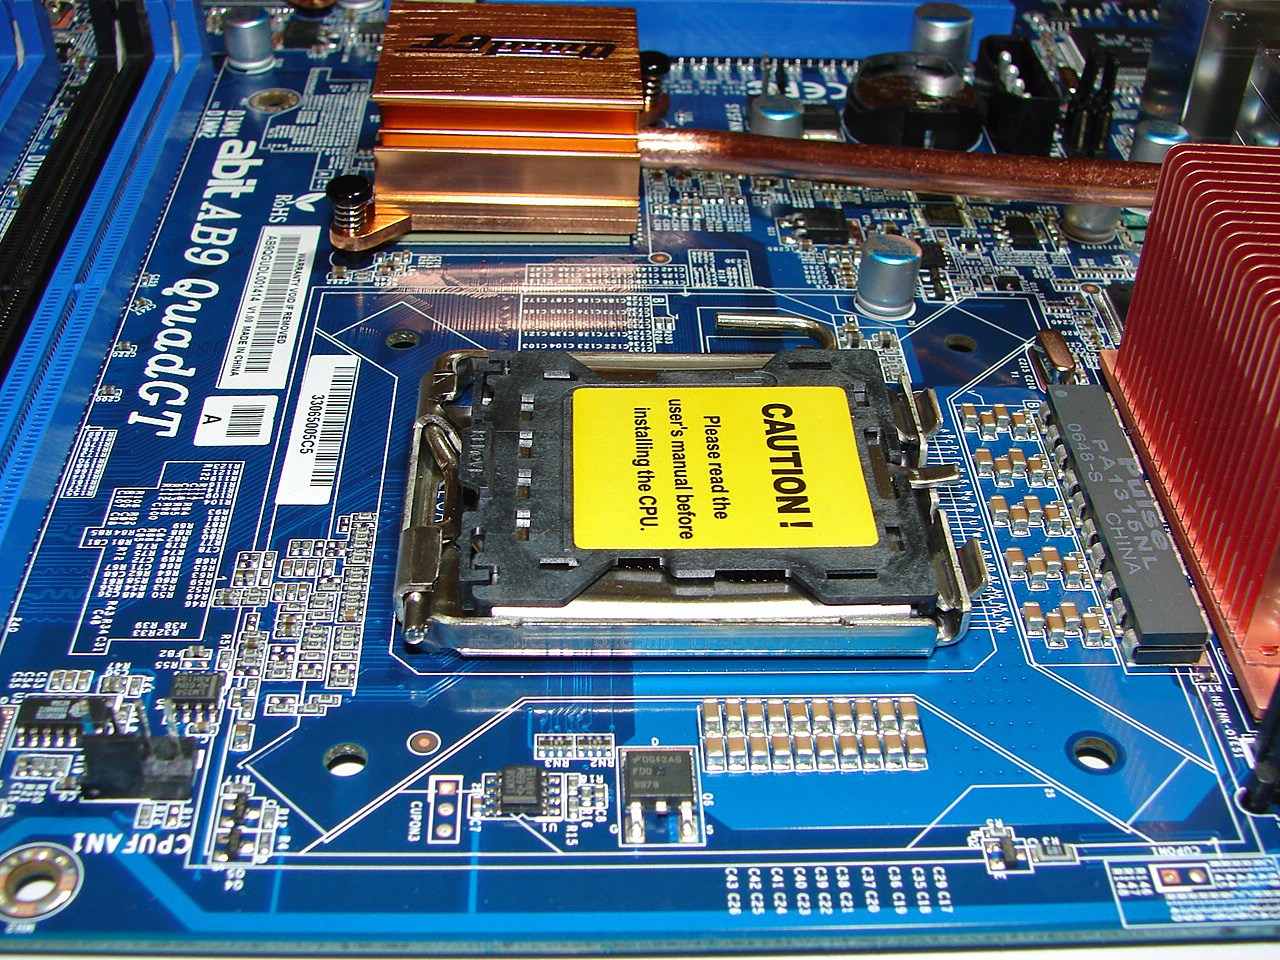
Getting back to CPU socket area, we find an excellent amount of room for alternative cooling solutions. We utilized the stock heatsink/fan in our normal testing but also verified a few larger Socket-775 air cooling solutions would fit in this area during our overclocking tests. The Intel P965 MCH chipset is passively cooled with a mid-rise heatsink unit that did not interfere with any installed peripherals and is connected to the digital PWM area via a heat pipe that worked without issue during testing.
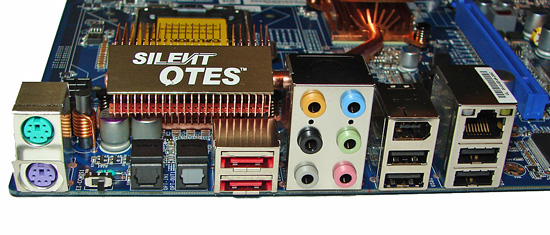
The rear panel contains the standard PS/2 mouse and keyboard ports, LAN port, and 4 USB 2.0 ports. The LAN (RJ-45) port has two LED indicators representing Activity and Speed of the connection through the Realtek Gigabit PCI-E chipset. The audio panel consists of 6 ports that can be configured for 2, 4, 6, and 8-channel audio connections for the Realtek ALC 888 HD codec along with S/PDIF optical out and in ports. The IO panel also features two e-SATA ports, an IEEE 1394 port, and a Clear CMOS switch.
The innovative clear CMOS switch is located next to the PS/2 ports and proved very handy during testing as the BIOS recovery system did not work consistently. With most motherboards lacking parallel and serial ports these days, the I/O panel tends to have quite a bit of unused space, and we would really love to see more companies include a clear CMOS button like this abit board - the only other time we have seen such a button is on several SFF systems.
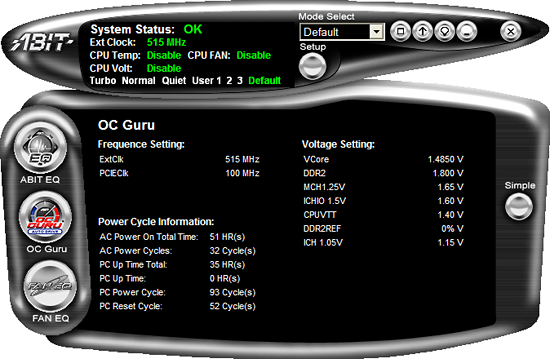
abit includes their µGuru utility which is absolutely the best Windows based software application for overclocking and hardware monitoring... or at least it was until we tried it on this board. Our primary issue is that the memory voltage readings are incorrect and if you change the voltage it will over volt your BIOS settings. We always found the µGuru utility read our memory about .2V to.4V under the BIOS setting. Unfortunately, we fried a pair of Corsair's best 6400C3 1GB modules by increasing the voltage to 2.400V in µGuru which ended up being an actual BIOS setting of 2.7V. Needless to say, our Orthos testing session ended early. Until abit resolves this issue, we strongly advise that you do not use µGuru to change memory voltages. Our testing of the other voltage settings did not reveal any issues, except on occasion the board would lock up if we dropped our CPU core voltage.
 |
| Click to enlarge |
abit really did an excellent job with the layout of this board and the color combination is elegant when compared to some of the more garish schemes we have seen recently on other boards. The board was very easy to install in our Cooler Master CM Stacker 830. Cable management was excellent with our only concern being the location of the floppy drive connector at the bottom of the board. The board features a total of five fan headers that are controlled via µGuru. The board also includes a digital PWM controller and 100% Conductive Polymer Aluminum Solid Capacitors that provided absolutely superb stability throughout testing.
The DIMM module slots' color coordination is correct for dual channel setup based upon the premise of installing DIMMs in the same colored slots for dual-channel operation. It was very easy to install memory modules with a full size video card placed in the top PCI Express x16 slot. abit places the CPU and two auxiliary fan headers above and to the right of the first DIMM slots respectively. The 24-pin ATX power connector is located below the number three and four DIMM slots.
The six Intel ICH8R SATA ports are black and are conveniently located between the IDE and Floppy drive connectors. The SATA ports feature the newer clamp and latch design. We found the positioning of the SATA ports to be very good when utilizing the PCI or second PCI-E x16 physical slot, although we had to bend our SATA cable a little when using the first and second port with our X1950XT video card and we would expect similar issues with other dual-slot GPUs.
The ICH8R is passively cooled and remained cool to the touch throughout testing. abit includes an LED based POST code display and power and reset buttons. The standard clear CMOS jumper is located below the ICH8R chipset with another fan header being located between the IDE and 24-pin ATX connectors. We really would like to see more companies replace the CMOS jumper with a button instead, as it can be very difficult to access the jumper with expansion cards installed, and luckily abit did just that, as we'll see in a moment.
The board comes with one PCI Express x16 connector, one PCI Express x4 (x16 physical), one PCI Express x1, and two PCI 2.3 connectors. The layout of this design offers one of the better dual x16 connector designs we have worked with to date. Only the first PCI slot will be physically unavailable if you use a double slot video card in the second PCI Express x16 physical slot. There is a four-pin 12V Molex connector that is required for dual graphic card operation. We confirmed the PCI Express x4 slot can be used with a wide variety of x1, x2, and x4 cards.
Something else worth noting are the audio features. The black three pin header next to the number two PCI slot and the green front panel audio header is an HDMI Audio header that allows output to a HDMI capable video card. A few HTPC enthusiasts might find that feature to be useful.
 |
| Click to enlarge |
Getting back to CPU socket area, we find an excellent amount of room for alternative cooling solutions. We utilized the stock heatsink/fan in our normal testing but also verified a few larger Socket-775 air cooling solutions would fit in this area during our overclocking tests. The Intel P965 MCH chipset is passively cooled with a mid-rise heatsink unit that did not interfere with any installed peripherals and is connected to the digital PWM area via a heat pipe that worked without issue during testing.
The rear panel contains the standard PS/2 mouse and keyboard ports, LAN port, and 4 USB 2.0 ports. The LAN (RJ-45) port has two LED indicators representing Activity and Speed of the connection through the Realtek Gigabit PCI-E chipset. The audio panel consists of 6 ports that can be configured for 2, 4, 6, and 8-channel audio connections for the Realtek ALC 888 HD codec along with S/PDIF optical out and in ports. The IO panel also features two e-SATA ports, an IEEE 1394 port, and a Clear CMOS switch.
The innovative clear CMOS switch is located next to the PS/2 ports and proved very handy during testing as the BIOS recovery system did not work consistently. With most motherboards lacking parallel and serial ports these days, the I/O panel tends to have quite a bit of unused space, and we would really love to see more companies include a clear CMOS button like this abit board - the only other time we have seen such a button is on several SFF systems.
abit includes their µGuru utility which is absolutely the best Windows based software application for overclocking and hardware monitoring... or at least it was until we tried it on this board. Our primary issue is that the memory voltage readings are incorrect and if you change the voltage it will over volt your BIOS settings. We always found the µGuru utility read our memory about .2V to.4V under the BIOS setting. Unfortunately, we fried a pair of Corsair's best 6400C3 1GB modules by increasing the voltage to 2.400V in µGuru which ended up being an actual BIOS setting of 2.7V. Needless to say, our Orthos testing session ended early. Until abit resolves this issue, we strongly advise that you do not use µGuru to change memory voltages. Our testing of the other voltage settings did not reveal any issues, except on occasion the board would lock up if we dropped our CPU core voltage.


41 Comments
View All Comments
Stele - Monday, January 22, 2007 - link
I second that. Intel has, unfortunately, a reputation for making drastic moves every now and then in a certain technological direction which it feels that everyone should head towards, and hurry - never mind if everyone else does not feel the same way about it, or if that direction is simply not ready for prime time; RDRAM, Itanic, BTX, and now removal of native IDE support stand testimony to that.I can't speak for everyone of course, but JMicron isn't so bad, really, at least from personal experience... a string of systems using P5B Deluxe and P5B-E Plus motherboards have so far behaved quite well during setup and installation. Part of the problem probably lies in how well motherboard manufacturers implement the device in their design and how much effort they put in to make sure they get it right. As for the alternatives to JMicron, it's not too easy to find one that can match the JMB363 in terms of features... PCIe, 2 SATA II-compliant ports, 1 ATA-133 IDE interface in a compact, single-chip solution. Perhaps Silicon Image should step forward and make use of their excellent IP to create such a competitor, but I suspect they're focusing on HDMI right now....