Infrant Technologies’ ReadyNAS NV: Enterprise Features, Desktop Footprint
by Purav Sanghani on March 17, 2006 11:42 AM EST- Posted in
- Storage
RAIDar – Device detection software
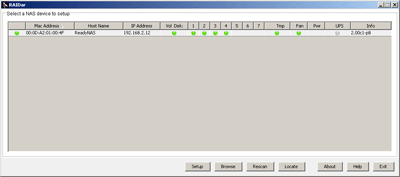
Infrant has designed their own proprietary operating system, which allows complete control over the configuration of the ReadyNAS devices. To detect the NAS after it has been fully booted, we start the included RAIDar software to find any ReadyNAS devices on the network. Note that the initial setting for the ReadyNAS devices out of the box is in DHCP mode, so we set our PC accordingly. The utility will display all of the devices that it is able to detect in the window as shown in the screenshot below.
This screen shows important information of the device such as MAC/IP addresses, Host name, volume information of the RAID array as well as information about the individual disks/USB drives installed (mouse over), drive and unit temperature status, fan status and UPS information. The last column shows the version of the OS installed on the device. We can then choose the specific device (in our case, there is one directly connected to our test machine), and choose either to set up the device, browse the shares, or rescan the network for ReadyNAS devices. There is also a “Help” option, which brings up an HTML page that explains briefly the various features of the RAIDar utility.
RAIDiator OS
To begin configuring the ReadyNAS device, we can either use the RAIDar software to find and log into the device’s user interface or we can open a web browser and enter the IP address of the device if it is known to us. For the first run, we ran the RAIDar utility, since the device was set to DHCP mode. Note that we used an Intel Pro/1000 MT desktop card, which supports gigabit Ethernet and Jumbo frames to test the ReadyNAS X6 and NV.
We are prompted to enter a login and password to get into the user interface. The credentials are set at the factory and can be cleared with a factory reset, but it can also be reconfigured. Once we enter our login information, we are presented with the initial setup screen in the Setup Wizard mode. This wizard basically walks us through each page step by step to configure and customize various aspects of the device, like its identity on the network, user accounts, designated shares, performance options, and various other features.
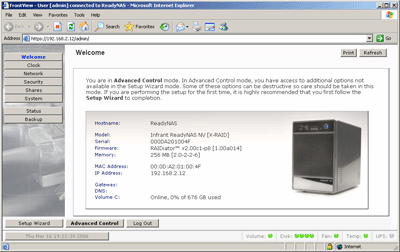
The alternate method of configuring the ReadyNAS device is to click over to the Advanced Control mode, which gives us more control in navigating the interface. In this mode, we are shown the main sections as buttons on the left side of the window. Once we click on a main section, the main frame is populated with that section’s content and all of the subsections divided by tabbed pages. This mode also shows us feature options and configuration options that we would not see in the Wizard mode.


13 Comments
View All Comments
Iozone - Thursday, May 11, 2006 - link
There is a bad link in the article:http://images.anandtech.com/reviews/storage/infant...">http://images.anandtech.com/reviews/storage/infant...
File does not exist ...
Any chance of getting the link fixed ?
dunnp - Saturday, March 18, 2006 - link
So since the RAID performance was so good, what was the setup for the RAID?byvis - Saturday, March 18, 2006 - link
...s939 has DDR2? :-)RAM: 1GB Corsair XMS4400 DDR2 (2x512MB)
WileCoyote - Friday, March 17, 2006 - link
What brand/model Raid 5 controller was used with the Seagate drives?randomlinh - Friday, March 17, 2006 - link
could you imagine backing up that much data... oi...Genx87 - Friday, March 17, 2006 - link
Did you put any memory into this thing or just use the basic 64MB for the OS?Curious if you didnt, if the performance throughput would increase from a larger memory?
PuravSanghani - Friday, March 17, 2006 - link
The ReadyNAS units come with a 256MB SO-DIMM module. However, transfer performance would be limited by the the NIC anyway.Purav
WileCoyote - Friday, March 17, 2006 - link
was journaling turned off? I've heard that has a big impact on performanceGenx87 - Friday, March 17, 2006 - link
Any chance they are planning on releasing an 8 part config?Read\write wasnt terribly impressive at 24MB\sec. That is hardly pushing the disks.
But for what i need it for that is plenty. But the 4 disk limitation kind of turns me off.
WileCoyote - Friday, March 17, 2006 - link
Doesn't look like they have plans for 8 drives - they seem more interested in downsizing and compacting. There is a lot of info in their forums. At first I was turned off by the 4 drive config but then I realized it would work since I could hotswap.