Investigations into Socket 939 Athlon 64 Overclocking
by Jarred Walton on October 3, 2005 4:35 PM EST- Posted in
- CPUs
BIOS Settings
Once everything is working properly and you're sure that the PC doesn't have any problems, it's time to approach the actual process of overclocking. You might want to give the PC a few days of heavy use (system burn-in) just to be sure that it's stable. All of the FutureMark benchmarking utilities are a good start for stress testing a system, and if you buy the registered versions, you can set them to loop continually - at least, the 3DMark versions can be looped; a quick batch file will get the PCMark applications to loop as well. If you can loop 3DMark03/05 and PCMark04/05 for several days, you can be relatively sure that the computer is running stable. We'll use that same approach later to stress test our overclocked configurations.
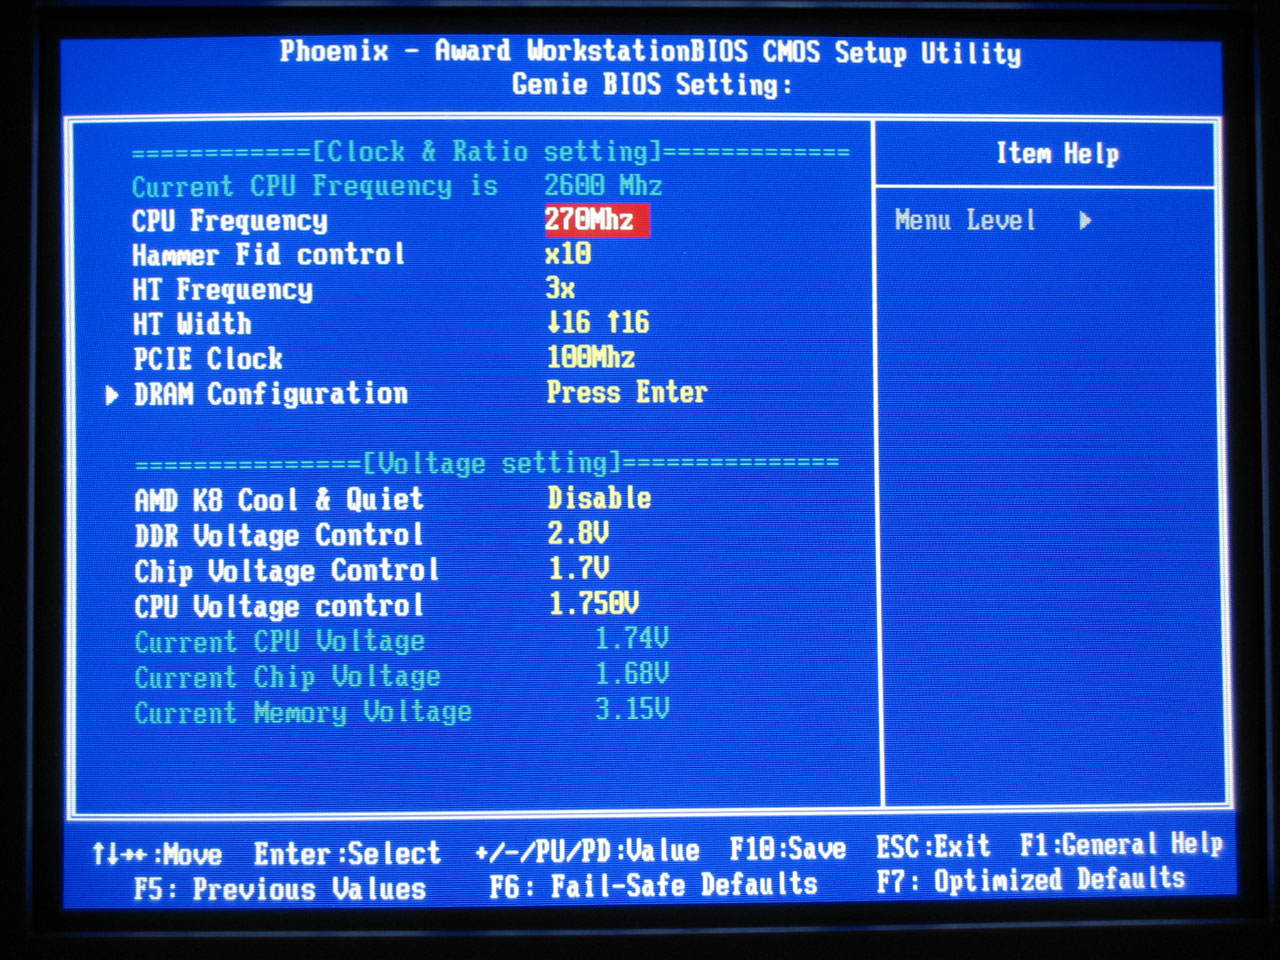
Here's where things get more complex, and virtually every motherboard BIOS is going to be at least slightly different from what we present here. If you have a socket 939 motherboard, you'll need to refer to its manual (or figure out where the settings are on your own), but most of the names and/or values will be similar to what DFI uses. The key areas that will need adjustment for overclocking are the CPU bus speed, CPU multiplier, HyperTransport (HT) multiplier, memory speed, memory timings, and voltages for RAM, CPU, chipset, etc. Let's cover each of these quickly to explain the process. We'll include BIOS images from our particular motherboard, so you can look for the matching setting in whatever board you're using.
The CPU bus speed is also referred to by other names. The DFI board labels it "CPU Frequency", while you may find HyperTransport Frequency in many BIOSes. (Some people will also call it the "Front Side Bus speed", which is not technically correct.) CPU Frequency, CPU Bus, HT Bus, etc. all mean the same thing, as the CPU communicates over an HT bus. Along with the CPU multiplier, there is also a HT multiplier (also called LDT - Lightning Data Transport - multiplier in some BIOSes). Most socket 939 motherboards support a 1000MHz HT speed, which is a 5X HT multiplier with a 200MHz base clock. The HyperTransport bus is sensitive to overclocking, so we need to keep its total speed in check. You may be able to run the HT bus at over 1000 MHz, but depending on motherboard and cooling, you will begin to have problems beyond a certain point. We'll keep our HT bus speed at or below 1050MHz by adjusting the HT multiplier as we increase the CPU bus speed (and we may at times drop lower if that brings stability). We can use the 4X multiplier with up to a 260MHz bus, and 3X will get us up to a 350MHz CPU bus (which is more than what most people are likely to reach, and more than what we'll test in this particular article). It is also possible to adjust the width of the HT bus from 16-bits up and down to 8-bits, but rarely does that help stabilize an overclock, so we'll leave it at 16/16.
We've covered the CPU and HT speed adjustments, but there's more to it than simply picking a target clock speed. In order to reach a stable overclock, you will often need additional voltage to the CPU and chipset - which affects the CPU speed and HT bus speed respectively. The default voltage of our Venice chip is 1.300V, but we will definitely increase the voltage as we go beyond a 10% overclock. Extreme overclocking (with liquid Nitrogen or phase change cooling) might go so far as to double the CPU voltages, but on air cooling that would be disastrous (not to mention few if any motherboards would even support that in the first place). We'll report the voltages required for each setting later on, but there are really two voltages: what we set in the BIOS, and what we actually get from the system. They may or may not be the same.
Something else that you should disable while in the BIOS is the Cool 'n Quiet feature of the Athlon 64. As that alters CPU voltage and multipliers dynamically in response to demand, it doesn't usually agree with overclocking. We also disable video and BIOS caching, as those are more relics of the DOS era than useful features (as far as we're aware). If you're interested in seeing the default settings that we used on the remaining BIOS screens, we have all the BIOS screens available for download in a Zip file.
Once everything is working properly and you're sure that the PC doesn't have any problems, it's time to approach the actual process of overclocking. You might want to give the PC a few days of heavy use (system burn-in) just to be sure that it's stable. All of the FutureMark benchmarking utilities are a good start for stress testing a system, and if you buy the registered versions, you can set them to loop continually - at least, the 3DMark versions can be looped; a quick batch file will get the PCMark applications to loop as well. If you can loop 3DMark03/05 and PCMark04/05 for several days, you can be relatively sure that the computer is running stable. We'll use that same approach later to stress test our overclocked configurations.
Here's where things get more complex, and virtually every motherboard BIOS is going to be at least slightly different from what we present here. If you have a socket 939 motherboard, you'll need to refer to its manual (or figure out where the settings are on your own), but most of the names and/or values will be similar to what DFI uses. The key areas that will need adjustment for overclocking are the CPU bus speed, CPU multiplier, HyperTransport (HT) multiplier, memory speed, memory timings, and voltages for RAM, CPU, chipset, etc. Let's cover each of these quickly to explain the process. We'll include BIOS images from our particular motherboard, so you can look for the matching setting in whatever board you're using.
Click to enlarge.
The CPU bus speed is also referred to by other names. The DFI board labels it "CPU Frequency", while you may find HyperTransport Frequency in many BIOSes. (Some people will also call it the "Front Side Bus speed", which is not technically correct.) CPU Frequency, CPU Bus, HT Bus, etc. all mean the same thing, as the CPU communicates over an HT bus. Along with the CPU multiplier, there is also a HT multiplier (also called LDT - Lightning Data Transport - multiplier in some BIOSes). Most socket 939 motherboards support a 1000MHz HT speed, which is a 5X HT multiplier with a 200MHz base clock. The HyperTransport bus is sensitive to overclocking, so we need to keep its total speed in check. You may be able to run the HT bus at over 1000 MHz, but depending on motherboard and cooling, you will begin to have problems beyond a certain point. We'll keep our HT bus speed at or below 1050MHz by adjusting the HT multiplier as we increase the CPU bus speed (and we may at times drop lower if that brings stability). We can use the 4X multiplier with up to a 260MHz bus, and 3X will get us up to a 350MHz CPU bus (which is more than what most people are likely to reach, and more than what we'll test in this particular article). It is also possible to adjust the width of the HT bus from 16-bits up and down to 8-bits, but rarely does that help stabilize an overclock, so we'll leave it at 16/16.
We've covered the CPU and HT speed adjustments, but there's more to it than simply picking a target clock speed. In order to reach a stable overclock, you will often need additional voltage to the CPU and chipset - which affects the CPU speed and HT bus speed respectively. The default voltage of our Venice chip is 1.300V, but we will definitely increase the voltage as we go beyond a 10% overclock. Extreme overclocking (with liquid Nitrogen or phase change cooling) might go so far as to double the CPU voltages, but on air cooling that would be disastrous (not to mention few if any motherboards would even support that in the first place). We'll report the voltages required for each setting later on, but there are really two voltages: what we set in the BIOS, and what we actually get from the system. They may or may not be the same.
Something else that you should disable while in the BIOS is the Cool 'n Quiet feature of the Athlon 64. As that alters CPU voltage and multipliers dynamically in response to demand, it doesn't usually agree with overclocking. We also disable video and BIOS caching, as those are more relics of the DOS era than useful features (as far as we're aware). If you're interested in seeing the default settings that we used on the remaining BIOS screens, we have all the BIOS screens available for download in a Zip file.


101 Comments
View All Comments
JarredWalton - Monday, October 3, 2005 - link
It's tough to say how things will pan out long-term. 1.650V seems reasonably safe to me, but I wouldn't do it without a better HSF than the stock model. The 1.850V settings made me quite nervous, though. If you can get your CPU to run at 1.600V instead of 1.650V, that would be better, I think. There's also a possibility that slowing down your RAM slightly might help the CPU run at lower voltages. I'd sacrifice 5% to run what I consider a "safer" overclock, though really the thought of frying a $140 CPU doesn't concern me too much. That's less than any car repair I've had to make....cryptonomicon - Monday, October 3, 2005 - link
well for most overclocks a reasonable ("safe") increase of voltage is 10-15%. however that is just a guideline, it may be more or less. there is sort of a way to find out: if you work on overclocking to the maximum of your chip while scaling the voltage, you will eventually hit a place where you have to increase the voltage dramatically just to get up the next FSB bump. for example if you are at 2500mhz and 1.6v, then it takes 1.75v just to get to 2600mhz, then you have hit that boundary and should go back down immediatly. when the voltage to cpu speed ratio is scaling consistently, then things are fine. but once the voltage required becomes blatently unbalanced, that is the logical time to stop... unless you have no concern for the longetivity of the chip.Ecmaster76 - Monday, October 3, 2005 - link
Finally goaded me into overclocking my P4 2.4c. I had been planning for a while but never bothered too.So I got bored and set the FSB to 250mhz (I went for my goal on my first try!) with a 5:4 (still DDR400) memory ratio. It works great at stock cooling + stock voltage. I will have to do some long term analysis of stability but since I am building a new system before the years end I don't really care if it catches on fire. Well as long as it doesn't melt some of my newer nerd toys that are attached to it.
lifeguard1999 - Monday, October 3, 2005 - link
I am running an AMD Athlon 64 3000+ Processor (Venice) @ 2.7 GHz, stock HSF; 1.55V Vcore; DFI LANPARTY nF4 SLI-DR. It was cool seeing you run something similar to my setup. I run value RAM and it seems that I made the right choice for me (giving up at most 5% performance). You ran at Vcores much higher than I do, so it was interesting to see the CPU handle that.The only thing I would add to this article is a paragraph mentioning temperatures that the CPU experienced.
mongoosesRawesome - Monday, October 3, 2005 - link
yes, i second that. temps at those volts using your cpu cooler as well as with maybe a few other coolers would be very helpful. also, if you could do a few tests using different coolers to see when temps hold you back.JarredWalton - Monday, October 3, 2005 - link
I've got some tests planned for cooling in the near future. I'll be looking at CPU temps for stock (2.0 GHz) as well as 270x10 with 1.750V. I've even got a few other things planned. My particular chip wouldn't POST at more than 2.6 GHz without at least 1.650V, but that will vary from chip to chip. The XP-90 never even got warm to the touch, though, which is pretty impressive. Even with an X2 chip, it barely gets above room temperature. (The core is of course hotter, but not substantially so I don't think.)tayhimself - Tuesday, October 4, 2005 - link
Good article, but your Vcore seems to scale up with most of the increments in speed? Did you HAVE TO raise the vcore? Usually you can leave the vcore until you really have to start pushing. Comments?JarredWalton - Tuesday, October 4, 2005 - link
2.20GHz was fine with default 1.300. 2.40GHz may have been okay; increasing the Vcore to 1.40V seemed to stabilize it a bit, though it may not have been completely necessary. 2.60GHz would POST with 1.450V, but loading XP locked up. 1.550V seemed mostly stable, but a few benchmarks would crash. 2.70GHz definitely needed at least 1.650V, and bumping it up a bit higher seemed to stabilize it once again. 2.80GHz was questionable at best even at 1.850V with the current cooling configuration. It wouldn't load XP at 2.80GHz at 1.750V, though.JarredWalton - Tuesday, October 4, 2005 - link
My memory on the voltages might be a bit off. Personal experimentation will probably be the best approach. I think I might have erred on the high side of required voltage. Still, past a certain point you'll usually need to scale voltage a bit with each bump in CPU speed. When it starts scaling faster - i.e. .1V more to get from 2700 to 2800 MHz - then you're hitting the limits of the CPU and should probably back off a bit and call it good.tayhimself - Tuesday, October 4, 2005 - link
Thanks a lot for your replies. Looks like there is a fair bit of overclocking even if you dont increase the Vcore too much to help save power/noise etc.Cheers