Investigations into Socket 939 Athlon 64 Overclocking
by Jarred Walton on October 3, 2005 4:35 PM EST- Posted in
- CPUs
BIOS Settings
Once everything is working properly and you're sure that the PC doesn't have any problems, it's time to approach the actual process of overclocking. You might want to give the PC a few days of heavy use (system burn-in) just to be sure that it's stable. All of the FutureMark benchmarking utilities are a good start for stress testing a system, and if you buy the registered versions, you can set them to loop continually - at least, the 3DMark versions can be looped; a quick batch file will get the PCMark applications to loop as well. If you can loop 3DMark03/05 and PCMark04/05 for several days, you can be relatively sure that the computer is running stable. We'll use that same approach later to stress test our overclocked configurations.
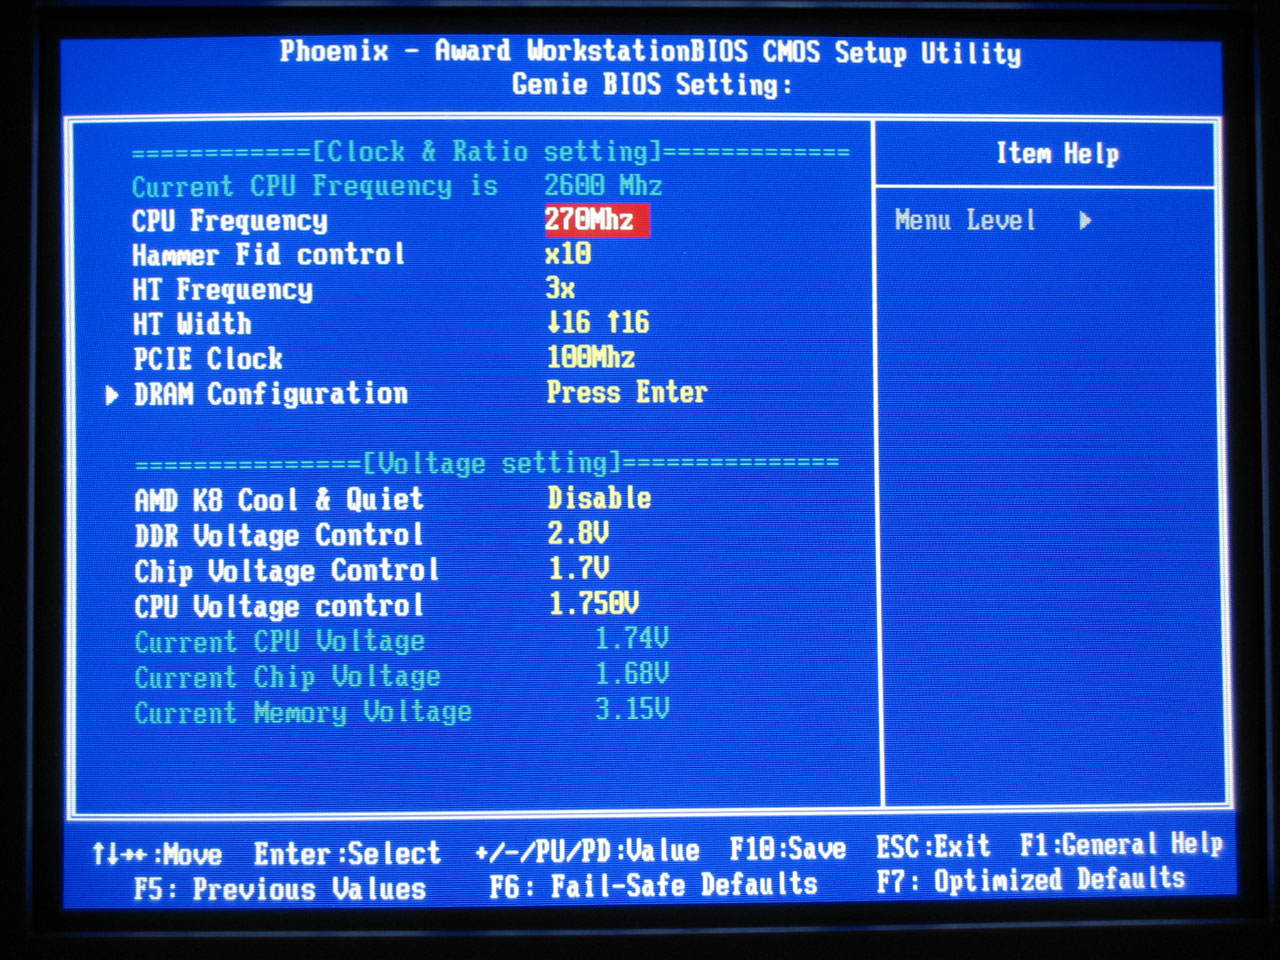
Here's where things get more complex, and virtually every motherboard BIOS is going to be at least slightly different from what we present here. If you have a socket 939 motherboard, you'll need to refer to its manual (or figure out where the settings are on your own), but most of the names and/or values will be similar to what DFI uses. The key areas that will need adjustment for overclocking are the CPU bus speed, CPU multiplier, HyperTransport (HT) multiplier, memory speed, memory timings, and voltages for RAM, CPU, chipset, etc. Let's cover each of these quickly to explain the process. We'll include BIOS images from our particular motherboard, so you can look for the matching setting in whatever board you're using.
The CPU bus speed is also referred to by other names. The DFI board labels it "CPU Frequency", while you may find HyperTransport Frequency in many BIOSes. (Some people will also call it the "Front Side Bus speed", which is not technically correct.) CPU Frequency, CPU Bus, HT Bus, etc. all mean the same thing, as the CPU communicates over an HT bus. Along with the CPU multiplier, there is also a HT multiplier (also called LDT - Lightning Data Transport - multiplier in some BIOSes). Most socket 939 motherboards support a 1000MHz HT speed, which is a 5X HT multiplier with a 200MHz base clock. The HyperTransport bus is sensitive to overclocking, so we need to keep its total speed in check. You may be able to run the HT bus at over 1000 MHz, but depending on motherboard and cooling, you will begin to have problems beyond a certain point. We'll keep our HT bus speed at or below 1050MHz by adjusting the HT multiplier as we increase the CPU bus speed (and we may at times drop lower if that brings stability). We can use the 4X multiplier with up to a 260MHz bus, and 3X will get us up to a 350MHz CPU bus (which is more than what most people are likely to reach, and more than what we'll test in this particular article). It is also possible to adjust the width of the HT bus from 16-bits up and down to 8-bits, but rarely does that help stabilize an overclock, so we'll leave it at 16/16.
We've covered the CPU and HT speed adjustments, but there's more to it than simply picking a target clock speed. In order to reach a stable overclock, you will often need additional voltage to the CPU and chipset - which affects the CPU speed and HT bus speed respectively. The default voltage of our Venice chip is 1.300V, but we will definitely increase the voltage as we go beyond a 10% overclock. Extreme overclocking (with liquid Nitrogen or phase change cooling) might go so far as to double the CPU voltages, but on air cooling that would be disastrous (not to mention few if any motherboards would even support that in the first place). We'll report the voltages required for each setting later on, but there are really two voltages: what we set in the BIOS, and what we actually get from the system. They may or may not be the same.
Something else that you should disable while in the BIOS is the Cool 'n Quiet feature of the Athlon 64. As that alters CPU voltage and multipliers dynamically in response to demand, it doesn't usually agree with overclocking. We also disable video and BIOS caching, as those are more relics of the DOS era than useful features (as far as we're aware). If you're interested in seeing the default settings that we used on the remaining BIOS screens, we have all the BIOS screens available for download in a Zip file.
Once everything is working properly and you're sure that the PC doesn't have any problems, it's time to approach the actual process of overclocking. You might want to give the PC a few days of heavy use (system burn-in) just to be sure that it's stable. All of the FutureMark benchmarking utilities are a good start for stress testing a system, and if you buy the registered versions, you can set them to loop continually - at least, the 3DMark versions can be looped; a quick batch file will get the PCMark applications to loop as well. If you can loop 3DMark03/05 and PCMark04/05 for several days, you can be relatively sure that the computer is running stable. We'll use that same approach later to stress test our overclocked configurations.
Here's where things get more complex, and virtually every motherboard BIOS is going to be at least slightly different from what we present here. If you have a socket 939 motherboard, you'll need to refer to its manual (or figure out where the settings are on your own), but most of the names and/or values will be similar to what DFI uses. The key areas that will need adjustment for overclocking are the CPU bus speed, CPU multiplier, HyperTransport (HT) multiplier, memory speed, memory timings, and voltages for RAM, CPU, chipset, etc. Let's cover each of these quickly to explain the process. We'll include BIOS images from our particular motherboard, so you can look for the matching setting in whatever board you're using.
Click to enlarge.
The CPU bus speed is also referred to by other names. The DFI board labels it "CPU Frequency", while you may find HyperTransport Frequency in many BIOSes. (Some people will also call it the "Front Side Bus speed", which is not technically correct.) CPU Frequency, CPU Bus, HT Bus, etc. all mean the same thing, as the CPU communicates over an HT bus. Along with the CPU multiplier, there is also a HT multiplier (also called LDT - Lightning Data Transport - multiplier in some BIOSes). Most socket 939 motherboards support a 1000MHz HT speed, which is a 5X HT multiplier with a 200MHz base clock. The HyperTransport bus is sensitive to overclocking, so we need to keep its total speed in check. You may be able to run the HT bus at over 1000 MHz, but depending on motherboard and cooling, you will begin to have problems beyond a certain point. We'll keep our HT bus speed at or below 1050MHz by adjusting the HT multiplier as we increase the CPU bus speed (and we may at times drop lower if that brings stability). We can use the 4X multiplier with up to a 260MHz bus, and 3X will get us up to a 350MHz CPU bus (which is more than what most people are likely to reach, and more than what we'll test in this particular article). It is also possible to adjust the width of the HT bus from 16-bits up and down to 8-bits, but rarely does that help stabilize an overclock, so we'll leave it at 16/16.
We've covered the CPU and HT speed adjustments, but there's more to it than simply picking a target clock speed. In order to reach a stable overclock, you will often need additional voltage to the CPU and chipset - which affects the CPU speed and HT bus speed respectively. The default voltage of our Venice chip is 1.300V, but we will definitely increase the voltage as we go beyond a 10% overclock. Extreme overclocking (with liquid Nitrogen or phase change cooling) might go so far as to double the CPU voltages, but on air cooling that would be disastrous (not to mention few if any motherboards would even support that in the first place). We'll report the voltages required for each setting later on, but there are really two voltages: what we set in the BIOS, and what we actually get from the system. They may or may not be the same.
Something else that you should disable while in the BIOS is the Cool 'n Quiet feature of the Athlon 64. As that alters CPU voltage and multipliers dynamically in response to demand, it doesn't usually agree with overclocking. We also disable video and BIOS caching, as those are more relics of the DOS era than useful features (as far as we're aware). If you're interested in seeing the default settings that we used on the remaining BIOS screens, we have all the BIOS screens available for download in a Zip file.


101 Comments
View All Comments
DonTrowbridg3 - Thursday, October 4, 2018 - link
2018 checking in. Thanks for all the info and comments. Very helpful in overclocking my FX-60, A8N32-SLI, dual 8800 GTX