How to Set up a Source Control on Windows without spending a dime.
by Jason Clark on December 28, 2004 9:00 PM EST- Posted in
- IT Computing
Tortoise CVS
CVSNT is the server side component of our new source control installation. Now, we need a client interface to allow us to manage our files. Tortoise CVS is an open source version control client that allows you to work with your files in CVS/CVSNT. Tortoise CVS integrates into Windows Explorer and makes managing your files incredibly easy. Tortoise CVS works in Windows 95, 98, ME, NT, 2000, 2003 and XP.Installing Tortoise CVS
To install Tortoise CVS, navigate to this link and download the latest build. After the download is complete, install the software, and accept the defaults throughout the install process. Once the install is complete, Tortoise will require a reboot because it has to integrate into your Windows Explorer shell interface.Creating your first "Module"
CVS organizes files into "Modules". Modules are top level containers for your files - think of them as the projects that you want CVSNT to manage. For example, we're working on a project called MyWebSite and we want to check that project into CVSNT. We first navigate to the top folder that contains all of our files; in our case, it's called MyWebSite. Then, we right click on that folder and select "Make new module" under CVS. You will be presented with the screen below.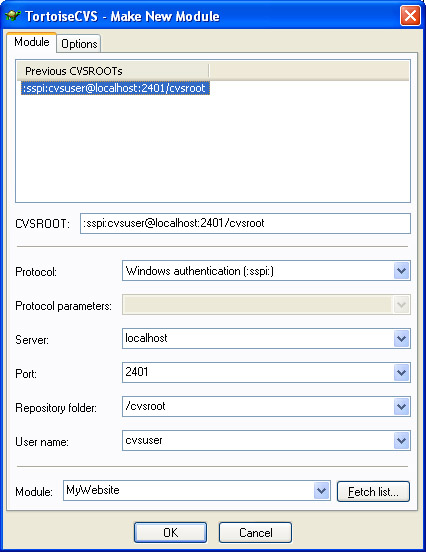
The "make new module" screen will ask you for connection information for your CVS server. In our case, the CVS server is on our local machine and we are connecting using SSPI with a local windows user. The port is the port number in which we set the Service Control Panel. The Repository folder is the name of the folder that we created when we created the repository. In our case, it was /cvsroot. After you have filled in your connection information, click "ok" and Tortoise will create a new module for you in CVS. After the module has been added, click "ok" in Tortoise. You will notice that the folder that contains your files now has a green box on it.

Adding files to the new Module
Now that we have a module created in CVS, let's add our files to the module. Once the files are added, CVS will now manage any changes, additions, or deletions to the files. To add files, right click on the folder that we added to CVS and choose "CVS Add contents". You should see a window similar to the screen shot below.
| Tortoise will list the files and folders that are in our top level folder. It also lists Type and Format of the files. You can double check that Tortoise detected your file type correctly, although I have yet to see an instance where it did not detect the file type correctly. After your files have been added, click OK. Your files should now look something like the screenshot on the right, with an orange cross box on each file. This indicates that the file has been added, but still needs to be committed to CVS. |  |


34 Comments
View All Comments
Sokaku - Tuesday, December 28, 2004 - link
I agree, cvs is replaced by subversion.cosmotic - Tuesday, December 28, 2004 - link
heh, I was going to say the same thing. CVS kinda sucks.Cat - Tuesday, December 28, 2004 - link
What, no Subversion?kishore.kumar - Friday, September 15, 2017 - link
I have set my cvsnt and have installed tortoise cvs client, now after running cvsnt server I am unable to create new module through tortoise for the folder containing a doc file in my D-drive. Please share me the steps to set new module as I am finding error as.cvs [import aborted]: the :sspi: access method is not available on this system