3DLabs' P10 Visual Processing Unit - When a CPU & GPU Collide
by Anand Lal Shimpi on May 3, 2002 7:30 AM EST- Posted in
- GPUs
The 3D Pipeline
We've already said that the P10 pipeline isn't really any different from a conventional 3D pipeline, but what defines a "conventional" 3D pipeline? Let's just take a brief tour of how the 3D pipeline works:
1) The first stage is the most obvious, sending commands and data to be executed on the graphics chip. This is initiated by the software running on the host CPU, sent over the AGP bus and finally reaching the graphics processor which is contacted using the graphics drivers.
2) Now that the GPU knows what data it needs to begin processing and what it needs to actually do to this set of data, it starts working. The data sent to the GPU is sent in the form of the vertices of the polygons that will eventually be displayed on your screen. The first actual execution stage in the graphics pipeline is what has been referred to as T&L for the longest time. This is the transformation of the vertex data that was just sent to the GPU into a 3D scene. The transformation stage requires a lot of highly repetitive floating-point matrix math. Next comes the actual lighting calculations for each of these vertices. In a programmable GPU these initial vertex processing stages are very flexible in that short vertex shader programs can be written to control a number of the characteristics of the vertices to change the shape, look or behavior of a model among other things (e.g. matrix palette skinning, realistic fur, etc..).
3) After we have beautifully transformed and lit vertices it's time to actually generate some pixels so they can be displayed on your screen. But before that there's a bit of house keeping to be done. There are the culling and clipping stages that basically remove all the vertices that extend beyond the bounds of the scene. Then we have some of the nifty visibility calculations that go on in most of today's GPUs to help throw out vertices that won't be visible to the user. This is where technologies such as HyperZ and NVIDIA's Visibility Subsystem come into play to throw out data before we actually start rendering pixels and waste fill-rate and memory bandwidth.
4) Now that we've had our spring cleaning it's time to generate some pixels. The remaining vertex data now converted into viewport space which is the 2D space of your monitor; remember that although this is 3D rendering, you're still looking at a flat (2D) monitor. The z-buffer data (how far away/deep the pixels are in reference to the viewer) is calculated and stored as well in order to turn this otherwise 2D image into a 3D world.
5) Texture coordinates are calculated which will be used to map textures onto these polygons that have been created using the vertex data. The textures are then loaded and then we have the pixel shading stage where today's programmable GPUs can allow small programs to run and create neat looking effects on the pixels (e.g. shadow mapping, z-correct bump mapping, etc…).
6) Finally we've come to the end of the pipeline where all final filtering, anti-aliasing, and other such techniques take place before the final pixel data is stored in the frame buffer and sent out to the RAMDAC or TMDS transmitter(s).
Now it's important to realize that this pipeline is the same for the P10 as it is for the GeForce4. What's different is determined by what happens within those stages.
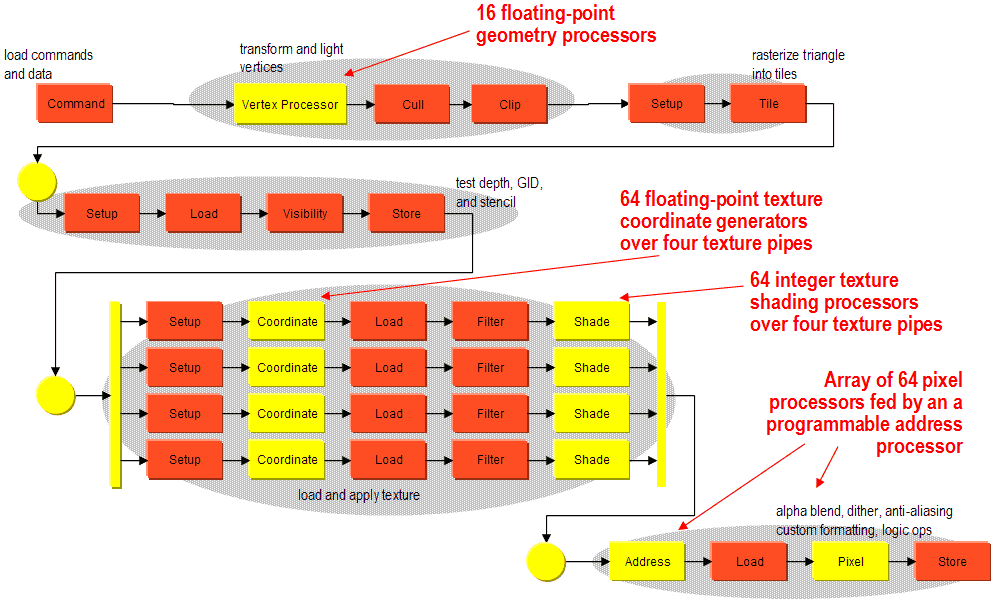
The 3DLabs P10 VPU Pipeline - Click to Enlarge
(Note: Yellow blocks are programmable, orange are fixed function)
Above we have an overview of the P10's 3D pipeline, if you want to follow along as we touch on the different areas you can keep the enlarged image open in another window; it may help you understand the technology a bit better.


0 Comments
View All Comments