ASRock X79 Extreme11 Review: PCIe 3.0 x16/x16/x16/x16 and LSI 8-Way SAS/SATA
by Ian Cutress on September 3, 2012 10:15 AM EST- Posted in
- Motherboards
- ASRock
- X79
- LSI
- PLX
ASRock X79 Extreme11 Overclocking
Experience with ASRock X79 Extreme11
Overclocking with this board has mirrored a lot of the overclocking experiences of ASRock boards of late. The automatic overclock settings are often stable with just a smidge of extra voltage to ensure stability, while manual overclocking can suffer from overheating VRMs causing declocks. We get a similar scenario here.
Manual overclock options are all in the BIOS – unlike Z77 options, we only get the ‘CPU EZ OC’ option here which offers 4.0 GHz to 5.2 GHz on our i7-3960X processor in 200 MHz steps. Each option provides a CPU voltage and Load Line Calibration appropriately, with a failed overclock either BSOD at boot or not even passing POST, requiring a ClearCMOS.
Overclock options are all essentially in the BIOS as well – the options via software are limited at best. In the BIOS we are free to change the CPU ratio and multiplier in the main OC Tweaker menu, but voltages, LLC and memory are in other menus. Each is easily navigable from the main OC Tweaker menu.
Methodology:
Our standard overclocking methodology is as follows. We select the automatic overclock options and test for stability with PovRay and OCCT to simulate high-end workloads. These stability tests aim to catch any immediate causes for memory or CPU errors.
For manual overclocks, based on the information gathered from previous testing, starts off at a nominal voltage and CPU multiplier, and the multiplier is increased until the stability tests are failed. The CPU voltage is increased gradually until the stability tests are passed, and the process repeated until the motherboard reduces the multiplier automatically (due to safety protocol) or the CPU temperature reaches a stupidly high level (100ºC+).
Our test bed is not in a case, which should push overclocks higher with fresher (cooler) air. We also are using Intel's All-in-one Liquid Cooler with its stock fan. This is a 120mm radiator liquid cooler, designed to mimic a medium-to-high end air cooler.
Automatic Overclock:
With the CPU EZ OC setting options, each of them were selected one by one, then booted and stress tested. Here are our results:
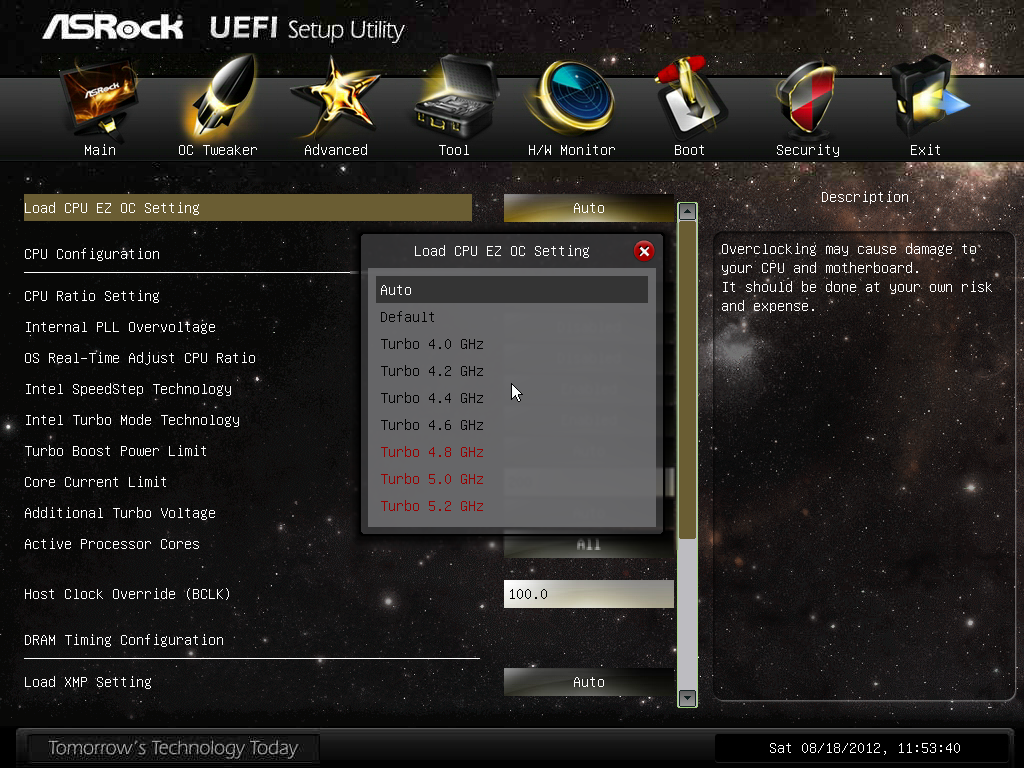
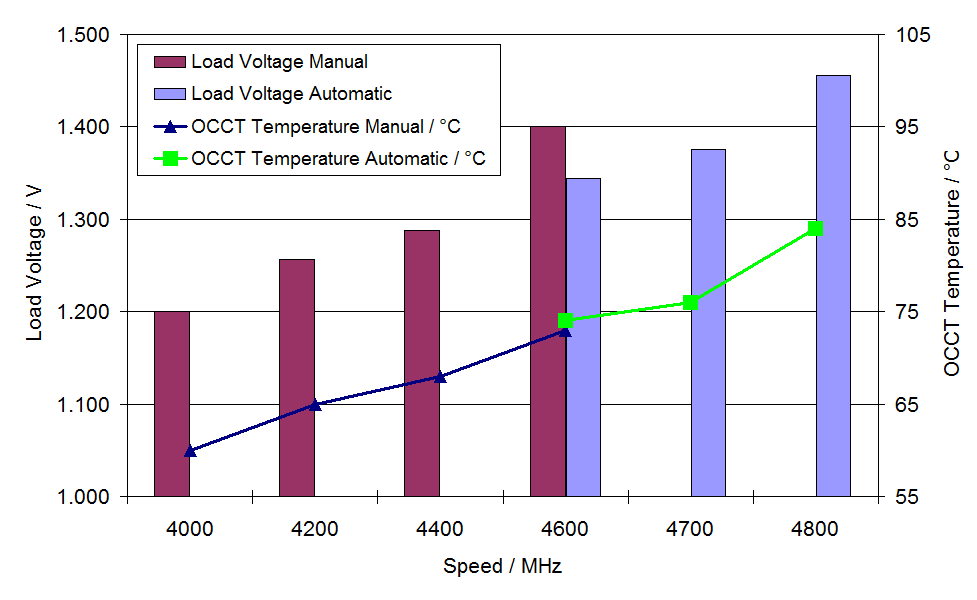
At the 4.0 GHz setting, the BIOS set the CPU LLC to Level 5 (low) and VCore on Auto. This led to a load voltage in the OS of 1.200 volts, with peak temperatures reaching 59°C during PovRay and 60°C during OCCT.
At the 4.2 GHz setting, the BIOS set the CPU LLC to Level 5 (low) and the VCore to a +0.040 volt offset. This led to a load voltage in the OS of 1.256 volts, with peak temperatures reaching 62°C during PovRay and 65°C during OCCT.
At the 4.4 GHz setting, the BIOS set the CPU LLC to Level 5 (low) and the VCore to a +0.080 volt offset. This led to a load voltage in the OS of 1.288 volts, with peak temperatures reaching 67°C during PovRay and 68°C during OCCT.
At the 4.6 GHZ setting, the BIOS set the CPU LLC to Level 3 (medium) and the VCore to a +0.130 volt offset, as well as enabling PLL Overvoltage. This led to a load voltage in the OS of 1.400 volts, with peak temperatures reaching 79°C during PovRay and 73°C during OCCT.
At the 4.8 GHz setting, the BIOS set the CPU LLC to Level 1 (high) and the VCore to a fixed 1.440 volt offset, as well as enabling PLL Overvoltage. This setting was not stable, resulting in a BSOD during boot.
At the 5.0 GHz setting, the BIOS set the CPU LLC to Level 1 (high) and the VCore to a fixed 1.460 volt offset, as well as enabling PLL Overvoltage. This setting was not stable, resulting in the board failing to POST.
At the 5.2 GHz setting, the BIOS set the CPU LLC to Level 1 (high) and the VCore to a fixed 1.500 volt offset, as well as enabling PLL Overvoltage. This setting was not stable, resulting in the board failing to POST.
Manual Overclock:
For our manual overclock testing, we start with PLL Overvoltage enabled by default (as required by Sandy Bridge over a certain OC) as well as Load Line Calibration set to Level 1 (high) to ensure stable voltages. We start with the CPU multiplier at 46x and a BIOS voltage of 1.350 volts. Here are our results.
At 46x, the BIOS setting of 1.350 volts was stable, giving 1.344 volts in the OS at load. This gave peak temperatures of 71°C during PovRay and 74°C during OCCT.
At 47x, the minimum stable voltage came from a BIOS setting of 1.375 volts, giving 1.376 volts in the OS at load. This gave peak temperatures of 76°C during PovRay and OCCT.
At 48x, the minimum voltage stable came from a BIOS setting of 1.450 volts, giving 1.456 volts in the OS at load. This gave peak temperatures of 84°C during PovRay and OCCT.
Beyond this speed, the system kept throttling down to 46x during load. Even when options were changed in the BIOS – CPU Thermal Throttling was off and Power Limits were raised, the system still reduced the clock speed at load.


62 Comments
View All Comments
StevoLincolnite - Monday, September 3, 2012 - link
Chipset fans.WHY!? They're noisy, probably fail quickly when filled up with dust...
I have the Asus Sabertooth x79 which has 2 small fans on it and the noise they generate drives me bonkers, thankfully the board has a 5 year warranty... Heck most of these chipset fans aren't even a standardized size so replacing them on your own is going to be tough/impossible.
Grebuloner - Monday, September 3, 2012 - link
I think you might want to check your board or your case cooling setup then. I can't hear the fans on my Sabertooth unless I stick my ear up to the grill on the I/O plate, and the chipset fan is inaudible over the 580 it sits next to.owan - Tuesday, September 4, 2012 - link
Its not rocket science, its right there in the review: 35+W underneath a very low-profile heatsink. Passive cooling just wasn't going to cut it. I swear, if people are going to complain about stuff on this motherboard, they could do a lot better than whinging about the fan.Master_shake_ - Tuesday, September 4, 2012 - link
i have an LSI 9260 add in card and that thing gets super hot, and the fan on this is really loud...just check out linus tech tips on youtube and you can hear it.
mike55 - Monday, September 3, 2012 - link
What are those little box-shaped components that are in the center of the CPU socket and appear in the dozens on every PCB I've ever seen?Ditiris - Monday, September 3, 2012 - link
They're capacitors for the CPU, more specifically decoupling capacitors.mike55 - Monday, September 3, 2012 - link
Ah, thanks! Good to finally know what the heck those things are.LamborghiniBooby43 - Monday, September 3, 2012 - link
As the X79 chipset does not have USB 3.0 as standard, ASRock have included Texas Instrument USB 3.0 controllers for a total of eight ports (4 on the back panel, 4 via two onboard headers) and a 2-port front USB panel included in the box. http://goo.gl/XbQv9JMC2000 - Monday, September 3, 2012 - link
If ASRock says this board is aimed at the workstation user, why in the world did they put those useless decorative metal shields on the heatsinks? Those things just scream out 'Gamer' to me.I would like to see someone build a dual-2011 socket board utilizing 4 of the PLX8747 chips.
Belard - Monday, September 3, 2012 - link
Yep... A Workstation board is just that... They don't need all the bling. Yes, this board has workstation features - but this looks nothing more than a board for an uber gamer who has money to spend.Of course, what game makes use of 4 gaming cards (yeah, the slots are only useful for rendering / compute type work).
Still, if you want to have EVERYTHING possible... this should be it.