Rosewill Thor v2: The God of Cooling and Silence?
by Dustin Sklavos on August 24, 2011 2:15 AM EST- Posted in
- Cases/Cooling/PSUs
- Full-Tower
- Rosewill
Assembling the Rosewill Thor v2
Do you remember when I said the Rosewill Thor v2's internals reminded me of the insides of Corsair's cases? That's a good thing and a compliment: Corsair's cases are still the easiest ones to build in I've ever seen, and thankfully the Thor v2 was just as easy to work with.
Installing the motherboard was easy and painless, though Rosewill doesn't include stand-offs built straight into the board, a convenience I do miss. Where Rosewill does run afoul of Corsair is in the rubber grommets used to line the holes in the motherboard tray, which as I said before are held in largely by wishful thinking. Honestly they're just not strong enough to stay in and for most of my cable routing I wound up either accidentally or deliberately popping them out, and this was going on pretty much from the get go.
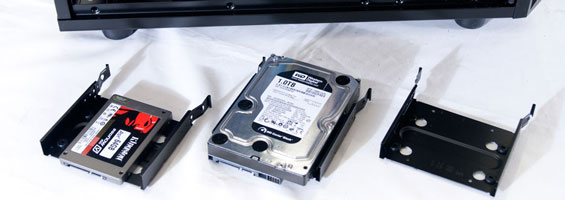
Unfortunately, while the drive trays are still back-facing and thus awesome, they aren't tool-less. The trays support both 2.5" and 3.5" drives, though only the 3.5" drives use rubber standoffs to dampen vibration (presumably anyone using 2.5" drives would have SSDs), and drives are always mounted from the bottom instead of the sides. Still, the trays work well enough and routing the cables behind them was a breeze.
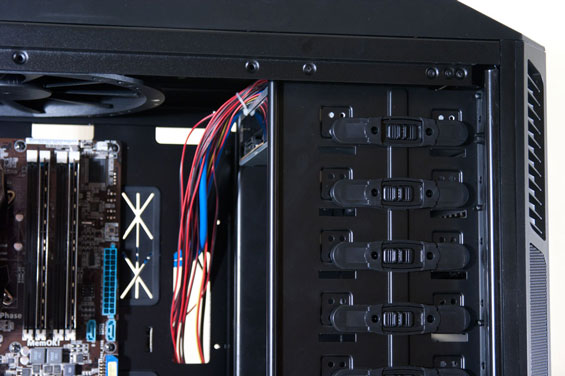
The same can't be said for the tool-less mechanism Rosewill uses for installing 5.25" drives. To remove the bay covers, you actually slide the right part of the case's front bezel off and then lever out the covers. Honestly, the old school "squeeze-and-pop" bay shields would've been perfectly fine here. My main problem is that the tool-less mechanism used to lock the drives into place is flimsy and loose. Optical drives are often among the loudest components in a good build, and with very little really securing them, they're free to vibrate in the bay. I would have been happier with just openings for screwing them in, and thankfully, you can forego using the case's locks and just use screws to mount them.
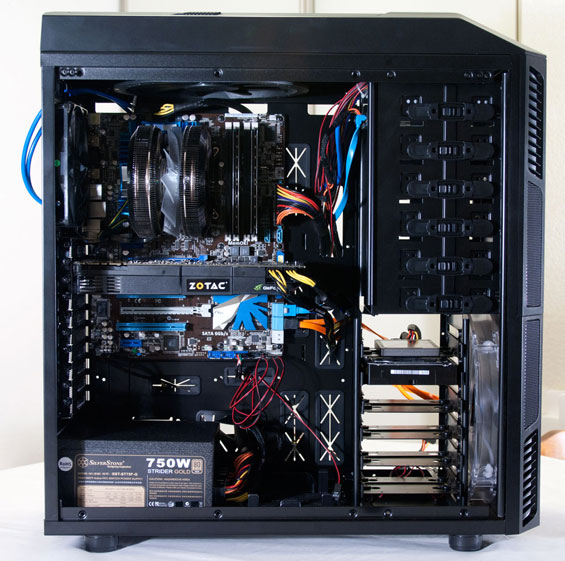
Getting the power supply in and everything else wired up was delightfully painless, as you'd expect from a chassis this size. While the case's cables are a mess of tiny wires, they're ultimately still fairly easy to actually sift through, and there's plenty of space behind the motherboard tray to keep the installation clean. The only issue I really ran into was routing the USB 3.0 cables out the back of the case: the rubber grommets in the back are just as loose as the ones inside, and shoving the cables through them invariably caused them to pop out. You'll also have to route a fan controller cable to the inside so you can connect the side intake fan, something you'll definitely want to do.


All told my chief complaints remain the iffy build quality. The rubber grommets are no big deal (NZXT's H2 had the same problem), but just about everything about the 5.25" drive bays rubbed me the wrong way. They aren't a huge issue and you can work around the problems, but even the material that lines the inside of the bay shields to filter dust is barely held in place. The fan controllers in my first review unit were also problematic: if I didn't tape the knob down, eventually fan speed would just ramp back up to full. I don't want to have to choose between having a tower that runs silent and cool with a piece of shipping tape on the top of it or a tower that runs very cool but with some noise, and I shouldn't have to. Judging from reviews on NewEgg, though, my problem seems to be isolated.


35 Comments
View All Comments
bobbyh - Wednesday, August 24, 2011 - link
Great review, I might have to pick one of these up for a new build.And first!
piroroadkill - Wednesday, August 24, 2011 - link
It gives you the option to disconnect the top fan and close the top vents, which is actually important for some people - if you own a cat, it'll love sitting on the top of your warm PC. Top vents aren't always a blessing.piroroadkill - Wednesday, August 24, 2011 - link
Oh, that's not even to mention the possibility of spilling beer into it.Blaze-Senpai - Wednesday, August 24, 2011 - link
Could always install one of those 40mm server fans and rev it past 9000, if that don't scare your cat then somethings wrong :3Can I get one in literally half the size though? I only want a Micro ATX build s:
Dustin Sklavos - Wednesday, August 24, 2011 - link
Surprisingly I have yet to see my cat perch on top of my FT02. She mostly settles for perching on the subwoofer or the scanner.OwnedKThxBye - Wednesday, August 24, 2011 - link
I also think being able to close the top vent is a great feature. Will be looking at this case when building the next system.Typo on page 3: "I wound up either accidentally or deliberately popped them out"
Great Review!
jonup - Wednesday, August 24, 2011 - link
I cant agree more with you. Disconnecting the fan and closing the vents is what I would do. I might even put some sound dampening material undernit it. From my experience with mini P180 are horrible for acoustics - I can hear the airflow from every single fan inside my case.jonup - Wednesday, August 24, 2011 - link
"From my experience with mini P180 are horrible for acoustics "should read:
"From my experience with mini P180 "top vents" are horrible for acoustics "
Mitch101 - Wednesday, August 24, 2011 - link
Lots of cat owners here. Anyone for dog slobber in the top?mooseunc - Wednesday, August 24, 2011 - link
It could also be so that you can close the vents when powered off to prevent dust or the aforementioned pet hair/liquids/etc from getting inside. Sure it might be cool if they auto opened when powered on, like some sort of jet exhaust, but it's only cool until it breaks.