Airport Extreme (5th Gen) and Time Capsule (4th Gen) Review - Faster WiFi
by Brian Klug on August 5, 2011 10:22 PM EST- Posted in
- Mac
- Airport Extreme
- Time Capsule
- WiFi
Without taking a peek at the internal FCC photos, I broke out a heat gun and dove inside. I began by opening up my existing Airport Extreme 4th generation. Disassembly still starts by using the heat gun to warm up the adhesive attaching the rubber shoe on the bottom to the metal underside, peeling that off, then removing some screws.
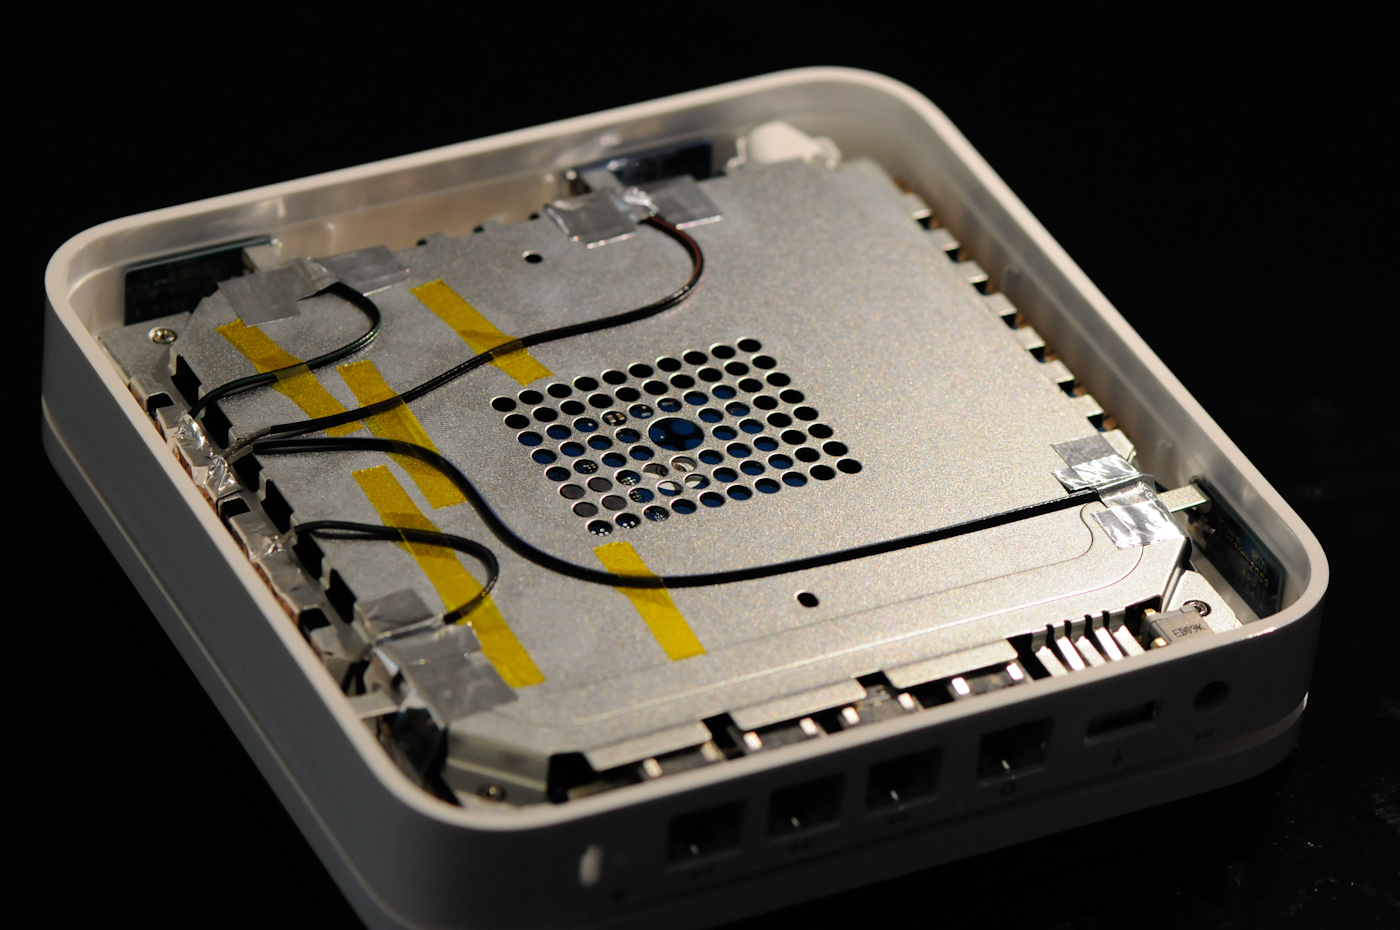
Inside, the Airport Extreme is surprisingly elegant. There’s a single large PCB which serves as a mainboard into which the WLAN card (which is a PCIe x1 slot) plugs.
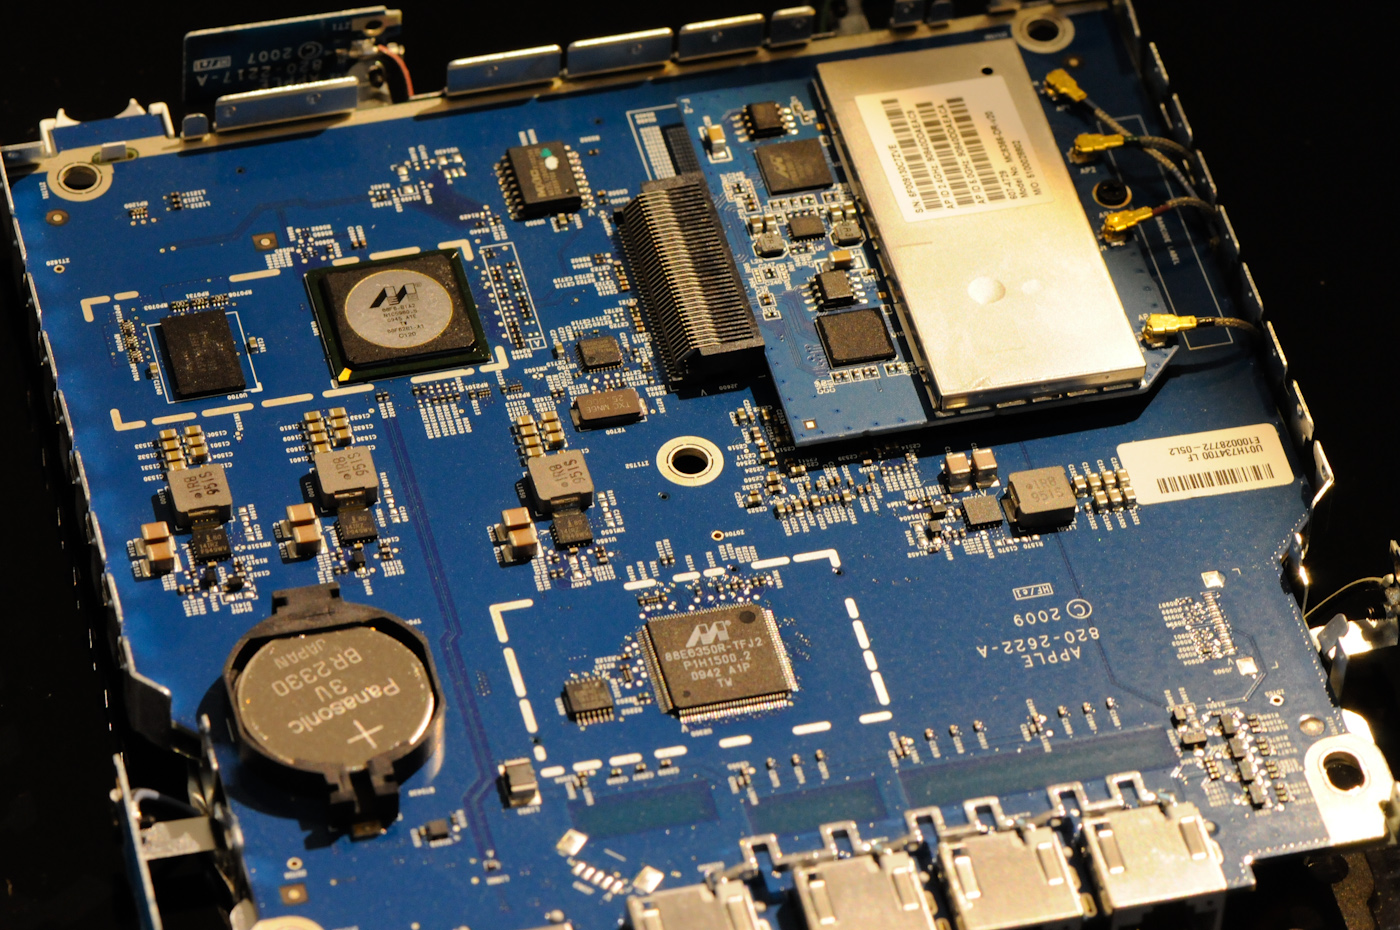
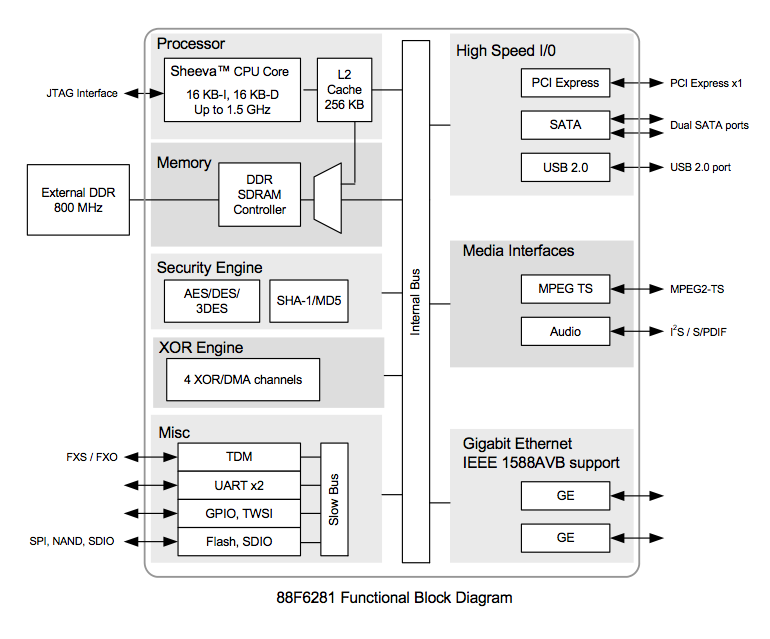
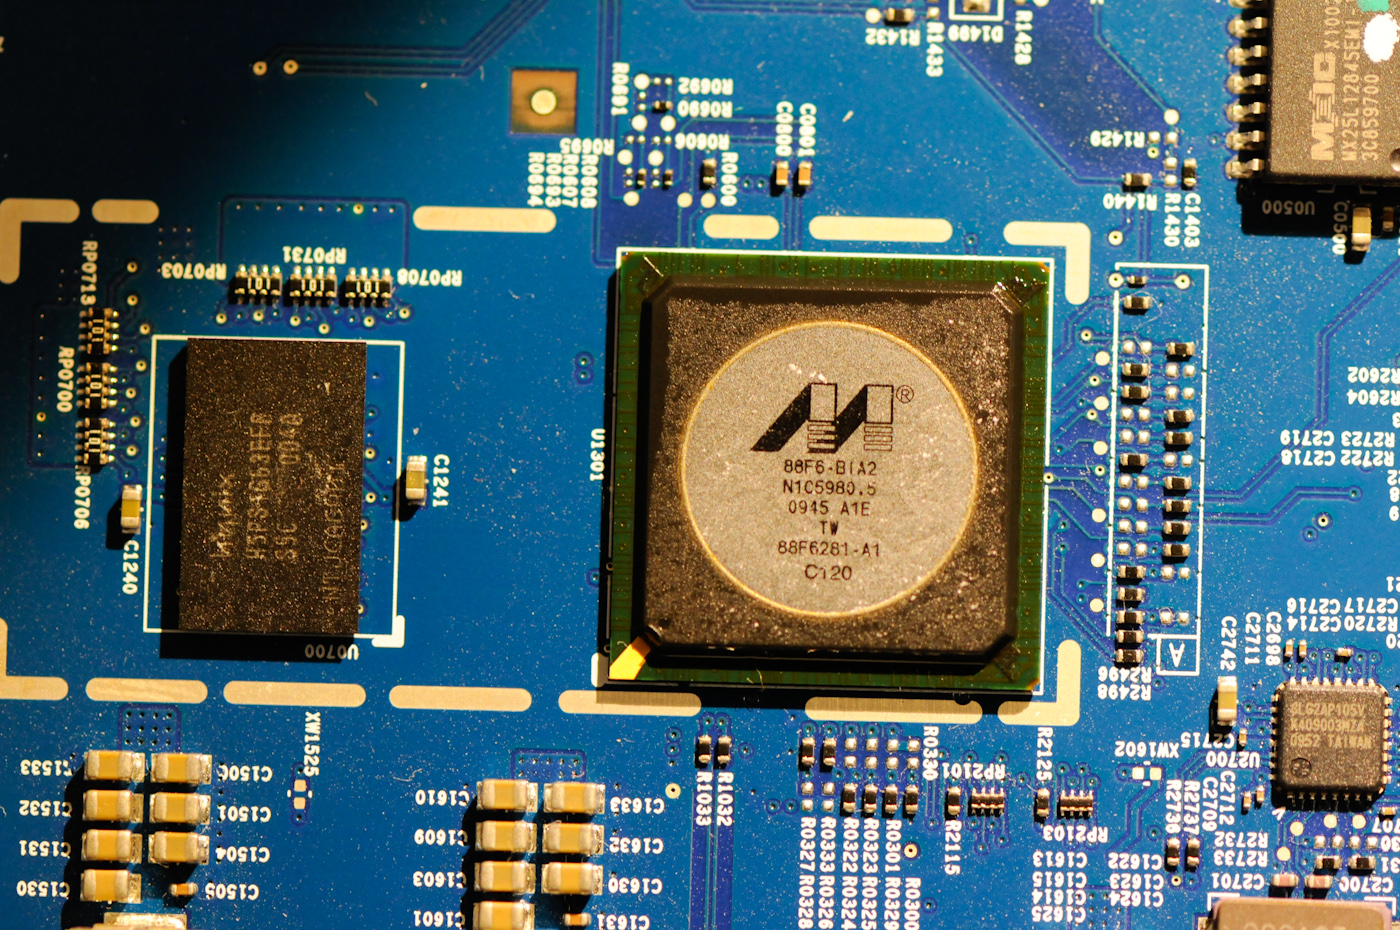
On that main PCB is a Marvell 88F6281 SoC with an internal ARMv5 Sheeva CPU core clocked at up to 1.5GHz. The Marvell 88F6281 also contains a PCI Express x1 controller, two SATA II ports, a single USB 2.0 port controller, and two GigE ports, not to mention a DDR controller.
Adjacent to the SoC is a Hynix DDR2 SDRAM marked H5PS1G63EFR, which corresponds to a 1 Gb (128 MiB) 400 MHz die.
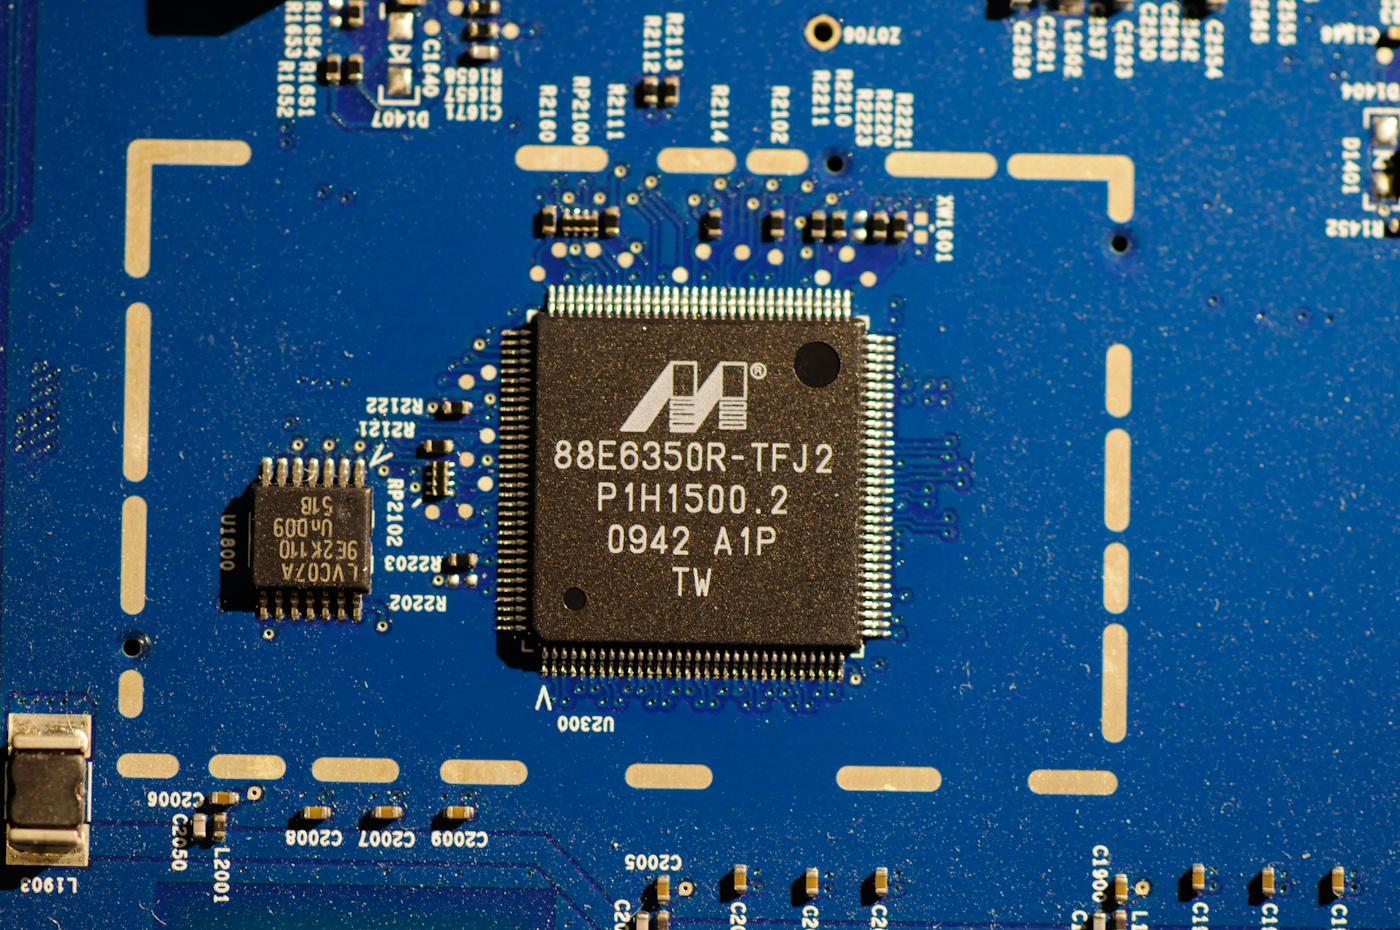
Switching those ports on the back is the task of a Marvell 88E6350R 7 port GigE switch, with 5 physical interfaces, all of which support up to 10 KByte jumbo frames. Of course, both devices only expose a total of four ports, but in theory there could be five. Those two others are internal for interfacing with the corresponding two ports on the 88F5281 SoC.
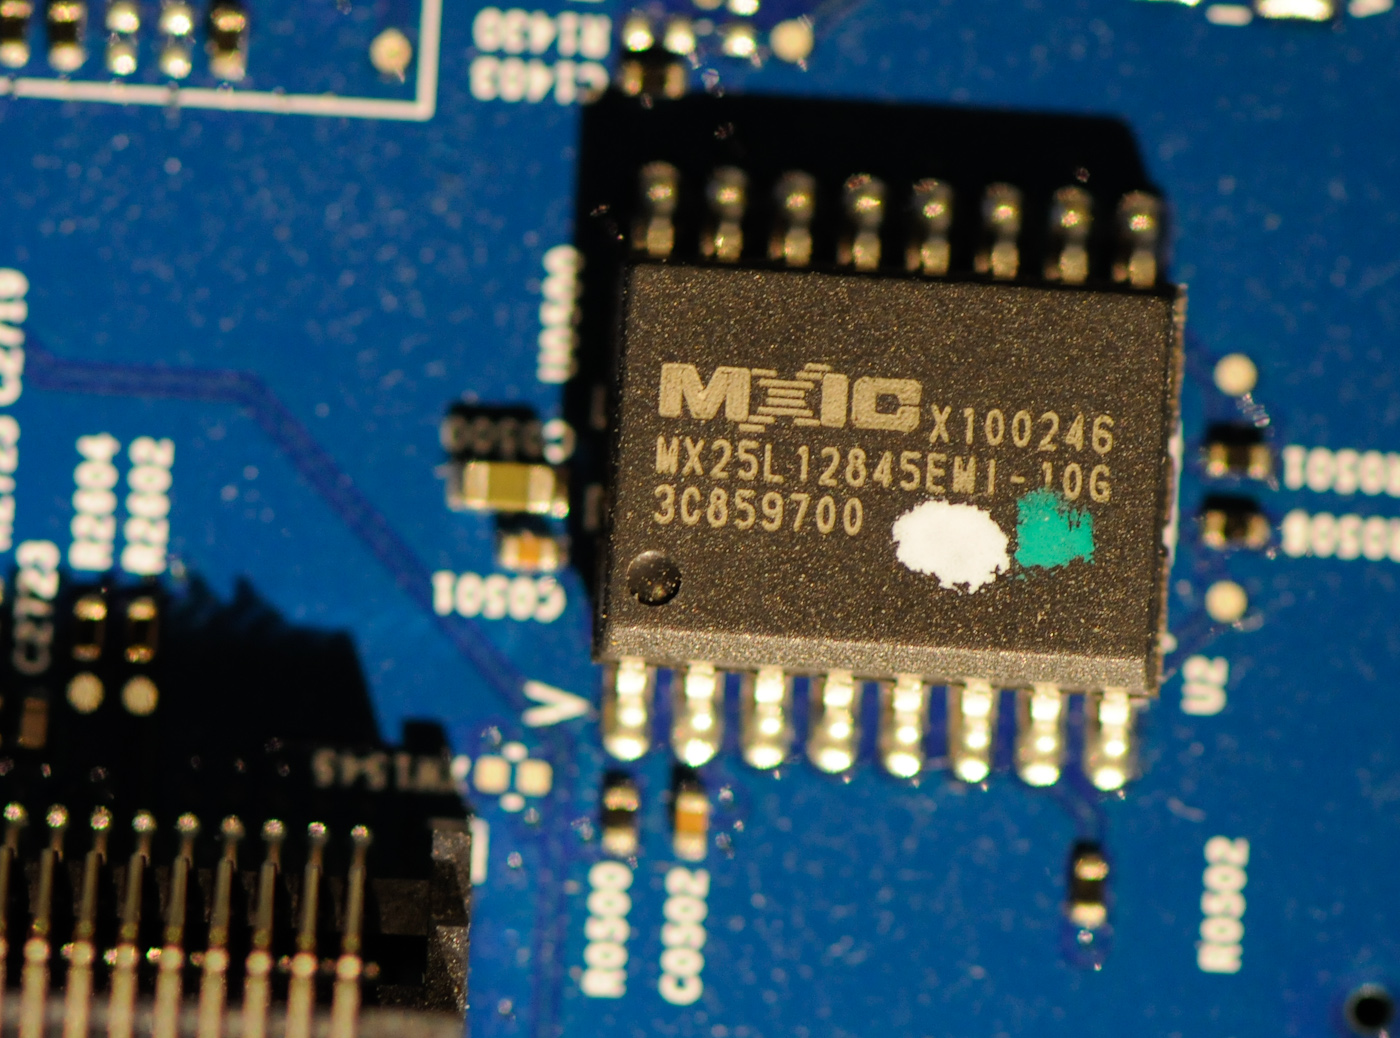
There’s also a curious looking button cell 3V battery on the device, which probably keeps the system clock ticking. With no obvious NAND TSOP onboard, I went searching for storage, and found it on an MXIC flash memory marked MX25L12845E which provides 128 megabits (16MB) of flash storage.
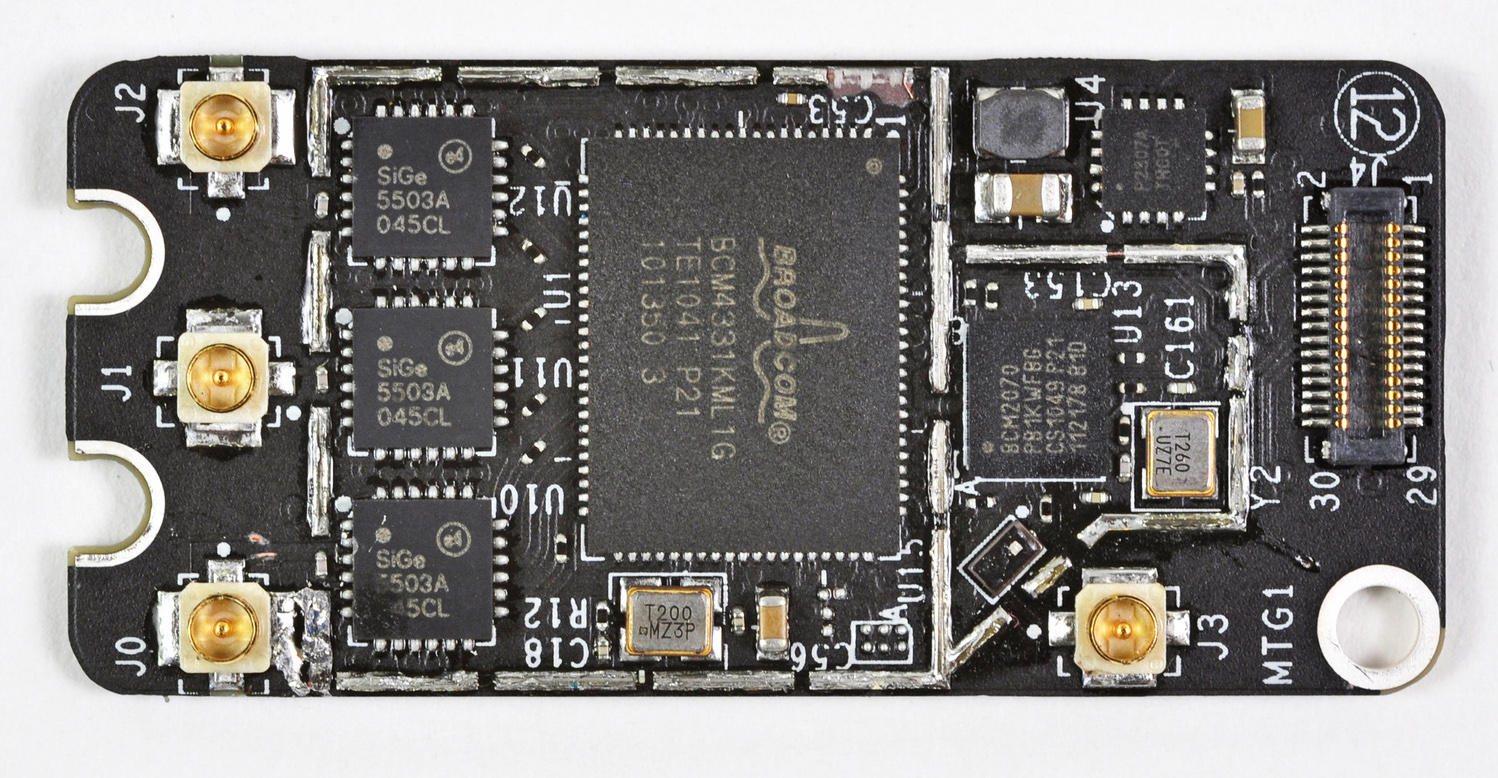
But probably the most interesting component on the previous generation Airport Extreme is the WLAN card, which I mentioned earlier is simply a PCIe x1 card that inserts into a small slot on the board.
Getting the cans off the card was easy enough, and underneath revealed two Marvell 88W8366 WLAN SoCs. These enable the previous generation Airport Extreme to support up to 3x3:3 802.11n on both 2.4GHz and 5GHz. Note that with the notation 3x3:3, the first digit is the number of transmit chains, second is total number of receive chains, and third is the total number of data streams supported.


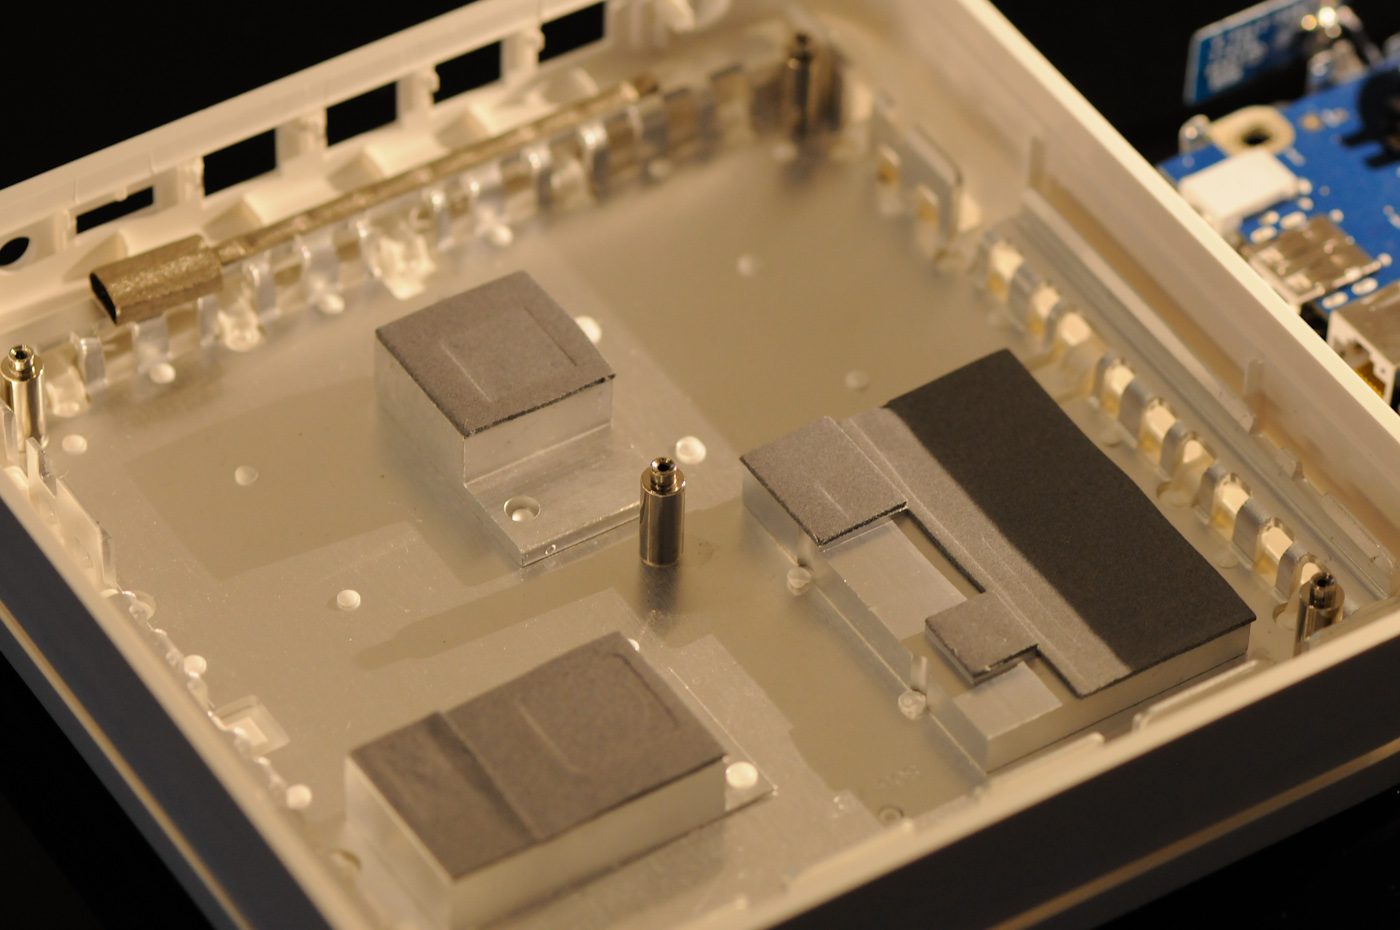
The underside (from my perspective, really this is the top) of the whole affair is home to the device's aluminum heatsink, which consists of pillars topped with thermal pads. Those mate up with the respective chips and carry heat out.
So enough rambling on about components the old Airport Extreme, what about the new one? After taking the Airport Extreme gen 5 apart, I discovered what was changed. It turns out that the new Airport Extreme keeps the exact same revision of the mainboard (and thus the same SoC, 128MB of DDR2, 16MB flash, and GigE switch).

In fact, after I opened up my Airport Extreme Gen 5, I was greeted with the exact same board revision and marking—“820-2622-A copyright 2009.” So what is changed? The fact that Apple designed the board to accommodate a modular WLAN radio card is key.
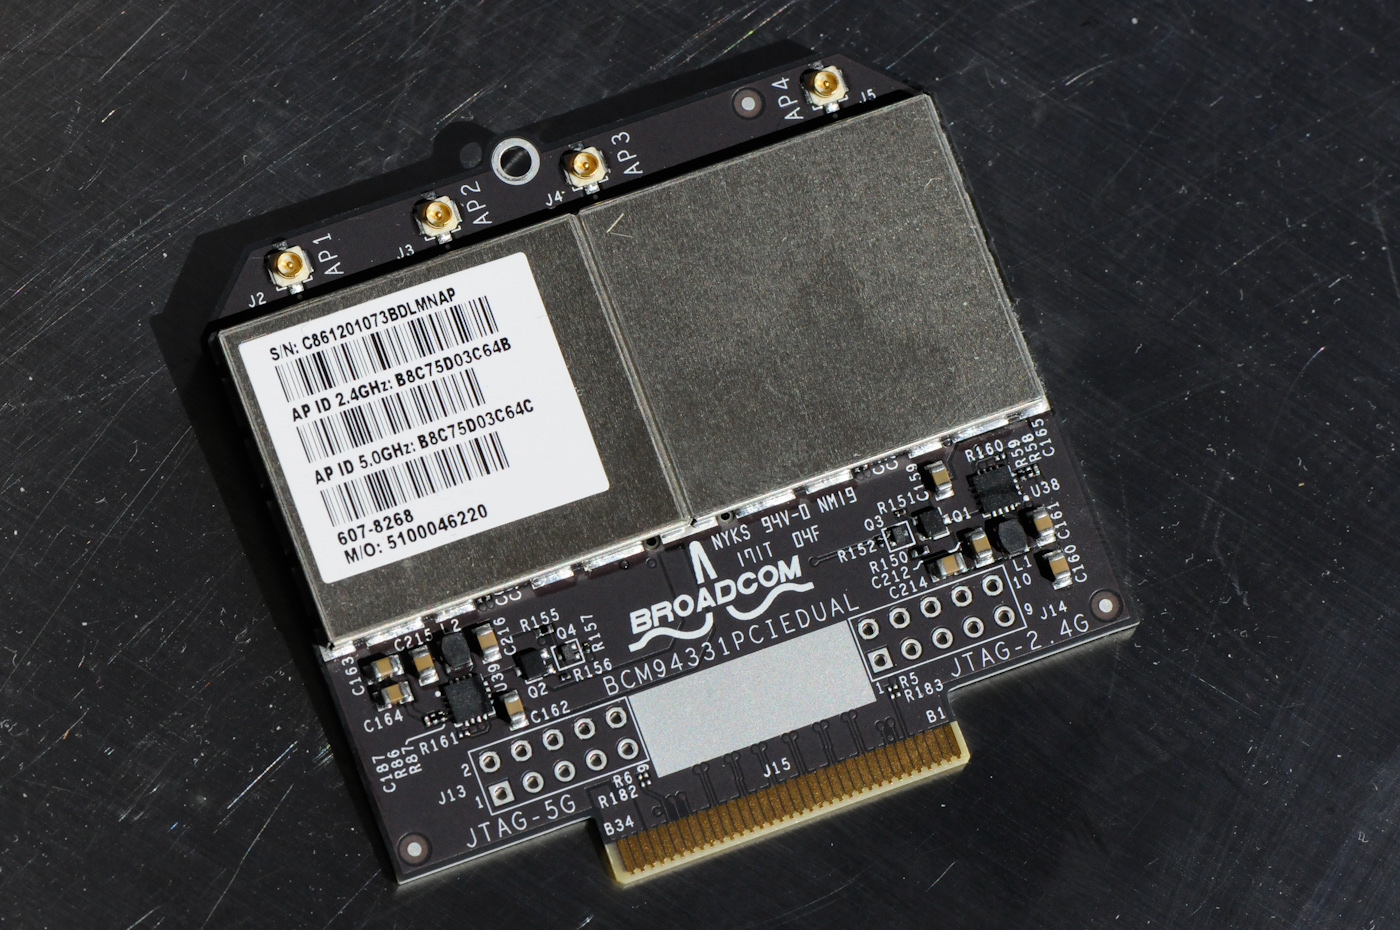
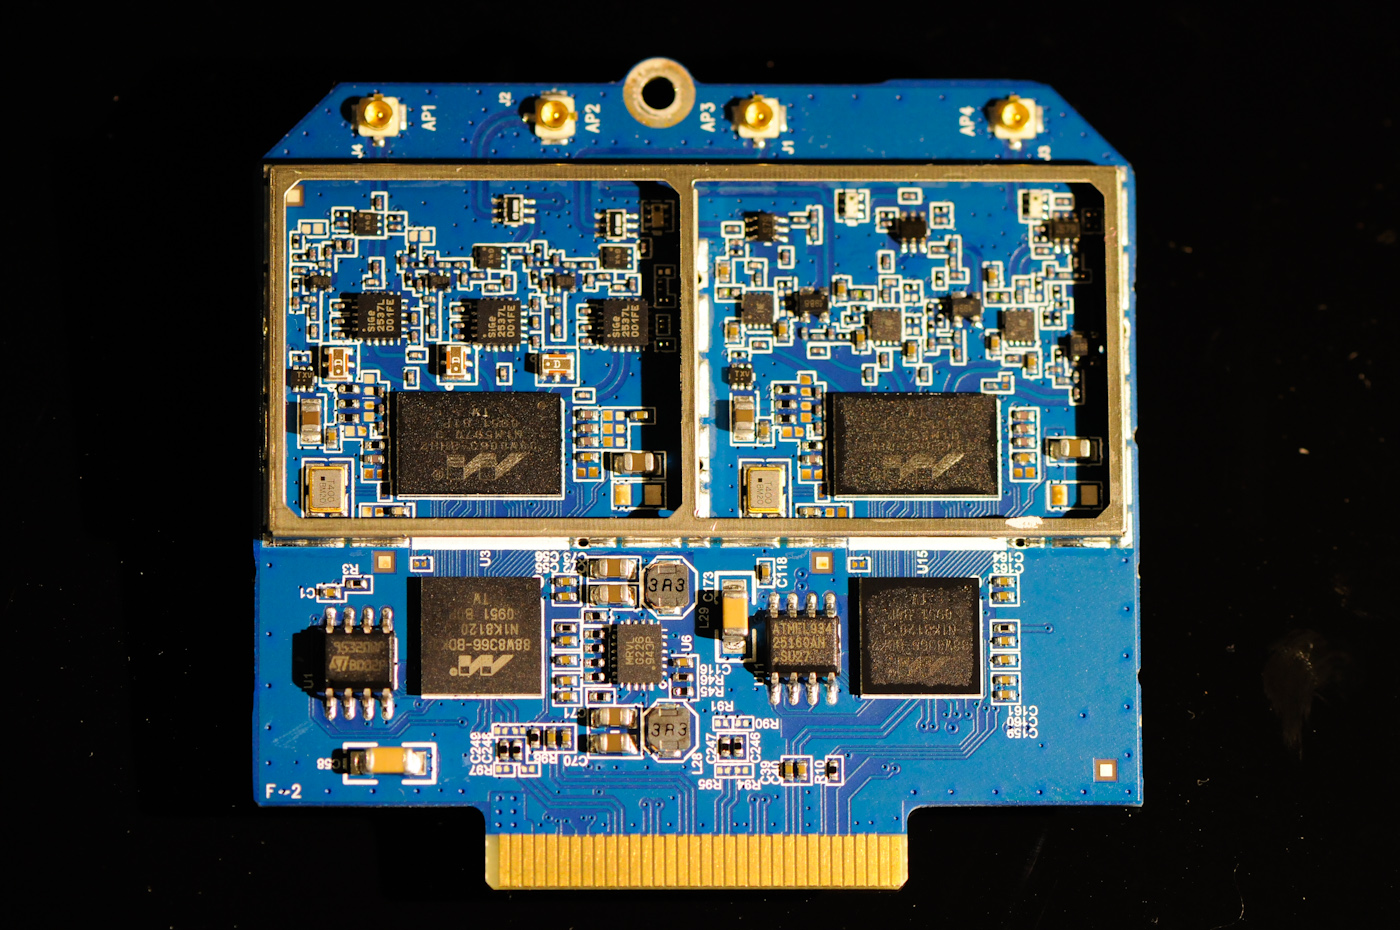
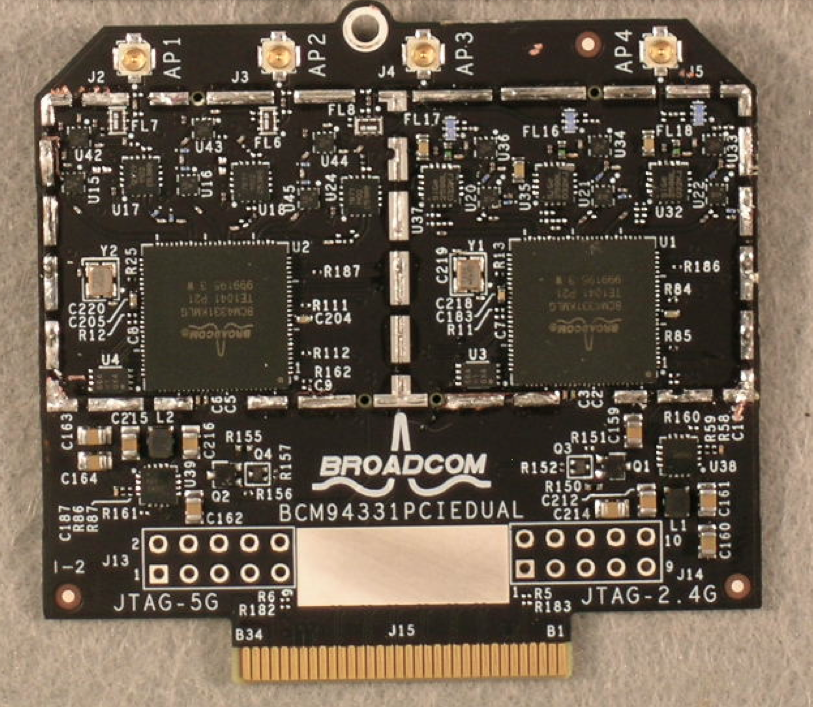
Instead of the Marvell 88W8366 WLAN solution of the generation 4, the generation 5 switches over to a dual Broadcom BCM4331-based solution. It’s pretty obvious to see all of that too given the markings on the card “BCM94331PCIEDUAL” pretty much gives away all of the high level details—two BCM4331 WLAN stacks over PCIe x1. The markings next to the JTAG headers also give away the fact that there are independent radios for 2.4GHz and 5GHz radio. The 9 in BCM94331 usually accompanies a Broadcom reference design, though the Broadcom website doesn’t have anything posted quite yet about that official reference design, however close it is to this design Apple is using.
The BCM4331 might be familiar if you read our Early 2011 MacBook Pro review, as it’s the single chip solution being used for 3x3:3 WLAN on the notebook. Broadcom is scant on details, but the BCM4331 is a modern single chip 3x3:3 802.11n solution.
Unfortunately my attempts to remove the cans on the new WLAN card were met with failure, as they’re held on with some seriously beefy lead-free solder and the cans acted like an effective heatsink even at my iron’s highest temp.
That said, it turns out I didn’t need to remove the cans at all, as the FCC did the job. Underneath you can see confirmation of what we already knew based on just markings—two BCM4331s, power amps, and three independent RF chains per radio. Unfortunately the FCC photo isn’t high enough resolution to show what power amps are onboard, but I can make out SiGe which has been in other Apple products before.
The only other major difference (which is admittedly pretty noteworthy) is that Apple is including finger stock EMI gaskets (which appear copper colored—maybe BeCu?) alongside the outside of the metal tray which meets up with the inside of the device. There’s careful attention to this shielding around the entire tray, and much more carefully applied foil tape holding it in place near and around the antennas in the 5th generation Airport Extreme. I’m not aware of any huge interference problems with the older generation Airport Extreme, nor does it seem like including some EMI gaskets near the antennas is going to vastly improve the independence of spatial streams, but something warranted this change.
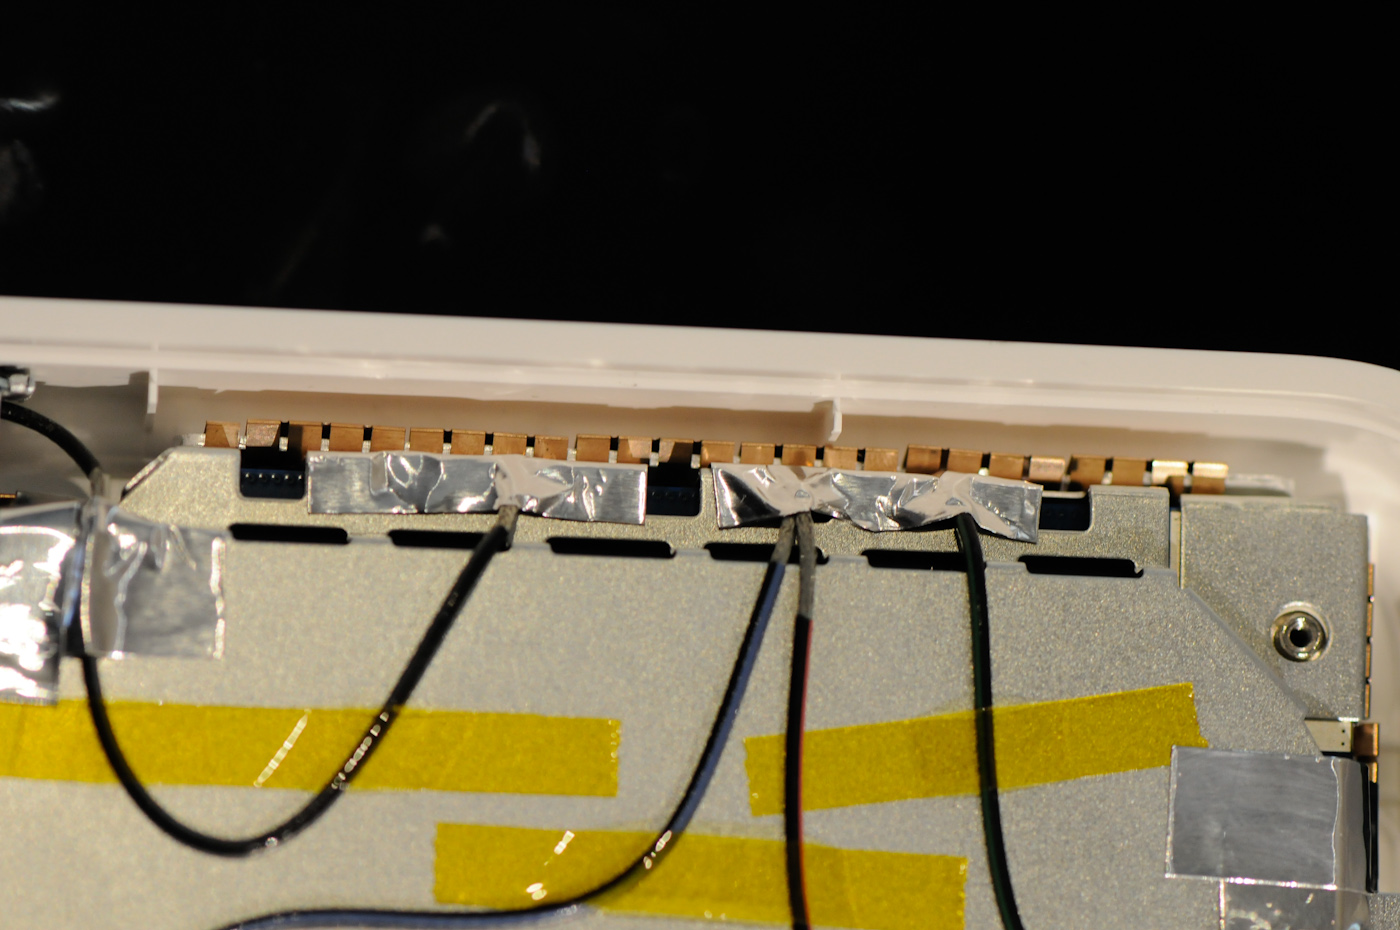
You can see the four antenna PCBs on their own positioned around the edge of the device as well. Again these are unchanged between generations.


That’s really the only change with respect to the 5th generation device. Now what about the 4th generation Time Capsule? Inside, things are much the same as they were in the previous generation. I never owned one, so I can’t compare, and most of the teardowns I’ve seen of it aren’t super comprehensive.


90 Comments
View All Comments
bigrobsf - Friday, August 5, 2011 - link
Minor typo in AFS discussion paragraph in the "WiFi Throughput and Range - Improved page:"Airport Extreme makes a hue difference"
I'm guessing you wanted to write "huge" :-)
Brian Klug - Saturday, August 6, 2011 - link
Good catch, thanks, should be fixed!-Brian
iwod - Saturday, August 6, 2011 - link
I just wish they put out a Raid 1 2.5" HDD Time Capsule so i know my data is going to fairly safe. HDD failure are happening more often these days and with their huge capacity i just cant afford to lose some of my content.repoman27 - Saturday, August 6, 2011 - link
Just use one of these: http://www.icydock.com/goods.php?id=121Combine with a brace of Western Digital WD10JPVT or Samsung Spinpoint M8 HN-M101MBB and you'll have 1 TB of RAID 1 goodness.
Penti - Sunday, August 7, 2011 - link
Raid 1 doesn't really protect from bit rot, just pure 1 drive failure. However they should take reliability and data corruption seriously, but it's not enterprise hardware so you can't really expect it.jackwong - Sunday, August 14, 2011 - link
I will never go with TC unless they have a better backup solution of the TC itself.I have a Synology 1 bay NAS with a external USB to backup all the contents on it.
cheinonen - Saturday, August 6, 2011 - link
Though I imagine most people won't be confused, labeling it as "Smaller values are better" when all the values are negative could cause people to read the data incorrectly. Perhaps "Closer to 0 is better" or something else?Brian Klug - Saturday, August 6, 2011 - link
Totally agreed, edited those tables to make it more easy to follow.-Brian
jigglywiggly - Saturday, August 6, 2011 - link
time capsule wins an award for stealing your money.500$ for a wireless 3tb hd? Don't be sodding st00pid.
repoman27 - Saturday, August 6, 2011 - link
$300 for a $150 simultaneous dual-band, three-stream router with gigabit switch, on board SATA controller and an $80 HD, all in one compact little unit along with the PSU? Not a bad deal, really.Paying $200 (2/3) more for a $70 HD upgrade that only provides 50% more storage space? Questionable, but Apple knows that most people won't bother to upgrade themselves because they'd be out of pocket an additional $150 for the drive and then have to open a brand new device to make the swap.