The Construction Begins
In that same relatively dust free location you've been working in, lay your case on its side so that the motherboard tray is exposed to you. If you have an ATX case and wish to install a new ATX I/O backplate then this is the time do so. Personally, I prefer leaving the backplate off, however if you feel more comfortable with it on then you can go ahead an install it now. Most AT cases do have a removable motherboard tray, in which case you will want to remove the motherboard tray for this part of the installation.
Place the motherboard over the tray and estimate how many stand-offs (metal and or plastic) you will need to fasten the motherboard to its tray. Out of the bag of screws that came with the case, set aside exactly as many metal and plastic stand-offs as you counted. Now, you want to set aside as many screws that will be used to attach your motherboard to the standoffs as you have metal standoffs. The reason for setting these screws apart now is to keep track of the metal standoffs, as you may be able to guess, no metal object should come in contact with your motherboard's PCB. So if you accidentally place a metal standoff underneath a part of your board that doesn't contain a screw hole you will short out the motherboard the minute you apply power to it. By setting aside exactly the same amount of screws as you have metal standoffs, after attaching the board to the standoffs, if you have any remaining screws you know you missed a standoff and you should immediately double check your mounting. This will prevent you from accidentally shorting out the board and may even save you the cost of replacing the board as no vendors will replace a board damaged by a mistake on your part.
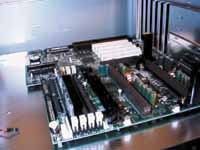
Metal standoffs simply screw into the motherboard tray itself, while plastic standoffs sort of snap into the tray as well as the board. The main purpose of both types of standoffs is to make sure that no part of the motherboard ever touches the metal tray underneath it, after you have secured the board to the tray make sure that no part of it could possibly touch the tray unless extreme force were applied to it. Now you want to fasten your motherboard to the tray and tighten all screws, remember not to make the screws too tight, a power screw driver may be a little overkill here. If everything checks out here, you're ready for the next step. |
 |
It's time to connect your power supply to your motherboard, first you want to make sure that the power supply is not connected to an outlet and all power cables are disconnected. After checking on that, you will want to grab the internal power supply cable and plug it into the motherboard. ATX power supplies offer a 20-pin P/S block that easily fits into the power connector, while AT power supplies use 2 separate 5-pin connectors. Both types of connectors can only go in one way, the general rule of thumb here is to remember that when plugging in AT P/S connectors you should never cross the black wires. There is a set of two black wires on each 5-pin connector, the black wires from each connector should be placed next to each other when plugged into the motherboard. Any other orientation will cause your motherboard to short out and could lead to more damage.
With the power supply connected, the next step is connecting all fans to their appropriate power supply connectors. If your fan has a three pin power connector, then the receptacle you are looking for will be a 3-pin port on your motherboard usually with a white or brown casing around half of the connector. If your fan requires a standard 4-pin 5V power connector then you can simply grab a free connector stemming from the power supply and plug it into there. If you have a secondary case fan then the same applies, while connecting additional devices onto power cables it is best to avoid connecting those onto a cable which has already been occupied by a secondary case fan as they do tend to be power hogs.
Before turning your computer on for the first time you'll want to pop in your video card. If you're using an AGP video card, simply remove the slot cover in front of your AGP slot and install the card there. If you're using a PCI video card then you probably want to choose the slot furthest away from the ISA slots. Plug in your monitor, keyboard (remember that on ATX cases, the keyboard port is the one physically closest to the floor of the motherboard tray), and power supply cable and fire up the system. If everything went ok your monitor should eventually switch out of suspend mode and you should see your BIOS initialize as the memory count starts up. Try getting into the BIOS, don't save any settings, but just make sure that your keyboard is working properly and that your video connection is ok as well. If you don't get anything on your screen after a reasonable period of time (30 seconds should be the maximum time between powering on your system and the first video display) power down your system, check all connections and try again. Always pay attention to the fans in your system, if they don't spin up then immediately remove all power to the case and make sure you're not shorting anything out. Double check that the processor has been inserted properly and that the motherboard isn't in contact with any foreign pieces of metal.
If that bootup worked out ok, pat yourself on the back as the hardest part of building your system is now over and you're ready to complete the building process.


1 Comments
View All Comments
Anonymous User - Tuesday, September 16, 2003 - link
this web site is soxy.. i love it