5 Megapixels for < $300: Kodak DX4530, Olympus C-50 Zoom, Casio QV-R51
by Stephen Caston on July 15, 2004 12:05 AM EST- Posted in
- Digital Camera
The Design: Casio QV-R51
88.3 x 60.4 x 33.4mm
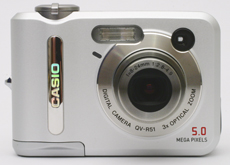
On the front of the camera, we can see the lens, the built-in flash, and a self-timer lamp. The lens is protected by a small automatic cover that opens before the lens extends and after the lens retracts. The lens has a 3x optical zoom and a 4x digital zoom. The optical zoom is equivalent to 39-117mm on a 35mm camera. The aperture range is between f2.8 - 4.8 in wide angle and f4.9 - 8.4 in telephoto. The shutter speed range is from 1/2000th - 4 seconds. Both are automatically adjusted. The flash range is 2 - 10ft in wide angle and 2 - 5.9ft in telephoto.
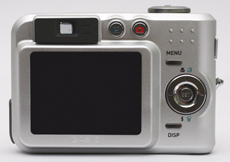
On the back of the camera, the first thing that really stands out is the size of the LCD screen. It is a 2" screen with 82,960 pixels. Just above the LCD screen are the optical viewfinder, 2 indicator lamps, a play button, and a record button. Pressing the play button when the camera is off will take you to play mode without having to extend the lens. Pressing the play button when the camera is on will switch from Record mode to Play mode (the lens will retract automatically after being left in Play mode for about 10 seconds). Pressing the Record button when the camera is off will turn the camera on in Record mode. Pressing record when the camera is already on and in play mode will also cause the camera to switch over to record mode. One common digital camera function that is missing from the QV-R51 is a shooting priority feature that would allow a half press of the shutter to switch the camera automatically to record mode. In order to take a picture from play mode you must press the record button and then press the shutter release button.
To the right of the LCD screen is a dedicated Menu button. Just under it is a 4-way arrow pad with an independent "Set" button in the middle. Below the arrow pad is a Display button that changes the display settings in record and play mode. In record mode, pressing this button will cycle through the following display settings: live histogram, clear camera setting information from LCD, turn off LCD, turn on LCD with camera setting information. In play mode, the Display button controls the following options: add a histogram and shooting info to the display, clear the display except for the picture, bring back the basic information on top of the picture (shot number, resolution, quality setting, date, time, and battery status).
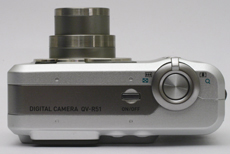
On the top of the camera is a small Power button. When the camera is off, pushing this button will turn on the power and LCD screen and extend the lens to its default position. The speed at which this camera can be ready to shoot is surprisingly fast (we will discuss this later in the article). When the camera is on, pushing the Power button will power down the camera and retract the lens. Also on top of the camera is the zoom control and shutter button.
 |
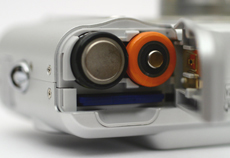 |
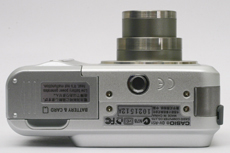
The bottom of the camera contains the battery compartment and metal tripod mount. The Casio QV-R51 supports 2 NiMH, Lithium, or Alkaline AA batteries. The camera comes with 2AA NiMH batteries and a wall charger. The charge time for these batteries is approximately 4 hours.
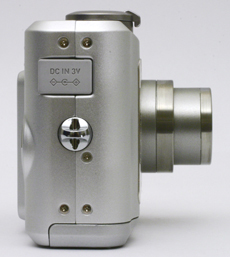
On the right side of the camera is a movable tab that covers the port for the optional 3V AC adaptor. Just a little bit further down is a post for the included wrist strap.
 |
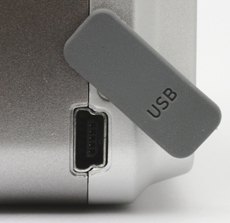 |
The left side of the camera is bare except for a tab that covers the USB port for downloading pictures from the camera.
The Casio QV-R51 offers a number of image size options with quality options: Fine, Normal, or Economy. The image size settings are outlined in the table below.
| Setting | Compression | Resolution (pixels) |
| 2560x1920 | JPG | 2560x1920 |
| 2560x1712 (3:2) | JPG | 2560x1712 |
| 2048x1536 | JPG | 2048x1536 |
| 1600x1200 | JPG | 1600x1200 |
| 1280x960 | JPG | 1280x960 |
| 640x480 | JPG | 640x480 |
This camera does not have an uncompressed image setting. All of the image sizes have an aspect ratio of 4:3 except for the second one (as labeled). In addition to image size options, there are also several adjustable quality settings. Sharpness can either be set to Hard, Normal, or Soft. Saturation and contrast both have options for High, Normal, or Low.
Another feature that the camera offers is the option to use digital Color filters. The options include: Off, B&W, Sepia, Red, Green, Blue, Yellow, Pink, and Purple. Although these are all options that can be applied by an image-editing program afterwards, the ability to compose shots with color filters may bring about some creative ideas.
In Snapshot mode (Auto mode), you have control over flash behavior and focusing modes. Pressing the down arrow key will switch between these different flash modes: Flash off, Always fire, Red-eye, and Auto. An indicator icon will show up on the LCD screen to indicate which setting you have chosen. The absence of an icon means the camera is in Auto flash mode. Pressing the up arrow key will cycle through the 4 different focusing modes: Auto, Macro, Infinity, and Manual focus. Again, the absence of an icon means that you are in Auto focus mode.
With auto focus, you can select between Spot and Multi modes. Spot mode focuses on the very center of the frame in the brackets (as shown). In Multi mode, 7-point focus points appear on the display. When you half-press the shutter button, the camera automatically selects a focal point based on the closest subject to the camera. In Macro focus mode, you can focus from 3.9"-27.6". Infinity focus mode causes the camera to focus out to infinity automatically. In Manual focus mode, you can control the focus by using the left and right arrow pads to focus close and far, respectively.
Besides Snapshot mode (Auto), there are 21 "BestShot" modes available as well as a Movie mode. Some examples of BestShot modes are Portrait, Scenery, Nature, and Candlelight. Each option has specific preset menu settings that are designed to enhance the overall image quality for the type of shot that you are taking. A quick description of the purpose of each setting is displayed when cycling through them. Two interesting BestShot options are Coupling Shot and Pre-shot modes. Both are options that allow you to include yourself in a picture with a friend by taking two separate shots that are automatically "stitched" together for the final picture. In movie mode, the camera captures a silent 320x240 movie clip in AVI format. The maximum length for a clip is 60 seconds (whether or not you have a larger capacity card).
This camera offers exposure compensation by +/- 2 stops in 1/3 increments. You can adjust the compensation in the menu or you can program the left and right arrow keys to decrease and increase the exposure. Flash compensation is also available with three options: Strong, Normal, and Weak. There are 3 different metering modes from which to choose. The default setting is Multi-pattern, where the camera measures the light in several sections of the frame to determine the best exposure. The second option is Center-weighted metering, which measures the light mostly in the center of the frame in the focus brackets. The last option is Spot metering, which measures a very small area from the center of the frame. In addition to metering options, you are given the following ISO settings to select: Auto, 50, 100, 200, and 400. With Auto chosen, the camera will attempt to pick the best ISO setting for the situation (from 50-200).
The QV-R51 offers 6 white balance options: Auto, Daylight, Shade, Incandescent, Fluorescent, and Manual. It is nice to see that this camera is following in the footsteps of the QV-R40 and R41 in that it offers manual WB. We feel that it is something that every camera should have for those shots when preset options don't quite capture the color.
One of the nice features about the QV-R51 is that you can customize the behavior of the left/right arrow keys in Record mode. They can be set to select any of the following: Recording mode (Snapshot, BestShot, Movie), Exposure compensation, White balance mode, ISO setting, and Self-timer mode. If you tend to switch between one of these settings frequently, it is much faster to use the left/right arrow keys than it is to go through the menu. Another handy feature is the ability to tell the camera what to remember when you turn off the camera. Almost all the options in the menu have an On/Off setting to indicate whether the camera should retain the settings it had before it was turned off. Also, the live histogram function (via the Display key in Record mode) is very useful for obtaining an even exposure. Some cameras offer histograms in play mode only after the picture is taken. Another feature that may be useful to some users is the option to compose shots with a 3x3 grid, which is displayed over the live image on the LCD.
In play mode, pressing the right/left arrow keys shuffles through previously taken photos. If you hold the right or left arrow key, the camera will shuffle through the pictures at a very fast pace. There is also a calendar screen that displays the first picture taken on each day of the month. A traditional thumbnail display ,which holds 9 images at a time, is also available to find pictures that you have taken. When viewing a single picture, you have the option to magnify the image by sliding the zoom controller to the right. An image can be magnified up to 4x.
In play mode, there are a number of options available to the user, including: Slideshow (specify images, slideshow duration, and picture interval time), Protect, Rotate, Resize (to 1600x1200, 1280x960, or 640x480), Trimming (with a moveable and sizeable cropping area), Create Album (creates an HTML-based webpage of photos), Alarm (turns on camera and sounds at a specified time), and Copy (from internal memory to flash card and vice versa).


9 Comments
View All Comments
LX - Friday, July 16, 2004 - link
A review of digicams on AnandTech is like a review of CPUs on dpreview or a review of motherboards on imaging-resource.Choosing digicams for comparison based on their pixel count is like comparing CPUs based on their MHz.
Please stick to your field of competence!
Mermaidman - Friday, July 16, 2004 - link
What next? A review of the new and improved ROOMBA robot vacuum? :preljam - Friday, July 16, 2004 - link
This review was really below the 'Anandtech standard'. The comments posted above are all valid, but you completely forgot to do indoor tests.Cameras (especially small ones) suffer from not being able to produce a sharp image in low light conditions. Taking three shots outdoors, even on a cloudy day is going to give you decent results 90% of the time. If you want to see noise, try taking indoor shots with the flash on. In indoor shots flash range becomes very important (portrait-only flash is unacceptable), and the amount of noise in the background is something that's a very real problem.
Your testing methodology is roughly like taking a Celeron, a P IV and and AMD64 and running IE page rendering tests - yes, there may be differences, but that's not the distinguishing feature.
nigham - Friday, July 16, 2004 - link
I think the review was done fairly well - though I am disappointed to say that at the end of it, I'm certainly not going to buy any of these things. All of them sure seem to have a few problems.physologically speaking, the best feeling i get after an anandtech article is when i really feel - hey i should actually go ahead and buy this thing... zilch of that here.
so what you probably need is to review all of these along with some really good cameras (and i'm sure they're out there - having used a DSC-P93 i can say that the picture quality is definitely better than the pics i've seen in this review).
if price range is your method of choosing "similar" cameras, i'd agree with SKiller and say go ahead and include 3/4 mp cameras if they've got much better quality, alongside the 5 mp ones, and let us make the choice of what we want to pay for. personally i can't for the life of me think what i'd ever do with a 2500x2000 pixel image.
i think for a first effort in the humanly-priced cameras, this was OK and i'm sure you guys will only keep getting better.
EddNog - Friday, July 16, 2004 - link
I say screw it and just buy a Canon. ;-Pianmills - Thursday, July 15, 2004 - link
ahahaha:)
WooDaddy - Thursday, July 15, 2004 - link
This is a TOTAL waste of time. Let me count the ways:1) All of the pages were direct testing method rips from dpreview.
2) THE CAMERAS ALL CAME FROM DIFFERENT YEARS (development cycles)!!! 2002, 2003, 2004?!? COME ON!! If you are going to have a comparision, compare cameras built within the same time frame! Do you think Anand, Wesley or Kris would attempt to do an apples to apples direct comparo on CPUs that were three years apart!?! NO!
3) WTF is with this conclusion!? THERE IS NO ADDED VALUE TO ALL THAT TESTING YOU DID! If you realized that those cameras weren't similar enough, the review should've stopped. The only difference you could find was price!? All Anandtech readers should feel insulted by that.
4) What was the basis for choosing these cameras?When CPU or Mobo comparision are done, they are done with products that are marketed to be similar. I didn't see the logic in choosing these three.. as a matter of fact, no reasoning was given at all.
Lastly, Anand, Kris, or whoever senior editors.. I am disappointed in YOU more so than anyone else. Don't you review the articles posted? Virtually every single article that you've posted in the years have had relevance, structure, in-depth conclusion, value-added information to bring upon very educated purchasing decisions. Two hiccups back to back like this is horrible. You've done research, so research what makes a good digital camera review... NO! Consider your purpose first. Anandtech is not a digital camera review site. That is such a large genre and almost completely separate from IT-based products. It's like going to McDonalds and not only asking and getting a filet mignon, but then expecting it to be as good ...
To slightly calm down, I don't believe that Anandtech is the appropiate forum for articles like this. I also didn't think the review represented the quality and in-depth nature of the majority of the reviews here. I believe the attempt add digital cameras to the review list is showing that the genre of the website is starting to lose its direction. Anandtech is a IT and consumer level PC product review site, not a general blog, review everything website. Digital cameras have links to this world but are not a subset.
WooDaddy - Thursday, July 15, 2004 - link
Look.......
I'm really pissed about this. Let me calm down and post later...
SKiller - Thursday, July 15, 2004 - link
5mp cameras at this price range are still not a very good option IMHO. They tend to sacrifice quality and features for the added resolution. I think that 3-4mp cameras at this price can give much better results unless you absolutely have to have 5mp.I'd consider Canon PowerShot A75, A80, Fujifilm FinePix F601Z, Kodak DX6340, and Samsung Digimax V4 from the "more advanced features" category.
Good review though.