ASUS P4C800 Deluxe: Board Layout
The ASUS P4C800 Deluxe's layout was pretty solid for the most part, with only minor annoyances that we think are worth elaborating on.
Looking at the positioning of the ATX (20-pin) connector, we see that ASUS placed it on the right-hand side of the motherboard. This is the best place to position an ATX connector, as the thick wires won't obstruct the installation/uninstallation of the HSF or passive North Bridge heatsink, as well as any other components that you may decide to modify or uninstall. Unfortunately, the ATX connector isn't located high enough; the ideal position would be at the very top, right-hand corner of the motherboard, perhaps just over the DIMM slots.
ASUS places the ATX12V connector in quite unique (but nice) location; on the right-hand side of the motherboard just to the left of the DIMM slots. We are pleased with this location as the ATX12V cable will not get in the way of uninstalling the CPU HSF. The ATX12V connector positioning is especially important since the vast majority of ATX12V cables that come attached to PSU's are almost always exactly the same length, unlike PSU ATX (20-pin) cables that can vary greatly in length.
We're happy that ASUS positions the Primary and Secondary IDE connectors to the right of the DIMM slots and above where the video card would be installed. We've experienced what a hassle it can be to have the Primary and Secondary IDE connectors placed on the lower portion of the motherboard. It makes it much more difficult for IDE cables to reach to the highest bays of a large-sized ATX case if the Primary and Secondary IDE connectors are placed below the mid-section of the motherboard. However, what may be of some issue is the Floppy connector's location, which is actually higher up on the PCB than the Primary and Secondary IDE connectors. This is a problem because if you plan on installing a Floppy drive, your Floppy cable is going to get tangled up with your Primary and/or Secondary IDE cables. This isn't an issue if you never plan on changing any components in your computer every again, but for those that plan on upgrading or changing the hardware in their computer before they scrap it, this is an issue.
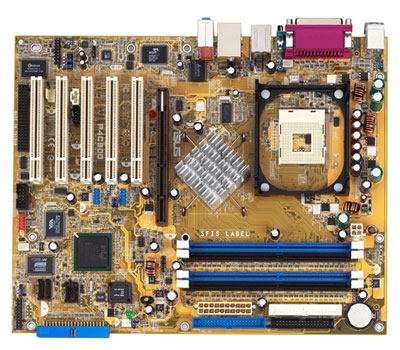
ASUS is also able to layout the P4C800 Deluxe well enough so that the DIMM connectors are placed just far enough away from the video card that it doesn't become a hassle to uninstall the video card if we want to install or uninstall memory. Those of you that frequently upgrade and maintain your hardware know how annoying cramped DIMM connector space can be, or any cramped space in general.
One thing we think is worth mentioning is the size of the P4C800 Deluxe's passive North Bridge heatsink, which is at least twice the size of passive 845PE North Bridge heatsinks we've seen in the past. Despite its size, the 875P heatsink was between warm and fairly hot when touched during full load. Serious overclockers may want to install an active North Bridge heatsink instead of the large passive one that comes with the P4C800 Deluxe.
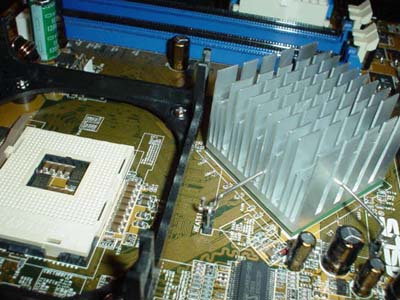
One other issue we noticed with the P4C800's North Bridge heatsink was the way it was angled such that it made it difficult to uninstall our retail Intel HSF. In fact we were forced use to use a flat head screwdriver to uninstall the HSF, it was impossible to do with our bare hands. This is even more of an issue with the bigger, better copper HSFs out there, which probably won't fit in the ASUS P4C800 Deluxe due to the North Bridge heatsink's location.
Last up is the location of the USB 2.0 and IEEE 1394 FireWire headers. There are two USB 2.0 headers on the P4C800 Deluxe, the first being located between PCI slots 1 and 2 and the second USB 2.0 header located between PCI slots 2 and 3. This is good positioning as there is little chance that your USB 2.0 bracket will get tangled up with any other wires/cables or hardware components. The same excellent positioning is applied to the IEEE 1394 FireWire header, which is located at the very bottom middle portion of the PCB, an inch or so to the right of the 5th PCI slot where your FireWire bracket will be placed if you decide you need more than just the rear FireWire port.


0 Comments
View All Comments