Hitachi CML174 17'' LCD Plus Samsung 172T Revisted
by Kristopher Kubicki on February 12, 2003 3:24 AM EST- Posted in
- Displays
Construction
If you have been keeping track of our previous LCD reviews, you will know that we have spent a small amount of time mocking the lack of color choices for monitors on the market right now. Many of you will be happy (or unhappy?) to know that the Hitachi CML174 does NOT come in silver. Our particular unit came in white, but Hitachi also sells a black version as well.
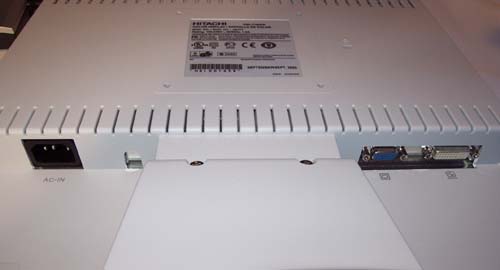
Interestingly enough, the CML174 has a very narrow bezel along the left and right sides, which provides the optical illusion of a larger screen. The bezel width is approximately 2/3 the size of the Samsung 172T's vertical bezel, but the CML174 stretches several times the depth of the Samsung panel. Because the connectors are mounted on the bottom of the 172T, the footprint on the CML174 takes up approximately 2” less desk space (in terms of depth) than the 172T.
While starting a new LCD up, we first look for dead pixels on the screen. Some screens will often have a dead sub pixel, meaning one of the 3 components of a single pixel will be stuck in an on or off position. However, if all three subpixels are broken, most companies (including Hitachi) now have a dead-pixel warranty. The CML174 also ensures a warranty on 6 dead subpixels, meaning if you can find 6 dead subpixels on the screen you get the same warranty if one full pixel was broken.
Our forums literally exploded last week when we announced that we would be exhaustively examining the CML174. This is the first monitor produced on a substrate with a low enough response time to appeal to gamers. While looking at the monitor specifications, we can conclude that the CML174 and the Samsung 172T differ in only a few key specifications.
| Samsung SyncMaster 172T |
|
| LCD |
17”
a-Si TFT/PVA LCD (Active Matrix) |
| Scanning Frequency |
Horizontal: 30-81kHz (analog) |
| Response Time |
25ms (Typical) |
| Contrast Ratio |
500:1 (Typical) |
| Compatibility |
1280 x 1024 (Native) |
| Brightness |
250 cd/m2 |
| Dimensions (WxHxD) |
15.2'' x 15.6'' x 8.5'' |
| Power |
Working : 42W Max |
| Weight |
10.3lbs |
| Warranty |
3 years parts and labor |
| Hitachi CML174 |
|
| LCD |
17”
a-Si TFT LCD (Active Matrix) |
| Scanning Frequency |
Horizontal: 24-80kHz |
| Response Time |
16ms (Typical) |
| Contrast Ratio |
400:1 (Typical) |
| Compatibility |
1280 x 1024 (Native) |
| Brightness |
260 cd/m2 |
| Dimensions (WxHxD) |
15.5'' x 14.7'' x 8.0'' |
| Power |
Working : 48W Max |
| Weight |
11.0lbs |
| Warranty |
3 years parts and labor |
Immediately, you should note that the CML174 has the famed 16ms response time
with a slightly higher brightness rating (260nits versus 250nits) but the
Samsung has a much higher contrast ratio. We will explore the unique qualities
about these two units near the end of the review.
The other key difference between these two monitors is the response time. There have been dozens of claims that this response time will result in a better gaming and entertainment experience, but we would sure like to verify it. We have provided several gaming experiences with both the CML174 and the Samsung 172T in the benchmark of this review.
Since the Hitachi CML174 had exposed screws (most LCD's we have seen do not), it was almost too tempting to take a look and see what was under the hood. If you look closely, you will see that Hitachi really does prove there are a million uses for duct tape.
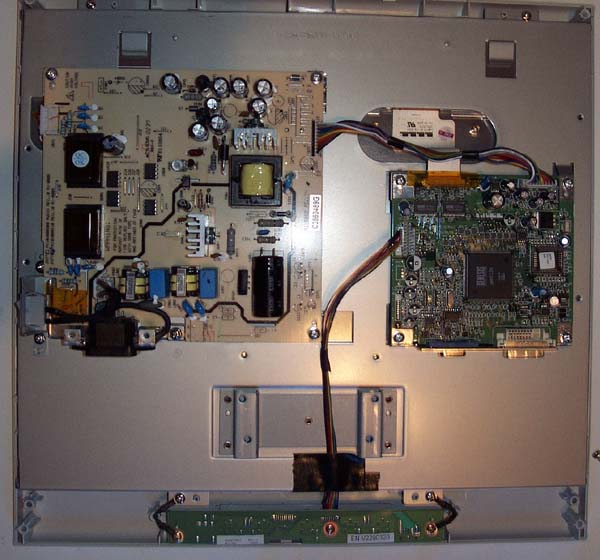
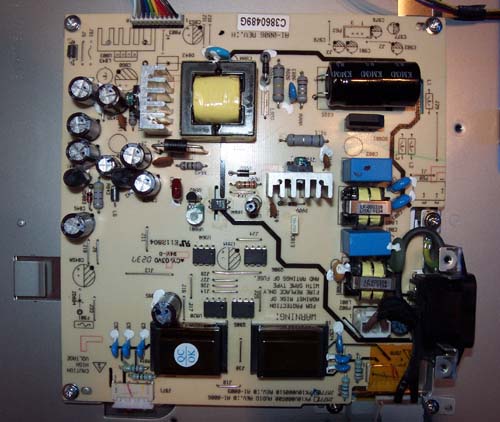
The larger beige board handles the DC step down conversion and provides power for the components.
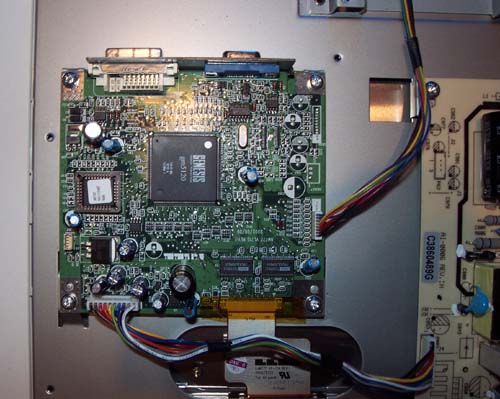
The smaller green board interfaces the inputs, controls and power together on the LCD screen. The large Genesis chip handles analog to digital conversion, while the smaller chip labeled “REV1.01MT” handles the on screen display. (Notice in our OSD section that a small Rev 1.01MT appears in the lower left hand corner of the menu). Very close inspection will reveal that AU is clearly written on the ribbon connecting the interface board to the LCD itself.


0 Comments
View All Comments