nForce2 6-way Motherboard Roundup - December 2002
by Evan Lieb on December 4, 2002 6:53 PM EST- Posted in
- Motherboards
MSI K7N2-L: Board Layout
The MSI K7N2-L didn't have too many major layout issues, though there were a few that caught our attention and that should be noted.

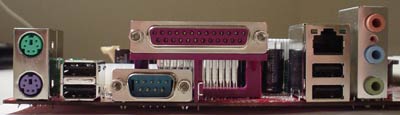
The ATX (20-pin) connector is located on the left-hand side of the motherboard next to the I/O ports. We've always said that this isn't the best place for the ATX connector to be because the thick ATX wires can obstruct the installation/uninstallation of the HSF in addition to any other components that might be modified around that area. On that note, we should say that we were disappointed that the capacitors around the CPU socket were a bit too close for certain types of large heatsinks. Since the mounting holes are missing in the first place, installing the higher quality MCX and PAL heatsinks won't be possible anyway. We're not sure why MSI continues to leave out the four mounting holes.
There are a total of two onboard fan headers on the included with the MSI K7N2-L. One is the CPU fan header, which is spoken for, and the other is the North Bridge fan header, an RPM reading of which you will find in the BIOS. Of course, you'll have to mod the motherboard with a North Bridge HSF that fits if you want to use this onboard header, though you can always use it for a case fan instead.
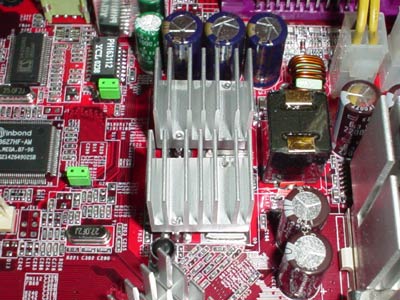
Lately, we've seen MSI add on passive cooling to their voltage regulators, as you can see in the picture above.
We also see a blue PCI slot located at the very bottom of the motherboard, which resembles ASUS's "Blue Magic" slot technology. Apparently, this is an ACR slot for future SoundStorm expansion. MSI wasn't able to elaborate any further than that, but we'll update this info if we do get more information from MSI.
Like the Epox 8RDA+, the Primary and Secondary IDE connectors are placed in a very awkward position in relation to the AGP slot. However, the IDE connector's location on the K7N2-L is even worse than the 8RDA+'s location. The K7N2-L places the Primary and Secondary IDE connectors even lower on the motherboard, close to the USB header. We would find it hard to believe if IDE cables running from these connectors would even be able to reach the upper two drive bays of a large sized ATX case. This is, of course, unacceptable, especially for power users that are looking for a quality computer case (which are usually quite large compared to your Joe Average OEM computer cases from Dell). In addition to all of this, the IDE cables will probably be hitting your video card, though that's assuming your video card is as long as ours.
Luckily enough, the DIMM connectors are placed nicely. The GeForce4 Ti4600 we used had plenty of room between itself and the DIMM connectors. This is nice to see as you aren't forced to uninstall your video card if you need to add memory to your system. An example of a common scenario where you might need to add memory to your system while your video card is installed is when you're upgrading your system for the first time in quite a while, and you decide to add a large stick of high-speed memory to boost application performance.
There's just one USB 2.0 header, and it's located at the bottom of the board, colored in blue. This is a good place to position the USB 2.0 header, as the wires from a USB 2.0 bracket won't collide with any other PCI cards you may or may not decide to install in your motherboard, in addition to any other components that may stick out. This location also helps reduce clutter of course, which is a bonus for those that upgrade frequently.


1 Comments
View All Comments
c627627 - Monday, July 21, 2003 - link
MSI contradicts your reviewhttp://www.anandtech.com/mb/showdoc.html?i=1759&am...
You say:
"12/04/02 UPDATE: MSI sends word that the K7N2-L indeed does not have a PCI bus lock at 33MHz."
To this day, that was used as ultimate proof that the original MSI nForce2 mobo does not have a PCI lock.
Today MSI Senior Moderators said:
"they are wrong,and who ever told them it did not from msi"
(!)
Source:
http://www.msi.com.tw/program/e_service/forum/thre...
Won't you please settle this for us.