Original Link: https://www.anandtech.com/show/1462
Konica Minolta DiMAGE Z2 & Z3: What is the difference in performance?
by Stephen Caston on September 5, 2004 12:23 PM EST- Posted in
- Digital Camera
Index
Product Samples provided by Newegg.com
The DiMAGE Z2 was released in February as Konica Minolta's follow-up to the 3MP Z1. The Z2 is built with a 4MP sensor and 10X optical zoom. Along with the impressive 38 - 380mm (35mm equivalent) optical zoom range, the Z2 offers a wide range of recording modes from fully automatic shooting to manual exposure. The Z2 has a continuous drive capable of up to 5 frames at 2.5 fps. In addition, the camera advertises a fast start-up time, high-quality 800x600 30 fps movie mode, 3 metering modes, and manual white balance.
Recently, the digital camera community has welcomed the release of the DiMAGE Z3. It features a 12X optical zoom (35 - 420mm), 4MP sensor, and CCD-shift Anti-Shake system. In addition to the full range of recording modes of the Z2, the Z3 has a more solid construction, improved macro capabilities, and some smaller design changes. We are going to run these two cameras through our multitude of testing procedures to determine their differences when it comes to performance.
DiMAGE Z2 and Z3 Specifications
Note: Italics highlight the differences
| Konica Minolta DiMAGE Z2 | Konica Minolta DiMAGE Z3 | |
| Release Date | February 2004 | July 2004 |
| Price | ~ $380 - $450 | ~ $480 - $560 |
| Pixel Count | 4.0 Million | 4.0 Million |
| Camera Type | Compact zoom | Compact zoom |
| Highest Resolution | 2272x1704 | 2272x1704 |
| Lower Resolutions | 1600x1200, 1280x960, 640x480 | 1600x1200, 1280x960, 640x480 |
| Sensor Type | CCD | CCD |
| Sensor Size | 1/2.5" | 1/2.5" |
| LCD Screen Size | 1.5" | 1.5" |
| Optical Zoom | 10x; 38 - 380mm equivalent | 12x; 35 - 420mm equivalent |
| Focus Range | W: 1.9' - Infinity; T: 6.8' - Infinity | W: 2.0' - Infinity; T: 6.6' - Infinity |
| Anti-shake | No | Yes |
| Macro | 1.2" | 0.4" |
| Digital Zoom | 4x | 4x |
| Lens Thread | Fits accessory lenses and filters | Fits accessory lenses and filters |
| Auto Focus | Yes | Yes |
| Auto Focus Type | Rapid AF | Video AF |
| Manual Focus | Yes | Yes |
| Aperture Range | W: f2.8 - 8.0; T: f3.7 - 8.0 | W: f2.8 - 8.0; T: f4.5 - 8.0 |
| Shutter Speeds | 30 - 1/1000th sec. | 30 - 1/1000th sec. |
| ISO | Auto, 50, 100, 200, 400 | Auto, 50, 100, 200, 400 |
| Flash | Built-in, accessory shoe | Built-in, accessory shoe |
| Flash Range | W: 0.75 - 20'; T: 4.2 - 15.1' | W: 0.7 - 13.1'; T: 3.9 - 8.2' |
| Flash Compensation | +/- 2 stops in 1/3 increments | +/- 2 stops in 1/3 increments |
| Exposure Compensation | +/- 2 stops in 1/3 increments | +/- 2 stops in 1/3 increments |
| White Balance | Auto, Daylight, Cloudy, Tungsten, Fluorescent, Flash, Manual | Auto, Daylight, Cloudy, Tungsten, Fluorescent, Flash, Manual |
| Bracketing | Yes, 0.3, 0.5, or 1.0 EV | Yes, 0.3, 0.5, or 1.0 EV |
| Metering | Multi-segment, Center-weighted, Spot | Multi-segment, Center-weighted, Spot |
| Color Space | sRGB | sRGB |
| Aperture Priority | Yes | Yes |
| Shutter Priority | Yes | Yes |
| Manual Exposure | Yes | Yes |
| Continuous Drive | Yes, 2.5 fps for 5 frames (2272x1704) | Yes, 2.5 fps for 5 frames (2272x1704) |
| Self-Timer | Yes, 10 sec. | Yes, 10, 2 sec. |
| Storage Method | SD/MMC | SD/MMC |
| Storage Included | 16MB SD card | 16MB SD card |
| Compressed Format | JPG | JPG |
| Uncompressed Format | None | None |
| Quality Settings | Fine, Standard, Economy | Fine, Standard, Economy |
| Video clips | 800x600 (15fps only), 640x480, 320x240, 160x120, 15 or 30 fps, w/sound, QuickTime MOV, unlimited duration | 640x480/Fine, 640x480/Standard, 320x240/Standard,15 or 30 fps, w/sound, QuickTime MOV, unlimited duration |
| Battery Type | 4 AA Ni-MH/Alkaline | 4 AA Ni-MH/Alkaline |
| Charger Included | No | No |
| PC Interface | USB | USB |
| TV-out | Yes | Yes |
| Tripod Mount | Yes, metal | Yes, metal |
| Weight (w/out battery or card) | 10.8 oz. | 11.8 oz. |
| Dimensions | 109.5 x 77.5 x 80mm | 108.5 x 80 x 83.5mm |
| Included in the Box | |
|
|
The Design: Konica Minolta DiMAGE Z2 and Z3
 Z2 Click to enlarge. |
 Z3 Click to enlarge. |
Although the Z2 and Z3 share many similarities, there are several major differences. The Z2 is made of slick plastic, which gives it a flimsy feeling, while the Z3 is made of rough plastic with rubberized panels. The Z2 has a lens capable of a 10X 38-380mm (35mm equivalent) optical zoom and the Z3 is capable of a 12X 35-420mm optical zoom. Both have a 4X digital zoom. The wide angle aperture range of both cameras is f2.8-8.0. However, the Z3's telephoto aperture range is a bit smaller at f4.5-8.0 compared to the Z2's f3.7-8.0. Both cameras have a shutter speed range of 30 - 1/1000 sec.
Above the lens on the Z2 is an "AF window" - a passive AF sensor. The Z3 uses a video AF system. Both cameras have removable lens caps. We found it kind of annoying that both cameras have a manual pop-up flash instead of having a button that would release the flash. This becomes not only cumbersome, but it also means that in Auto mode, the camera cannot automatically release the flash if it is needed for a proper exposure. You will notice that the flash on the Z3 opens to a higher position, allowing it to comfortably shoot over its lens. The Z2 has a larger flash range than the Z3. The instruction manual provides flash range figures for Auto Recording mode. The Z2 has a flash range of 0.75-20' in wide angle and 4.2-15.1' in telephoto, while the Z3's flash range is 0.70-13.1' in wide angle and 3.9-8.2' in telephoto. Both cameras have a self-timer lamp to the left of the lens. The Z2 also houses its microphone on this side.
 Z2 Click to enlarge. |
 Z3 Click to enlarge. |
The back of the Z2 and Z3 are very similar. Both cameras have a 1.5" LCD display. The display on the Z2 rereshes at 60 fps and the Z3 at 50 fps. With both cameras, action looks smooth on the monitor. The diopter adjustment for the Z2 is located on the left side of the viewfinder in the form of a very small knob, which we found very difficult to turn. The Z3 has a different diopter adjustment control that is equally as difficult to use. It is located just to the right of the viewfinder as a grooved wheel. The wheel is set too far into the camera to make it easy to turn. On both cameras, you have the option to view the LCD either via the monitor or through the viewfinder. This means that you can see all the same information through the viewfinder that you would on the traditional LCD monitor. The difference between the two cameras is that the Z2 utilizes Konica Minolta's Switch Finder system. The Switch Finder uses a mechanical process that blocks the LCD monitor with a mirror that reflects the image to the viewfinder. The Z3 is able to show the LCD image through the viewfinder without the mechanical process that the Z2 employs.

Switch Finder (Z2)
Image courtesy of Konica Minolta
The rest of the controls are exactly the same on both cameras. You have the option to turn the camera on in either Play mode, Record mode (LCD), or Record mode (viewfinder). To the right of the viewfinder is a 4-way controller with a separate "Enter' button in the middle. Below the directional buttons are the Menu, QV/Delete, and i+ buttons. Pressing the Menu button will display a menu that is specific to the current mode. Pressing the QV (Quick View)/Delete button in record mode will display previously taken pictures for review. Another press of the QV/Delete button will ask if you want to erase the picture. In play mode, the QV/Delete button only serves to delete pictures. The i+ button cycles through different overlay options in record and play mode. Just to the right of the i+ button on the Z2 is the port for the optional AC adapter. The camera's zoom controls are located in the upper right corner. The camera will zoom out if you slide the control to the left and zoom in if you slide it to the right.
 Z2 Click to enlarge. |
 Z3 Click to enlarge. |
On the top of both cameras is an accessory-shoe that fits the following Konica Minolta flash units: Maxxum/Program Flash 2500(D), 3600HS(D), and 5600HS(D). While not in use, the accessory-shoe is protected by a snug-fitting cover. To the right of the accessory-shoe is the shutter button, which is angled towards the front of the camera. Below the shutter button are the Macro button, Flash button, and Exposure-mode dial. There is only a minor difference in the layout of the Flash and Macro buttons between the Z2 and Z3. On the Z2, there is a speaker located on the far right side of the camera. The Z3 has both the microphone and speaker between the shutter button and the Flash and Macro buttons.
| Z2 | Z3 |
 Click to enlarge. |
 Click to enlarge. |
 Z2 Click to enlarge. |
 Z3 Click to enlarge. |
On the bottom of both cameras is a battery compartment inside the hand grip. On the Z2, there is a switch that locks and unlocks the door to prevent accidental opening. We did not find the absence of this lock to be a problem on the Z3. The battery door felt strong and secure. Both cameras use 4-AA batteries. Although alkalines were included with both cameras, we recommend using Ni-MH rechargeables. For our review, we are using 4-AA NiMH Power2000 2500mAh batteries. On the Z3, the slot for the SD/MMC flash card is located between the battery compartment and the tripod mount. The slot is hidden by a tiny spring action door. Directly below the lens is a metal tripod mount.
 Z2 Click to enlarge. |
 Z3 Click to enlarge. |
The only thing on the right side is one of the posts for the neck strap.
| Z2 | Z3 |
 Click to enlarge. |
 Click to enlarge. |
 Z2 Click to enlarge. |
 Z3 Click to enlarge. |
On the left side, the Z2 has a delicate sliding door that reveals the SD/MMC card slot and a combination USB and A/V port. The Z3 has a rubber tab that pulls back to access the combination USB and A/V port as well as a 6V DC jack. The other post for the neck strap is also located on this side.
Overall, both cameras have a very modern and sleek appearance, but the Z2 feels a bit delicate. The Z3, on the other hand, has a much more solid feel to it. The biggest design differences between these two cameras are the optical zoom, construction material, flash height, and other minor layout differences. Both cameras are quite compact considering that they have a 10X and 12X optical zoom. However, they are not small enough to carry around in our pocket. Yet, the large hand grip makes both cameras feel very secure in our hand. One thing that bothered us was the manual flash. It would be nice if Konica Minolta included a release mechanism to have easier and faster flash access.
Recording Features
* Because the Z2 and Z3 operate so similarly, the features below will refer to both cameras unless otherwise stated.In all recording modes, both cameras record images as JPG files with quality settings: Fine, Standard, or Economy. The resolution options are below:
| Resolution (pixels) |
| 2272x1704 |
| 1600x1200 |
| 1280x960 |
| 640x480 |
Auto Recording Mode (Auto)
Both the Z2 and Z3 offer a wide variety of recording modes from fully automatic to manual exposure. In Auto mode, the camera selects most of the settings automatically to provide the proper exposure. However, the user still has access to some of the camera's options. For example, you can enable the flash (by flipping it up) and choose from Auto, Auto w/red eye, Fill-flash, or Slow (sync). You can enable the macro feature in either Standard or Super Macro mode. In Standard Macro mode, the Z2 can focus on objects as close as 6.7" from the lens in wide angle compared to 3.9" on the Z3. In Super Macro mode, the Z2 can focus on objects as close as 1.7" from the lens compared to 0.4" on the Z3. Pressing the Menu button gives you a few more options:| Drive mode | Single, Self-timer, Continuous, Progressive, Bracketing |
| Image Size | 2272x1704, 1600x1200, 1280x960, 640x480 |
| Quality | Fine, Standard, Economy |
| Auto DSP | On, Off |
| Digital zoom | On, Off |
In Single Drive mode, the camera will take one picture each time the shutter button is pressed. With Self-timer activated on the Z2, the camera will take a picture after counting down from 10 sec. (the Z3 also has a 2 sec. option) after the shutter button is pressed. The Continuous Drive option has two sub-settings: "Continuous advance" and "UHS Continuous advance".
In Continuous advance mode, both the Z2 and Z3 are able to take 5 pictures in a row at the highest resolution and quality setting at 2.5 fps without the flash. With UHS Continuous advance, they can take up to 15 pictures at 10 fps with a resolution of 1280x960 (any quality setting) without the flash.
The Progressive option also has two sub settings: "Progressive capture" and "UHS Progressive capture". With the Z2 set to Progressive capture, the camera will take images at 2.5 fps for as long as the shutter button is held down. However, only the last 5 pictures will be saved to the flash card. The Z3 is similar, but will save the last 6 pictures. With UHS Progressive capture, the camera will continue taking pictures at 10fps with a resolution of 1280x960 for as long as the shutter button is held down. After the shutter button is released, the camera will save the last 12 pictures taken. The Z3 will save the last 15 pictures taken.
The advantage of Progressive drive is that you don't need to know when an action will begin - you can simply hold down the shutter button until an action occurs and then decide when to let go. The last drive option is Bracketing. With bracketing, you are given three options: 0.3, 0.5, or 1.0 EV (exposure value). After selecting an EV, the camera takes 3 pictures: one with a normal exposure, one with an underexposure, and one with an overexposure. For example, if you choose 0.3 EV, the three pictures would be: normal EV, -0.3 EV, and +0.3 EV.
Auto DSP refers to "Automatic Digital Subject Program". Digital Subject Programs are preset modes on the camera: Portrait, Sports action, Landscape, and Sunset. In Auto mode with DSP enabled, the camera will attempt to automatically select one of these presets. For example, if the camera detects that you are taking a portrait, it will select the Portrait DSP automatically. This means that the camera would set the f-stop to a low number (large aperture) and create a small depth of field. If the camera is unable to determine which DSP setting to use or it is disabled in the menu, it will use the default Program autoexposure.
Advanced Recording Modes (P, A, S, M)
The Z2 and Z3 come with the full range of exposure modes: Program, Aperture priority, Shutter priority, and Manual. In Program mode, the camera sets the aperture and shutter speed automatically to provide the proper exposure. In Aperture priority mode, the photographer sets the desired aperture value and the camera automatically picks the corresponding shutter speed needed to record an even exposure. In Shutter priority mode, the photographer picks the desired shutter speed, while the camera picks the aperture. Finally, in Manual mode the camera allows the user to control both the aperture and shutter speed. When the shutter button is pressed halfway, the shutter speed and aperture settings will either turn black or red. Black indicates an acceptable exposure and red indicates either an overexposure or underexposure. In all the advanced exposure modes, there are 3 menu sections with several options.The first menu section offers the following options:
| Drive mode | Single, Self-timer, Continuous, Progressive, Bracketing |
| Image Size | 2272x1704, 1600x1200, 1280x960, 640x480 |
| Quality | Fine, Standard, Economy |
| White balance | Cust. set, Cust. recall, Auto, Preset: Auto, Daylight, Cloudy, Tungsten, Fluorescent, Flash |
| Flash key func. | Flash mode, Drive mode, White balance, Focus mode, Color mode |
In addition to the menu options available in Auto mode, there is a White Balance setting with options: Auto, Daylight, Cloudy, Tungsten, Fluorescent, Flash, and Custom Set (manual). There is also an option to assign the Flash button (next to the Macro button) to cycle through any of the following modes: Flash, Drive, White Balance, Focus, and Color.
On the second menu screen, the following options are available:
| Focus mode | Single AF, Cont. AF, Manual |
| Full-time AF | On, Off |
| Flash mode | Auto flash, Auto Red-eye, Fill flash, Fill+Red eye, Slow sync. |
| Flash comp. | +/- 2 stops in 1/3 increments |
| Metering mode | Multi-segment, Center-weighted, Spot |
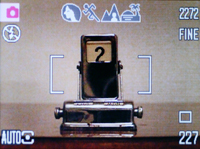
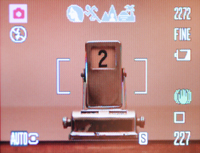
With Single AF selected, the camera will lock its focus after half-pressing the shutter button, allowing you to recompose a shot after achieving focus. With Continuous AF selected, when the shutter button is half-pressed, the camera will continue to focus until the picture is taken. This feature is ideal for sporting events where the subject may be changing position frequently. Manual focus is a bit tricky on both cameras because, like most compact cameras, they do not have a focus ring to turn. Instead, while adjusting the focus with the up/down buttons, the screen becomes magnified. On the Z2, the center portion of the screen is magnified. With the Z3, the entire screen is magnified. In our experience, we found it hard to tell when the image was in sharp focus with either camera. With Full-time AF enabled, the camera will continue to focus until the shutter button is half-pressed, at which point the camera will lock its focus. In any recording mode, if you hold down the "Enter" button, selectable focus points will appear on-screen. The Z2 offers 3 focus points, while the Z3 offers 5 focus points from which to choose.
 Z2 Auto mode, Normal AF |
 Z3 Auto mode, Normal AF |
 Z2 Auto mode, 3 selectable focus points |
 Z3 Auto mode, 5 selectable focus points |
The Flash mode options are designed to be used when the Flash button has been reassigned to another function. Next, there is a Flash compensation option, available for up to +/- 2 stops in 1/3 stop increments. It's good to see that both cameras offer a few choices for metering. With Multi-segment metering selected, the camera measures 256 areas of the frame to determine the best exposure. With Center-weighted metering, the camera measures the entire frame with added weight in the center. Spot metering is when the camera measures just a small area in the center of the frame. This is often used in difficult lighting situations when the other metering modes may be tricked into incorrectly exposing the subject.
The third menu screen offers the following options:
| Sensitivity | ISO 400, 200, 100, 50, Auto |
| Digital zoom | On, Off |
| Color mode | Natural, Vivid, B&W, Sepia |
| Sharpness | Hard(+), Normal, Soft(-) |
| Contrast | High(+), Normal, Low(-) |
The Sensitivity setting determines how sensitive the camera will be to light. A higher ISO setting corresponds to a higher sensitivity level. If left on Auto, the camera will automatically choose an ISO setting to use. The camera is set to use the Natural color mode by default; however, the other color modes are available as creative options. For example, if Vivid is selected, the images will be recorded with an increased level of saturation. The Sharpness and Contrast options also affect the in-camera processing of recorded images.
DSP Recording Modes (Portrait, Sports action, Landscape, Sunset, Night portrait)
The next 5 modes are Digital Subject Programs: Portrait, Sports action, Landscape, Sunset, and Night portrait. The menu for all 5 DSP modes is identical to the menu in Auto mode with one difference: "Auto DSP" is replaced with "Focus mode". These 5 DSP modes are designed for specific shooting conditions. For example, Portrait mode will blur the background and keep the subject sharp. Sports action mode will utilize the highest possible shutter speed while focusing continuously. Landscape mode is designed for focusing on distant objects. Sunset mode saturates warm tones for pleasing sunset pictures. Night portrait uses the camera's slow sync ability to first illuminate the subject with the flash. After the flash fires, the shutter stays open to allow ambient light to illuminate the background in order to produce a natural, well-lit scene. In the DSP and Advanced recording modes, E.C. (exposure compensation) is available in +/- 2 stops. To apply E.C. in these modes, you simply use the left/right keys to move up or down in 1/3 stop increments.Movie Mode
The Z2 and Z3 have slightly different Movie mode menu options:| Z2 Movie mode menu | |
| Image size | 800x600, 640x480, 320x240, 160x120 |
| Frame rate | 30 fps, 15 fps |
| Optical zoom | On, Off |
| White balance | Cust. set, Cust. recall, Auto, Preset: Auto, Daylight, Cloudy, Tungsten, Fluorescent, Flash |
| Movie mode | Night movie, STD movie |
| Focus mode | Cont. AF, Single AF, Manual |
| Color mode | Natural, Vivid, B&W, Sepia |
| Z3 Movie mode menu 1 | |
| Quality | 640x480 FINE, 640x480 STD, 320x240 STD |
| Frame rate | 30 fps, 15 fps |
| White balance | Cust. set, Cust. recall, Auto, Preset: Auto, Daylight, Cloudy, Tungsten, Fluorescent, Flash |
| Movie mode | Night movie, STD. movie |
| Z3 Movie mode menu 2 | |
| Focus mode | Cont. AF, Single AF, Manual |
| Color mode | Natural, Vivid, B&W, Sepia |
| Digital zoom | On, Off |
Both cameras can record video with audio in QuickTime format, which is limited only by the capacity of the flash card. As you can see, the Z3 does not offer the resolutions 800x600 or 160x120. We should also note that the 30 fps setting on the Z2 is only available for resolutions 640x480 and below. Both cameras allow you to use the optical zoom while recording. However, there is one large difference. The zoom on the Z2 is very audible in movie clips while the Z3 zoom is essentially silent. This is a huge improvement over the Z2. The White balance, Focus mode, and Color mode options are the same as you'll find in any of the advanced recording modes. When recording in Night movie mode, the camera raises its sensitivity in order to capture video in low light situations. Enabling the option Cont. AF will cause the camera to focus continuously as it records. The Manual focus option simply allows the user to focus manually before recording; it does not allow focusing during recording. In the General Image Quality section of this article, we will discuss our impression of each camera's Movie mode in more detail.
In all the shooting modes, you can access a setup menu with 4 sections of options. The following menus show common options between the Z2 and Z3:
| Setup Menu 1 | |
| LCD brightness | (11 levels) |
| Power save | 10, 5, 3, 1 min. |
| Inst. Playback | 10, 2 sec., Off |
| Lens acc. | WideConvertr., None |
| Language | Japanese, English, Dutch, French, Spanish, Chinese |
| Setup Menu 2 | |
| File # memory | On, Off |
| Folder name | Std. form, Date form |
| Noise reduction | On, Off |
| Date/Time set | Enter |
| Date imprint | On, Off |
| Setup Menu 3 | |
| Reset default | Enter |
| Audio signals | 1, 2, Off |
| Focus signal | 1, 2, Off |
| Shutter FX | 1, 2, Off |
| Volume | 3(High), 2, 1(Low), Off |
| Setup Menu 4 | |
| Video output | NTSC, PAL |
| Transfer mode | Data storage, PictBridge |
| Anti-shake (Z3) | Disp + Exp, Exp only, Off |
| Self-timer (Z3) | 10, 2 sec. |
The Z3 offers two additional options in the 4th section of the Setup menu. The first regards the Z3's Anti-shake technology. When Anti-shake is enabled, it will activate during a half-press of the shutter button in situations where the shutter speed may be slow enough to cause blurring. The options are "Display + Exposure", "Exposure", and "Off". If "Display + Exposure" is chosen, pressing the shutter button halfway down will display the effect of Anti-shake and will record the image with Anti-shake applied. The "Exposure" option will apply Anti-shake to the exposure only and will not show the effect on the live image. The other option that the Z3 has added is the ability to set the Self-timer to 2 or 10 seconds.
Playback Features
To view recently taken pictures, there are a few options. If you continue to hold down the shutter button after taking a picture, the picture will remain on the LCD/viewfinder until you release the button. While you are in record mode, you can also press the QV/Delete (Quick View/Delete) button or slide the "mode switch" to play to switch to a playback screen. In QV mode, however, you do not have access to the playback menu. QV and playback modes are similar in that you can do the following: delete pictures, rotate pictures, view extra info., view images as thumbnails, and magnify images. In both modes, pressing the QV/Delete button brings up a message confirming your request to delete the current picture. Pictures can be rotated in-camera by pressing the down button. Pressing the up button changes the regular playback screen from one with basic information (including time, date, resolution, quality, and image number) to one with added information (including a histogram, shutter speed, f-stop, E.C., white balance, ISO, and folder name). The i+ button changes the screen to one of 3 displays: one with basic information over the picture, one with no information, and a thumbnail page with 6 small images. Images can be magnified on the screen by up to 6x in 0.2x increments by using the zoom control to raise or lower the magnification value. Image regular view |
 Image magnified 3.4x |
The main benefit of QV mode is that pressing the menu button or half-pressing the shutter button will return the camera to record mode. In playback mode, there are quite a few additional options available through the menu:
| Playback Menu 1 | |
| Delete | This frame, All frames, Marked frames |
| Format | Enter |
| Lock | This frame, All frames, Marked frames, Unlock all |
| Edit movie (Z2) | Enter |
| Copy | This frame, Marked frames |
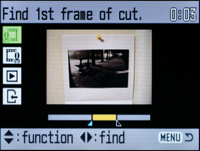
Z2 Edit movie screen
Like many digicams, the Z2 and Z3 offer the option to "lock" specific frames to prevent accidental deletion. The "Edit movie" function is a great idea, although it is only available on the Z2. It switches over to a basic editing screen where you can specify a section of a video to delete. When you have specified the first and last frames of the cut, you can preview the edit and save it as a new file on the flash card. The copy function allows you to copy single files or marked files to another flash card.
Below is the second set of menu options:
| Playback Menu 2 | |
| Slideshow | Enter |
| Playback | All frames, Marked frames |
| Duration | 1-60 sec. |
| Repeat | Yes, No |
These settings pertain to the slideshow feature. The "Playback" menu option allows you to indicate if you want all the frames displayed in the slideshow or just specific ones. For the duration that each frame is displayed, you can specify a time from 1 - 60 seconds. There is also an option to loop the slideshow after all the images have been shown. The third set of options is outlined below:
| Playback Menu 3 | |
| DPOF | This frame, All frames, Marked frames, Cancel all |
| Date print | On, Off |
| Index print | Yes, No |
| E-mail copy | This frame, Marked frames |
| Image size (Z2) | 640x480, 160x120 |
The DPOF (Digital Print Order Format) option allows you to select which images you wish to print on a DPOF-compatible printer. If the "Date print" option is enabled, the date will be printed on each picture. The index print option specifies whether or not you want an index to be printed with your pictures. The image size setting is only available on the Z2 and it specifies the resolution to use when resizing pictures selected with the "E-mail copy" function. The Z3 sets e-mail images automatically to 640x480. In playback mode, you can also view images on a TV by using the supplied A/V cable. NTSC or PAL is selectable in the main "Setup" menu.
Battery Performance
Our general method for battery testing is to reset the camera to its default settings and change the recording mode to the highest quality option. Then, we take 5 pictures without the flash and 2 pictures with the flash until the battery is dead. For more information on our battery test, please refer to our Testing Procedures page. For this test, we used 4-AA NiMH Power2000 2500mAh batteries charged overnight in a Power2000 wall charger. The batteries were fully drained before charging for the test.
| Number of shots taken in one battery charge | |
| Z2 | 3,643 |
| Z3 | 2,295 |
Both the Z2 and Z3 performed extraordinarily in our battery test. The lower number of the Z3 can almost certainly be attributed to the Anti-shake system. Although the Z3 shot over 1,000 less images, we were still blown away by both of these cameras. We should note that this number will certainly go down a bit if the cameras are used more casually. Our results come from continuous shooting from a stationary position. Using the camera over an extended period of time, frequent use of the zoom, and reviewing images are a few factors that would decrease battery life. However, we believe that even with heavy use of either camera, battery life will still be impressive.
The Timing Tests
* NOTE: For all of our time tests, both cameras are reset to their factory default settings and set to record using the highest resolution and quality setting. The cameras were set to Auto mode. We also disabled all sounds. A PNY 512MB SD card was used.Before reading our results, please refer to our Testing Procedures page.
Startup Time
The startup time is recorded from the moment the power button is pushed to the moment the shutter sounds. The cameras were set to startup in LCD mode and to record in Auto mode.| Startup time (seconds) | |
| Z2 | 4.24 |
| Z3 | 3.86 |
The Z3 did just a bit better than the Z2 with regards to startup time. The difference is very small, however, at .38 sec. The startup time will vary a little depending on the flash card used in the camera. We used a PNY 512MB SD card. We were not really blown away by either of these times.
Shutter Lag
To record shutter lag, we perform two tests. For the first test, we pre-focus the lens and measure the amount of time it takes the camera to take a picture after the shutter button is pressed. The second test measures the time it takes for the camera to take a picture after we press the shutter button without pre-focusing. Each test is performed 3 times and the results are averaged. For more information regarding our testing procedures, please refer to our Testing Procedures page.| With Pre-focus (seconds) | Without Pre-focus (seconds) | |
| Z2 | .09 | .59 |
| Z3 | .11 | .55 |
When we pre-focused the cameras, we measured the shutter lag at 0.09 sec. for the Z2 and 0.11 for the Z3. This difference is so small that it is virtually unnoticeable. The lag time from the moment we fully pressed the shutter button to when the shutter sounded was 0.59 sec for the Z2 and 0.55 sec. for the Z3. Again, there is not a huge difference between the cameras, but the Z3 has just a small advantage. Both cameras are fairly fast compared to the other cameras that we have tested. In short, we did not find shutter lag to be an issue with either camera.
Write Times
We recorded 5 different write times with a PNY 512 SD card: Single Shot, Shot to Shot, Shot to Shot w/Flash, Shot to Shot w/Buffer Full (to next frame), and Shot to Shot w/Buffer Full (to next burst).Single Shot - The time it takes for a single picture to be completely written to the flash card (the time the "activity light" is on).
Shot To Shot (STS) - The time until the second shot is able to be taken after the first (shutter to shutter).
Shot To Shot w/Flash - The time it takes for the camera to take two pictures with the flash, starting from the moment the first flash is fired to the moment the second is fired.
Shot To Shot w/Buffer Full (to next frame) - The time between taking the last shot of a "Continuous advance" burst to the moment the shutter sounds again.
Shot To Shot w/Buffer Full (to next burst) - The time between taking the last shot of a "Continuous advance" burst to the moment the first frame of the next burst is taken.
We set the camera to the highest resolution and quality setting and ran 4 tests. We performed each test three times and averaged the results. Below are the resolution, quality setting, and average file size used for the tests.
Z2 - 2272x1704, Fine, Avg. file size = 1.4MB
Z3 - 2272x1704, Fine, Avg. file size = 2.59MB
| SD card (seconds) | |||||
| Single Shot | Shot To Shot | Shot To Shot w/Flash | Shot To Shot w/Buffer Full (to next frame) | Shot To Shot w/Buffer Full (to next burst) | |
| Z2 | 0.92 | 1.82 | 2.09 | 4.97 | 6.06 |
| Z3 | 1.58 | 0.95 | 3.01 | 1.37 | 6.89 |
The Z2 has a Single Shot time of 0.92 sec. compared to the Z3's time of 1.58 sec. The difference here is merely an indication of the file size differences. Although the Z3 is slower to write a single image, its Shot to Shot time is about half of the Z2's. Interestingly, the Z2's Shot to Shot w/Flash time is nearly a second faster than the Z3.
When it comes to the Continuous advance mode, both the Z2 and Z3 are able to take 5 pictures in a row at 2.5 fps before filling the buffer. Although both cameras capture these 5 frames at the same rate, we should point out the significant advantage that the Z3 has. After the burst, the Z3 is able to shoot another frame after just 1.37 sec. compared to nearly 5 seconds on the Z2. We should point out that the Z3 is able to shoot at this rate (one image every 1.37 sec.) until the flash card is full. The speed does not slow down. We found the discrepancy between the Z3's Single Shot time and Shot to Shot w/Buffer Full time to be intriguing. One possible explanation for this may be that the activity light is on for a couple of tenths of a second too long. That would explain why the Z3 seems to be capable of writing its Continuous advance images faster than its Single Shot images.
The Z2 has a bit of an advantage over the Z3 in its speed in emptying its internal buffer after a burst of images. However, we were truly impressed with the Z3's ability to shoot endlessly at 1.37 sec. per frame in Continuous advance mode.
Resolving Fine Lines
For our resolution test, we reset both cameras to their default settings and then used the highest resolution and quality setting. The cameras were set to +1.3 E.V. For more information, refer to our Testing Procedures page. Below are 200% crops of the test. Click on a crop to see the full chart.| Z2 |  Z2 Click to enlarge. |
| Z3 |  Z3 Click to enlarge. |
The clear winner here is the Z3. The Z2 resolution chart is characterized by a soft/fuzzy appearance. The camera is able to retain its vertical line resolution out to the 11 mark and moves to extinction by 13. The Z3, on the other hand, has higher contrast and sharpness. It is able to produce distinct lines out to the 12 and move to extinction a little after 14.
| Z2 | Z2 Click to enlarge. |
| Z3 | Z3 Click to enlarge. |
The horizontal resolution is identical to the vertical resolution for both cameras. Again, the Z3 is clear out to 12 while the Z2 makes it to the 11 mark before extinction. We were generally impressed with the resolution performance of both of these cameras. They performed above-average for 4 megapixel cameras.
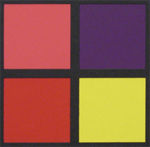
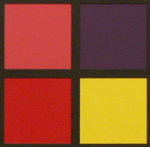
Color Reproduction
* For all of our color tests, we reset the Z2 and Z3 to their factory default settings. They were then set to record using the highest image quality option.We took a picture of our color chart using each of the following WB settings: Auto, Tungsten, and Manual. Click on a thumbnail below to view the full-size image.
| Auto WB | Tungsten WB | Manual WB | |
| Z2 |  |
 |
 |
| Z3 |  |
 |
 |
 Reference Chart ("actual colors") |
|||
Crops
| Auto WB | Tungsten WB | Manual WB | |
| Z2 | 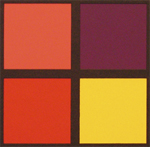 |
 |
 |
| Z3 | 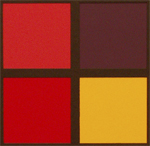 |
 |
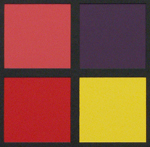 |
As with most current digital cameras, the Z2 and Z3 had trouble reproducing the color chart under our tungsten lights with the Auto WB setting. The Auto WB crops show that both cameras produced images with yellowish-pink color casts. However, the Z3 crop shows a much stronger color cast. When we set the cameras to Tungsten WB, the resulting colors were very accurate. We saw very little difference between Tungsten and Manual modes. It is important to note that the Z3 appears to have slightly underexposed all three charts.
Studio Shot
In this shot, we tested each camera's ability to reproduce colors in our studio shot using different WB settings. The cameras were set to Aperture priority mode (f4.0) without the flash.| Auto WB | Tungsten WB | Manual WB | |
| Z2 |  |
 |
 |
| Z3 |  |
 |
 |
Again, we can see the difference in the strength of the yellowish-pink color cast in our studio shot. The Tungsten WB performance on the Z2 was very accurate while the Manual setting shows a slight bluish tint. The Tungsten and Manual WB settings on the Z3 appear to be accurate, but again, are slightly underexposed.
Built-in Flash
For the flash test, we set both cameras to Auto mode w/Auto flash. The picture was taken from 5 feet away. Z2 |
 Z3 |
The Z2 showed average flash performance in our test shot. The white background appears to have a bluish cast. We were really disappointed with the Z3 in this test. The image has a very strong pinkish cast. The most likely reason for the pink cast is the camera's Auto WB processing of the ambient tungsten light. In more casual indoor flash pictures with the Z3, the pinkish cast was not nearly this evident.
Noise
The noise test consists of pictures of our studio shot taken at increasing ISO levels to show the effect on the image. The pictures were taken after resetting the cameras to their factory default settings. The cameras were then set to record with the highest quality option with manual WB. Click on a 100% crop below to view the full-size image.| Z2 | Z3 | |
| ISO 50 |  Click to enlarge. |
 Click to enlarge. |
| ISO 100 |  Click to enlarge. |
 Click to enlarge. |
| ISO 200 |  Click to enlarge. |
 Click to enlarge. |
| ISO 400 |  Click to enlarge. |
 Click to enlarge. |
Noise on both cameras is well-contained at ISO 50 and 100. However, at ISO 200 the images begin to lose a noticeable amount of detail and discoloration appears in shadow areas. At ISO 400, there is a large loss of detail and the images become very noisy. The Z3 appears to have a higher default contrast than the Z2.
General Image Quality
Unfortunately, we did not have the Z2 and Z3 available for testing at the same time. Therefore, we were unable to take pictures of the same subjects (with the same conditions) with each camera. Below, we have assessed general outdoor image quality separately for each camera. For these pictures, both cameras were reset to their factory default setting. Then, they were set to their highest quality recording setting. The pictures were then taken in Auto mode unless otherwise stated. Click on a thumbnail to view the full-size image. The crops below the thumbnails are 100%.| Z2 Images | ||
 Click to enlarge. |
 Click to enlarge. |
 Click to enlarge. |
 |
 |
 |
| In our first crop, we can see that although the subject is properly focused, the image has a fuzzy appearance to it. In addition, it looks like there are JPG artifacts on the blade of grass on the right side. | In this shot, we were looking for chromatic aberration and we only found a bit at the upper left corner. The rest of the image shows the same softness that the first image did. | Here, chromatic aberration is not a problem, but we can see JPEG artifacts around the lines of the door in the shadow. |
 Click to enlarge. |
 Click to enlarge. |
 Click to enlarge. |
 |
 |
 |
| For this shot, we set the camera to "Sports action". As you can see, the Z2 did a good job of freezing the action. However, the image is fuzzy and there is chromatic aberration visible in several spots. | Again, there are JPEG artifacts around lines in this picture. The artifacts are especially visible on the lettering (if you are having trouble seeing the artifacts, turn up the contrast on your monitor). The rest of the image has a fuzzy quality. | Taken in "Super Macro" mode, this image was average in image quality. We spotted some chromatic aberrations along some edges. Also, this image contained the same soft, fuzzy look that most of the pictures had. |
For the Z3, we left the camera on its default Anti-shake setting of "Display + Exposure".
| Z3 Images | ||
 Click to enlarge. |
 Click to enlarge. |
 Click to enlarge. |
 |
 |
 |
| The main thing to notice here is that the Z3 produces images that are less saturated than the Z2. Otherwise, the image looks pretty good. | Notice the horizontal lines across the crop of this image. We found this issue to be prominent in shadow areas with the Z3. Another note is the absence of chromatic aberrations compared to the Z2. | Again, we have these lines through the image. This time they are vertical (since the image is rotated). This crop also demonstrates the massive loss of detail in the shadow areas on the right side of the frame. In addition, the main subject has a fuzzy appearance and a small amount of JPEG artifacts are visible throughout the image. |
 Click to enlarge. |
 Click to enlarge. |
 Click to enlarge. |
 |
 |
 |
| Here, we were relatively impressed with the quality of the subjects, but we have to mention the recurring lines in the shadow areas of the background. Also, we are disappointed with the visibility of JPEG compression along sharp lines. | It's the same story here. As the crop shows, the subject is well exposed and sharp. However, if you look at the background (particularly the left side), the shadow areas are overtaken by horizontal lines. | We can't really complain about the macro capabilities of the Z3. With the ability to focus as close as 0.4" in combination with the Anti-shake system, we found it very easy to take sharp and detailed macro pictures. |
In general, we were not impressed with either camera's general image quality. We found the Z2 to produce images with more vibrant colors than the Z3, but both cameras had an overall soft/fuzzy appearance. Although both cameras had trouble reproducing detail in shadow areas, the Z3 was the worst. In some of our Z3 samples, detail is almost non-existent in these areas. Also, we spotted unsightly lines across these shadow areas. We were surprised to see both cameras displaying visible JPEG artifacts, considering that we were shooting at the highest quality (FINE). It would be great if Konica Minolta offered a raw mode on these cameras, since these compression artifacts are unacceptable. Overall, we preferred the look of the Z2's images. Right out of the camera, they are more colorful and they have more shadow detail, giving the images a depth that the Z3 could not reproduce. The Z2 showed some chromatic aberrations in comparison to the Z3. However, we feel that they do not detract a substantial amount from the general quality.
Anti-shake (Z3)
The comparison pictures below were handheld on the Z3 at approximately 120mm (35mm equivalent). Anti-shake Off Click to enlarge. |
 Anti-shake On Click to enlarge. |
As you can see, the Z3's A.S. (Anti-shake) system does a pretty good job stabilizing the image at this focal length. As we expected, we found A.S. to be less effective at higher focal lengths than at lower ones.
Z2 - Movie Mode
 Clip 1 (640x480, 30 fps) Right click to download. |
 Clip 2 (640x480, 30 fps) Right click to download. |
Although the movie mode on the Z2 looks promising, "Clip 1" demonstrates the most significant problem that we found. There is a very noticeable A/V sync problem here. After first discovering the problem, we tried changing several movie settings to see if it would help. The audio lag appeared in every combination of settings that we used. Of course, we made sure that the firmware was up to date (1.02). Interestingly, v1.02 was released to address audio problems with regard to playback with the included software. Given that we are not the only ones who have experienced this problem, we would expect Konica Minolta to take some action to fix it.
"Clip 2" above demonstrates two other problems that we had with the movie mode. First, the optical zoom is simply too loud. It overpowers any ambient sound in the scene. The second problem is that the camera has trouble focusing fast enough to keep up with the zoom. If it weren't for the audio lag problem, the movie mode would still be quite usable despite the noisy zoom and slow focus. However, given that there are so many issues, we were really disappointed with the Z2's video functionality.
Z3 - Movie Mode
 Clip 1 (640x480, 30 fps) Right click to download. |
 Clip 2 (640x480, 30 fps) Right click to download. |
"Clip 1" demonstrates two things. Firstly, it shows that audio lag is not a problem on the Z3. We are happy to hear/see that the sound is synced perfectly with the video. Secondly, the camera had some trouble producing a bright image using the ambient indoor lighting in our room. Even when we adjusted the E.C., there did not seem to be a difference. When we tried the "Night movie" option in ambient indoor lighting, the results were a little better, but not nearly as bright as the Z2. In the second clip, you can hear that Konica Minolta took care of the loud zoom from the Z2. The optical zoom is essentially silent. Overall, we were very happy with the movie mode on the Z3. The only thing that could be a problem for some people is the focusing lag. When performing a substantial optical zoom (as in Clip 2), the camera takes a few moments to focus the lens. We don't think most people will find this to be a big issue.
Final Words
In our review, we discovered that although the Z3 features some new design and operational enhancements, the difference in performance is not so clear cut. Both the Z2 and Z3 offer several recording options, including Auto, Program, Aperture priority, Shutter priority, Manual, and Digital Subject Programs. The photographer can also choose from 3 metering modes and several focusing options. The Continuous advance mode is exceptional, allowing you to take up to 5 full-resolution frames at 2.5 fps. Both cameras offer movie modes that allow recording video at 30 fps with audio.The Z3 offers a more solid construction along with several design enhancements over the Z2. For example, the Z3 features a 12X optical zoom and Anti-Shake system. Also, the Z3 does away with the Switch Finder system of the Z2, while retaining the option to view the LCD through the viewfinder. Konica Minolta addressed the noisy zoom issue that is apparent on the Z2. This makes the movie mode on the Z3 really fantastic.
When it comes to other performance points, the Z3 does not necessarily have an advantage over the Z2. Despite the same 4MP sensor, we found significant differences in image quality between these two cameras. Although both cameras produce images that are somewhat fuzzy, we were surprised to see such a loss of detail in shadow areas with pictures taken with the Z3. In the place of detail, we found distracting lines. With the Z2, shadow areas were far more detailed than the Z3. Also, the Z2 simply produced brighter images with more vibrant colors than the Z3.
Overall, we found the Z2 to perform better than the Z3 in relation to Auto WB in tungsten light. In our color reproduction test, the Z3 had a much stronger yellowish-pink cast than the Z2. Indeed, it performed worse than we could have imagined. However, both cameras did pretty well reproducing colors in tungsten light when we used the Tungsten preset or set the WB manually. That said, we noticed that the Z3 slightly underexposed all of our indoor image tests (including video).
In our timing tests, we also discovered ambiguous results. Although the startup and shutter lag times were similar between both cameras, the shot performance times were very different. The Z3's Shot to Shot w/out Flash time was nearly half that of the Z2. However, when it comes to Shot to Shot w/Flash, the Z2 was almost a second faster than the Z3. Both cameras have the ability to shoot a burst of 5 full resolution images at 2.5 fps. The Z3 is much faster than the Z2 at shooting subsequent frames after the burst. The Z2 is a bit faster than the Z3 in clearing its internal buffer for the next 5 shot burst.
In the end, it is up to the photographer to make a decision when deciding between these two cameras. Each camera has its ups and downs, but we really feel that the overall image quality of the Z2 is preferable to the Z3. The Z2 is a well-rounded camera with manual options and a 10X optical zoom. It can take colorful and appealing images if you don't mind the fuzzy quality that we discussed earlier. The Z3 has the benefit of a 12X optical zoom, Anti-shake system, and exceptional video capability. It is too bad that the Z3 is weighed down with the problems that we found. If the image quality was identical to the Z2, we would think it was a great compact zoom digicam. However, we would most likely choose the Z2 over the Z3 as a more balanced option.
| DiMAGE Z2 | |
| Pros | Cons |
|
|
| DiMAGE Z3 | |
| Pros | Cons |
|
|
Thanks again to Newegg.com for loaning us the Konica Minolta DiMAGE Z2 and Z3 for review.


