The ASUS ZenFone 2 Review
by Brandon Chester on May 26, 2015 8:00 AM ESTStill Image Performance
After discussing the general architecture and the software experience of the camera on the ZenFone 2, we're ready to take a look at how it actually performs when taking photos in the real world. Since the world is very diverse, a camera needs to be able to adapt to various conditions. Lighting may not always be optimal, and if a scene has a significant amount of movement then driving long shutter speeds with the help of OIS in order to keep ISO down no longer becomes a viable option.
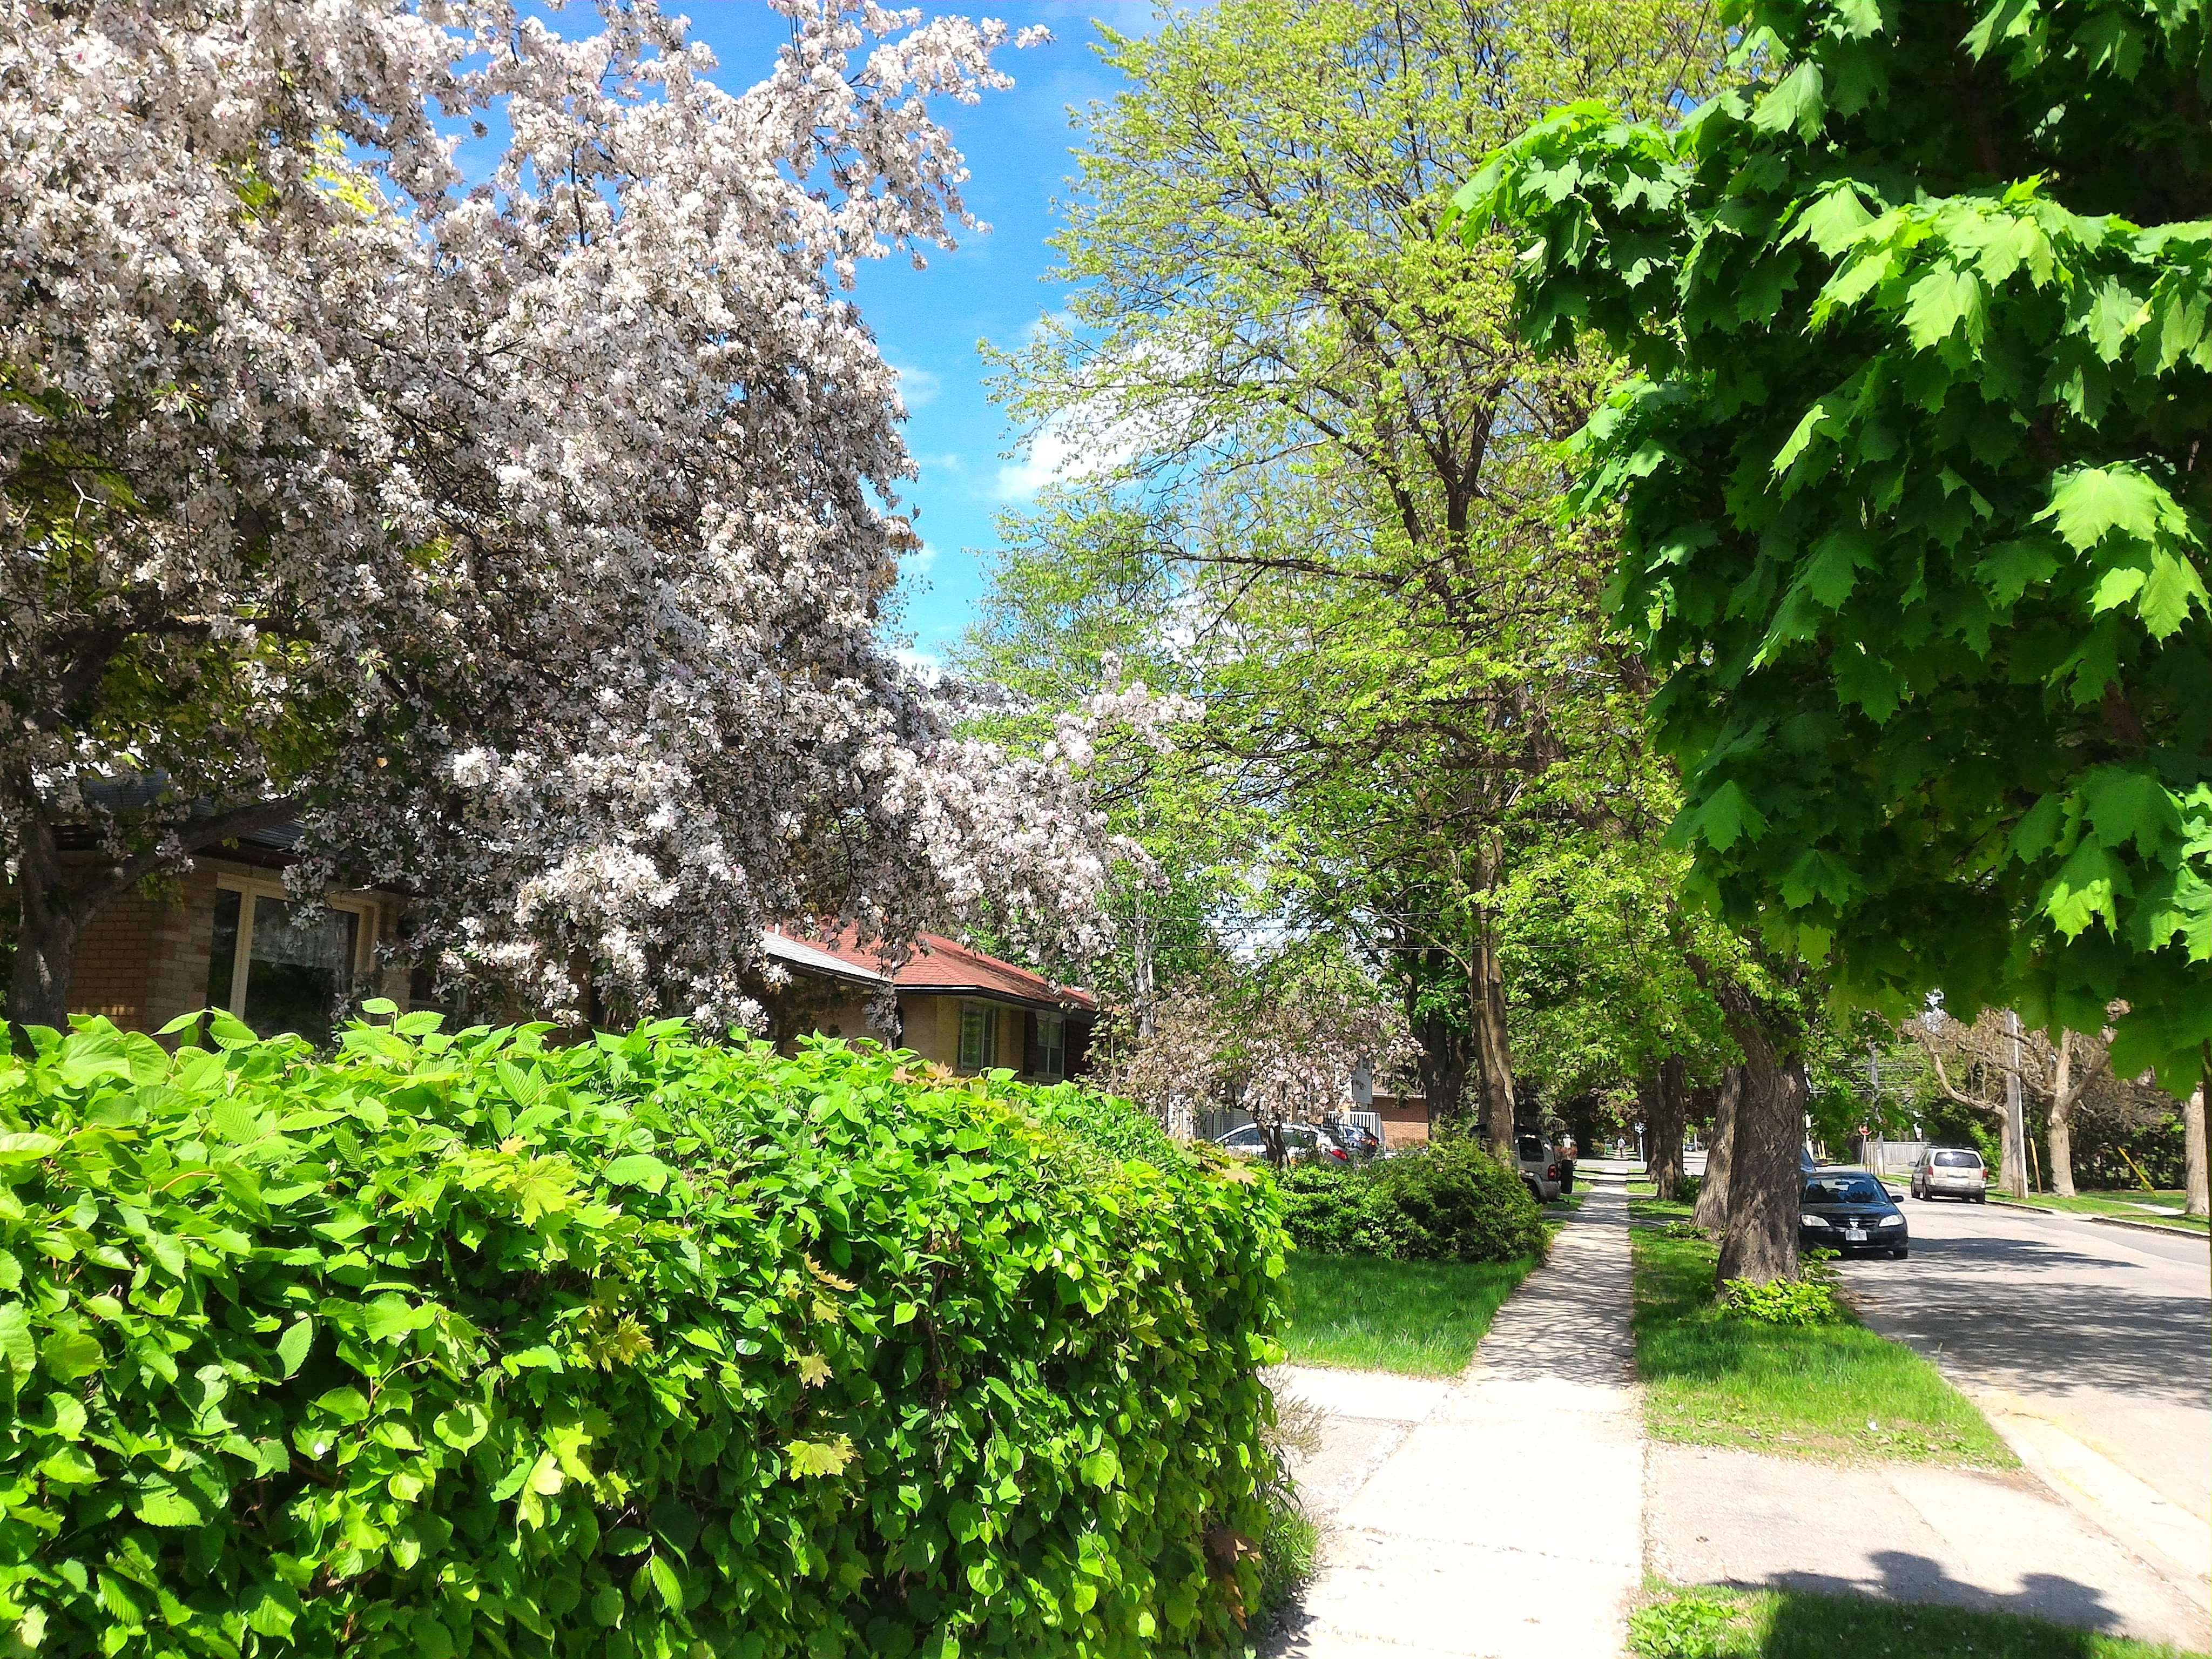
The first test I'm doing is an outdoor test during the day. There's ample lighting from the sun, and the scene has a variety of objects and surfaces that can be examined to see how well detail is resolved by the ZenFone 2 in optimal shooting conditions.


Looking at the overall image, it's clear to me that this sensor is capable of taking good photos. Unfortunately, there are a lot of issues related to the processing that ASUS is doing that really bring down the image quality. Not limited to this scene is the camera's tendency to oversaturate colors, as well as some very heavy sharpening that causes white and black borders on the edges of objects. Despite being taken at the base ISO of 50 and a shutter speed of 1/1135 seconds, there's still noise in the blue parts of the sky, which doesn't happen on any of the other devices in the comparison.


ZenFone 2 on the left, Nexus 6 on the right
Above is a 100% crop of the bicycle in the distance from the ZenFone 2 and Nexus 6 photos. I chose the Nexus 6 to compare to because it has the same resolution and pixel size. As you can see, in the ZenFone 2 photo there's a black border around the frame of the bike as well as the rings of the bike rack. There's also more noise on the concrete road in the background, and just an overall lower level of detail in areas like the grass and the second bike rack further in the background.
Some of the issues that I've mentioned are the result of the "Optimization" setting in the camera menu. This setting is set to auto by default, and it changes the amount of sharpening and noise reduction done during processing, as well as other aspects like contrast and color saturation. Turning this setting off makes some noticeable changes to the appearance of images, but not all of them are positive.
Above you can change between a 100% crop of an image taken with ASUS's optimization set to auto, and one where it is set to off. It's clear that when optimization is turned off the issues with heavy noise and dark edges caused by sharpening are eliminated. However, the image is also considerably softer, and no matter how hard I tried I could not get the leaves and flowers to appear as sharp and in focus when optimization was off as when it was set to auto. ASUS also gives you the option to manually set these values. While I'm sure you could spend your time tweaking them to get an optimal balance, that completely defeats the point having a camera mode where everything is automatic. Ultimately ASUS has to improve their algorithms and processing for shooting in auto mode.


The next test uses the same seen as the first test, but it is done at night where lighting is scarce and only provided by a handful of lamps on the road and on the sides of some of the buildings. Most smartphones now produce usable images with good lighting, and so low light performance has really become the area where a device needs to excel in order to be considered among the best smartphone cameras.


Relative to the other smartphones I'm comparing it to, the ZenFone 2's photo quality at night actually ends up being pretty good. Both it and the two Nexus devices didn't expose for the sky very well, but the ZenFone 2 is much brighter in the rest of the scene. It also has more detail on the pavement than the Nexus 6, but it also has more noise throughout the image. I think it actually outperformed the iPhone 5s overall as well, with a much more accurate white balance, and more detail on fine objects such as the bicycle and bike racks in the distance.
The black borders caused by ASUS's sharpening during processing are definitely still visible in areas where objects are in the light, but it's much less distracting when the scene is already very dark in general. Overall, I would actually rank the ZenFone 2 somewhere between the Nexus 6 and Galaxy S6 Edge in this scene, with the S6 Edge being the overall best of the photos despite being somewhat overexposed.
Special Camera Modes
In addition to the standard auto and manual modes, ASUS offers a variety of camera modes for special circumstances. There are ones like beautification mode and HDR, which I don't really care for that much. I'm actually shocked that there's no auto HDR in the automatic mode to begin with. However, there are two camera modes that I'd like to talk about because of how prominent they are in ASUS's marketing for the ZenFone 2 and its "PixelMaster" camera.
The first mode that I'd like to examine is the Super Resolution mode. This camera mode merges together the details of four slightly shifted images to produce a much higher resolution image. ASUS claims the images are up to 52MP in resolution, which is four times the native resolution of the sensor. In practice, my image was slightly over 50MP which is pretty close to what ASUS claimed.
Because of the immense size of the 50MP photo I was unable to include it in a gallery. You can view the super resolution photo here, and the normal resolution photo here. I recommend taking a look at them scaled to a reasonable size and seeing if you can notice any notable differences in sharpness.


The above photos compare a crop from the normal resolution photo taken using the auto mode and the photo from the Super Resolution mode. I've enlarged the normal resolution photo to 2x in order to make the crops the same size. While this has an impact on the quality of the normal photo, the point I'm trying to make is preserved because there's really no visible improvement in sharpness from using the Super Resolution mode that I can see even after blowing up the original image. There's definitely a visible reduction in noise throughout the frame, but it's not noise that you'll be able to see during normal viewing anyway, and a denoising filter in a photo editing application could achieve a similar effect. In the end I don't really think that the Super Resolution mode is very useful.
The second camera mode that I wanted to talk about is the low light mode. Some users may be familiar with this type of mode from other smartphones and from digital cameras. Essentially what the camera is doing in the low light mode is merging adjacent pixels together in order to combine their luminances. This is known as pixel binning, and at the sensor level this is done by combining charges on the CCD/CMOS sensor. For our purposes, it's easier to just discuss the end product which is a significantly improved signal to noise ratio (SNR) at the expense of spatial resolution. A commonly used form of pixel binning in cameras is 2x2 binning, where the light of four pixels is essentially combined into one pixel. This would confirm ASUS's claimed 400% increase in sensitivity when using the low light mode.
The downside is, of course, the lower spatial resolution. The use of 2x2 pixel binning and EIS during low light mode means that the resolution of the images is limited to 3MP. This means that it's only worth using this mode in circumstances where it's dark enough that you won't be able to see the subject of the photo properly in the normal camera mode. I've taken a couple of comparison images to see how well this feature works.

I chose this first scene because it doesn't have any lighting within the frame. I'll explain why that is in a moment, but for now lets discuss what improvements the low light mode makes in this scene. The most obvious improvement is that the scene is much brighter. The original photo is so dark that you can't even tell there are trees and power lines in the background. The bins are also very hard to make out, and only show up because of their white labels. You would also never know that on the right side of the frame there is part of another car being shown. In the image taken using the low light mode, all of these parts of the image are clearly visible and recognizable.
The obvious downside to the low light image is a loss in resolution. While the auto mode image is very dark, there's clearly more detail on the ground, as well as on the features of the cars that are bright enough to be seen such as the tires of the silver car on the left side, and the license plate of the car on the right. In the low light mode there's a lot of smearing and blur in those areas, and the noise throughout the image is not as fine grained.

In this second scene I've deliberately chosen an area where there's a light source visible in the scene. This puts less of a strain on the auto mode so we can see how low light mode improves over auto mode photos that actually aren't that bad. It also highlights some of the limitations of pixel binning.
In this case, the low light mode is again much brighter than the auto mode photo. However, while the low light mode pulls parts of the scene like the trees and the sky out of the shadows, the difference in quality between it and the auto mode photo is very noticeable and makes it difficult to choose which of the shots has more redeeming qualities. The blurring throughout the low light image scrubs away essentially all of the details. The cars are not as sharp, and the details of the bricks on the house are completely lost. The inclusion of a light source in the scene presents another problem. Since the camera is basically exposing for the darkest part of the scene, the light is completely over exposed and distracts from the other parts of the photo.
In this case, it's hard to say that the low light mode photo is certainly the better one, as it's not as hard to see the objects in the photo as it was in the first test case. You trade much of the detail to obtain a better exposure, and while that may still give the low light mode the edge here, in any case where there's even a bit more lighting I would probably opt for the normal auto mode or manual mode. In general, my recommendation would be to only use the low light mode when it's so dark that you won't be able to see what the subject of the photo even is with the normal camera modes.
My overall verdict on the ZenFone 2's camera quality is somewhat mixed. It actually did fairly well in the night time test, but during the day the image quality was negatively impacted by ASUS's processing. The sharpening causes white and black halos around objects, the images had a much higher level of blurriness than I would expect from a shot with a sub 1ms shutter speed, and at base ISO there was visible noise in the sky that I can't even begin to explain. I would love if some of these problems could be fixed in a potential software update, because I think that they are going to show up in the majority of circumstances where users will be taking photos. At present, these processing issues really cripple an aspect of the ZenFone 2 that I believe could be optimized to perform much better than it currently does.


147 Comments
View All Comments
quiksilvr - Tuesday, May 26, 2015 - link
I bought a third party Qualcomm Quick Charge 2.0 charger for $15 on Amazon for my Zenfone 2 and it works just fine.http://www.amazon.com/dp/B00OVD3FEU/
grusin123 - Tuesday, May 26, 2015 - link
Camera review focuses just on the asus camera app, which clearly is the weak point. Could you please test it with google camera app? you can download it or any kitkat+ device.It would be interesting to see how it compares against nexus 5 and 6, which both use google camera app.
Kepe - Tuesday, May 26, 2015 - link
Using a different camera app doesn't fix problems with the ISP. Camera apps don't process images, the ISP does. Well, some camera apps may do some extra post-processing after the ISP has done its processing, but still if the ISP oversharpens the images in the "opimized" mode and leaves them blurry in the "no optimizations" mode, there's very little a different camera app could do to change image quality in any significant way. You'll probably end up with less choice for camera settings using a 3rd party camera app, because an app made by someone else probably doesn't know about the "optimized" and "nonoptimized" modes the ASUS camera has.A camera app basically just tells the phone to take a picture with a certain set of parameters, and those parameters are within the same limits no matter what app you use. Some apps may have settings that seem to exceed what the OG app has, but those are usually just some software tricks that make horrible looking images. For example, I've got an app that lets me choose a 20s exposure time, but using that makes images horribly grainy, causes weird light effects and as such produces images that are completely useless. Max exposure in the original camera app is 1s, so the other app probably tries to take multiple images and combine them to a single one, or then it records a 20s video and compresses that into a single image. It's similar with apps that let me choose a higher ISO level than what is offered by the original app. They just use software post-processing to brighten the image after it has been taken.
Kepe - Tuesday, May 26, 2015 - link
*optimized. Still need an edit button... How hard can it be?tmc - Tuesday, May 26, 2015 - link
Can you please comment on cell signal reception? Possibly compare with other phones as well - like you have done for other features. The reason I am asking is that - a new phone (not mentioning the device/brand) that I purchased has like approx 10dBm lower reception than my earlier device (nexus 4) - and this significantly affects LTE. Where I used to get LTE, now I don't. I would think cell reception should be a very important criterion. Thanks.Brandon Chester - Tuesday, May 26, 2015 - link
It didn't seem to be any worse or better than other devices. For reference, I put the phones in a certain spot in order to make sure the LTE signal is strong during the battery life test. The signal strength was basically the same as the iPhone 5s or the Galaxy S6 in that same spot.tmc - Tuesday, May 26, 2015 - link
Thanks. That helps.velanapontinha - Tuesday, May 26, 2015 - link
Hi, Brandon.Any ETA on the review of the "regular" MX4? MWC is long over.
AnandTech still doesn't have one single review of a Mediatek based device. Mediatek is no longer a Cyrix kind of thing, you guys should give it the spotlight it is starting to deserve.
Maxpower2727 - Tuesday, May 26, 2015 - link
I hate to be "that guy," but....G4 review?re2onance - Tuesday, May 26, 2015 - link
Thanks for the detailed review of the battery life. Did you use the Asus web browser or Google Chrome for the web browsing battery test?