DDR4 Haswell-E Scaling Review: 2133 to 3200 with G.Skill, Corsair, ADATA and Crucial
by Ian Cutress on February 5, 2015 10:10 AM ESTEnabling XMP
By default, memory should adhere to specifications set by JEDEC (formerly known as the Joint Electron Device Engineering Council). These specifications state what information should be stored in the memory EEPROM, such as manufacturer information, serial number, and other useful information. Part of this is the memory specifications for standard memory speedswhich a system will adhere to in the event of other information not being available. For DDR4, this means DDR4-2133 15-15-15 at 1.20 volts.
An XMP, or (Intel-developed) Extreme Memory Profile, is an additional set of values stored in the EEPROM which can be detected by SPD in the BIOS. Most DRAM has space for two additional SPD profiles, sometimes referred to as an ‘enthusiast’ and an ‘extreme’ profile; however most consumer oriented modules may only have one XMP profile. The XMP profile is typically the one advertised on the memory kit – if the capability of the memory deviates in any way from specified JEDEC timings, a manufacturer must use an XMP profile.
Thus it is important that the user enables such a profile! It is not plug and play!
As I have stated since reviewing memory, at big computing events and gaming LANs there are plenty of enthusiasts who boast about buying the best hardware for their system. If you ask what memory they are running, then actually probe the system (by using CPU-Z), more often than not the user after buying this expensive memory has not enabled XMP. It sounds like a joke story, but this happened several times at my last iSeries LAN in the UK – people boasting about high performance memory, but because they did not enable it in the BIOS, were still running at DDR3-1333 MHz C9.
So enable XMP with your memory!
Here is how for most motherboards except the ASUS X99-Deluxe, which uses an onboard XMP switch:
Step 1: Enter the BIOS
This is typically done by pressing DEL or F2 during POST/startup. Users who have enabled fast booting under Windows 8 will have to use motherboard vendor software to enable ‘Go2BIOS’ or a similar feature.
Step 2: Enable XMP
Depending on your motherboard manufacturer, this will be different. I have taken images from the major four motherboard manufacturers to show where the setting is on some of the latest X99 motherboard models.
On any ASUS X99 board, the setting is on the EZ-Mode screen. Where it says ‘XMP’ on the left, click on this button and navigate to ‘Profile 1’:

If you do not get an EZ mode (some ROG boards go straight to advanced mode), then the option is under the AI Tweaker tab, in the AI Overclock Tuner option, or you can navigate back to EZ mode.
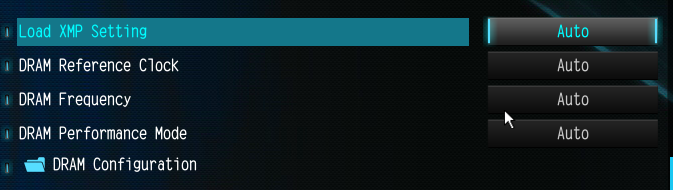
For ASRock motherboards, depending on which model you have, navigate to OC Tweaker and scroll down to the DRAM Timing Configuration. Adjust the ‘Load XMP Setting’ option to Profile 1.
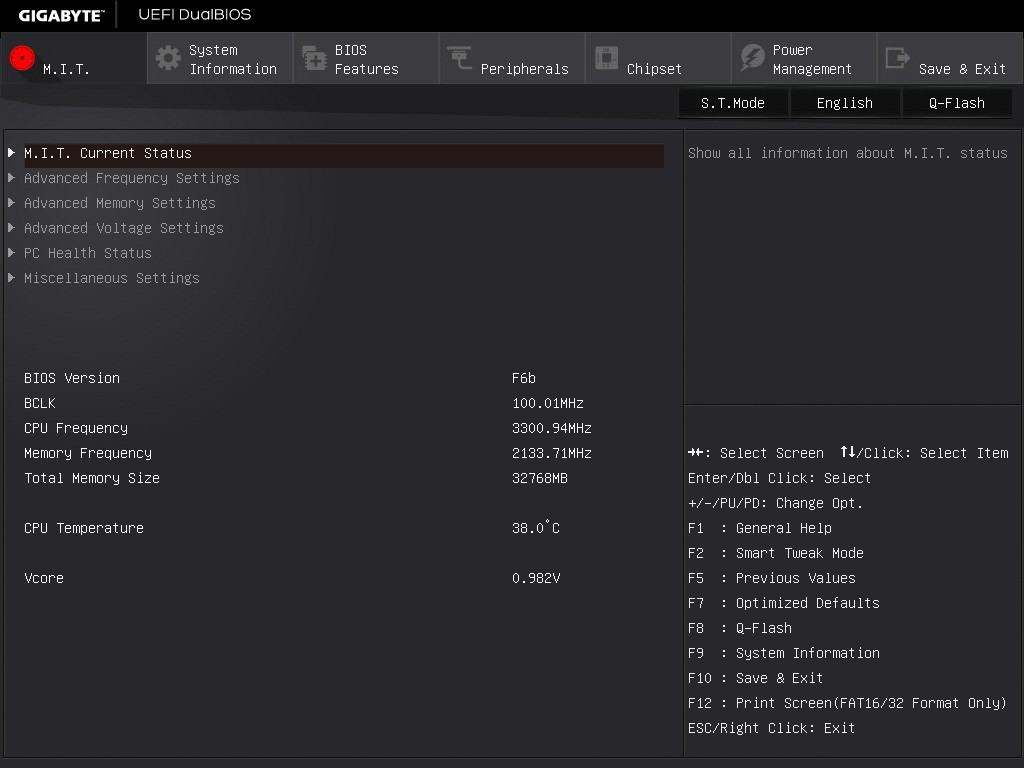
For GIGABYTE motherboards, press F2 to switch to classic mode and navigate to the MIT tab. From here, select Advanced Frequency Settings.
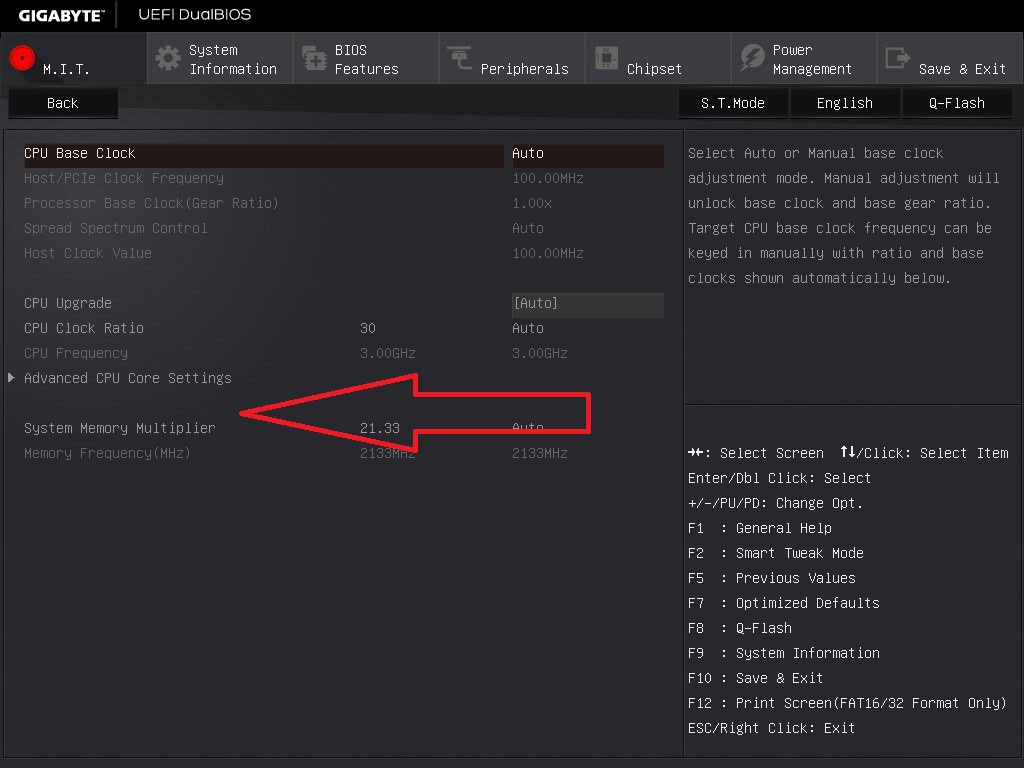
In this menu will be an option to enable XMP where this arrow is pointing:
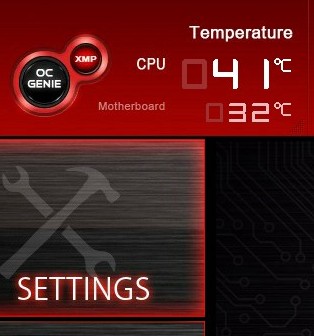
Finally on MSI motherboards, we get a button right next to the OC Genie in the BIOS to enable XMP:
I understand that setting XMP may seem trivial to most of AnandTech’s regular readers, however for completeness (and the lack of XMP being enabled at events it seems) I wanted to include this mini-guide. Of course different BIOS versions on different motherboards may have moved the options around a little – either head to enthusiast forums, or if it is a motherboard I have reviewed, I tend to post up all the screenshots of the BIOS I tested with as a guide.


120 Comments
View All Comments
jabber - Friday, February 6, 2015 - link
Well I've added into my T5400 workstation USB3.0, eSATA, 7870 GPU, SSHD and SSD. I haven't added SATA III as its way too costly for a decent card, plus even though I can only push 260MBps from a SSD, with 0.1ms access times I really can't notice in real world. The main chunk of the machine only cost around £200 to put together.Striker579 - Friday, February 6, 2015 - link
omg those retro color mb's....good timesWardrop - Saturday, February 7, 2015 - link
Wow, how did you accidentally insert your motherboard model in the middle of the word "provide"? Quite an impressive typo, lolmsroadkill612 - Saturday, September 2, 2017 - link
To be the devils advocate, many say there are few downside for most using 8 lane gpu vs 16 lanes for gpu.if nvme an ssd means reducing to 8 lanes for gpu to free some lanes, I would be tempted.
FlushedBubblyJock - Sunday, February 15, 2015 - link
Core 2 is getting weak - right click and open ttask manager then see how often your quad is maxxed at 100% useage (you can minimize and check the green rectangle by the clock for percent used).That's how to check it - if it's hammered it's time to sell it and move up. You might be quite surprised what a large jump it is to Sandy Bridge.
blanarahul - Thursday, February 5, 2015 - link
TOTALLY OFF TOPIC but this is how Samsung's current SSD lineup should be:850: 120 GB, 250 GB TLC with TurboWrite
850 Pro: 128 GB, 256 GB MLC
850 EVO: 500/512 GB, 1000/1024 GB TLC w/o TurboWrite
Because:
a) 500 GB and 1000 GB 850 EVOs don't get any speed benefit from TurboWrite.
b) 512/1024 GB PRO has only 10 MB/s sequential read, 2K IOPS and 12/24 GB capacity advantage over 500/1000 GB EVO. Sequential write speed, advertised endurance, random write speed, features etc. are identical between them.
c) Remove TurboWrite from 850 EVO and you get a capacity boost because you are no longer running TLC NAND in SLC mode.
Cygni - Thursday, February 5, 2015 - link
Considering what little performance impact these memory standards have had lately, DDR2 is essentially just as useful and relevant as the latest stuff... with the added of advantage of the fact that you already own it.FlushedBubblyJock - Sunday, February 15, 2015 - link
If you screw around long enough on core 2 boards with slight and various cpu OC's with differing FSB's and result memory divisors and timings with mechanical drives present, you can sometimes produce and enormous performance increase and reduce boot times massively - the key seems to have been a differing sound in the speedy access of the mechanical hard drive - though it offten coincided with memory access time but not always.I assumed and still do assume it is an anomaly in the exchanges on the various buses where cpu, ram, harddrive, and the north and south bridges timings just happen to all jibe together - so no subsystem is delayed waiting for some other overlap to "re-access".
I've had it happen dozens of times on many differing systems but never could figure out any formula and it was always just luck goofing with cpu and memory speed in the bios.
I'm not certain if it works with ssd's on core 2's (socket 775 let's say) - though I assume it very well could but the hard drive access sound would no longer be a clue.
retrospooty - Thursday, February 5, 2015 - link
I love reviews like this... I will link it and keep it for every time some newb doof insists that high bandwidth RAM is important. We saw almost no improvement going from DDR400 cas2 to DDR3-1600 CAS10 now the same to DDR4 3000+ CAS freegin 80 LOLmenting - Thursday, February 5, 2015 - link
depends on usage. for applications that require high total bandwidth, new generations of memory will be better, but for applications that require short latency, there won't be much improvement due to physical restraints of light speed