ASUS Maximus VII Impact Review: Premium Gaming Z97 in mini-ITX
by Ian Cutress on December 9, 2014 10:00 AM ESTASUS Maximus VII Impact In The Box
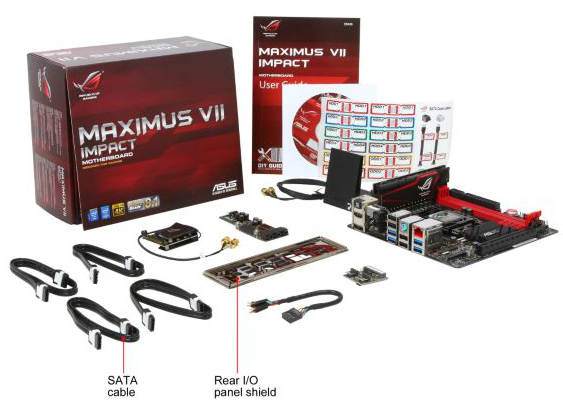
Being part of the ROG brand, ASUS usually attempts to bolster the experience with a number of extra goodies in the box. With the Impact being filled with daughter boards, some detachable, these become the bulk of the extras. To that reason, we get the mPCIe Combo IV add on card with 802.11ac 2T2R dual band WiFi, the SupremeFX II sound add-in board and the CoolHub with two extra fan controllers off the bat. Added to this is a set of WiFi antenna, the driver disks, manuals, a set of stickers for easy cable labeling, the rear IO shield, four SATA cables and an extension cable for the front panel.
ASUS Maximus VII Impact Overclocking
Experience with ASUS Maximus VII Impact
ASUS’ main auto overclocking feature with the Impact for 24/7 use is the software via 5-Way Optimization in AI Suite 3. For those that are a little more adventurous, the BIOS offers a Gaming OC in the presets which implements a 47/46/45/44 multiplier based on 1-4 core loading. There is also the CPU Level Up options from 4.2 GHz to 4.6 GHz, ensuring that even some of the worst Haswell CPUs can at least aim for a reasonable speed enhancement.
On the manual overclock side, ASUS’ range of overclock options is practically insane. Unless you are a full time overclocking professional, or actually work on motherboard design, chances are slim that all the options make sense. But ultimately the high end overclocking market is where these boards are aimed at, so options for these users should be there. One could argue their relevance when LN2 mode is disabled, however.
Methodology
Our standard overclocking methodology is as follows. We select the automatic overclock options and test for stability with PovRay and OCCT to simulate high-end workloads. These stability tests aim to catch any immediate causes for memory or CPU errors.
For manual overclocks, based on the information gathered from previous testing, starts off at a nominal voltage and CPU multiplier, and the multiplier is increased until the stability tests are failed. The CPU voltage is increased gradually until the stability tests are passed, and the process repeated until the motherboard reduces the multiplier automatically (due to safety protocol) or the CPU temperature reaches a stupidly high level (100ºC+). Our test bed is not in a case, which should push overclocks higher with fresher (cooler) air.
Results
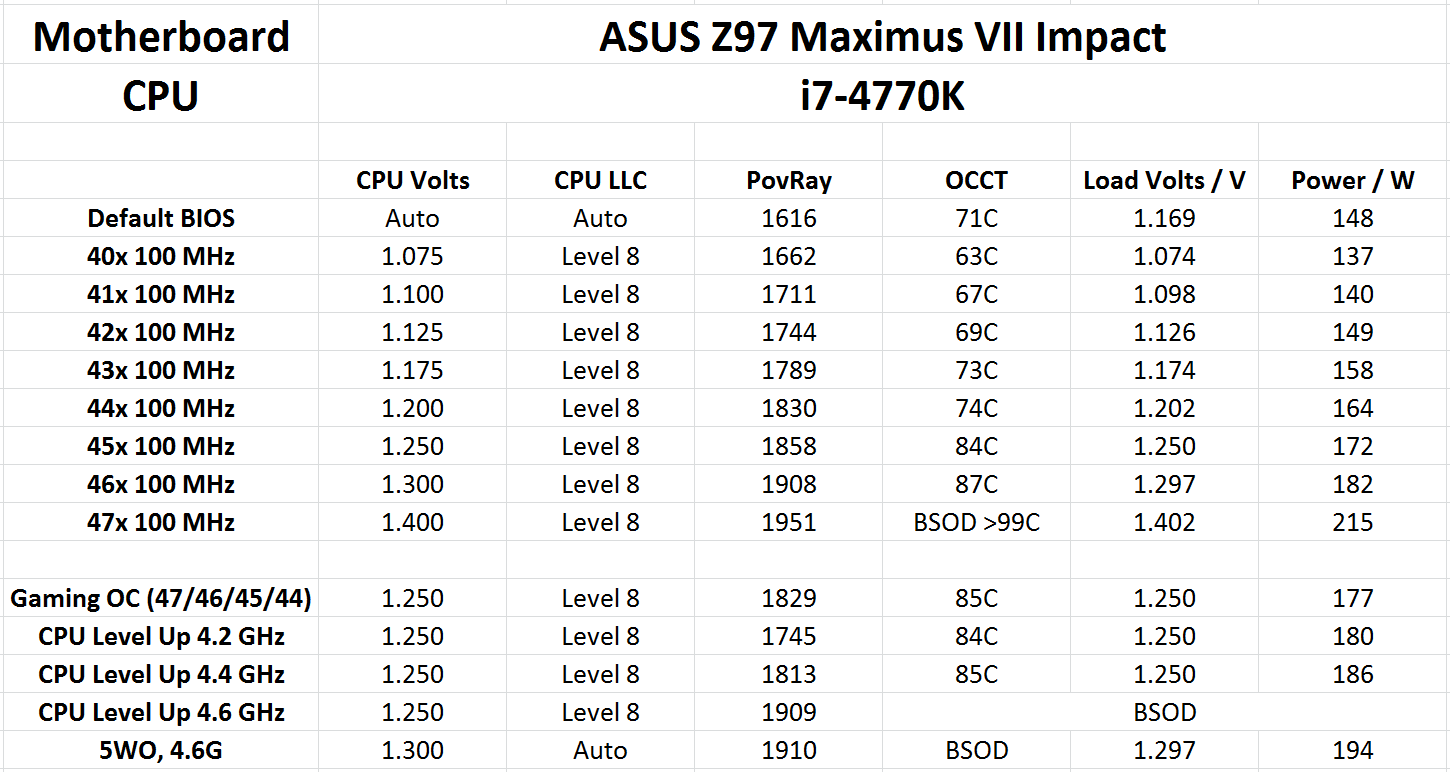
One thing I did notice when overclocking was the lowest possible voltage I could manually apply was only 1.05 volts. Typically I start at 1.000 volts and work up, but this was not possible here.


41 Comments
View All Comments
iLloydski - Monday, June 22, 2015 - link
nevermind, i found this.. http://www.techpowerup.com/reviews/NVIDIA/GTX_980_...