The AnandTech Guide to Video Card Overclocking Software
by Michael Wilding on October 8, 2014 3:00 PM ESTEVGA Precision X
Next up is the recently released Precision X 16 utility from EVGA. This latest version of Precision X was introduced with the launch of NVIDIA’s next generation Maxwell video cards, the GeForce GTX 970 and GTX 980.
Kicking things off, like many of the video card manufacturer developed overclocking utilities we’re looking at today, officially Precision X is geared towards EVGA video cards. However, like other utilities EVGA has not done anything to restrict Precision X to just their video cards. As a result it’s freely downloadable from EVGA’s website and is de-facto compatible with most recent NVIDIA video cards, giving NVIDIA card owners yet another option for a solid second-party developed overclocking utility.
Notable among this article’s features, Precision X 16 is EVGA’s second take on developing an in-house overclocking utility this year. After discontinuing their development work with RivaTuner’s creator Alexey Nicolaychuk back in July of this year, EVGA released Precision X 15, their first entirely in-house developed version of Precision X. However due to several bugs and some unresolved issues with Nicolaychuk, EVGA quickly pulled Precision X 15 for further development.
Although their in-house development efforts didn’t go as well as initially planned, after a second development cycle EVGA has been able to correct a number of issues and redesign their user interface as well, releasing the revised utility last month as Precision X 16. Though it's in an odd spot to create a successor to what was commercially their own program in the first place, EVGA has done their best to retain the majority of the features and options found in their previous RivaTuner based Precision X utility. However, true feature parity would require EVGA to recreate features that Nicolaychuk had originally developed over a number of years, so Precision X 16 still isn’t quite as comprehensive a utility as Precision X 4.2 was, as we will uncover when delving further into the utility.
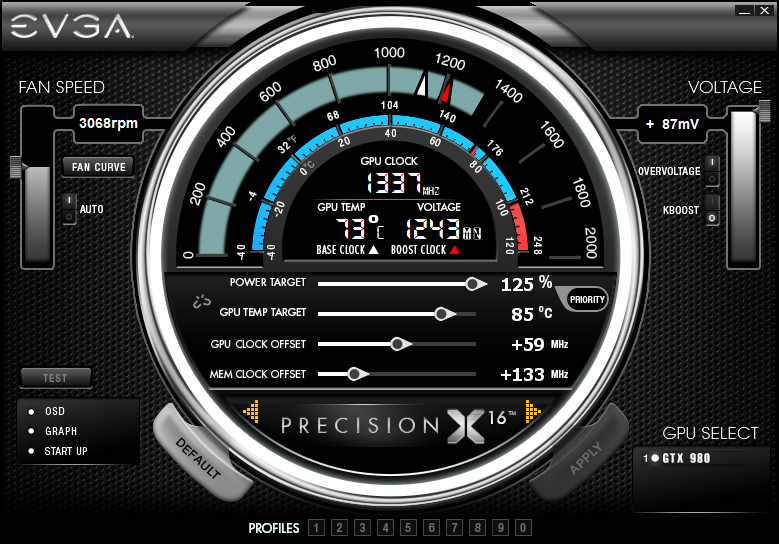
When you first launch Precision X, the first thing you'll notice is its high performance inspired design. Users will feel as if they are starring down at the gauge cluster of a high performance sports car. We feel that EVGA knocked the design of the user interface out of the park with this version of Precision X, as in my opinion it's the best looking of all the utilities in our round-up. (Others are welcome to disagree, of course.)
Let’s start things off with the top section of the gauge. Here you can view your current GPU clock speed, GPU temperature, and GPU voltage in real time. There are red and white triangle indicators that point to your card's base and boost clock speeds, along with indicators that verify the GPU temperatures in Celsius and in Fahrenheit. [Ed: does anyone really think in Fahrenheit when it comes to computer temperatures?]
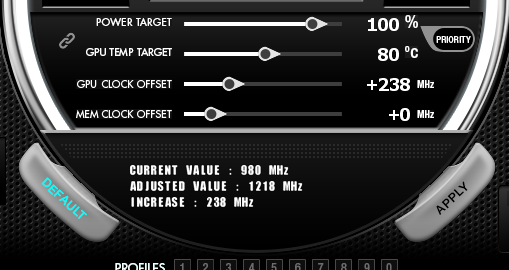
The middle section of the gauge displays the traditional sliders as seen in most utilities. You can adjust the GPU's power target, GPU temperature target, GPU clock offset, and memory clock offset as well. As shown below, you can adjust the settings using the provided sliders or enter the values manually. Precision X 16 also shows the adjusted values before you apply them. For example, below we added a +238 MHz offset to our GPU clock speed. Precision X will then display our current GPU base clock and the adjusted value, which shows an increase of 238 MHz, and a new GPU base clock of 1218MHz.
In addition, we have a priority button, which allows the dynamic clock adjustments to be prioritized between the power target and GPU temperature. Directly across from the priority button is the link button, which allows the power and temperature target to become linked or remain separate.
Finally, at bottom of the gauge are two yellow arrows on either side of the Precision X 16 logo. These are used to navigate through the menu and settings portion of the utility. Clicking on the right arrow reveals the hardware monitoring graphs, and clicking again brings up the settings section of the utility. We will explore both of these sections more in depth in a moment.
Lastly, I wanted to note that Precision X’s user interface can vary depending on the generation of video card being used. Kepler and Maxwell based cards that employ NVIDIA’s GPU Boost technology will include the sliders for power target as well as temperature target. NVIDIA video cards based on older architectures will have both of these sliders grayed out and they will not be selectable.
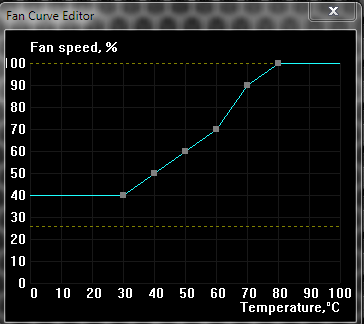
Moving on to the Fan speed section of the utility, you can see the current GPU fan speed percentage and RPM. Like most of the other utilities in our round-up, you have the option to leave the fan on auto, set a fixed fan speed, or create a custom fan curve. Selecting the Fan Curve button brings up the settings menu; from here, we can enable the software fan control and create our own fan curve.

We also have the option to select a fan speed preset. Our selections include aggressive, quiet, or custom fan curve presets. As shown below, the aggressive preset isn't a huge departure from the auto setting, which is the same as the custom setting before any modifications are made. However, the fan speeds on the quiet preset were extremely low for my taste; enabling this would cause a hefty dose of GPU throttling, as the fan speed tops out at 50%.


Custom, Agressive, and Quiet
Another option within this section allows us to define a hysteresis value. Setting a hysteresis value becomes useful when using a steep fan control curve, as in the aggressive fan preset. This helps reduce the rate of fan speed fluctuations when the GPU temperature is hovering around the temperature step points. For example, in our aggressive fan profile we see our fan speed is set to 70% with a GPU temperature of 60C. As the GPU temperature increases to 70C, the fan speed increases to 90%. The sudden change in fan speeds between 70% and 90% is extremely noticeable and rather annoying if temperatures are hovering around the 69-70c mark. If we set a hysteresis value of 5C, as the GPU temperature rises to 70C the fan speed will increase to 90%, but it will not decrease again to 70% until the temperature is lower than 65C (70C - 5C). As an added note, hysteresis is applied only when temperatures are dropping, not rising.
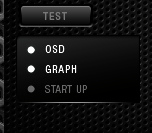
Now let's divert our attention to the area below the fan speed section. First up is the test button. The test button is used to launch a desired test application with a single click. To configure a test application, we'll need to go into the settings menu and locate the interface section. Within the second tab of the interface section, we can select any application that we have currently installed on our PC. Being that were using an EVGA utility, we have opted to select EVGA’s OC Scanner X.
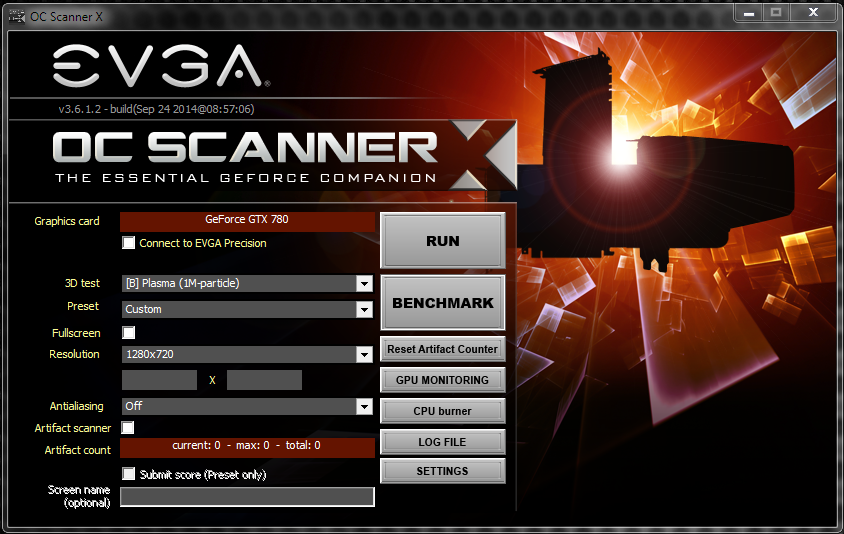
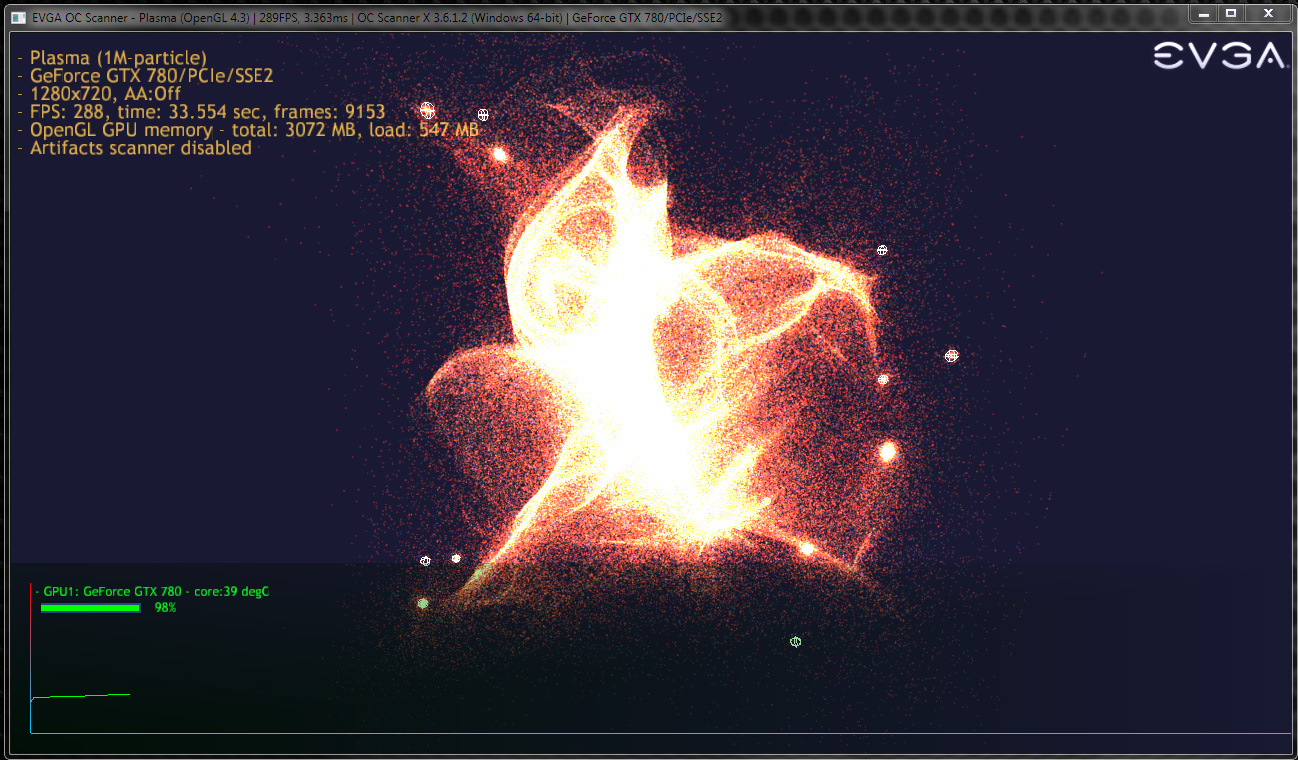
Available as a side download from EVGA’s website, OC Scanner X can do a number of things to help test for system stability. We can stress test and benchmark our GPU, enable built-in log functionality, and even use a CPU burn-in module to stress test our CPU. The graphics stress test portion of OC Scanner X uses Furmark technology. I would say the stand out feature of OC Scanner X is the scanning for artifacts option. OC Scanner X can scan for visual artifacts, even the ones that we can't see or those that disappear too quickly to be noticed. There are few tools with this option, which really makes OC Scanner X a great tool for testing GPU stability.
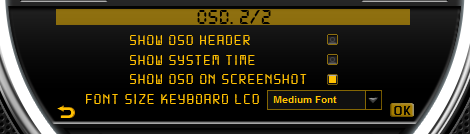
Below the test button is the OSD or on screen display selection. This is used as a way to toggle the OSD setting on and off as desired. We can further control our OSD by entering the OSD section in the Precision X settings. Here we can select a hotkey to toggle the OSD on and off when in an application, change the font sizes when using a compatible keyboard LCD, show system time in the OSD, and show the EVGA header when using the OSD.

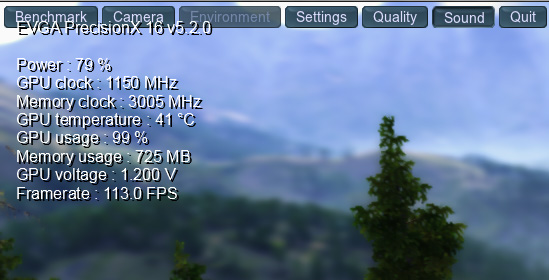
Here is an example of what the OSD with EVGA header looks like in the Unigine Valley benchmark.
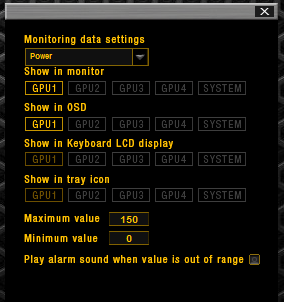
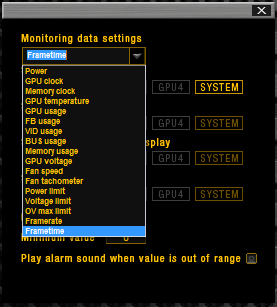
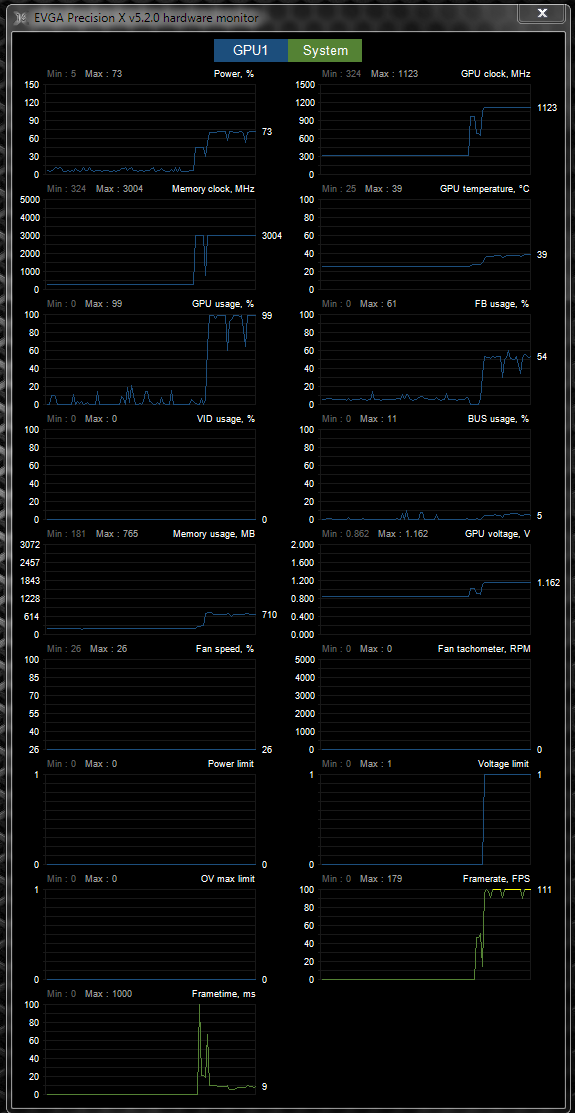
The second selection is the monitoring graph, which also works in accord with the OSD option. Clicking on the graph selection will display the monitoring data settings window. Here you can choose from seventeen different monitoring selections, everything from GPU temperature to frametimes. You also have the choice on how you want the monitoring information to display. It can be shown in the hardware monitor, OSD, supported Logitech keyboard display, and windows system tray.
Additionally, you can access the hardware monitor by clicking on the yellow arrow to the right side of the Precision X 16 logo. Here you can use the mouse to left click and drag the section up and down, or double click on the hardware monitor to expand the display to a side-by-side layout of all the graphs. We really like the layout of the expanded hardware monitor display, as it's superior to those used in previous versions of Precision X.

Precision X 16 also uses its own server that runs in the background when enabling the OSD option. However, it's not nearly as robust as its predecessor, as it only allows for OSD application exceptions to be added or deleted. In short, if you want to use the Precision X OSD feature in specific applications be sure to delete them from this list if they're shown. For some reason the Battlefield 4.exe file was included in this list, so I had to delete it in order for the OSD to display properly in this game.
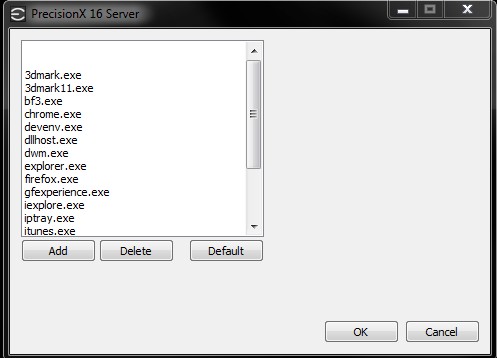
Meanwhile there are some options I would like to see implemented into this section. First, there's no option to change the order of monitoring data. This means the OSD will always show the monitoring information from the top to bottom without giving you the ability to change the order. Second, there is no option to change the color, location, or size of the OSD font in the Precision X 16 server. This is a bit of a letdown for users coming from previous versions of Precision X, which uses the robust RivaTuner Statistics Server and allows for these modifications.
Nonetheless, having all of these monitoring options is something that no other utility at this point can offer. The option to use all of these methods to monitor the video card while in an application or at the desktop is a huge plus for EVGA's precision X utility. In addition, EVGA has also added 32-bit and 64-bit support for DirectX 9, 10, and 11 games when using the OSD.
The last selection is the startup section, which allows Precision X to load when booting into Windows. When enabled, it will automatically apply a selected saved profile if allowed. You can also hold the control key to bypass the automatic loading of profiles, in cases where you end up with an unstable profile.
Moving over to the right side, we see the voltage section of the utility. Selecting the overvoltage switch allows you to adjust GPU core voltage, as per the capabilities and allowances of NVIDIA’s GPU Boost technology. Precision X does a good job at offering voltage adjustment for many mid- to high-end NVIDIA based video cards, as I haven’t installed a video card yet that didn’t allow for GPU voltage adjustment. In addition, the amount of increased voltage can differ depending on the type of card installed.

Along with voltage adjustment, Precision X also has an option called K-Boost or Kepler Boost. Enabling K-Boost allows the GPU's clock speeds and GPU voltage to run at their highest set frequencies all of the time. K-Boost disables all of the power saving features that current video cards use to aid with lower temperatures and lower power consumption. The major benefit of K-Boost is to help remove the sudden drops in voltage and clock speeds that happen dynamically when stressing video cards. Removing these can reduce performance inconsistencies and instabilities when overclocking, but keep in mind that this option is not likely to benefit the majority of users out there, as it will cause idle power consumption and GPU temperatures to rise. For that reason this option is primarily geared towards extreme overclockers, particularly those who have a modified VBIOS with direct voltage control.
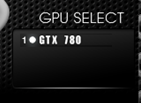
Below voltage is the GPU select section of the utility. This allows you to select individual video cards when using a system containing multiple cards (e.g. SLI). You can also choose the sync option if you want to apply the same settings/overclock to all of the cards in your system.
Located at the bottom of the utility is the profiles section. As stated many times before in our round-up, profiles allow you to save and apply settings with the click on a button. The big difference with EVGA's Precision X is that it offers up to 10 profiles, which is more than most users will ever need. To save a profile, right-click to highlight a profile number, and then left click to apply and select.

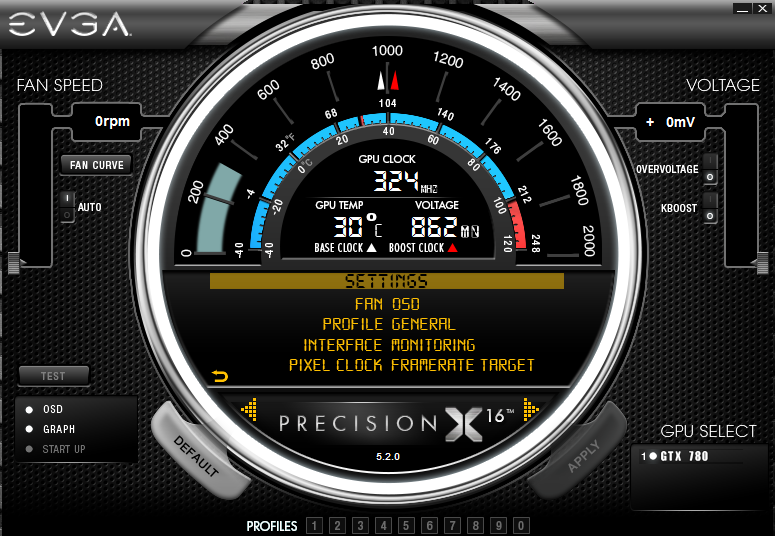
Before we wrap things up, let's dive back into the settings section of Precision X to take a look at a few more features this utility has to offer. First up is the Frame Rate Target feature. This feature allows you to set a maximum frame rate for any game or application. This option tends to come in handy when playing older or less demanding games, which generally produce high frame rates. Setting a desired frame rate at or slightly above your monitor's refresh rate can help the GPU run cooler and quieter, and it can also cause power consumption to go down. This can also be useful for notebooks, as lowering the frame rate can increase battery life.

Next up is the Pixel clock feature, where you can manually adjust the pixel clock used to drive your monitor, in essence allowing you to overclock the refresh rate of the monitor. I really like the fact that EVGA decided to integrate NVIDIA’s monitor overclocking concept into their utility, as it's a feature not found on any other overclocking utility we've used. Though when discussing this feature lets also keep one thing in mind: not all monitors can be overclocked, so make sure to do plenty of research before utilizing this tool.
Lucky for us, we are testing Precision X with a very overclockable Qnix QX2710 Evolution II 60Hz monitor. Firing up this tool, we had no problem hitting 120Hz right off the bat, but due to a large amount of dimming along with some visual artifacts, we settled for a refresh rate of 96Hz, which is still a stellar overclock. While there are a number of ways to overclock a monitor, I really enjoyed the simplicity of doing it with Precision X.
![]()
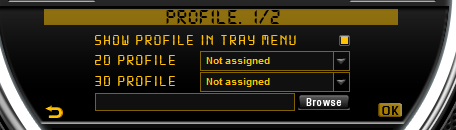
Looking at the Profile setting, you can assign any of our saved profiles to a specific hotkey. This adds a nice touch of convenience when using a full screen application, as we can apply profiles without having to switch to the desktop. Additionally, we can assign 2D and 3D profiles. When the 3D profile is selected, it will automatically load when entering a 3D application, while the 2D profile will load when the system enters a 2D state.

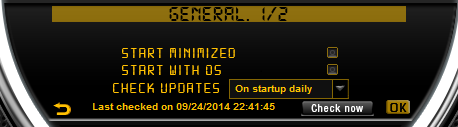
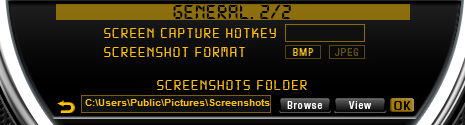
In the General settings, you can set up Precision X to check for utility updates on a daily, weekly, or monthly basis. You can also set up a screen capture hotkey, so you can take BMP or JPEG screenshots. Setting up a screenshot target folder is mandatory, as it's needed before you can use the screenshot feature.
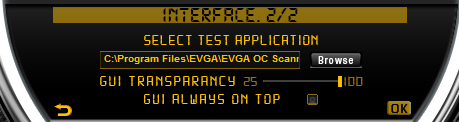
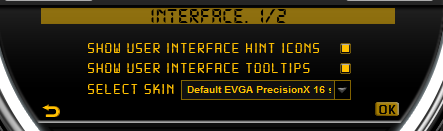
We have previously visited a portion of the Interface section in order to configure our test button. In addition, we can also change the transparency of the Precision X utility, turn the interface tool tips off/on, and apply additional GUI skins as they become available.
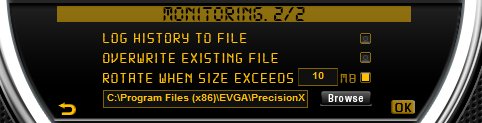
The Monitoring section is the last in our settings rundown. Here you can adjust the hardware polling period and enter the monitoring data settings as we showed in the graph selection. You also have the ability to save a log of the hardware polling history to a.txt file.

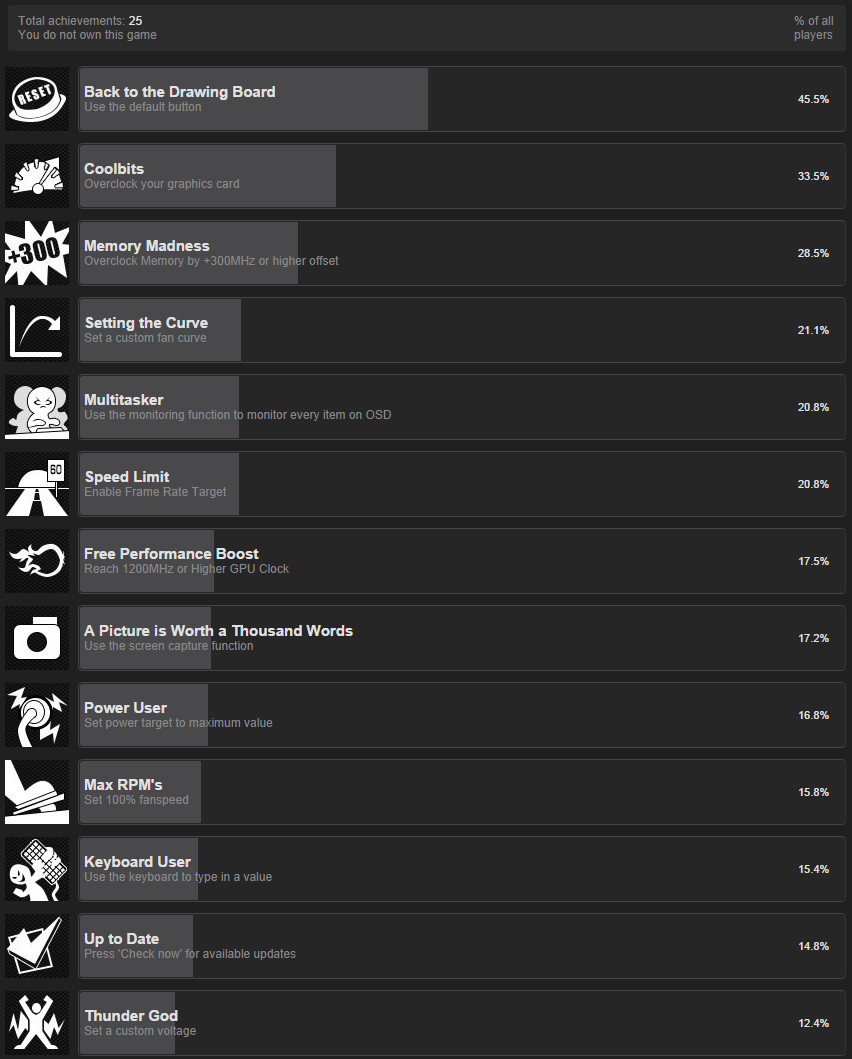
Meanwhile along with being available as a direct download from EVGA’s website, Precision X 16 is also available for download on Steam. These versions are virtually identical, with the exception that users that install Precision X 16 through Steam are now able to unlock up to twenty-five Steam achievements when using the utility. The inclusion of overclocking achievements is clearly intended to be tongue-in-cheek, but if you are the kind of person who likes racking up Steam achievements then you will be amused to find that you can earn achievements for otherwise silly actions such as using the “default” button.
In conclusion, there really is a lot to like with EVGA's newest version of Precision X. It's their best looking interface to date, offers a robust monitoring system, has a fantastic OSD option, enables GPU voltage adjustment, offers monitor overclocking, and has a ton of other useful features. With this list of features, it's hard not to like EVGA's Precision X 16 utility; however, I did have a couple of issues when using Precision X 16.
I found the new settings interface to be very cumbersome when navigating though the settings section, as the last stable version had a more user-friendly interface. I also feel EVGA did their best to keep the majority of options and features from their previous RivaTuner based 4.2.1 version, but it seems like they fell short in some areas. Users coming from the 4.2.1 version may miss the customizable OSD, the feature rich RivaTuner server, and the Android Precision X application support. Additionally, I would like to see VRM temperature monitoring available on supported cards, but it's not a deal breaker.
Overall, as far as overclocking and features go, Precision X 16 is easily one of the best in our round-up. Perhaps the biggest drawback is that it's not useful for owners of AMD GPUs.


59 Comments
View All Comments
kasakka - Friday, October 10, 2014 - link
I don't think I've seen it update in a long while. I moved to Afterburner after realising that despite people asking for it 2 years ago, there is still no monitoring for two cards at the same time in ASUS GPU Tweak.know of fence - Wednesday, October 8, 2014 - link
There are arguments to be made for CPU overclocking, with CPU it's always about maximum burst and single threaded performance. It even can help boost those dreaded min frame rate lags.GPU overclocking always has been and still remains a complete waste of time and watt power. Even more so now that GPUs utilize thermally controlled turbo throttling, and OC themselves on their own.
Go ahead and tweak your settings, experiment a bit with the limits of your 500 dollar card, but let's not pretend that it serves any higher purpose or makes the slightest lick of sense.
Impulses - Wednesday, October 8, 2014 - link
I think you got lost and ended up on this enthusiast site by mistake.theuglyman0war - Thursday, October 9, 2014 - link
I find that overclocking memory freq on a GPU often makes the difference between playability or having to put up with a single un-immersive monitor intead when shooting for nvsurround resolutions.Anonymous Blowhard - Thursday, October 9, 2014 - link
Found the console peasant.YazX_ - Wednesday, October 8, 2014 - link
Another thing not mentioned about OSD in MSI AB (RTSS), its the only tool that supports x64 games, as far as i know its exclusive to them.Michael Wilding - Wednesday, October 8, 2014 - link
Hi YazX_The RTSS 6.2.0 build removes 64-bit OSD MSI Afterburner exclusivity lock, so it now works with Precision X 4.2.1. Precision X 16 also has 64 bit OSD support for DX9 and up games.
Guinpen - Wednesday, October 8, 2014 - link
With these utilities there seems to be an ongoing competition to create the ugliest user interface imaginable.TiGr1982 - Wednesday, October 8, 2014 - link
What's your standards of GUI prettiness, BTW? Can you give us all an example?nissefar - Wednesday, October 8, 2014 - link
Standard Windows ui widgets, obviously. Annoys me how every application think they need their own skin.