Lian Li's PC-A05FN: Alternative Thinking at a $99 Price Point
by Dustin Sklavos on December 7, 2011 10:15 PM EST- Posted in
- Cases/Cooling/PSUs
- mid-tower
- Lian Li
Assembling the Lian Li PC-A05FN
The fundamental problem with trying to assemble a system in any kind of small enclosure is that the enclosure itself is going to make the work slow and cramped. That's not really the fault of anyone or anything but physics, but sometimes a manufacturer tries to make their case a little bit more "capable" than they probably ought. Such may very well be Lian Li's PC-A05FN, which ostensibly has space for our testbed components (and indeed, we were able to fit the standardized testbed inside with some work), but honestly, if you're interested in this enclosure you're going to want to be fairly selective about the parts you choose.
Lian Li was gracious enough to include standoffs built into the motherboard tray, but because of the reversed cooling design, I had to remove the HSF unit we use for testing and then rotate it 180 degrees. Another option for a build in the PC-A05FN may be to orient the HSF to exhaust out of the top of the enclosure (by adding a 140mm fan), thus giving the unit sole access to the air coming in from the back. By that logic, it might also be wise to turn the front fan into an intake as well. Either way, our full-ATX motherboard was able to be jimmied in, but I ran into a problem almost immediately.
![]()
The SilverStone Strider Gold power supply we use for testing is 180mm, 20mm longer than Lian Li's specifications indicate. Thankfully I was still able to get it into the enclosure (I actually installed it first, though you can also install it by first removing the front bezel and then removing the mounting bracket) and get everything wired, but you're better off sticking with a 160mm or shorter unit. Note that clearance isn't good at all; the PSU completely blocks off the side-mounted SATA ports on the motherboard and prevents you from routing any cabling behind the motherboard tray (not that there's much reason to.) I do have to question whether that missing 20mm really matters, though; that's about enough to plug in a SATA cable but it cuts things awfully close.
I'm still not a fan of Lian Li's "rubber and rails" approach to installing 3.5" drives. You basically mount four thumbscrews with rubber rings into the sides of the drive, "unlock" the drive cage by removing the thumbscrew and lifting up the interior metal bumper, slide the drive in, then lower the bumper again and "lock" it by replacing the thumbscrew. I'm just not sure this is really that much easier than a basic, run of the mill drive cage where you have to screw the drive in by hand. And while the 5.25" optical drive at least benefits from a snap-to-close tool-less locking mechanism, that mechanism feels loose and you'll want to screw it in on the opposite side just to be safe (e.g. a loose DVD mount can cause increased vibration noise).


2.5" drives use a similar approach to their 3.5" cousins, but instead the screw and mount go into the bottom of the drive, and you have to use a screwdriver. From there, you pop the drive into a set of holes in the bottom of the chassis and then slide it into place. It feels remarkably secure, but any SATA power plug you use for these low drives is going to need to be at the end of the chain; clearance between the drive and the bottom of the chassis is basically nonexistent. I'd also recommend against using a mechanical drive in one of these mounts; these were clearly intended for SSDs and I can't vouch for how a mechanical drive will handle the vibration or the heat.
You can fit a 10.5" video card like our Zotac GeForce GTX 580 into the PC-A50FN, but you'll sacrifice at least one of the 3.5" drive bays in the process. Really you're better off with a smaller, shorter card like a GTX 560 or Radeon HD 6870; this is another one of those instances where "you can" doesn't mean "you should."
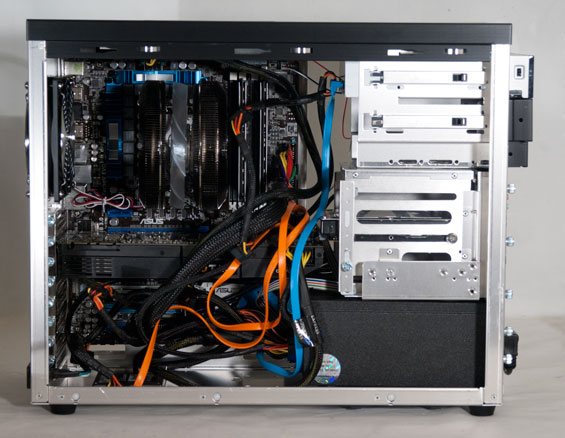
Finally, wiring the whole thing up was troublesome. Part of that is due to using a power supply that's admittedly a touch out of spec for this enclosure, but part of it is also the fact that while there's some space behind the motherboard tray, there's also really nothing to put back there or route. The result is a build that looks a bit messy internally, and worse, seems to crowd the video card something fierce. You could probably clean things up a bit more with some better component choices, but cable management is not the PC-A50FN's strong suit.
Honestly, I like the PC-A50FN more than the other Lian Li cases I've tested so far, but once again you really do need to choose your components carefully if you elect to build in this enclosure. That's not necessarily a bad thing, but this is most definitely not a "one size fits all" case.


65 Comments
View All Comments
know of fence - Thursday, December 8, 2011 - link
Every case I ever opened had this empty room in the lower front, where only tumble weeds of dusts are blowing, maybe you'll find a dropped drive screw there, or a stray cable. Sometimes you'll even spot a speaker (beeper) from the old days...It's the most logical and consequential thing to stick a power supply there, even if you have to reroute the power cable.
Beenthere - Thursday, December 8, 2011 - link
PSUs are intentionally mounted in the upper back of a case as that's where the heat is that the PSU fan evacuates. Basic engineering 101.Luumpy - Thursday, December 8, 2011 - link
Ya thats the worst possible place for a psu(Top of case) . It sucks in hot air from the rest of pc. Just dumb.Your clearly NOT an engineer.
Most high end cases put psu at bottom of case, where its cool.
Death666Angel - Thursday, December 8, 2011 - link
Really splitting hairs here. The old ATX design says for the PSU to be in the top/back, because the air flow is from the lower/front, once over all components and then out the back . It was designed in old times when PCs used below 100W. Then came 100W CPUs and 300W graphics cards and things changed a bit.You cannot say that a PSU _must_ be at the top/back. However, you are just as wrong to say that it is a dumb place for it to be because of sucking in hot air. You can put it in the bottom. You can also put it in the top and turn it upside down (TJ08-E).
Mostly, it doesn't matter nowadays as PSUs get ever more efficient, more and more becoming quieter and even semi-passive to the point where their exhaust ability is negligible and their need to be cooled also diminishes. And people with beefy hardware have one or two 120/140mm exhaust fans anyway.
To the original poster: This design didn't really win any space by the positioning of the PSU. Also, a lot of modern designs use that space for HDDs, drives bays, larger fans and other interesting things. Depending on the usage scenario, dead space can be used quite effectively (water cooling, where you need space for a pump and a reservoir for example).
crackedwiseman - Thursday, December 8, 2011 - link
I made a build for a client of mine back in early 2009 using an earlier model of this case - the significant difference was the motherboard tray was "upside down", with the CPU being on the bottom and the GPU being on top. It performed spectacularly; the build was an overclocked i7-920 and a GTX 260, with a pair of 3.5" HDDs.Yes, it's cramped - thats the price of a small case. But (the older models at least) could handle pretty much any high-end single GPU system; this isn't made for gaming rigs, it's made to cram a powerful work machine into as little space as possible, which can be appealing depending on the availability of office space.
johnsmith9875 - Thursday, December 8, 2011 - link
It has a hot spot at the top of the case. I use a slot cooler to take the heat that the video card generates and get it out of the box, otherwise it would cook anything near the top of the case.Because the cover on the front obstructs airflow I keep it off in the summer. In winter it seems to be adequately ventilated.
What it needs is a blowhole in the top.
Chuck_NC - Thursday, December 8, 2011 - link
Interesting to read the reviews. As an engineer, there are some obvious points to make. I doubt that the HDD temps going higher are intentional, but a byproduct of goofing the airflow around the front. With the PSU blowing out, the HDD fan just pulls the hot exhaust right back in again. The PSU and HDD fans end up recirculating the air. They should reverse the direction of the HDD fan to blow out, and provide positive pressure from other fans going *into* the case (side fan, back, etc.). Would drop all temps, especially those in the front of the case. Anyway you do this, the HDDs are going to be warmer though.By moving the PSU from the typical top over the CPU area over to the front bottom, there is much less air being drawn out of the top back of the case, causing a hot spot area. Again, a side intake fan would help that but at the expense of noise and an added fan, which also adds less reliability (fans fail faster than any other PC part).
I would guess that whoever designed this was looking more at aesthetics and less at airflow, but some minor changes fixes the airflow problems. And the blowhole idea is great - but add some air going into the case somewhere else.
Kepe - Thursday, December 8, 2011 - link
You didn't read the article. Air is sucked in by the rear fan, and exhausted by the front fan. Also, the typical place for the PSU has changed from the top back position to the bottom back position over the last, say, five years. I haven't seen cases with the PSU in the top back position for years.Iketh - Thursday, December 8, 2011 - link
Warmer HDD temps are good up to about 45-50C. The problem is HDs running too cool with intakes blowing right on them (below 30C).TwistedKestrel - Thursday, December 8, 2011 - link
I pulled the trigger on this case when there weren't too many reviews out there. I laughed at the picture of the mess of cables - it made me feel better about not being able to figure out a good way to route pretty much everything.I still like it though. The cooling idea may not have paid off, but it hasn't seriously impacted my ability to overclock. The finish is nice, it's reasonably quiet ... better than a fork in the eye. Would I have bought if I'd seen this review first? Probably not!