Intel DX79SI Review: The Default X79?
by Ian Cutress on November 18, 2011 1:10 AM EST- Posted in
- Motherboards
- Intel
- X79
BIOS
Having not personally delved into an Intel motherboard BIOS for quite a while, it was going to be interesting to see their take on the grand cityscape of graphical BIOS opportunities. As I postulated earlier, it is hard to gauge just how much time, effort and people Intel put in this department, given they are more in the market for selling processors and chipsets. The answer to this could be considered straightforward after booting into their BIOS.
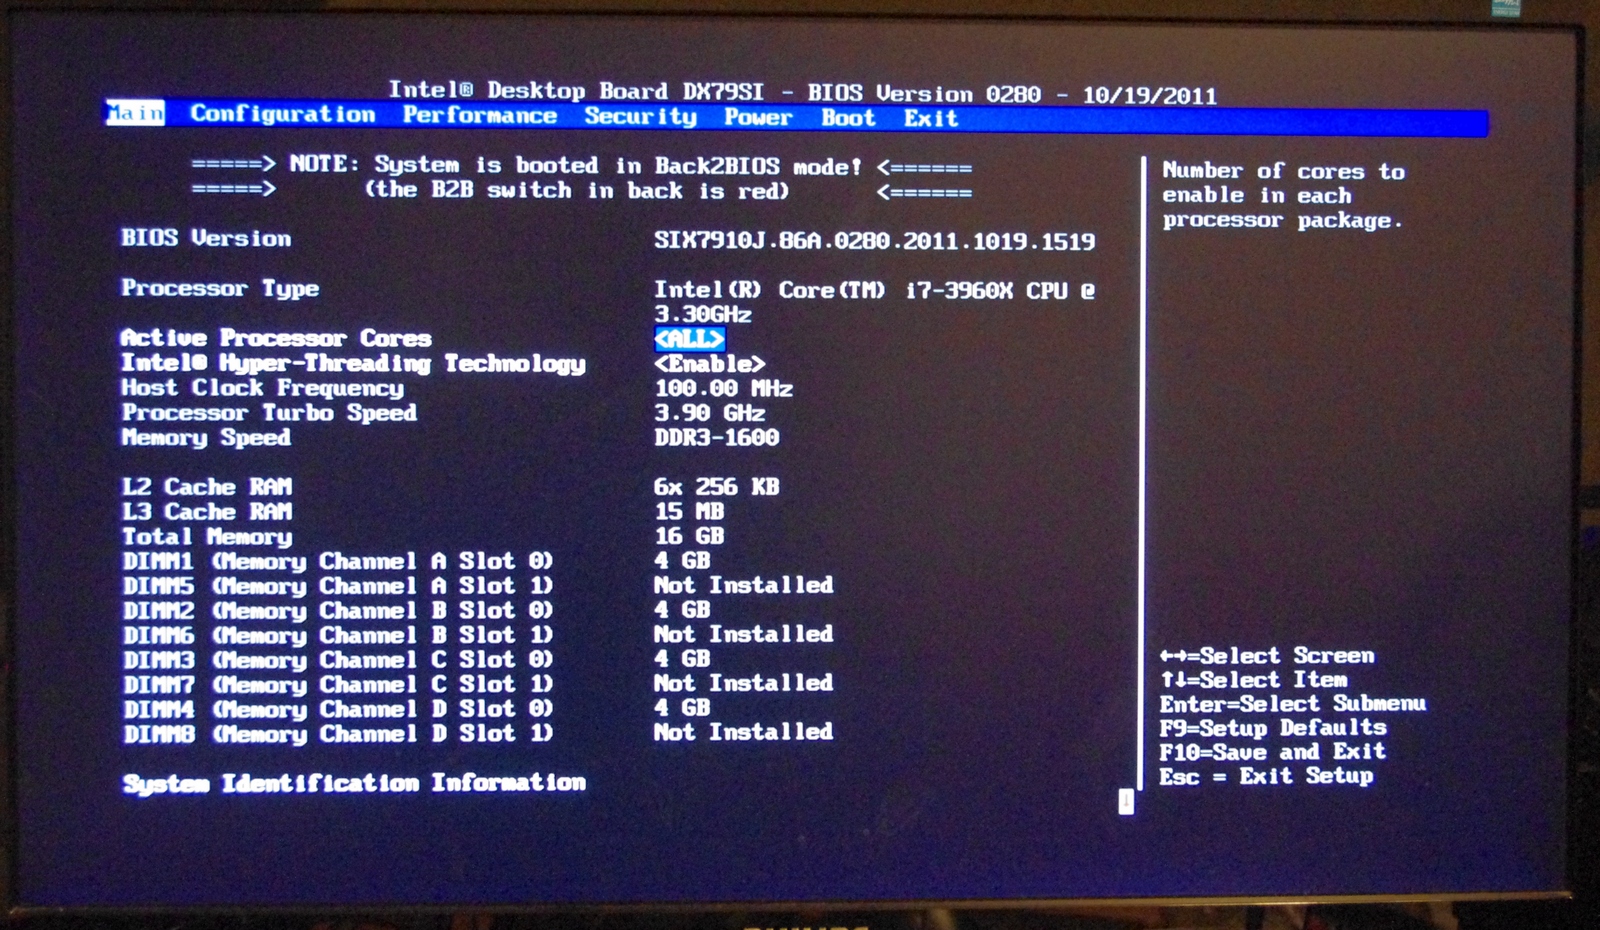
Do not expect much in the way of graphics, unless you have a penchant for ASCII art. However the first screen does contain a lot of info that other motherboard manufacturers do not bother to show right off the bat – BIOS version, processor, speed, frequency, memory and memory speed. In the best graphical implementations on other products we also get fan speeds and voltage quick reference values, so there is definitely room for improvement here.
The primary screen of interest however is the performance section for overclocking. Right at the top is the Overclocking Assistant, where the user can select either a 1.00x or 1.25x gear ratio (I’ve heard that only 1% of CPUs can do a 1.66x ratio, so there’s method in limiting it to 1.25x here), which creates a processor speed menu underneath for selecting an optimum CPU speed. These are sets of predefined CPU values pre-programmed into the BIOS, so your mileage may vary – make sure there is sufficient cooling at hand. I will go through these options later in the overclocking section.
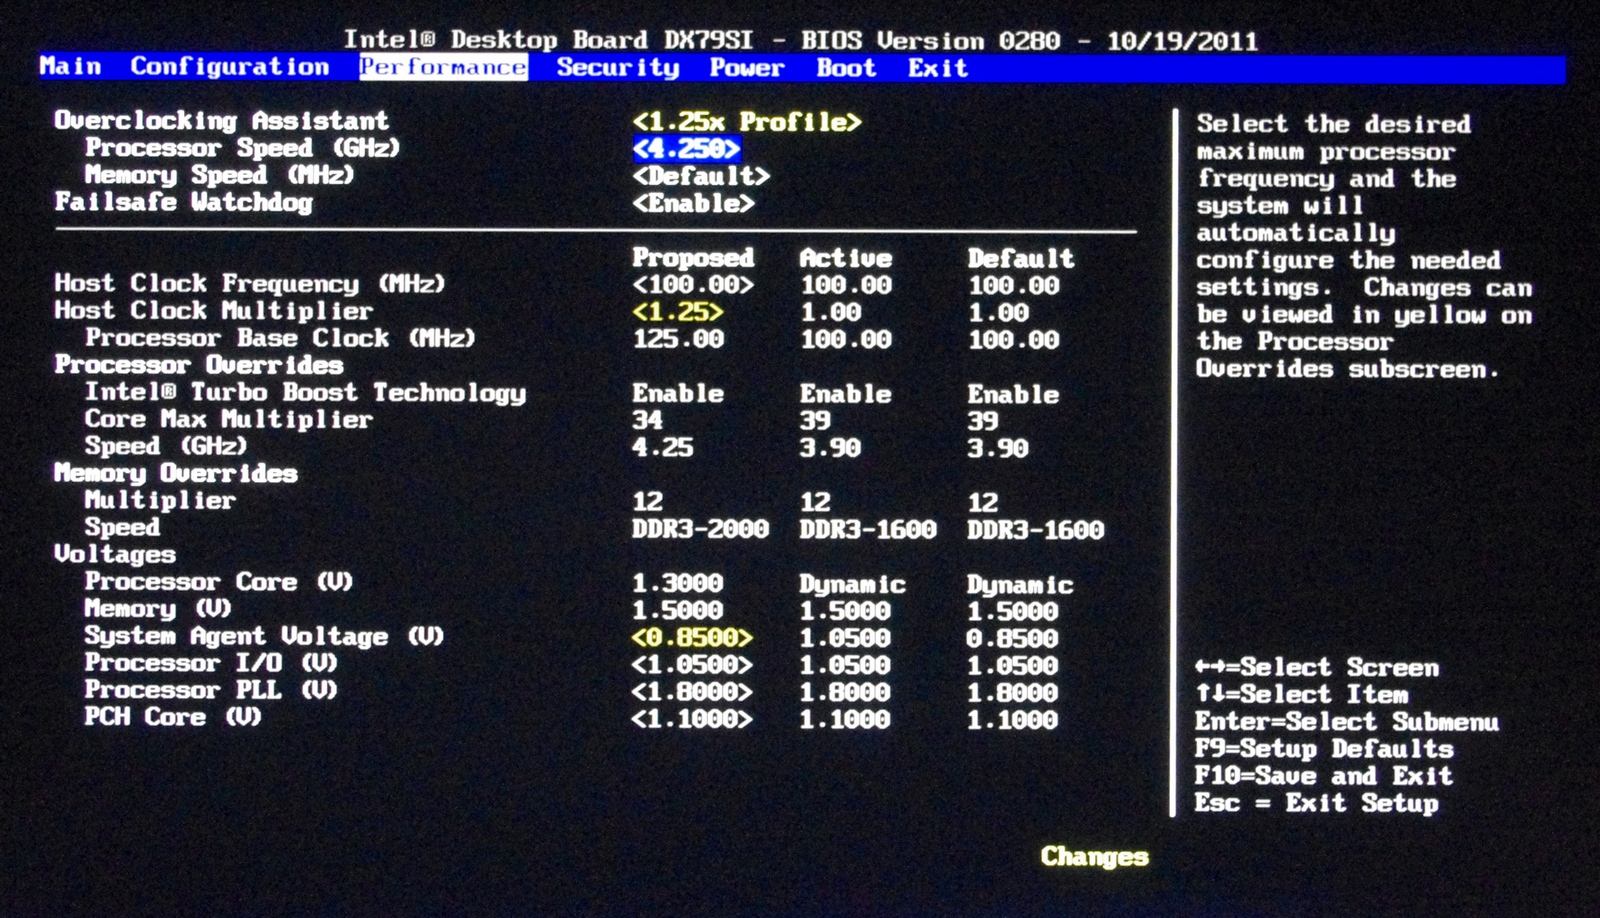
What’s odd about this menu is that the ‘Processor Overrides’ and ‘Memory Overrides’ sections are actually expandable into new screens of options – this isn’t immediately obvious when you first look at it. The processor related screen deals with voltage, V-Droop, Turbo Boosts technology and power limits, whereas the memory configuration is where we deal with XMP and sub-timings. If you have manually overclocked before, there is not anything here that should be confusing.
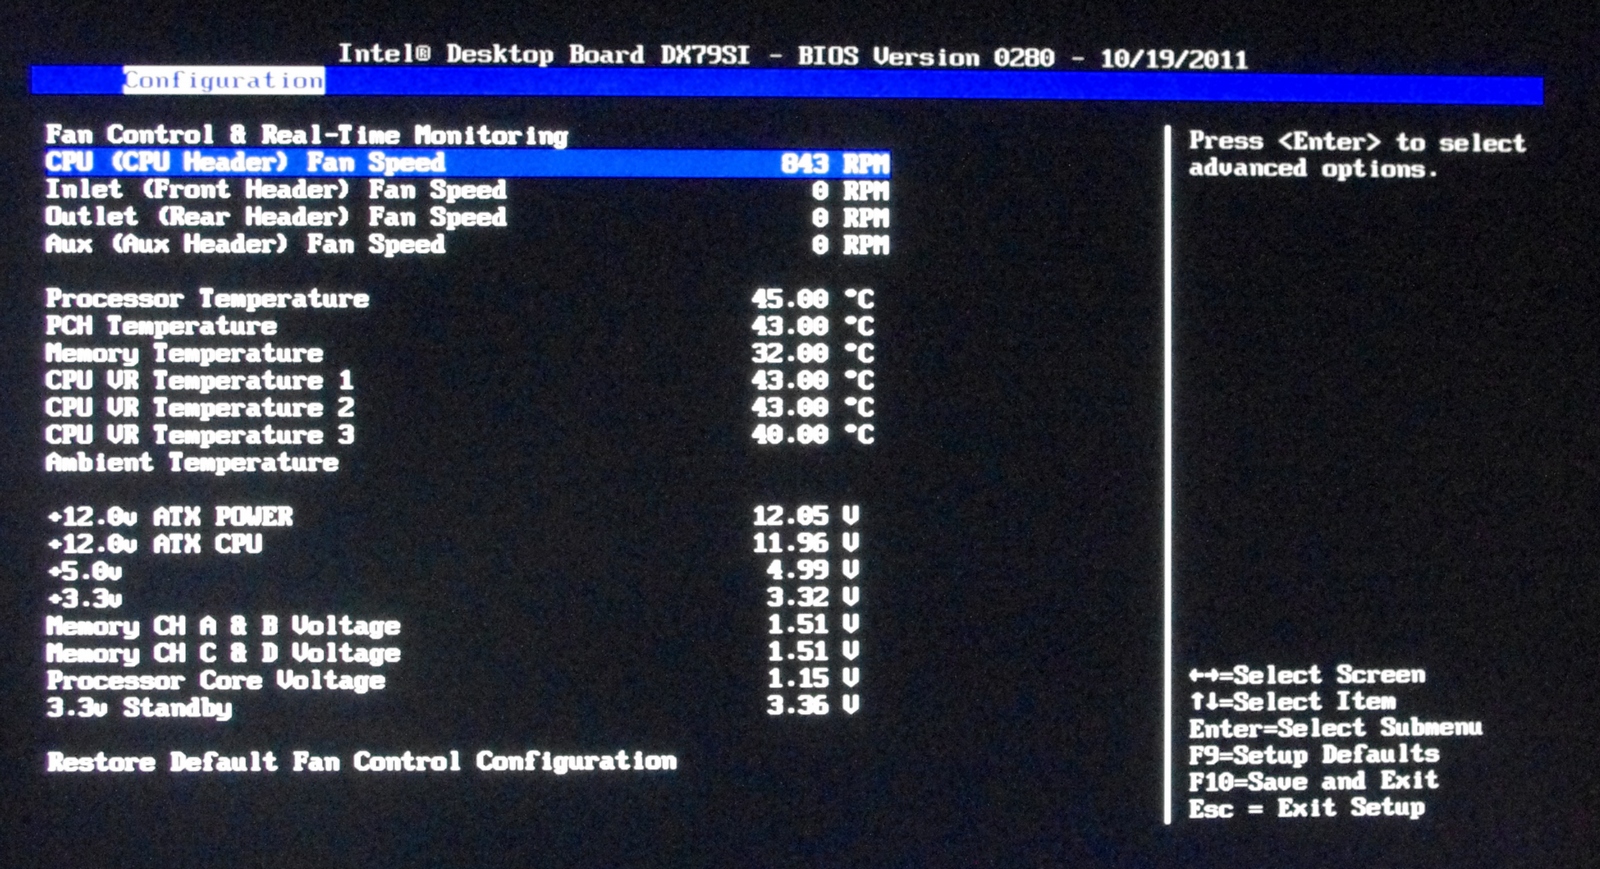
Of importance to a lot of people are the fan control options. As the OS controls are non-existent, we are left to navigate the BIOS to optimize the four fan headers on board. The Real-Time Monitoring screen shows information relating to current fan speeds, temperatures and voltages. In a similar fashion to the performance screen, it is not painfully obvious that the fan speed values actually delve into sub menus where more specific fan controls can be adjusted. In this respect, Intel should probably consider a little notification or color change to an option which is a sub menu.
One main criticism levied at a lot of motherboard manufacturers is the limited amount of ways a user can enter a value in a BIOS. Take something as simple as a voltage setting – some users like to use a the plus/minus keys, some like to choose an offset, some may perhaps even enjoy a menu to select values, while others like myself prefer a direct entry method. Unfortunately, Intel is let down here in terms of direct entry. The menu system is also questionable, with the ‘default’ setting near the 1.0000 V option, requiring the user to scroll all the way to 1.3 V or above for a specific setting.


Overclocking
As I noted back in my review of the ASUS P9X79 Pro, overclocking on the X79 is slightly more involved than P67/Z68, but not as complex as other Intel platforms. We have a ‘gear ratio’ to select (usually 1.00x or 1.25x) which gives a default frequency of either 100 MHz or 125 MHz, then we can adjust +/- a few MHz as with Sandy Bridge.
Intel thankfully provides a series of Auto-OC options in the BIOS, either on the 1.00x or 1.25x ratios as required. To start, I tested the first ratio, which offers 4.0-4.6 GHz on the multipliers. The voltage settings would automatically be adjusted depending on the speed chosen – 4.6 GHz being run at 1.42 V. The board would eventually boot at 4.6 GHz (for some reason it had two failed attempts), but while in the OS it was rock stable, passing a Blender stability test. I did notice however, that if the board was booted at this speed, and then the Auto-OC options were ‘disabled’, as the board still had that 46x option in memory, it would still boot at that level, which is contrary to what the user is selecting.
At the 1.25x gear ratio however, things were not as peachy. While it still offers a good range of CPU speeds to chose from (~4.0-4.625 GHz), the board would simply not apply the gear. Even if this was set manually, the gear would not engage, leaving the CPU at 1.00x on the gear and 35x on the multiplier. There is something not latching in the BIOS to apply this setting – hopefully this will be remedied in an update.
In turn, I tried adjusting the settings manually. As with the ASUS X79 review (and future reviews), I limited the CPU to 1.4 V and adjusted the multiplier. The highest setting that was truly stable was 47x; 48x would usually boot (if the power limits were increased), but would at some point fail a stress test.
For memory, there are several options a user can pick. There are Auto-OC options, which are from 1600 MHz to 2133 MHz, in the subtiming menus a user can select XMP, or manually adjust the DRAM strap. The Auto OC options were an odd sort – at 1600 MHz, the memory would be set to 8-8-8, at 1867 MHz we would get 8-10-8, then at 2133 MHz it would default to 9-9-9. This last setting would not boot on my 2133 9-11-9 kit; I am under the impression that the automatic sub-timings were not optimized for this memory kit. In terms of manual adjustment of timings, it’s actually quite rough – none of the options are able to be set on ‘auto’, so you have to know all the exact sub-timings for your kit.
XMP settings worked well, though it selected DDR3-2000 8-10-8, rather than DDR3-2133 9-11-9 to which my kit should be set to. After speaking with G.Skill, I have been told that for some reason there are XMP issues for those boards which are not XMP 1.3 rated. Nowhere in the Intel specifications can I find that the DX79SI is XMP 1.3, though it would be quite odd if it was not.
As a combined overclock, there are more issues to contend with. If an Auto-OC option is selected for CPU, you cannot select XMP on the memory, you have to use an Auto-OC DRAM option, which as said previously, is not exactly pushing your DRAM to the limit. Nevertheless, taking into account temperatures and options, the 4.4 GHz Auto-OC option at the DDR3-1867 works well.


60 Comments
View All Comments
acompsys - Wednesday, November 30, 2011 - link
Check this out ....http://www.youtube.com/watch?v=z0uXWmlMOgg
mooninite - Friday, November 18, 2011 - link
*eye squint*Not sure if troll...
Alurian - Friday, November 18, 2011 - link
But does having a skull on a motherboard seem like a jinx to anyone else?DanNeely - Friday, November 18, 2011 - link
Intel used Skull Trail as it's ultra performance branding in the past; this I suppose is a hommage to it.halo37253 - Friday, November 18, 2011 - link
I have the intel DX58SO board sadly, got it in a used combo deal so not complaining about the price. Though the bios's tend to be riddled with problems and have problems OCing. While I can overclock my I7 920 to 4.2ghz on this board (pretty good clock but most boards can do it) at only 1.38V. But doing so brings on some of the bios or maybe even the motherboard itself. Can't have S3 sleep turned on at all because when you wake it up it resets the v-core back to stock and system freezes. Or sometimes it will hang at boot and just restart and boot fine or just take long time to post. System is fully stable intel burn test and 24/7 prime. At newest bios but that may be the problem, just really haven't felt like trying out a bunch of different bios yet. And poor placement of sata ports are a big let down as well.The Boards also tend to be made up of lower quality parts and tend to have less power phases. They also tend to have the least performance. I would have to go with a gigabyte motherboard, had the ep45-ud3p and loved it. Gigabyte boards are also known to be the best overclocking motherboards, what is important to me cause I like to have the best performance I can get with the lest amount of money spent.
Viceroy_Fizzlebottom - Friday, November 18, 2011 - link
Interesting, I've have the exact same motherboard paired with a core i7 920 and never have had a single issue with it.Samus - Friday, November 18, 2011 - link
I have an Intel X58 board with my i7-920 and its been solid as a rock for 3 full years. Of course it cost $300 back in 2008, but, honestly it was worth it. Even today my PC is faster than 95% of the market.Clorex - Friday, November 18, 2011 - link
Mentioned in the original i7 3960x review:"Users running dual-GPU setups can enjoy the fact that both GPUs will have a full x16 interface to SNB-E (vs x8 in SNB). If you're looking for this to deliver a tangible performance increase, you'll be disappointed:
Modern GPUs don't lose much performance in games, even at high quality settings, when going from a x16 to a x8 slot."
But here we see that the extra bandwidth for the second GPU really shows, with the X79s pulling ahead of the P67/Z68 in Dirt 3 and Metro 2033. Does this mean that X79 might make sense for multi-GPU setups?
halo37253 - Friday, November 18, 2011 - link
I think you would start to notice with 3-4 gpu setups.I would love to see a 3way for 4way sli on this board. like 3/4 580s in sli. Compare it to the old lga1366 in same 3-4 way sli setup. If you can try to get the old i7 and new i7 at the same clock so we can see how much performance per clock increases.
Denithor - Friday, November 18, 2011 - link
This would be an interesting test, to see how efficient these chips/chipsets are at managing the overhead from 3-4 GPUs.