Lian Li PC-TU200: On the Road With Lian Li
by Dustin Sklavos on October 31, 2011 12:45 AM EST- Posted in
- Cases/Cooling/PSUs
- Mini ITX
- Lian Li
Assembling the Lian Li PC-TU200
On the ease of assembly continuum for cases, at one far end you have Corsair (really the brand in general): couldn't be any easier to put together short of including a technician to just do it for you. On the opposite end you'll have some of SilverStone's more exotic cases (such as the Raven RV03), but I have to say the benchmark has really been set: thus far, out of every case I've assembled, the Lian Li PC-TU200 has been among the hardest if not the hardest case to put together.
I don't expect a case this small to be a tool-less design, far from it. But while many of SilverStone's exotic designs feel like puzzles with elegant solutions reflected in the documentation they ship with, the TU200 oftentimes feels like a bit of a head scratcher, not at all dissimilar to the V353 we reviewed recently. Advance warning: newbies need not apply here, and if you're going to build in the TU200 it may behoove you to have it in mind before you even order the first component.
This is the first time I've ever consulted the instruction manual to figure out how to get the side panels off: remove the two thumbscrews in the back (at the top), and then press the levers and the panels pop out. It's kind of cool but not something you'd immediately expect. To Lian Li's credit, all of the mechanisms involved feel very secure and built to last.

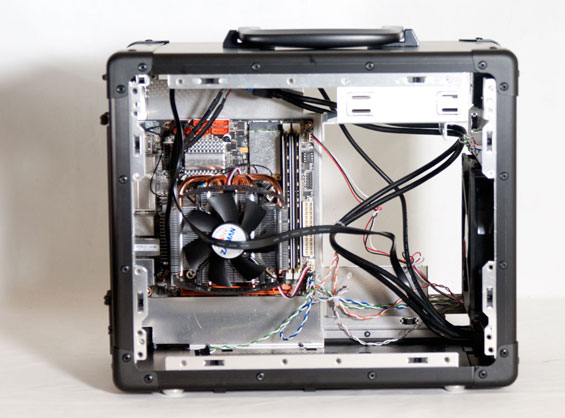
Their instruction manual will tell you to insert the I/O shield for the motherboard and then just pop the board in, but I found that there simply isn't enough clearance to get the motherboard in (at least not remotely easily) without completely removing the drive cage, a task that theoretically shouldn't be required if the included instructions are to be believed. That said, I'm always happy when the standoffs for the motherboard are already built into the tray, so once you can shimmy the board in and squeeze it up against the I/O shield, it's just a matter of getting the four screws in place.
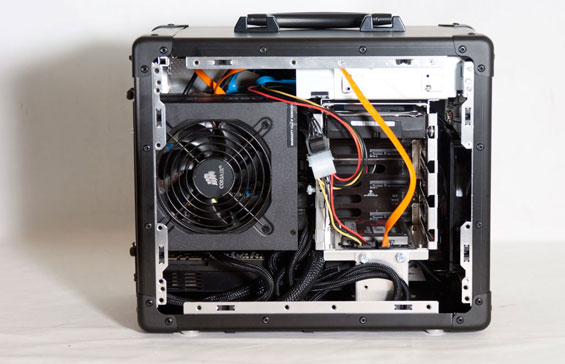
After that, though, you get to what I'm convinced is the TU200's fatal flaw: the drive cage. I honestly feel like the way drives are mounted in the TU200 is just plain over-engineered. Here's how drives are supposed to mount, at least in theory: for 3.5" drives, you'll loosen the thumbscrew on the left side of the cage, in the extruded lip of the cage, then slide it up, opening the "rails" for inserting the drive. Then put four screws with large, wheel-shaped heads into the side mounts of the drive, slide the drive into the "rails" and into the SATA and power ports in the backplane, then basically close off the rails with the thumbscrew. I wish there were a clearer way to explain it than that.
2.5" drives are simultaneously better and worse: mount four screws into the bottom of the drive with rubber grommets around them (broad grommet side against the drive itself), then insert it into the open holes at the bottom of the cage (or case) and push it back into place. In the cage, this will block off the bottom bay, while in the case itself it runs the risk of butting up against the video card. Either way, you're going to have to route cables around the top of the cage instead of from the back.
Finally, to mount a 5.25" drive, you need to unscrew two screws on each side of the enclosure's interior that hold the bay cover in place, slide the drive in from the front, screw the bay cover back on, and then screw in the drive. Phew.

This is all over-engineered, but the real problems have to do with the drive cage itself. While I was able to get things mounted without too much trouble, the cage actually blocks a tremendous amount of air from the front fan. Worse still, the extrusion on the left side of the cage, where the thumbscrew that locks the drives into place is, drastically limits the size of power supply you can fit into the case. Lian Li's spec page originally listed the case as being able to support a power supply 180mm in length, the length of our usual test PSU. That PSU just plain didn't fit; cables mushing up against the lip of the cage (along with the power supply itself) saw to that. I had to use a 160mm power supply from Corsair, the AX850, and even then the modular cable plugs drastically interfere with clearance. I also had to flip the power supply since most PSUs have the plugs closer to the side with the intake fan: that meant the intake was left with a small gap between it...and the side panel. No es bueno. There's a reason their spec page now lists the power supply clearance at 140mm, and you'll want to adhere to that requirement.
Finally, because of the monster cage, routing cables turns into a massive chore, and jimmying a video card into the enclosure (particularly our GeForce GTX 580) winds up being an exercise in brute force. This is, I think, the first enclosure I've seen where a modular power supply might actually be a bad idea. Not only that, but I feel like cramming an ATX power supply into a case design like this is just...unwise. I know Lian Li was going for an enclosure that can handle a top-of-the-line graphics card, but there are smaller power supply form factors that may have been more ideal for something like this. Deepening the enclosure an inch or two, moving to a smaller power supply form factor, and mounting it up behind the optical drive might have improved things. That, and a case with an airflow design like this one would benefit tremendously from even a tiny tower-style cooler on the CPU.


53 Comments
View All Comments
ronmccord - Sunday, February 2, 2014 - link
What a shame this review. Anyone serious about this case will do research first. "I'll admit I don't think our testbed represents a particularly good combination of components for a unique specimen like the TU200, " No one will try and run this case in the style of the author. If you read new egg reviews no one uses the drive cage and will find the right power supply and combinations of components. This review is certainly good info of what not to do. I am confident with the right power supply, drive cage removed and modern gpu installed this case will perform as well in general as other itx machines out there with a unique look and quality unmatched. This is one of the few cases you could have at home and then bring to work easily. Ditch the dvd drive and add a fan controller for example from Lian Li, they have one with one fan control know and adds a 2.5 cage! In aluminum or black color. Or an aluminum ventilation screen and other options. Get longer case feet, a sff modular power supply. In other words do everything right instead of wrong like in this review and you could have one special case!NA1NSXR - Friday, April 24, 2015 - link
You are right, I just did a paper build of this case and did all the research. You can kill two birds with one stone by using a SFX PSU and adapter bracket, which will free up space for air/cables and also get you some additional CPU heatsink clearance. In fact, you get enough additional clearance to go one step up on Noctua's offerings, to a L12, which definitely means extra clockspeed from OC headroom - maybe not up to 1.3V but definitely 1.2V in the 80C range. Also, a powerful 140mm like Noctua Industrial PPC 3000rpm can really be quite sufficient, even if GPU placement is somewhat cramped for breathing room.It's definitely a workable case. In fact I am pretty tempted by my paper build since I live overseas for work. This thing would work as a carryon easily.
n13L5 - Sunday, October 18, 2015 - link
I could actually make this thing smaller and achieve the goal of a portable Lan party box.Lian Li's problem here is not the size but the layout. Fortunately, their recent PC-Q10 is a good indicator that they have finally understood - after leaving the field pretty much to Silverstone & Co uncontested.