Lian Li PC-TU200: On the Road With Lian Li
by Dustin Sklavos on October 31, 2011 12:45 AM EST- Posted in
- Cases/Cooling/PSUs
- Mini ITX
- Lian Li
Assembling the Lian Li PC-TU200
On the ease of assembly continuum for cases, at one far end you have Corsair (really the brand in general): couldn't be any easier to put together short of including a technician to just do it for you. On the opposite end you'll have some of SilverStone's more exotic cases (such as the Raven RV03), but I have to say the benchmark has really been set: thus far, out of every case I've assembled, the Lian Li PC-TU200 has been among the hardest if not the hardest case to put together.


I don't expect a case this small to be a tool-less design, far from it. But while many of SilverStone's exotic designs feel like puzzles with elegant solutions reflected in the documentation they ship with, the TU200 oftentimes feels like a bit of a head scratcher, not at all dissimilar to the V353 we reviewed recently. Advance warning: newbies need not apply here, and if you're going to build in the TU200 it may behoove you to have it in mind before you even order the first component.
This is the first time I've ever consulted the instruction manual to figure out how to get the side panels off: remove the two thumbscrews in the back (at the top), and then press the levers and the panels pop out. It's kind of cool but not something you'd immediately expect. To Lian Li's credit, all of the mechanisms involved feel very secure and built to last.
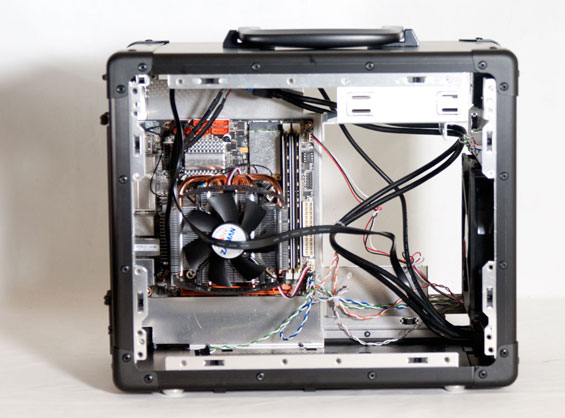
Their instruction manual will tell you to insert the I/O shield for the motherboard and then just pop the board in, but I found that there simply isn't enough clearance to get the motherboard in (at least not remotely easily) without completely removing the drive cage, a task that theoretically shouldn't be required if the included instructions are to be believed. That said, I'm always happy when the standoffs for the motherboard are already built into the tray, so once you can shimmy the board in and squeeze it up against the I/O shield, it's just a matter of getting the four screws in place.
After that, though, you get to what I'm convinced is the TU200's fatal flaw: the drive cage. I honestly feel like the way drives are mounted in the TU200 is just plain over-engineered. Here's how drives are supposed to mount, at least in theory: for 3.5" drives, you'll loosen the thumbscrew on the left side of the cage, in the extruded lip of the cage, then slide it up, opening the "rails" for inserting the drive. Then put four screws with large, wheel-shaped heads into the side mounts of the drive, slide the drive into the "rails" and into the SATA and power ports in the backplane, then basically close off the rails with the thumbscrew. I wish there were a clearer way to explain it than that.
2.5" drives are simultaneously better and worse: mount four screws into the bottom of the drive with rubber grommets around them (broad grommet side against the drive itself), then insert it into the open holes at the bottom of the cage (or case) and push it back into place. In the cage, this will block off the bottom bay, while in the case itself it runs the risk of butting up against the video card. Either way, you're going to have to route cables around the top of the cage instead of from the back.
Finally, to mount a 5.25" drive, you need to unscrew two screws on each side of the enclosure's interior that hold the bay cover in place, slide the drive in from the front, screw the bay cover back on, and then screw in the drive. Phew.
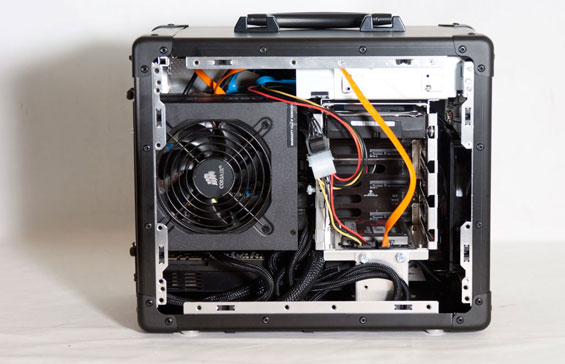
This is all over-engineered, but the real problems have to do with the drive cage itself. While I was able to get things mounted without too much trouble, the cage actually blocks a tremendous amount of air from the front fan. Worse still, the extrusion on the left side of the cage, where the thumbscrew that locks the drives into place is, drastically limits the size of power supply you can fit into the case. Lian Li's spec page originally listed the case as being able to support a power supply 180mm in length, the length of our usual test PSU. That PSU just plain didn't fit; cables mushing up against the lip of the cage (along with the power supply itself) saw to that. I had to use a 160mm power supply from Corsair, the AX850, and even then the modular cable plugs drastically interfere with clearance. I also had to flip the power supply since most PSUs have the plugs closer to the side with the intake fan: that meant the intake was left with a small gap between it...and the side panel. No es bueno. There's a reason their spec page now lists the power supply clearance at 140mm, and you'll want to adhere to that requirement.
Finally, because of the monster cage, routing cables turns into a massive chore, and jimmying a video card into the enclosure (particularly our GeForce GTX 580) winds up being an exercise in brute force. This is, I think, the first enclosure I've seen where a modular power supply might actually be a bad idea. Not only that, but I feel like cramming an ATX power supply into a case design like this is just...unwise. I know Lian Li was going for an enclosure that can handle a top-of-the-line graphics card, but there are smaller power supply form factors that may have been more ideal for something like this. Deepening the enclosure an inch or two, moving to a smaller power supply form factor, and mounting it up behind the optical drive might have improved things. That, and a case with an airflow design like this one would benefit tremendously from even a tiny tower-style cooler on the CPU.


53 Comments
View All Comments
lorribot - Monday, October 31, 2011 - link
The USB logo goes up on every USB socket except Dell Optiplex front connectors which for some reason have always been upside down.No one at Dell has ever been able to tell me why.
7Enigma - Tuesday, November 1, 2011 - link
Hmm, so since 90% of USB cables I seem to use are vertical rather than horizontal, is that to the left or the right? :)Golgatha - Monday, October 31, 2011 - link
Remove the drive cage entirely, put in a 4x2.5in to 5.25in adapter at the top of the tower, and make sure the main system fan is blowing over it. 7200rpm mechanical 2.5in HDDs are plenty fast for this type of application (especially if you put 2 in RAID0 or RAID1) and a bay for a SSD would be welcome. Optical drives are rarely needed anymore and you can bring an external USB optical drive with you if you end up needing one anyway.These major changes would allow for a full sized PSU and a high end graphics card, and you wouldn't have the heat issues to deal with due to more room for airflow. A 2x120mm fan configuration in the front and single 120mm fan in the back (the second 120mm fan in the back would be in the PSU) would be cool, quiet, and effective for any system you could dream up. I 2nd the idea of creating an Anandtech "by the enthusiast for the enthusiast" company. Let's do it and make millions.
superccs - Monday, October 31, 2011 - link
So what are the obvious things you do in the case of an ultra portable laptop?1 small HDD.... check.
no optical drive.... check.
Since this is not a laptop 2 HDDs sounds good (2.5 SSD + 2-3TB drive). A standard ATX PSU makes total sense since they are infinitely available and their added size is worth the stable and reliable power they provide.
Optical drive really? If you are trying to make a compact as possible box, make a half height 5.25 drive bay, or can the whole bay and let them plug in a USB drive if they need to.
Anyone want to go in to the case making business? I think that there are some definite opportunities. Lian Li keep trying.
Death666Angel - Monday, October 31, 2011 - link
I like the drive cage with the back plane, that's a nice touch. But I do ask myself, who here would use 4 3.5" drives in such an enclosure. If it were me, I'd pop the drive cage out and use it for something else. Best usage would be to install a radiator with the 140mm fan. Unfortunately, there is no AIO water cooling solution with 140mm radiators (as far as I know).Still, I always appreciate a small case. But I'd always go mATX in this day an age. Maybe when we hit 10nm CPU/GPU and a system uses 100W tops I can go with something this small. Until then I'll need the extra space for some quieter cooling. And I like to keep my options open of using an Intel PCIe NIC, sound card etc. Just 'cause.
miteethor - Monday, October 31, 2011 - link
I have two Lian-Li cases and they are hands down the best I've ever owned. I just feel bad that the first to Lian-Li's reviewed by this site are super-compact and apparently cumbersome and poor performing, because working in the larger chassis is pure pleasure. Maybe you should get one of the larger models to compare because it would be a shame for the last 2 reviews to be representative of this company.Dustin Sklavos - Monday, October 31, 2011 - link
I actually have two bigger Lian Li cases in house waiting to be reviewed, so things should pick up there.Knifeshade - Monday, October 31, 2011 - link
Any more smaller cases after those? I'm personally wondering what you think of the V354.martmann - Wednesday, November 2, 2011 - link
Good review, in general, but seeing as your review motherboard did not have a 20 pin USB 3 header for the front ports (just like most current mini-ITX boards), you would think it would be worth mentioning that there is no way to use the front USB 3 ports (except as USB 2 ports).You did point out enough faults to keep most from buying this case, but you missed that pretty big one. I bought a replacement front port cable that had 2 Male type A USB 3 connectors (to run to the back panel ports of my motherboard) to correct this, but it cost around $30 (shipped) LL P/N: PW-IE5H550.
TheGoodGeek - Thursday, November 3, 2011 - link
...Newegg didn't even have pics on the product page yet. I completely agree that this was the hardest (and most expensive) case I've ever used in a build. On the plus side, my spouse decided to put the quality to the test, and ran into the USB extension cord for the keyboard when I was testing the hookup to the big TV - a 3 foot drop onto concrete floors, and the only damage was to one of the side panel clips. No dents, no part failures. THAT's true durability, just what you need for travel. (And yes, I've now got a bluetooth keyboard!)I did, however, have to go back to the drawing board when my temps were simply unacceptable with the initial build. I switched to a modular Silverstone power supply with shorter cables, and swapped out the CPU cooler, and now it's fine.
I've been on about an hour and a half, and currently the system as at:
Chassis Fan 976 rpm
CPU fan 1687 rpm
Motherboard 31C
CPU 28C
I took a lot of pics during the build and re-build, but have been too lazy to post them in the forum. I'll get to work.