Corsair Obsidian 650D: Transmuting Graphite to Obsidian
by Dustin Sklavos on July 29, 2011 1:05 AM EST- Posted in
- Cases/Cooling/PSUs
- Corsair
- mid-tower
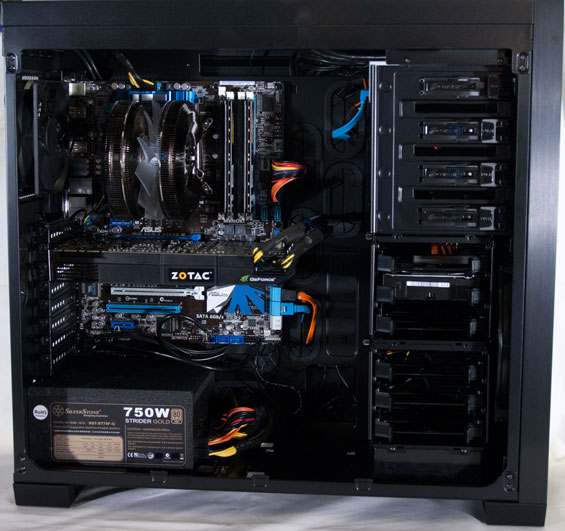
Assembling the Corsair Obsidian 650D
Amusingly, installing the testbed into the Corsair Obsidian 650D gave me a serious case of Groudhog Day (the movie). I'm so used to working inside the 600T, and the 650D's internal layout is nigh identical.
First, installing the motherboard was a breeze. I've been championing pre-installed motherboard standoffs for a while and Corsair delivers, with standoffs in place for a standard ATX board. Not just that, but the centermost standoff isn't a standoff at all, but a nub that will actually help hold the board in place and makes lining the rest of the mounting holes up a breeze. It's a simple addition that goes a long way towards easing the process.


Once again, with installing drives, ease of use is the name of the game. There's a tool-less mechanism that snaps into place when you install a 5.25" drive in one of the four external bays; to remove the drive, just push the lever down and the drive pops out. It's nice and secure, but just in case, there are also easily accessible mounting holes on the opposite side of the bay. The drive trays for 2.5"/3.5" drives are just as easy to use: they're plastic with four metal nubs surrounded by rubber, and the trays flex open to accept 3.5" drives and lock them into place. They also snap in and out of the drive cage with just the right amount of resistance. For mounting a 2.5" drive you'll need to use screws, but there are holes in the bottom of each tray explicitly for this purpose. It's not as easy as mounting a 3.5" drive, but I have yet to see a better 2.5" drive mount in an enclosure.
The vented expansion slot covers are held in place by thumbscrews, and are simple enough to remove. Installing our Zotac GeForce GTX 580 was a breeze, and the extra expansion slot at the bottom below the motherboard is such a welcome feature that I wish it was included in more enclosures: even the 650D's big brothers (the 700D and 800D) don't have it. I actually use the one in my 600T, having placed my secondary card (a GeForce GT 430) in the bottom-most slot. The card's cooler is a half a slot too wide, but fits in just fine in the 600T and would be perfectly fine here as well.
Getting the power supply in place required a bit of finagling as it almost always does, but in the end it wasn't too difficult. In fact the worst part of the entire installation is the same thing it's always been: routing cabling, specifically power cables. I feel like the opening in the motherboard tray next to the power supply for routing cables is actually a bit too small and this is one place where a revision would be appreciated. Still, getting all of the power cables routed was a bit more painless than it usually is, and with the ports of the 2.5" and 3.5" drives facing behind the motherboard tray, all of the data and power cables are lined up neatly and kept behind the tray.
Installing the testbed in the 650D reminded me of just how clean Corsair's internal design for it and the 600T really is, and you can really see it in our photos. Space behind the motherboard could be a hair more generous but is still ample, and the interior of the 650D remains remarkably clean. In fact my 600T with two occupied optical drive bays and all six drive trays occupied is still an extremely tidy build. Corsair's engineers made things as easy to keep neat as they conceivably could, and it shows.


36 Comments
View All Comments
mscrivo - Wednesday, July 11, 2012 - link
you're crazy if you can't hear the noise. I just bought one of these cases, and 2 days in, its driving me nuts. Its more than audible, especially compared to my old P180B.ooostephen - Saturday, January 14, 2012 - link
same here. i tossed some 'vent filters' used for air conditioners, in the front, and that made a noticeable diff. it also helps keep the dust out.DanNeely - Friday, July 29, 2011 - link
Even if the cooling worked well, this would be a killer for me. It looks ugly, and most mobos are coming with a header now for an internal connection making the kludge obsolete.LtHawkins - Saturday, July 30, 2011 - link
I just built a system and got around this by connecting the USB3 expansion panel that came with my motherboard to the mobo header, then connected the 650D USB3 connector to that, but I'm keeping it all internal - I tucked the panel into one of the external drive bays that I'm not using. Won't work for everyone, but if you have a spare drive bay, theres no reason to have wires come poking out the back of the case.Locklear - Friday, July 29, 2011 - link
Seem to remember Corsair stating that they would release a substitute frontpanel which has usb3 internal header connections instead of the current one. This one will be available on their web-shop. No idea about the timeframe though.darckhart - Friday, July 29, 2011 - link
free replacement? or paid? i hate how some charge you for something that it should have come with in the first place. (i'm looking at you evga and your high flow brackets for the 580s)Locklear - Friday, July 29, 2011 - link
As far as i remember it's not a free replacement, as it's not a defect. The case (and all other cases with usb3 front ports i know of) was designed like this because internal usb3 headers on motherboards were not that common when it was designed, so they opted for a "universal" solution instead.There are ways to work around the problem with things like this http://www.bitfenix.com/global/en/products/accesso...
But I agree.. It's not the ideal solution.
Goty - Friday, July 29, 2011 - link
Solution for negative pressure: simply turn the exhaust fan in the top of the case around. I built a PC for my father in this case and it works just fine.Wieland - Saturday, July 30, 2011 - link
That will get rid of the negative pressure, but it will introduce other airflow problems, inefficiencies.That intake will be right next to the only exhaust so a lot of the air it blows in will go straight back out of the case. This cold air will take up some of the capacity of the exhaust fan and make it less efficient.
The top fan is oriented almost directly opposed to the airflow coming from the front of the case, and the opposing airflows will probably create some dead zones. If you have a big tunneled heatpipe cooler oriented front-to-back (like my Kingston XT-1264), it will push air around and away from it.
With that big open vent on the top and positive air pressure there's bound to be some recycled hot air. The fan filter they removed will now be an absolute necessity to keep out dust.
EJ257 - Thursday, August 11, 2011 - link
I have the HAF932 with a similar fan setup. I really think the big fan on top is a great idea because the heat likes to collect near the top of the case. I turned the back fan around so its acting as an intake too and I haven't had issues with it. So now the airflow is front/back intake, top exhaust.