Intel Z68 Chipset & Smart Response Technology (SSD Caching) Review
by Anand Lal Shimpi on May 11, 2011 2:34 AM ESTThe problem with Sandy Bridge was simple: if you wanted to use Intel's integrated graphics, you had to buy a motherboard based on an H-series chipset. Unfortunately, Intel's H-series chipsets don't let you overclock the CPU or memory—only the integrated GPU. If you want to overclock the CPU and/or memory, you need a P-series chipset—which doesn't support Sandy Bridge's on-die GPU. Intel effectively forced overclockers to buy discrete GPUs from AMD or NVIDIA, even if they didn't need the added GPU power.
The situation got more complicated from there. Sandy Bridge's Quick Sync was one of the best features of the platform, however it was only available when you used the CPU's on-die GPU, which once again meant you needed an H-series chipset with no support for overclocking. You could either have Quick Sync or overclocking, but not both (at least initially).
Finally, Intel did very little to actually move chipsets forward with its 6-series Sandy Bridge platform. Native USB 3.0 support was out and won't be included until Ivy Bridge, we got a pair of 6Gbps SATA ports and PCIe 2.0 slots but not much else. I can't help but feel like Intel was purposefully very conservative with its chipset design. Despite all of that, the seemingly conservative chipset design was plagued by the single largest bug Intel has ever faced publicly.
As strong as the Sandy Bridge launch was, the 6-series chipset did little to help it.
Addressing the Problems: Z68
In our Sandy Bridge review I mentioned a chipset that would come out in Q2 that would solve most of Sandy Bridge's platform issues. A quick look at the calendar reveals that it's indeed the second quarter of the year, and a quick look at the photo below reveals the first motherboard to hit our labs based on Intel's new Z68 chipset:
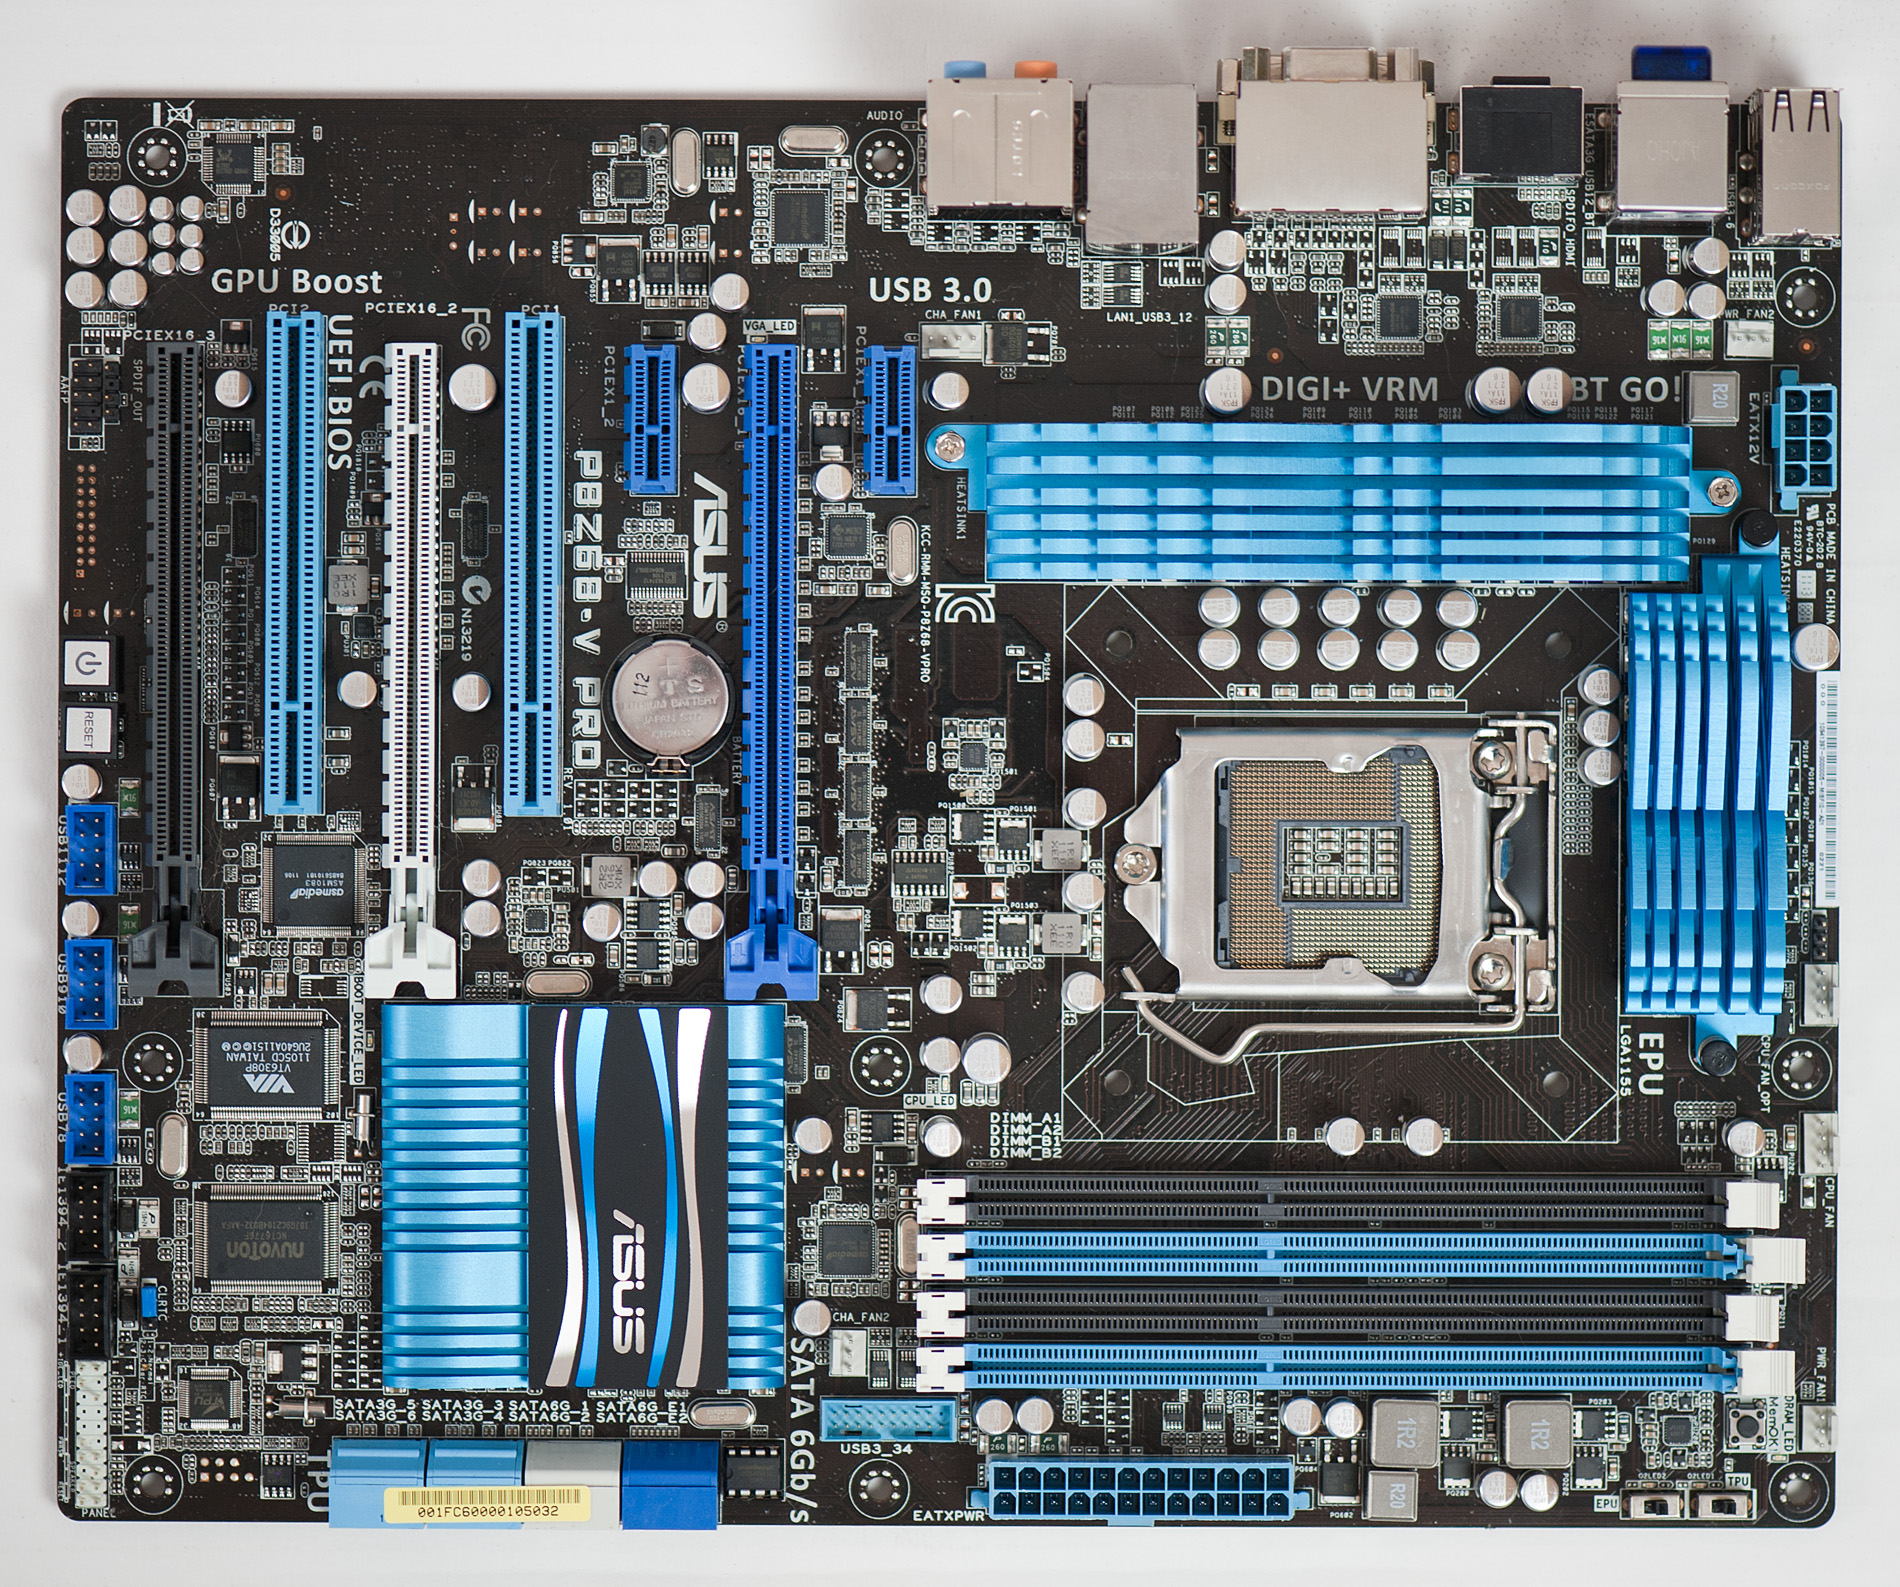
ASUS' P8Z68-V Pro
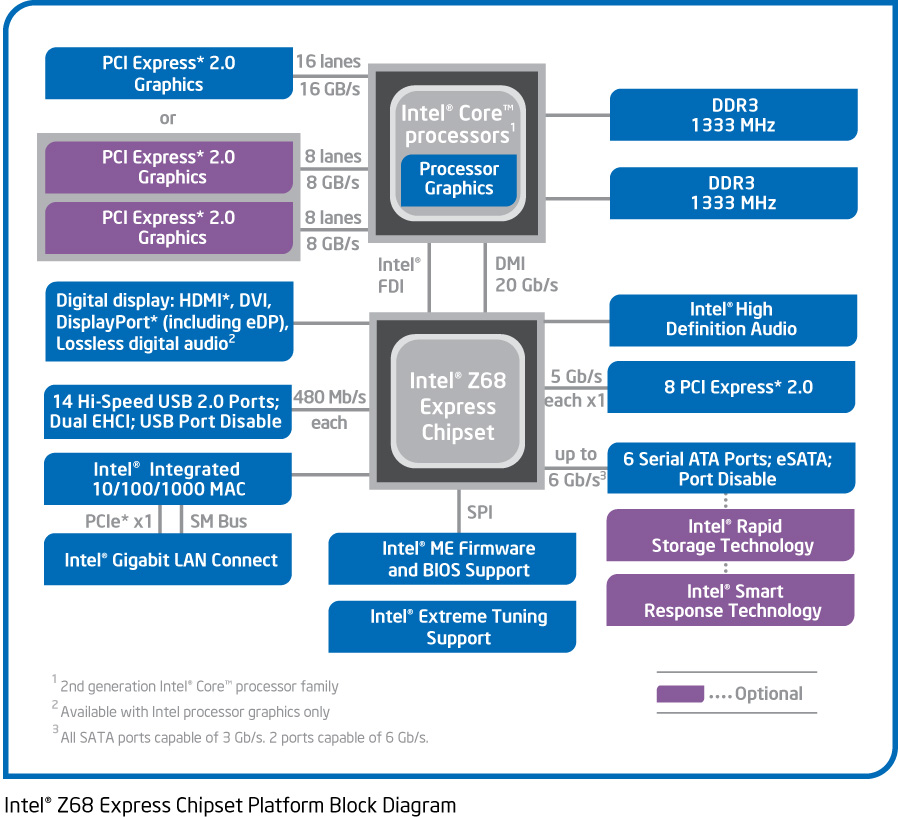
Architecturally Intel's Z68 chipset is no different than the H67. It supports video output from any Sandy Bridge CPU and has the same number of USB, SATA and PCIe lanes. What the Z68 chipset adds however is full overclocking support for CPU, memory and integrated graphics giving you the choice to do pretty much anything you'd want.
Pricing should be similar to P67 with motherboards selling for a $5—$10 premium. Not all Z68 motherboards will come with video out, those that do may have an additional $5 premium on top of that in order to cover the licensing fees for Lucid's Virtu software that will likely be bundled with most if not all Z68 motherboards that have iGPU out. Lucid's software excluded, any price premium is a little ridiculous here given that the functionality offered by Z68 should've been there from the start. I'm hoping over time Intel will come to its senses but for now, Z68 will still be sold at a slight premium over P67.
Overclocking: It Works
Ian will have more on overclocking in his article on ASUS' first Z68 motherboard, but in short it works as expected. You can use Sandy Bridge's integrated graphics and still overclock your CPU. Of course the Sandy Bridge overclocking limits still apply—if you don't have a CPU that supports Turbo (e.g. Core i3 2100), your chip is entirely clock locked.
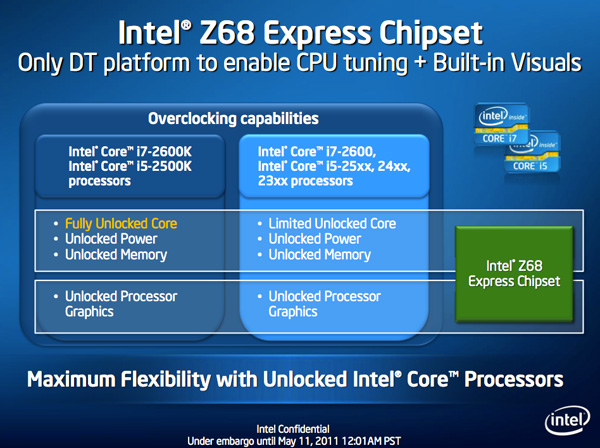
Ian found that overclocking behavior on Z68 was pretty similar to P67. You can obviously also overclock the on-die GPU on Z68 boards with video out.
The Quick Sync Problem
Back in February we previewed Lucid's Virtu software, which allows you to have a discrete GPU but still use Sandy Bridge's on-die GPU for Quick Sync, video decoding and basic 2D/3D acceleration.
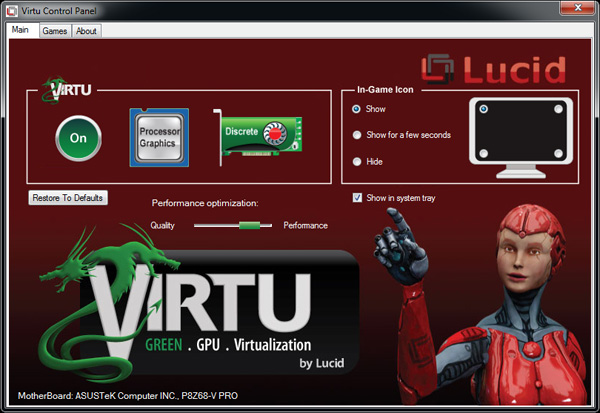
Virtu works by intercepting the command stream directed at your GPU. Depending on the source of the commands, they are directed at either your discrete GPU (dGPU) or on-die GPU (iGPU).
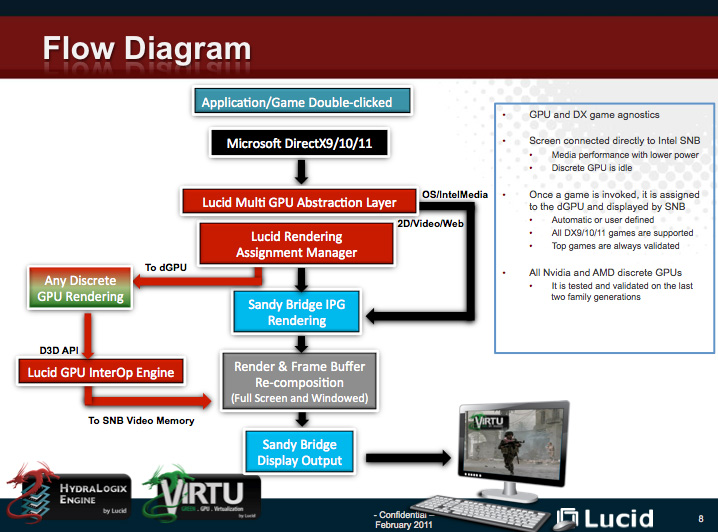
There are two physical approaches to setting up Virtu. You can either connect your display to the iGPU or dGPU. If you do the former (i-mode), the iGPU handles all display duties and any rendering done on the dGPU has to be copied over to the iGPU's frame buffer before being output to your display. Note that you can run an application in a window that requires the dGPU while running another that uses the iGPU (e.g. Quick Sync).
As you can guess, there is some amount of overhead in the process, which we've measured to varying degrees. When it works well the overhead is typically limited to around 10%, however we've seen situations where a native dGPU setup is over 40% faster.
| Lucid Virtu i-mode Performance Comparison (1920 x 1200—Highest Quality Settings) | |||||||
| Metro 2033 | Mafia II | World of Warcraft | Starcraft 2 | DiRT 2 | |||
| AMD Radeon HD 6970 | 35.2 fps | 61.5 fps | 81.3 fps | 115.6 fps | 137.7 fps | ||
| AMD Radeon HD 6970 (Virtu) | 24.3 fps | 58.7 fps | 74.8 fps | 116.6 fps | 117.9 fps | ||
The dGPU doesn't completely turn off when it's not in use in this situation, however it will be in its lowest possible idle state.
The second approach (d-mode) requires that you connect your display directly to the dGPU. This is the preferred route for the absolute best 3D performance since there's no copying of frame buffers. The downside here is that you will likely have higher idle power as Sandy Bridge's on-die GPU is probably more power efficient under non-3D gaming loads than any high end discrete GPU.
With a display connected to the dGPU and with Virtu running you can still access Quick Sync. CrossFire and SLI are both supported in d-mode only.
As I mentioned before, Lucid determines where to send commands based on the source of the commands. In i-mode all commands go to the iGPU by default, and in d-mode everything goes to the dGPU. The only exceptions are if there are particular application profiles defined within the Virtu software that list exceptions. In i-mode that means a list of games/apps that should run on the dGPU, and in d-mode that is a smaller list of apps that use Quick Sync (as everything else should run on the dGPU).
Virtu works although there are still some random issues when running in i-mode. Your best bet to keep Quick Sync functionality and maintain the best overall 3D performance is to hook your display up to your dGPU and only use Sandy Bridge's GPU for transcoding. Ultimately I'd like to see Intel enable this functionality without the use of 3rd party software utilities.


106 Comments
View All Comments
KayDat - Wednesday, May 11, 2011 - link
I know this bears zero relevance to Z68...but that CGI girl that Lucid used in their software is downright creepy.SquattingDog - Wednesday, May 11, 2011 - link
I tend to agree - maybe if she had some hair it would help...lolRamarC - Wednesday, May 11, 2011 - link
Seems that it would be better to designate a partition to be cached and other partitions uncached. With only a 20GB cache SSD, ripping from BD to .MP4 could easily cause cache evictions.And, will this work with a mixed Rapid Storage array? I typically run hard drives in pairs, and mirror (raid 1) the first 120GB and stripe the remaining so I've got a fault-protected 120GB boot device and a 1700GB speedster. In this case, I'd only want the boot device cached.
ganeshts - Wednesday, May 11, 2011 - link
This looks like a valid concern. For HTPCs, there is usually a data partition separate from the boot / program files partition. Usage of the SSD cache for the data partition makes no sense at all.velis - Wednesday, May 11, 2011 - link
I agree with validity of this proposal, but must also comment on (non)sensicality of caching the data partition:I for one was disappointed when I read that multi-MB writes are not (write) cached. This is the only thing that keeps my RAID-5 storage slow. And a nice 32GB cache would be just the perfect thing for me. That's the largest I ever write to it in a single chunk.
So instead of 100MB/s speeds I'm still stuck with 40 down to 20MB/s - as my raid provides.
Still - this is not the issue at all. I have no idea why manufacturers always think they know it all. Instead of just providing a nice settings screen where one could set preferences they just hard-code them...
fb - Wednesday, May 11, 2011 - link
SRT is going to be brilliant for Steam installs, as you're restricted to keeping all your Steam apps on one drive. Wish I had a Z68. =)LittleMic - Wednesday, May 11, 2011 - link
Actually, you can use a unix trick known as symbolic link to move the installed game elsewhere.On WindowsXP, you can use Junction,
On Windows Vista and 7, the tool mklink is provided with the OS.
jonup - Wednesday, May 11, 2011 - link
Can you elaborate on this or provide some links?Thanks in advance!
LittleMic - Wednesday, May 11, 2011 - link
Consider c:\program files\steam\...\mygame that is taking a lot of place.You can move the directory to d:\mygame for instance then you can use the command
vista/7 (you need to be administrator to be able to do so)
mklink /d c:\program files\steam\...\mygame d:\mygame
xp (administrator rights required too)
junction c:\program files\steam\...\mygame d:\mygame
to create the link.
The trick is that steam will still find its data in c:\program files\steam\...\mygame but they will be physically located on d:\mygame.
Junction can be found here :
http://technet.microsoft.com/fr-fr/sysinternals/bb...
LittleMic - Wednesday, May 11, 2011 - link
Update : see arthur449 suggestion.Steam mover is doing this exact operation with a nice GUI.