AnandTech Guide to Better Photos: Night Photography
by Stephen Caston on February 18, 2005 12:05 AM EST- Posted in
- Digital Camera
Index
Welcome to our latest guide to better photos. This time we are going to take a look at some ideas and techniques behind night photography. Other than your digicam, one of the most important tools that you will need to take good night pictures is a way to stabilize your camera. Obviously, the easiest way to do this is with a tripod. You can get a basic tripod for about $20 from most stores that sell cameras. If you aren't a big fan of carrying around a large tripod, mini tripods can be found for under $20 that fit in your pocket or camera bag. If for some reason you really hate the idea of carrying a tripod at all, you can still take great night shots with a little creativity. For example, you could place your camera on a low wall with a flat top, your car (turn off the engine to reduce vibrations), the ground, etc. The most important thing is that your camera remain completely still during the exposure. If you are using a makeshift stabilizer, you will probably need to prop up part of the camera to get the image framed the way you want it. We've all done this before when taking group pictures with the self-timer; you can use anything that's lying around: a jacket, keys, a twig, etc. We highly recommend a tripod, though, just because it's easier to set up and keep stable.Before taking a picture, the first thing that you will want to consider is how long your exposure will be. There are several reasons for asking this question, but the most important one has to do with selecting your ISO setting. With all digital cameras, a higher ISO setting will result in more noise than a lower setting. However, the benefit of a high ISO is that it enables you to use a faster shutter speed. If you are planning on shooting a long exposure, there is no point in using a high ISO setting (unless you like the effect of a noisy image). If you really need a fast shutter speed, the chances are pretty high that you will have to increase the ISO to get an acceptable speed. Fortunately, there are some noise reduction techniques that you can use later to clean up the images (we will discuss this in a bit). In addition, many digicams today have noise reduction processing built in. Check your digicam's manual; it may appear as a menu item (Ex: NR On, Off) or as an automatic process when the shutter speed exceeds a specific length.
If your digicam offers manual exposure controls, such as aperture-priority, shutter-priority, and manual, you will find a greater degree of control over your pictures than those with Auto or "scene" modes. First, let's discuss aperture priority. In order to let in as much light as possible, you will want to set the aperture to the lowest possible setting. If you are in a bright area like a well-lit city and you want a long exposure, you may have to "stop" the aperture down (choose a higher f number) in order to achieve a slower shutter speed. However, most people prefer to use shutter-priority mode when shooting night images. With shutter-priority, you simply select the shutter speed that will give you the amount of motion (or lack thereof) that you want while the camera adjusts the aperture. Either way, you will want to make a decision about the ISO setting before shooting. Otherwise, you might be surprised to find a ton of noise ruining your otherwise beautiful night shot.
If your camera does not offer manual exposure controls, you may be at the mercy of your camera's preset shooting modes such as "night scene" or "long exposure". If the images don't look good with those preset modes, try applying an E.C. (exposure compensation) to adjust the exposure. If your camera simply doesn't allow long exposures, it might be time to invest in a more advanced model. Otherwise, you will be restricted to brighter locations and shorter shutter speeds.
You can use different white balance settings to create different effects. Unlike daylight photography, choosing the wrong white balance setting may have a desirable effect. For example, many streetlamps use tungsten lights, which give off a strong yellowish glow. If you were to set your camera to tungsten WB to correct for this yellowish cast, the resulting image may not look quite right. However, setting the camera to Auto may yield a yellowish cast that captures the scene as you remember it. Different color casts can evoke different moods in images. For example, a yellowish cast has a warming effect while a bluish cast has a cooling effect. With fluorescent light, many Auto WB systems will record a greenish cast. While you could set the camera to correct for this, you might find that it adds a certain mood to leave the color cast there. In the picture below, we prefer the warm yellow cast from the Auto WB setting as opposed to the cooler, correctly-balanced image on the right.
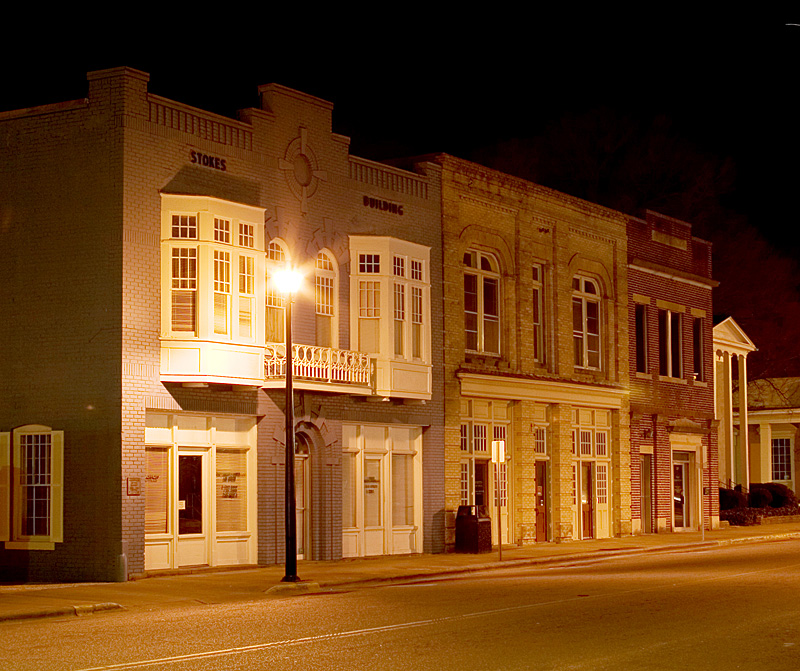 Auto WB |
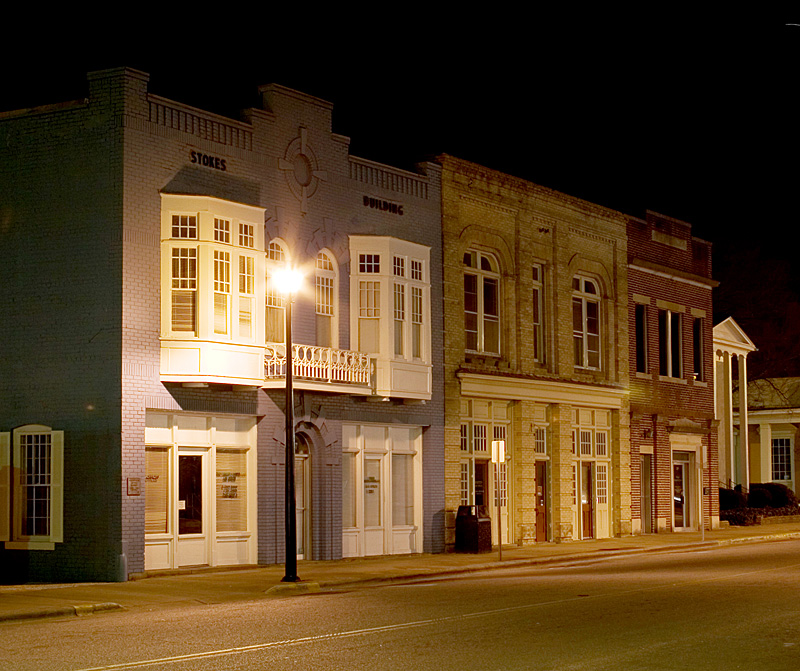 Tungsten WB |
| Click on images to enlarge. | |
If your camera has a raw recording option, we highly recommend using it for night photography. By shooting raw files, you can adjust the white balance later without compromising image quality. Now, let's take a look at noise reduction.


20 Comments
View All Comments
sxr7171 - Saturday, February 19, 2005 - link
You can find upto 30 secs on all the Canon S and SD series point and shoot digital cameras.AtaStrumf - Saturday, February 19, 2005 - link
That flashlight trick is realy neat. You can also use a flashlight to illuminate just parts of the scene or to outline certain objects like cars and stuff.Night and dusk photos are great fun to do, but the problem that I have is picking the best digicam (not DSLR) for long exposures. As far as I have seen FUJI seems to be the best in terms of noise, but I really don't know for sure. Exposures longer that a few seconds are also not that easy to find in a compact digicam. And then there's the problem of apertures, ...
Suggestions anyone?
Jeff7181 - Friday, February 18, 2005 - link
Maybe a "choosing a digital camera" article would be a good addition to the series? Explain the features... include photos take with different features. That's what I've always looked for but never found when shopping for a digital camera. Sure, a 5 MP camera will take a more detailed photo than a 3 MP camera... but how MUCH more detailed? Would it matter to me? Stuff like that is hard to find answers to unless you can take two cameras side by side, shoot the picture, and examine the results yourself.shuttleboi - Friday, February 18, 2005 - link
Good article, but you fail to mention the importance of the digital camera's sensor size. The Canon 10D that you have (as well as my 300D) has an APS-C size sensor, much larger than those found in point-and-shoot digital cameras, resulting in MUCH less grain and noise during night shots. If you are shooting with high ISO, then the grain will be unacceptable. Long-exposure shots will also have pretty bad grain.shuttleboi - Friday, February 18, 2005 - link
How about reviewing the Epson P-2000 and the Archos AV400 as digital storage devices, like I've been suggesting the last 7 months?Vinney - Friday, February 18, 2005 - link
steve - awesome article, esp. because i've been waiting to do some shots similar to the cars on I-40 .. now i have no more excuses to delay.. (well except for all the ones i keep telling myself)Poser - Friday, February 18, 2005 - link
Thought it might be worth mentioning the open source photoshop imitator, GIMP here. Windows binaries are available, and it provides a zero cost way of doing many of the things photoshop can do.http://www.gimp.org
Jeff7181 - Friday, February 18, 2005 - link
Ok... gotcha... I didn't mean RIGHT under the lense, but wasn't sure if the ideas was to heat/light the air just in front of the lense or what. I understand now, thanks.HauntFox - Friday, February 18, 2005 - link
This is just what I needed, I been wanting to take some night photos :Dstephencaston - Friday, February 18, 2005 - link
Please don't hold a lighter under your lens! :-) The idea is to stand several feet in front of your camera and use a flashlight or lighter to "draw" in the air. This light will be recorded by the camera and can look really cool. A flashlight doesn't necessarily have to be pointed directly into the lens; pointing the light somewhere in the direction of the camera will work. Pointing the light directly at the lens will create a lens flare effect if thats what you want. There really are no rules for this type of thing, but its a fun creative way to paint with light. I hope this helps to clarify.