AnandTech Guide to Better Photos: Composition
by Stephen Caston on November 19, 2004 12:05 AM EST- Posted in
- Digital Camera
Simplicity, ROT, Lines & Curves
Simplicity
Before discussing ways to compose an appealing image, you must first have a clear idea of what you are shooting. Before framing a shot, ask yourself, "What is/are my primary subject(s)?" By asking this question, you should also begin to understand what you are not shooting. For example, look out for distracting scenery or objects that might compromise the prominence of your primary subject. By mentally defining your subjects and "non-subjects", believe it or not, you have already begun composing your shot. Now, you can begin framing your image in the viewfinder or LCD screen.One of the first ideas that we will discuss is to simplify the arrangement so that your viewer's eyes are immediately drawn to the subject. For example, you do not want a bunch of excess clutter around the edges of the frame that simply would detract attention from the main subject. One way to remove unnecessary clutter is to change your shooting position or to use your camera's zoom. In the example below, the image on the left has a significant amount of clutter on the bottom of the frame. Additionally, there are some distracting bits on the left and right sides. In this circumstance, we were unable to move closer to eliminate the clutter. However, we did have the ability to zoom in further to achieve the more striking and simple image on the right.
 |
 |
In the image below, we have employed another commonly used simplification method - simply, to fill the frame. By doing this, we have effectively eliminated elements that could be in competition with the subject. Other than moving or zooming to exclude objects, you can also eliminate background clutter by selecting a large aperture setting on your camera. As a result, you create a small depth-of-field, thereby blurring the background and detracting attention from it.

In any case, simplifying your composition will make your pictures much more effective. It gives the viewer's eyes an easier time of finding your subject, which also means instant impact.
Rule of Thirds
 |
Below is an example of the ROT in action. Notice that the eyes and head of the subject are centered at the upper-right intersection.

Hold mouse over image to see ROT lines
The ROT can also be used in composing landscape shots by placing the horizon along one of the lines. In this example, both the tree and the horizon are situated on the lines.
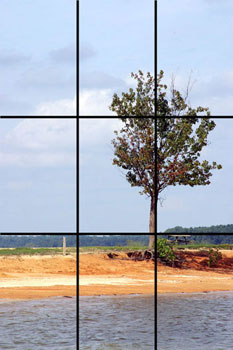
Hold mouse over image to see ROT lines
To see more pictures that use the ROT as an underlying compositional tool, take a look at some of your favorite pictures. You will probably find that the imaginary ROT lines are at work in many of the pictures you find appealing. In most circumstances, pictures with subjects along the ROT intersections/lines simply look better than other pictures. You should by no means take this "rule" to be the ultimate decider of good pictures; the ROT is simply a common compositional tool. Do some experimentation with the ROT in your own pictures. Whether or not you choose to use it as a primary compositional tool, you should at least be aware of its presence.
Lines and Curves
Lines and curves can be used to direct attention to subjects and to give form to a picture. You will find lines everywhere as you are out shooting. If you are aware of them, you can incorporate them into your compositions to improve your pictures. Below are two examples of how lines can be used: |
 |
In the first image, the lines formed by the mountains lead into the main subject (the tree and chairs). In addition, the tree branches themselves bring attention down to the lower right portion of the frame. In the second image, the fallen tree and the railroad track lead the viewer's eye to the subject in the upper-left corner. Another great way to make your pictures interesting is to use curves. Below is an example using the popular "S" curve.
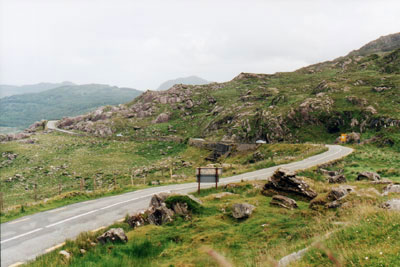
In the picture above, the "S" curve, along with the downward slope of the hill, add a certain dynamic to the picture that gives the viewer a sense of movement and rhythm. There are many who think that the "S" curve makes for the most beautiful pictures. At the very least, any camera-wielding photographer would be hard-pressed to pass up the opportunity to shoot one of these curves.


25 Comments
View All Comments
Maverick2002 - Friday, November 19, 2004 - link
I have to agree with #5. It's a good beginner's guide, nothing more.Jeff7181 - Friday, November 19, 2004 - link
I found it very informative... like #10, I find my pictures are usually boring and I'm not creative at all. Most photography sites don't discuss the basics of composition. The pictures I take that turn out good are mostly by accident... I'm the type who centers whatever I'm taking a picture of and snaps the picture. Or if I'm taking a picture of something larger like a landscape, I just point and shoot without giving much thought to what's in the picture. I'm not REALLY into photography obviously, but when I do take pictures I'd like them to look nice.yelo333 - Friday, November 19, 2004 - link
Very nice pointers...do you happen to have higher res versions of the photos? I especially liked the ladybug&stop sign for some reason...If you don't mind emailing them(I'd only use them for personal use, like wallpaper), my email is gmeena at gmail dot com.
WooDaddy - Friday, November 19, 2004 - link
#11 said it.This is who the article was for. Not the rest of us camera jockeys who can go through a roll of 36 in 30 minutes.
CurtOien, if you really want to get into it, take a camera course at your local community college. Also, check out "Photography" by Barbara London. It's the photography student's textbook.
And remember, just keep on taking pictures and examining them. That's how you get good at it.
CurtOien - Friday, November 19, 2004 - link
I’m not a professional photographer or even close to it. I very much appreciated the article. It makes me want to go out and buy a digital camera It costs too much money to click away and experiment with film.ChrisSwede - Friday, November 19, 2004 - link
I agree with #5 that this will not make you a professional photographer. But, for someone like me that struggle to take good pictures and do not have a single creative/artistic bone in me, it gives me some hints on how to improve picture quality and get a little excited about taking pictures./Chris
Calin - Friday, November 19, 2004 - link
#5, you are completely right. However, I am glad for this article as I didn't knew not even a single thing in it. Yes, I am not a photographerCalin
skunklet - Friday, November 19, 2004 - link
i was hoping u guys gave up on these photography articles...kcma - Friday, November 19, 2004 - link
#6brilliant idea!! eat the mattress!! i like them BBQed.
Dustswirl - Friday, November 19, 2004 - link
You can't explain how to sleep to an insomniac but you can show him a bed.