Overclocking The AMD Ryzen APUs: Guide and Results
by Ian Cutress & Gavin Bonshor on April 16, 2018 2:30 PM ESTOverclocking Methodology
To achieve the overclocks on our test setup, only a small selection of the settings were changed.
Overclocking the CPU
Firstly, we adjust the CPU ratio. The APUs have a 'base frequency' of 100 MHz, and to get the final frequency, the CPU ratio acts like a multiplier (it is often called the CPU multiplier as well). For our testing, to show some underclocking as well as overclocking, we start with a CPU ratio of 30x on all cores. This gives us a floor frequency of 3.0 GHz to start with, and we get a stable voltage and work up from there. At 3.0 GHz, we adjust the CPU voltage to find the lowest setting that remains stable for our testing.

Now the CPU testing rises up like a staircase. If the CPU is stable, raise the ratio by one, and retest stability. If the system is not stable, then add +0.025 volts to the CPU, and retest. Repeat until stable. When stable, raise the ratio again. Repeat until the stress tests hit a thermal limit.
As a result, we get this nice graph when it comes to testing:
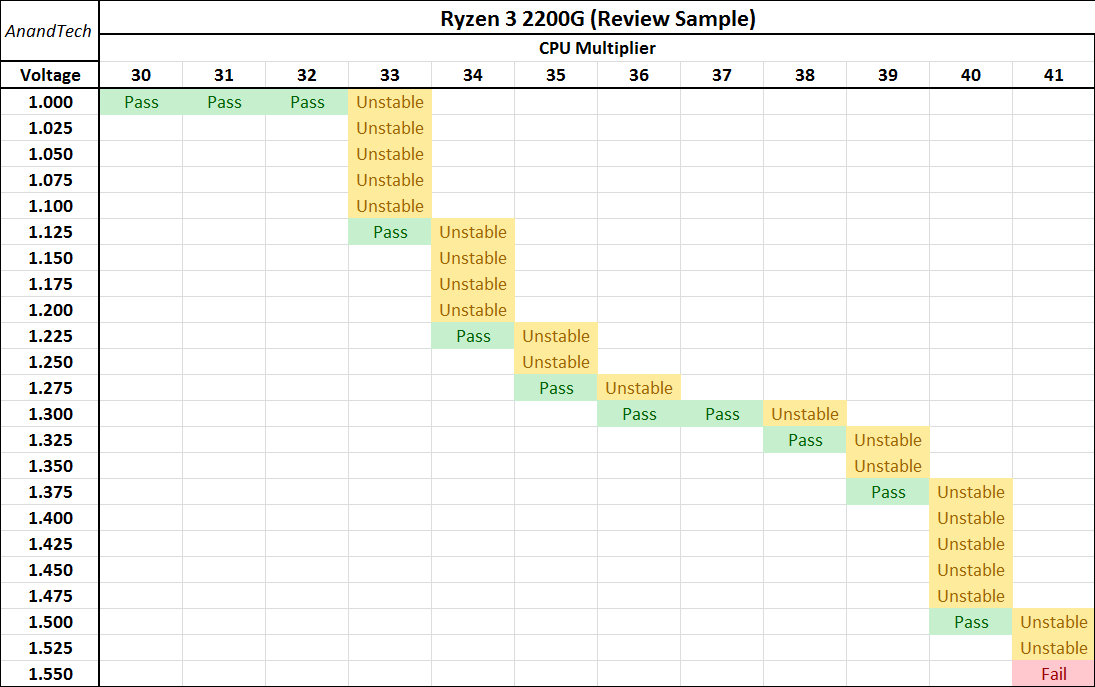
The last fail at the end was due to temperature - the Ryzen family of processors, due to the manufacturing process, seem to have a distinct hard limit on CPU frequency. This hard limit means that a lot of voltage is required just to move up one on the frequency ratio - we can see here that the jump from 39x to 40x required six more stops on the voltage curve. At this point, it would be prudent to select the 39x multiplier for more of a 24/7 daily system, which for the Ryzen 3 2200G is a reasonable core overclock, especially as we test will all CPU cores at this frequency.
Overclocking the Memory
The performance of the memory overclock is dependent on two things: the capability of the memory controller in the processor, and the capability of the memory itself. Either one can present a limit to overclocking, and it can be difficult to diagnose which on is a limit without testing with either a different memory kit or a different CPU.
The memory controllers of the Ryzen APUs are rated to DDR4-2933 out of the box, meaning that with verified memory, the system should happily run at this speed under 'JEDEC' sub-timings (JEDEC being the standard). Memory manufacturers sell memory faster than this, and the easiest way to 'overclock' the APU is by buying a memory kit that has a high speed. Users can then install the kit, and use the BIOS to apply the memory profile (because high speed kits are not enabled automatically). As long as the memory controller in the processor can handle the memory, all is well. However these high-speed memory kits are often very expensive.
Memory comes with two main parameters: frequency and sub-timings. For daily overclocking, DDR4 is quite reasonable in that most memory kits have roughly the same sub-timings, but differ more in frequency, and it is easier to adjust the frequency. Sub-timings are complicated, but AnandTech posted a big analysis on this in 2010. It is worth a read to get a more detailed look:
Everything You Always Wanted to Know About SDRAM (Memory): But Were Afraid to Ask
For our memory overclocking, we are using G.Skill's DDR4-3600 memory kit, with 17-18-18 sub-timings. For each of our processors in our stack that would do this out of the box, it would instantly giving a sizeable boost from the rated DDR4-2933 or from any cheap DDR4-2400 memory kit. Our G.Skill kit actually offers two different XMP profiles on-board, one with DDR4-3333 and the other at DDR4-3600, with the same latency timings.
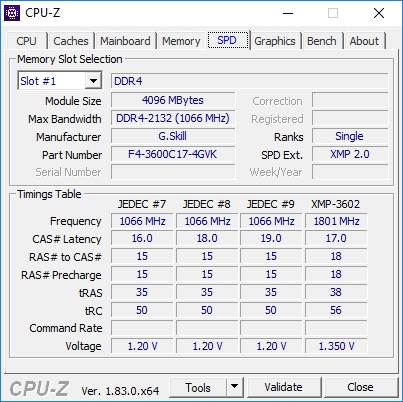
For the DDR4 standard, three different memory voltages are defined. The regular voltage for most memory kits is 1.20 volts, while high-speed memory kits are given 1.35 volts. There are also low powered kits at 1.05 volts. Overclocking the memory is similar to that on the CPU - the memory ratio/multiplier can be adjusted in conjuction with the voltage. However unlike a CPU, thermal limits of the memory are not often the limiting factor, but the ability of the memory itself or the memory controller on the processor. This can be hard to determine - for most daily overclocks we recommend a safer voltage around 1.35-1.40 volts and to work within those means. Pushing too much voltage through the memory controller is not something that the processor can recover from as easily, like an unstable CPU overclock.
In our testing, due to a limitation on the integrated memory controller on our Ryzen 3 2200G ($99) samples, we would need to push voltages beyond levels considered safe at DDR4-3600, so we opted to go with the first profile with speeds of DDR4-3333. While all of the other settings in regards to memory were left untouched, the only one that was changed was the DRAM voltage, (called VDDIO voltage on the board we used). It was changed to match the specifications of the applied XMP profile, just to ensure the voltage remains stable during operation.
Overclocking the Graphics
When it comes to gaming, the GPU frequency is likely to matter the most, As with the other two parts of the processor, the main goal here is frequency and voltage. Overclocking the GPU is a little different for frequency, as the options allow for a 1 MHz granularity, rather than dealing with ratios or multipliers. It comes down to pushing the frequency, adjusting the voltage, finding the stability point, and repeating. In this case we usually raise the GPU voltage by 50 MHz each time, then dialling the overclock back when we hit a hard limit.
I managed to push the integrated Vega cores on our Ryzen 3 2200G sample to 1360 MHz, with a maximum recommended SoC/GPU voltage of 1.25V. Coming from a 1100 MHz turbo frequency, this is almost a 25% overclock. Other overclocks have been reported to hit higher, some even reaching 1450MHz in some cases. The limiting factors in integrated graphics usually come down to the capabilities of the chip and the power delivery mechanism: some motherboards are not geared towards integrated graphics, due to the regular Ryzen processors not having any, and as such built more towards discrete graphics solutions.
Note - As with all overclocking on the Ryzen 2000 series APUs, we would recommend the processes to be done individually with stress and stability testing done at each stage, etc. CPU overclock, stability test, RAM overclock, stability test, graphics overclock, stability test and so forth. This way allows for a process of elimination to be carried out if one of the overclocks fails during stability testing, although this isn’t an exact science, it is more than likely that the last changed setting is the one that needs adjusting in relation to the component you’re currently overclocking.
Some Results from CPU Overclocking
For each of our CPUs, we used the method listed up top to see the limits in CPU frequency. One of the concerns with readers that follow the tech press quite closely is that for launch day reviews the CPU manufacturer might send out 'golden samples' - processors that overclock very well. The danger here is that they might not be representative of what a user will get, and the journalist might give the product a favorable review when the retail situation is actually quite different.
Most manufacturers that sample the press, either CPU, motherboard, DRAM, power supplies, do some level of internal testing on samples before sending them out. There is no point shipping a 1200W power supply around the world that is dead on arrival, for instance. Every time we get an MSI motherboard, it comes with a certificate of pre-testing: someone in the PR team has put in a chip, run a few basic 3DMark tests, and given it a tick. That makes common sense - it saves time and money for all concerned.
The issue comes with pre-launch hardware. Normally a section of the tech press (not all, and how many depends on the company involved) get access to the hardware in advance. Sometimes, in order to be timely with articles, these are engineering samples and not full retail products. Big companies are likely to test these samples before leaving in more ways than one: if they know that 80% of the products can overclock to a certain frequency, they are going to make sure that none of the other 20% are sent out: the goal of the PR is to put the product in the best possible light. It is up to the tech press and the journalist to determine how much weighting they should give to a single, solitary overclock score (in our view, not much if any). If a journalist is raving about overclock performance from testing one processor, something should fire up a red flag. But is that the fault of the manufacturer that sampled, or the journalist?
Obviously the best way to solve this is to get a retail sample. Some tech press who don't get samples will buy it and then test, although that misses the boat on 'day one' reviews (some media don't care much about day one reviews). As stated above, sending out untested retail samples, even if they were available to the PR team early, might not be the best way for the PR team to 'showcase' the product, especially if it ends up DoA. There will be some testing, and we cannot get away from it.
So for this article, we decided to have our small run of processors. We have two that came from AMD before the launch, and obtained two after the launch in sealed retail boxes. There was a small difference, but not a big one by any means.
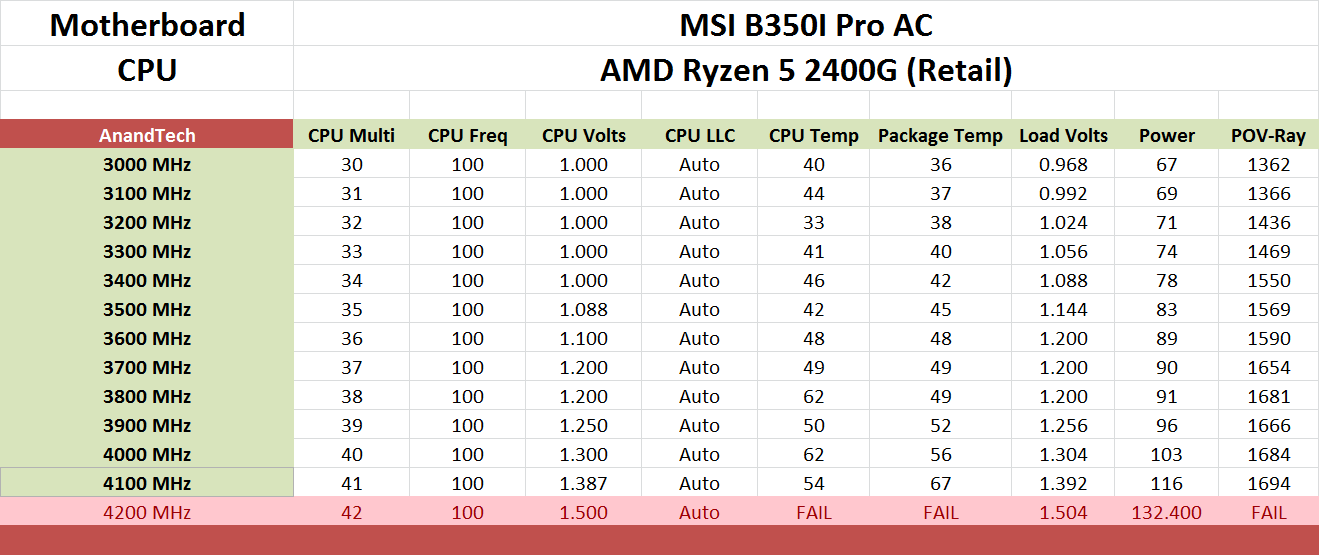
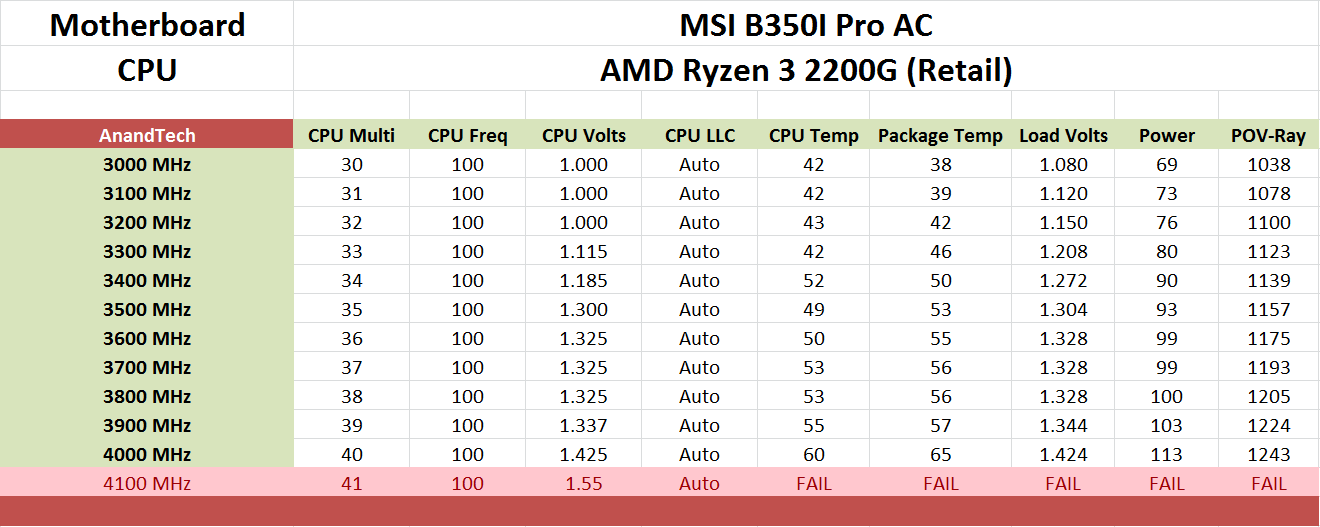
Launch Samples
Both CPUs were tested in the MSI B350I Pro AC.
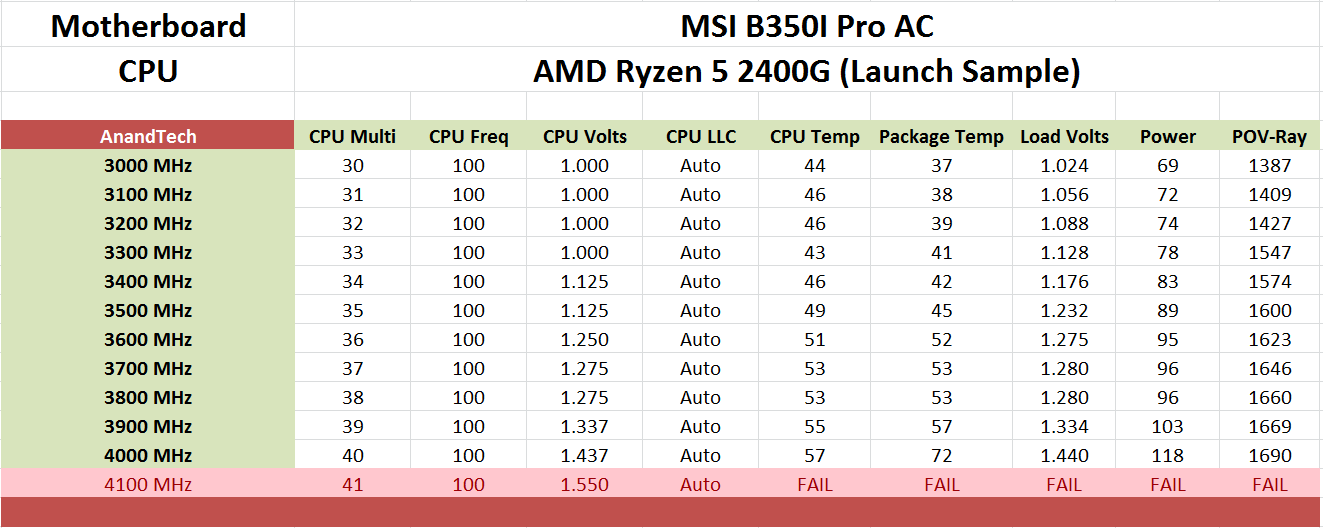
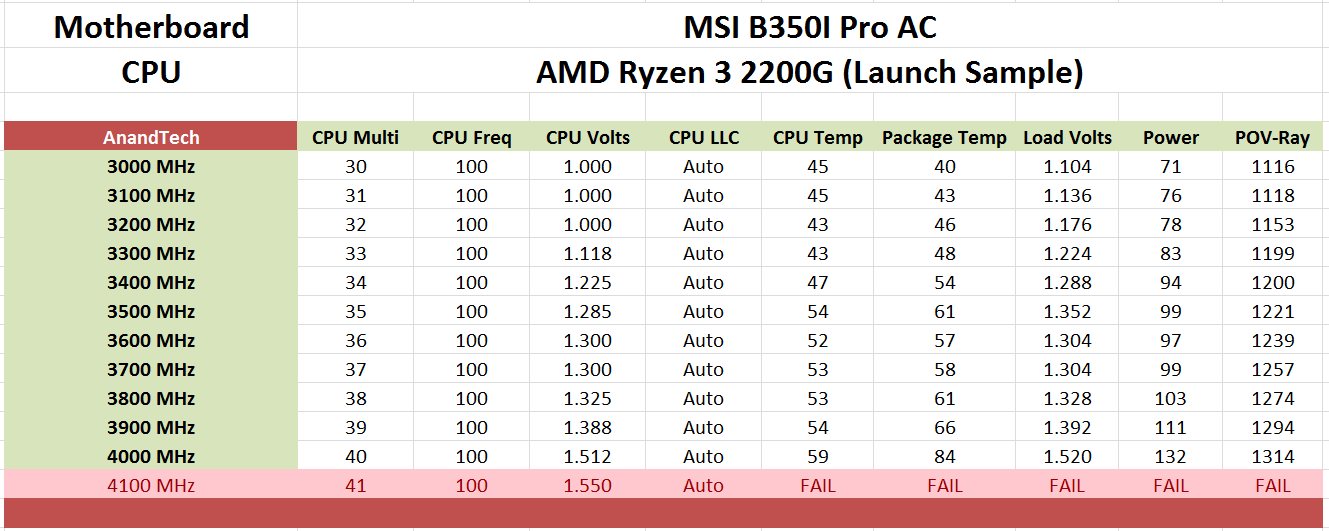
Both of our luanch samples hit 4.0 GHz, although the Ryzen 3 2200G required a lot more voltage to get there. The Ryzen 5 2400G also had lower power consumption across the board, and lower temperatures, despite having two threads per core. This shows that it was the better binned chip from AMD.
Retail Samples
Both CPUs were tested in the MSI B350I Pro AC.


63 Comments
View All Comments
jjj - Monday, April 16, 2018 - link
Yet to fully read the article but P-state OC and baseclock OC are nice if you can avoid entering OC mode that way, at least with Ryzen. No idea what works and what doesn't with RR, haven't kept up on it but do care about that with Pinnacle Ridge.RarG123 - Monday, April 16, 2018 - link
Look at this: https://www.gamersnexus.net/guides/3251-raven-ridg...So SoC (seemingly 2D clocks) voltage should be left at ~1.1V, and GFX (seemingly 3D clocks) voltage should be at ~1.2V max in order to remain within safe limits in all scenarios. This might have changed with the latest BIOSs but until such time that it's tested, it's better to err on the side of caution.
Also for anyone with HWMonitor, if some data points aren't getting displayed correctly, give HWInfo a shot it's more Ryzen friendly.
Lolimaster - Tuesday, April 17, 2018 - link
For true OC check techepiphany on youtube.eastcoast_pete - Monday, April 16, 2018 - link
Good and informative article. I had planned to build an HTPC setup around the 2400G, alas both the 2200 and 2400 seem to be falling short on the home theater side (4K HDR playback at 60p using MPC-HC with madVR). If this has changed, please correct me, with the link to the source showing that they are now able to do so - Thanks!Somewhat related: I would be interested to see how far one can undervolt the 2400G CPU and GPU and still get stable sort-of stock performance. [yes, I know - there's always at least one who has to be contrarian - still chasing the quiet setup]
JoeyJoJo123 - Monday, April 16, 2018 - link
I'd recommend just using MPV. The visual gains that the MadVR scaler uses can be extremely taxing on the GPU, depending on the settings used. With good MPV settings it literally looks 95% as good as MPC-HC + MadVR looks, at a fraction of the computational intensity, ie: less fan noise while playing back media, which you'll hear when playing back content.Lolimaster - Tuesday, April 17, 2018 - link
You always need to config the fans rpm, I lock my CM Hyper 212+ to 600-800rpm, dead silent.Lolimaster - Tuesday, April 17, 2018 - link
Undervolt helps achieving that without worrying about load temps.Lolimaster - Tuesday, April 17, 2018 - link
There's a reddit post (just google it)2400G system stock 105w
undervolted 75w
:D
eastcoast_pete - Tuesday, April 17, 2018 - link
Thanks! According the pictures posted on reddit, undervolting a 2400G resulted in almost stock performance (less than 5% difference vs. stock, and only one benchmark, but still, promising) and an almost 25% reduction in Wh drawn for the entire setup; he used a kill-a-watt Wattmeter.Just like some people here and on reddit, I wonder if the new MoBo chipsets could allow fine-tuning, so for GPU-limited games, undervolt the CPU, and use the ~ 10-25 Wh thermal headroom gained to overclock /overvolt the GPU. Doing so might even work just with the stock cooler. Has anybody tried? Ian, can you try it?
eastcoast_pete - Tuesday, April 17, 2018 - link
Sorry, meant to address both of you: Ian, Gavin, can you try it?