The NZXT N7 Z370 Motherboard Review: A New Player in the Motherboard Market
by Joe Shields on January 9, 2018 12:00 PM EST- Posted in
- Motherboards
- Intel
- NZXT
- Coffee Lake
- i7-8700K
BIOS
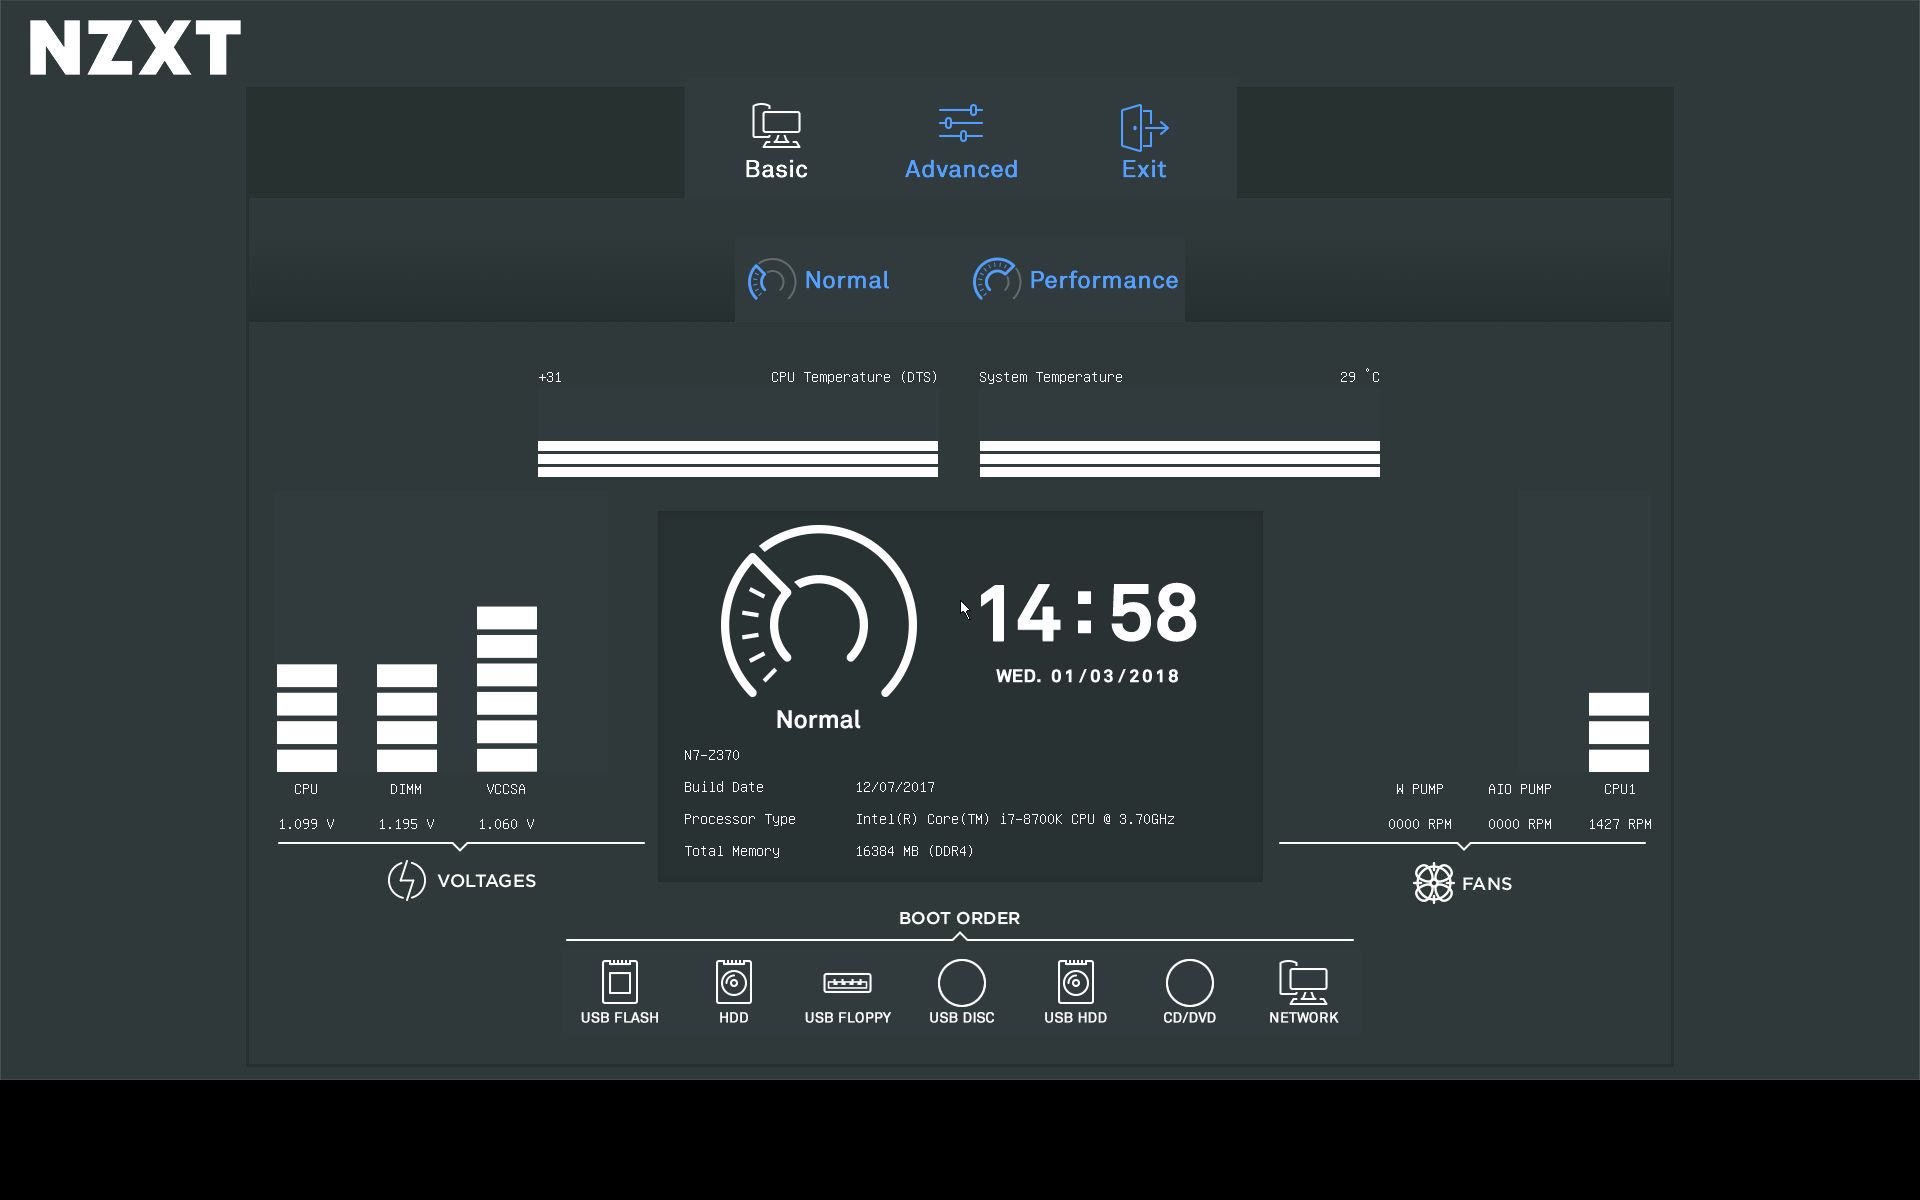
Being this is NZXT's first crack at motherboards, I wasn't sure what to expect from the BIOS in both appearance and functionality. It, like many others, starts users off in an 'EZ Bios' type of screen that is more informative than it is functional. The overall appearance of the BIOS is very basic with a flat grey background with white and blue writing.
In the middle part of this dashboard we see the mode (default normal), it is on date/time as well as information about the BIOS version, installed process, and total memory. TO the left and right are simple block graphs showing voltages (left side) and RPM speed devices connected to headers. In this case, it displays the CPU and both pumps. System fans did not make the cut here. Above that we see two presets for the system, normal and performance. The performance mode really didn't seem to do much, but we will get into that later. The bottom of the BIOS lists boot order which we can configure from this screen via mouse and clicking and dragging the icons to change the order.
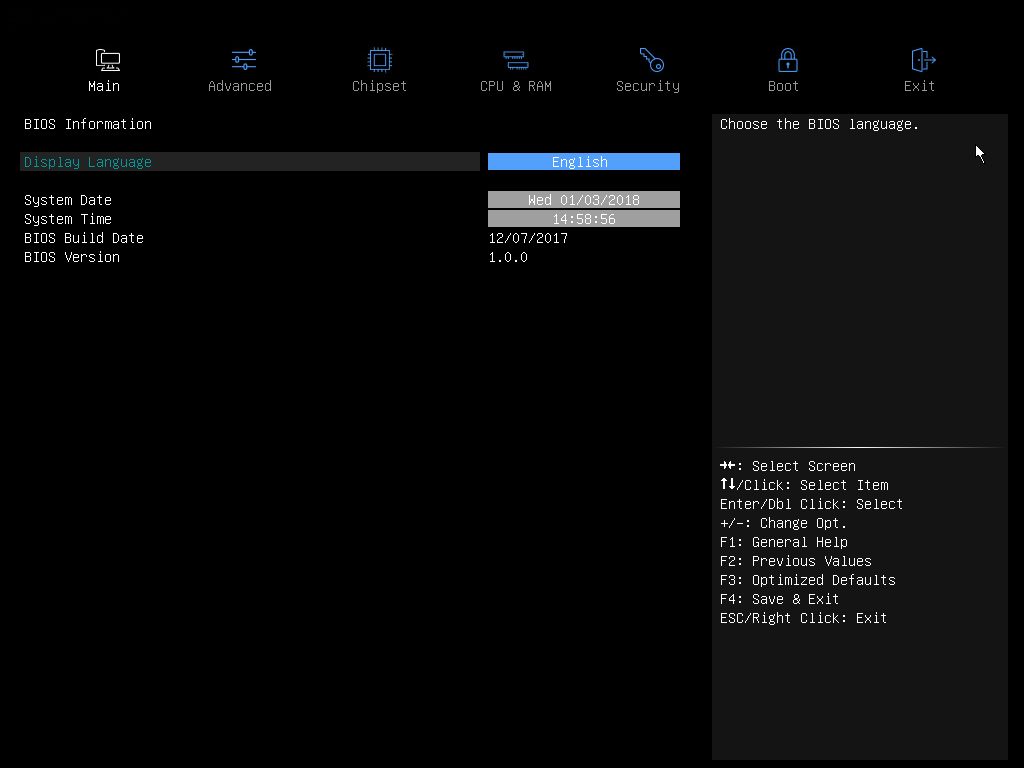
The first BIOS screen we see is the Main heading containing information about the system date/time as well as the BIOS build date and version. The only option one is able to edit here is the display language.
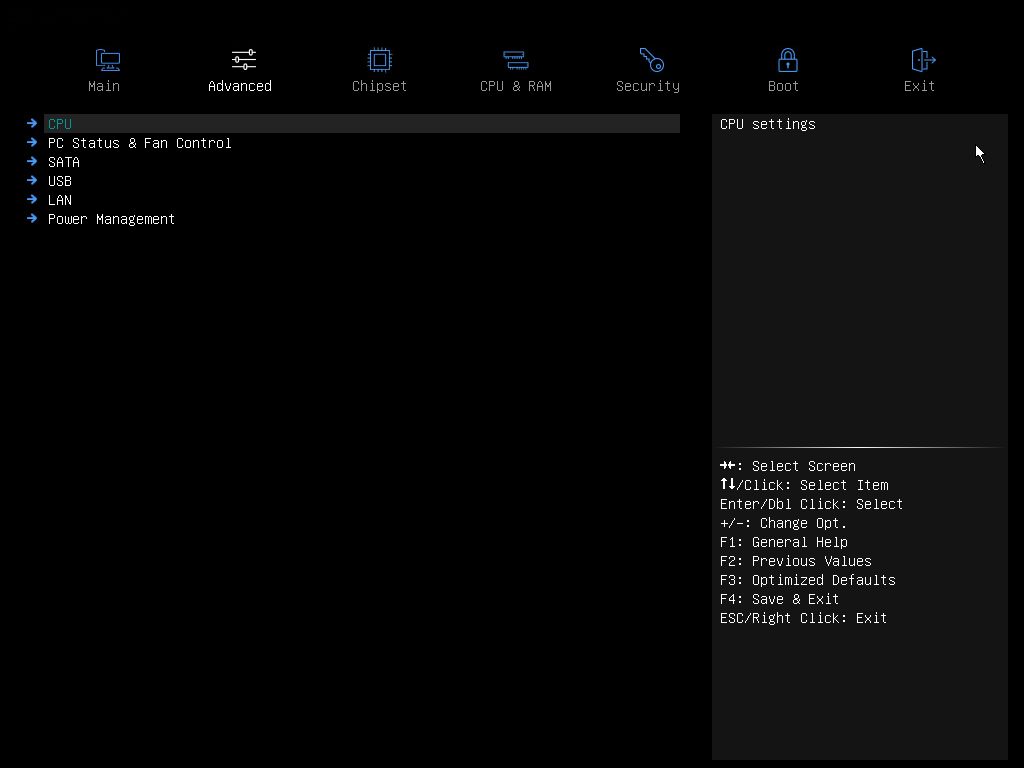
Next across the top is the advanced heading displaying six options underneath. The CPU header holds functionality such as enabling/disabling Hyperthreading, virtualization, and Speedshift/C-state options. The PC Status and Fan Control section display information regarding CPU and System temperatures as well as fan/pump header RP values and voltage for the Core, DRAM, and VCCSA. The SATA, USB, and LAN sections display information on the connected devices and are where users will switch modes (SATA) or disable ports (USB/LAN). Inside Power Management users are able to set wake and resume functions and set sleep states among other options.
The chipset header is where to find options for the integrated graphics, PCH, and Intel ME functionality. The integrated graphics section has only one option in there to enable a mixed multi-monitor mode using a discrete card and the iGPU on Coffee Lake CPUs. The PCH section contains an option to disable/enable HD Audio, while the Intel ME simply has an enable/disable function for Management Engine Technology.

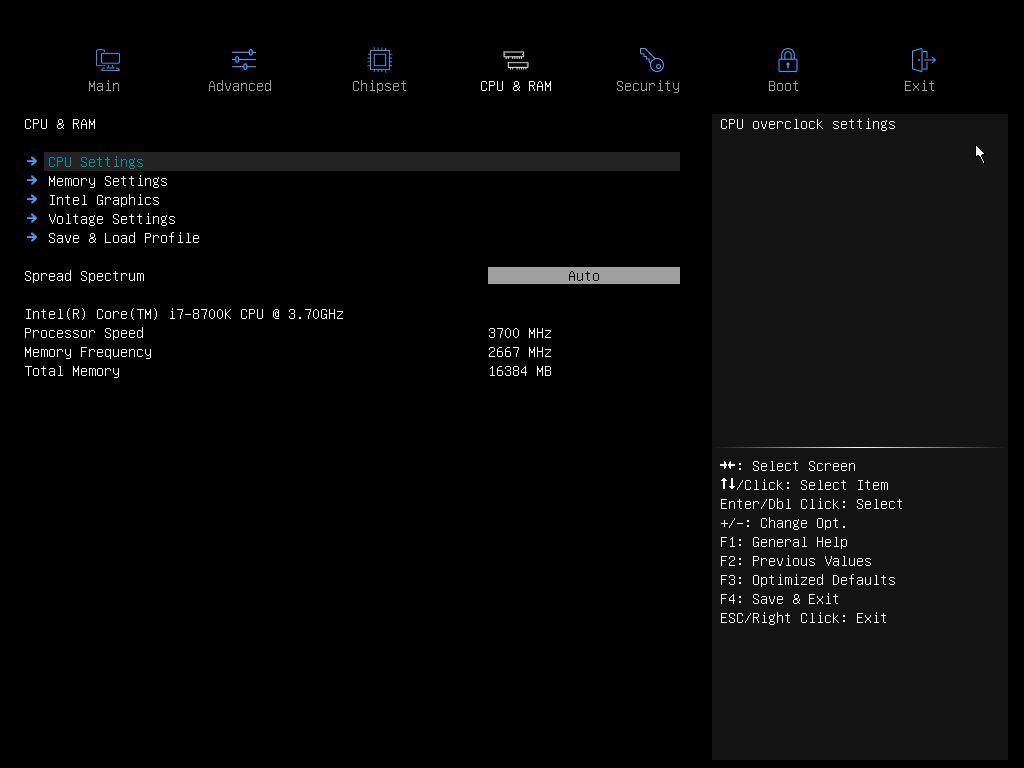
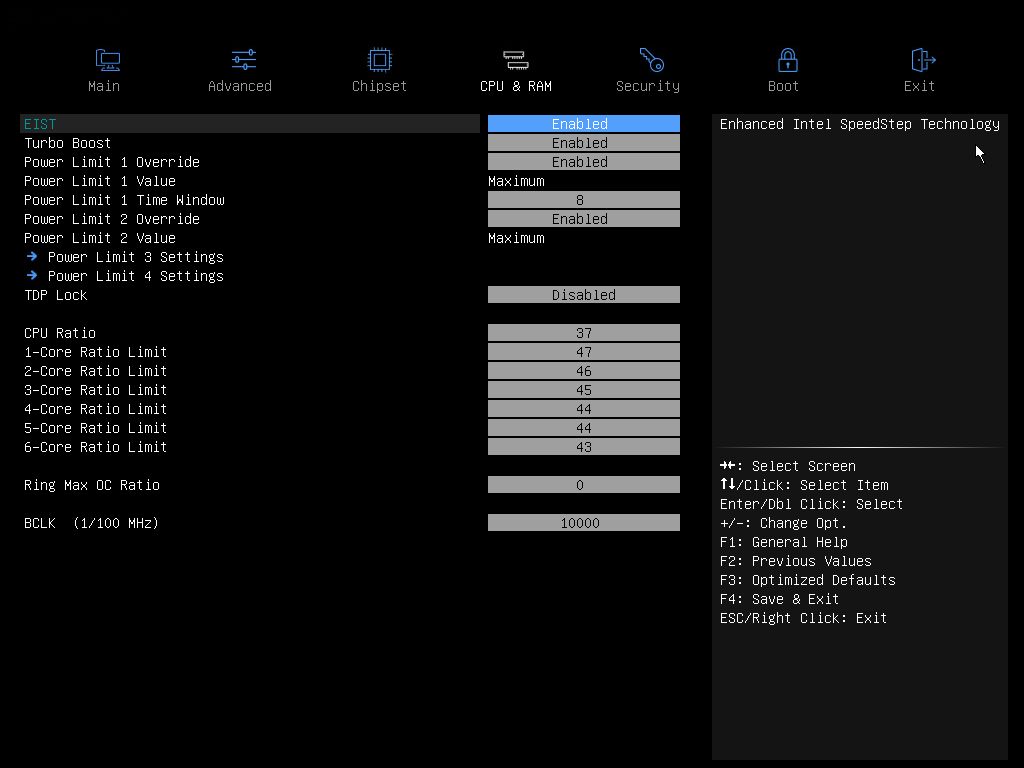
The CPU & RAM section contains all the options needed to mess with your CPU, Memory, iGPU, and voltage settings. In other words, this is where the overclocking happens. The CPU section (2nd image below) displays all the options for overclocking the CPU parameters. Anything from power limits and EIST to CPU core and ring ratio, as well as BCLK. Contrary to what one may think, or at least what I thought it should be, the CPU ratio does not control all cores. When I set this to 4.3 GHz to start it still ran at lesser speeds. The trick to all cores is to manually change all the core ratio limits. Not the most efficient way, but certainly workable.
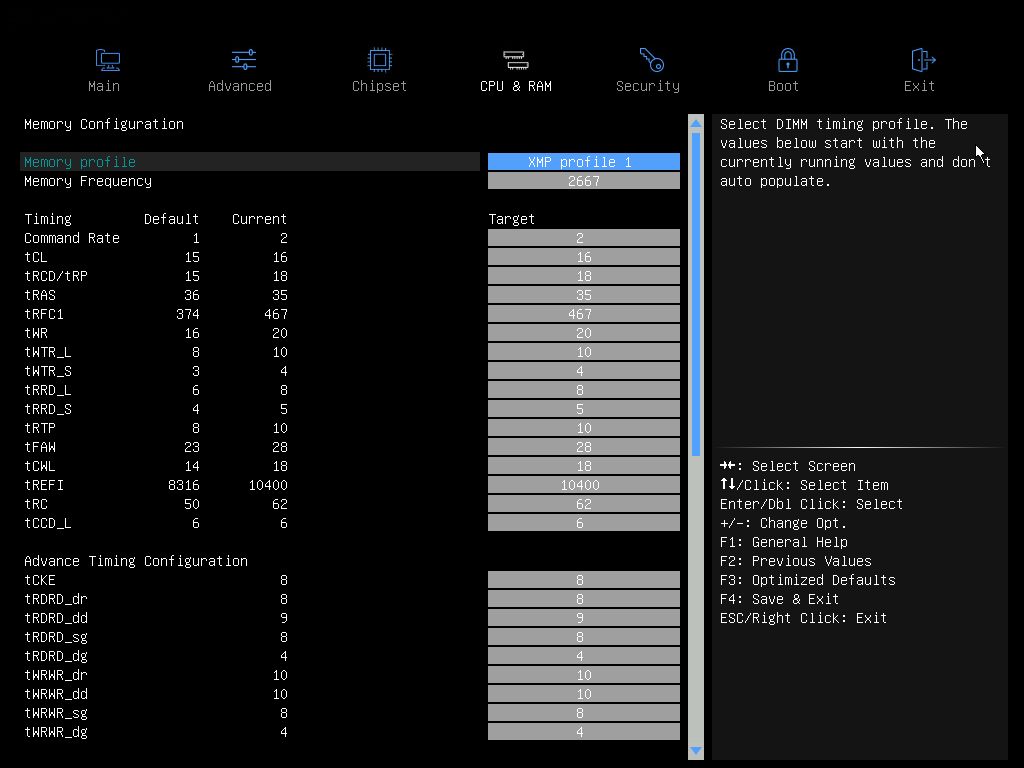
The Memory Settings (3rd image down) is where to enable XMP settings or memory speed and timings. There are plenty of timings to adjust from the primaries listed up top, to the secondary timings below. I didn't have any issues setting XMP on the DDR4 2666 I used during testing.
The Voltage settings screen (4th image) is where to change CPU, VCCSA, VCCIO, Uncore, and DIMM voltages. These are the only options available. This is really all one needs for ambient overclocking, however, there are other motherboards with more options. When setting the voltage manually, it sppears there is still some kind of adpative voltage control in effect and will raise the voltage as the CPU Ratio goes up (stopping at 1.4V/4.6 GHz). More details on that in the overclocking section but it did make it a challenge to overclock 'properly' (least amount of voltage needed to be stable at a given clock). The BIOS doesn't have any adpative/offset voltage options to change so we used the voltage offset in the CAM software to mitigate the issue.

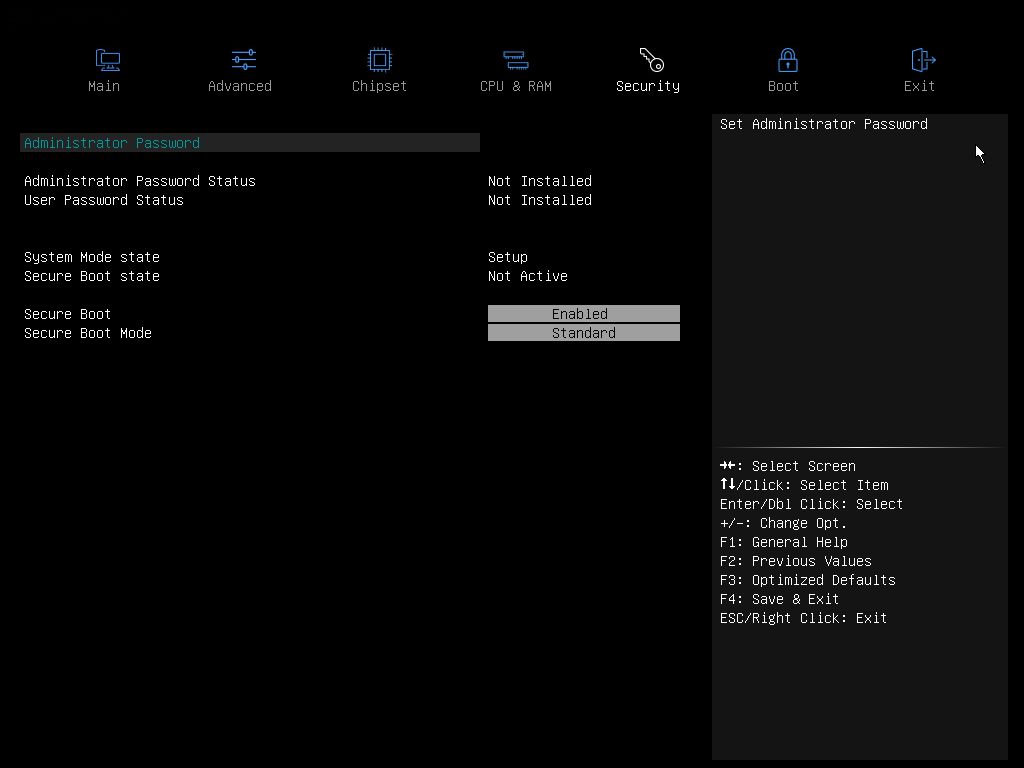
Security Section
The last image we have (all BIOS images are in the gallery below) is the Boot screen. This is pretty straightforward with options boot configurations such as windows type, and PXE boot functions as well as setting the boot mode and boot priority. There is also an Update System BIOS option when set to enable, will go into a BIOS update mode and looks for a file that must be named eboot.rom in order to update. I would imagine their updated BIOSes to come in this form and expect users would not have to edit it.

Overall the BIOS did its job. It certainly wasn't the best looking or had the most options, but worked just fine for my testing. The BIOS is a bit quirky to work within that most of the function keys are not the same as we are used to on say ASUS, MSI, or ASRock boards. Save and Exit is F4, while Defaults are F5. The BIOS does have the ability to capture screenshots and send them to USB, however, it isn't listed in the legend. I had to figure out that it worked by accident. I would imagine that with more time refinements will come and improve upon what we already have just as other vendors have had years or decades of experience to do the same to get them where they are today.


Software
Being new to the game and not available until 1/9, this section will not be loaded with different software options as we have seen in most post-release reviews. The packaging didn't come with a driver disk in fact (though retail should). To that end, the only piece of software we have to show off is CAM. CAM stands for...nothing. I reached out and asked, and was told it may have stood for something in the past, but for now, it was "simple and friendly sounding". What really matters is how the software works. Long story short, it worked fine in my limited time with it.
The CAM application is similar to other board partner's Windows-based suites (think: Command Center, or AI Suite, etc). It is there for users as a central location for system status/monitoring/system information, overclocking, fan control, and of course RGB Lighting. The CAM software also includes FPS monitoring and an Adaptive Noise reduction feature, both of which users are required to 'sign in' to use.
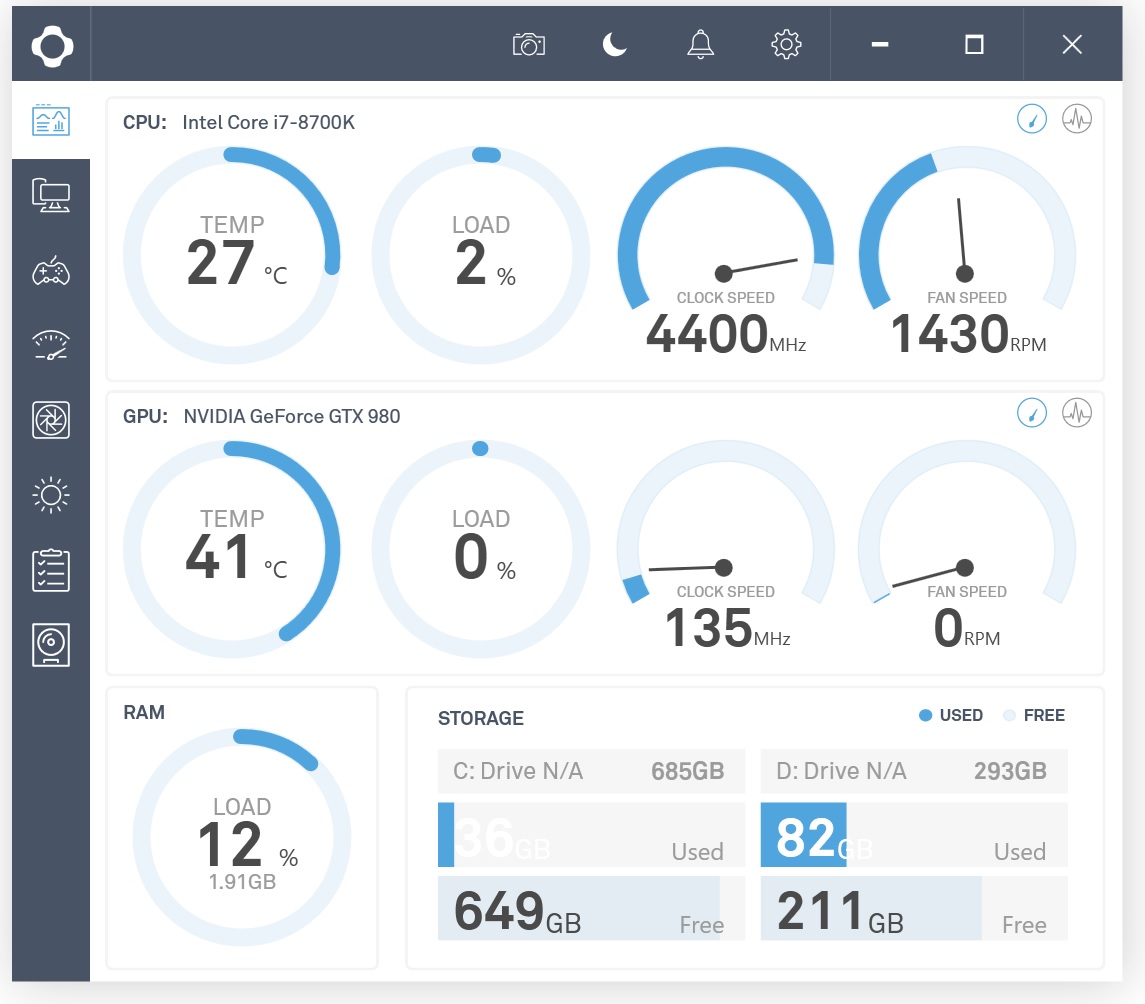
The CAM's main dashboard displays a lot of pertinent information for users in an easy to read format of circle graphs in basic mode. There is an advanced mode which changes it to a real-time line graph which looks to show about a minutes worth of data. The CPU and GPU sections display CPU/GPU temperature, clock speed, and load and also displays the fan speed. At the bottom, it shows total RAM in use as well as storage information such as used and free capacity. The screen is informative and also easy to read in this form.
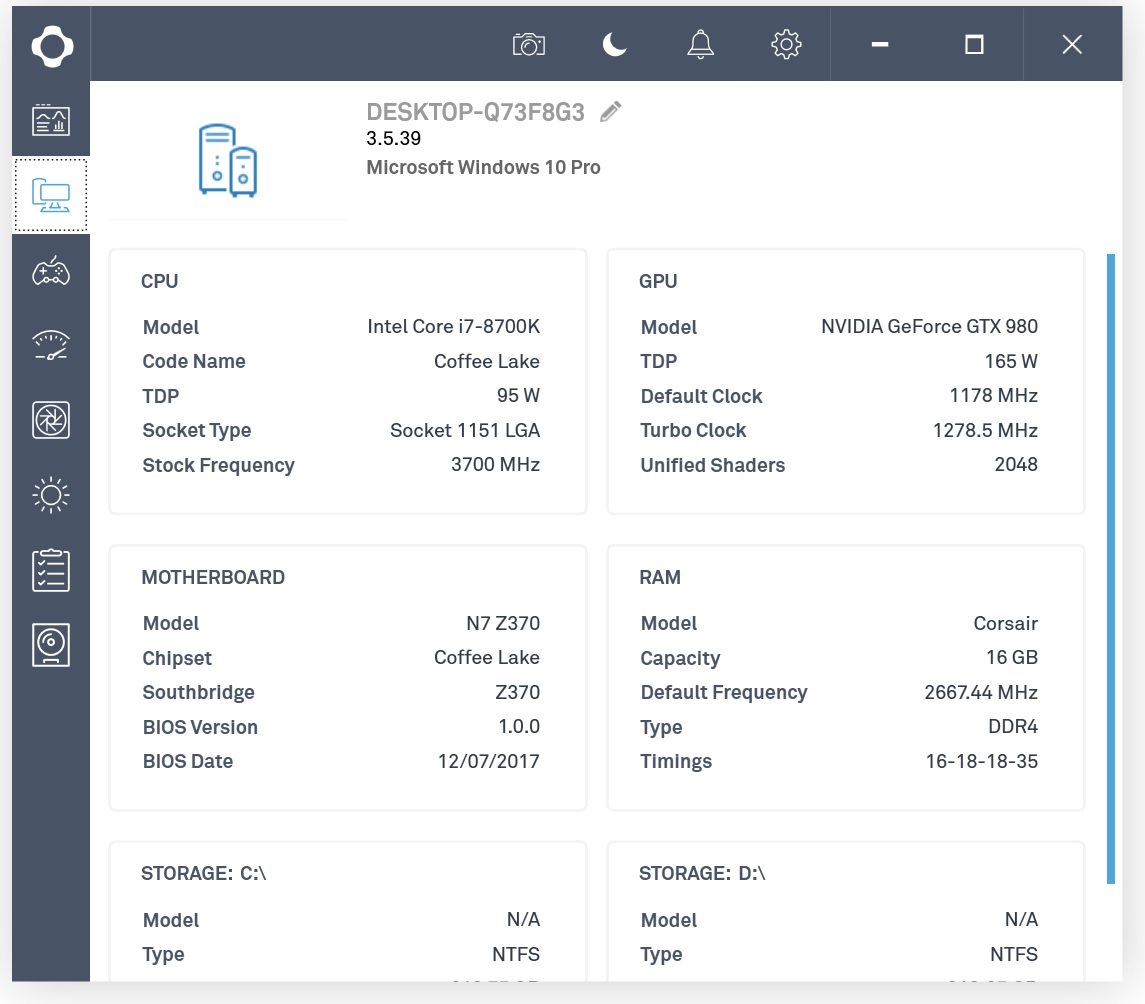
The next section is labeled "Build" and essentially displays information about the system. We can find CPU, GPU, Motherboard, RAM, and Storage details on this screen.
We skipped the game section due to the login (image in gallery), and have moved on to the Overclocking section. Here users are able to control the CPU Frequency multiplier either via all cores or per core along with a voltage offset. The voltage offset has a range of .5V and is based on the voltage set in the BIOS. We are not able to adjust the BCLK in this software.

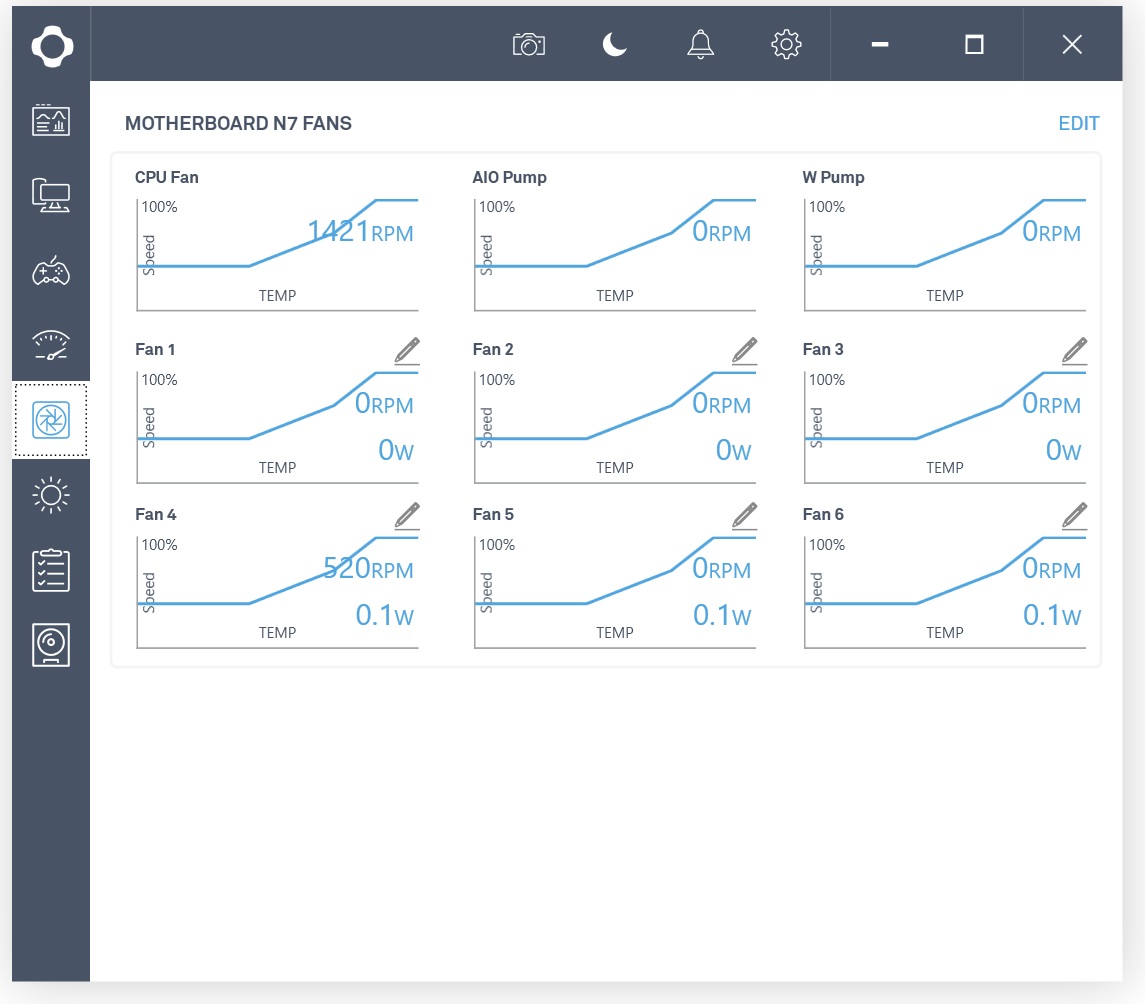
Next is the Fan section designed to give users a one-panel view of all the headers on the board and adjust each curve according to their needs.
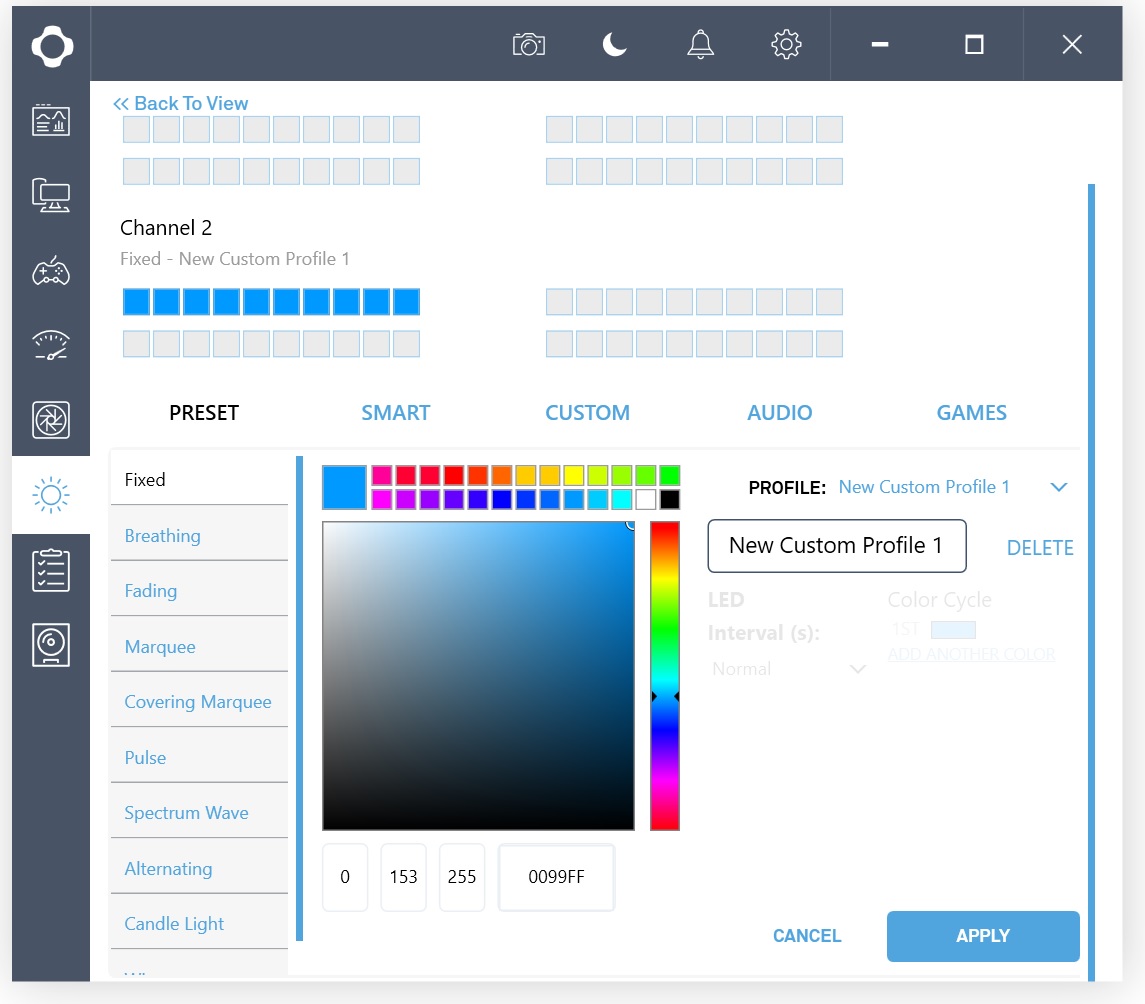
 The last portion of this we will cover is the Lighting section. Here we are able to control and customize RGB LEDs attached to the two headers (remember, the board doesn't have any native). The N7 includes two small LED strips as well as extensions to connect to the board. There are a total of 10 different modes on the preset section and each of the rest has their own as well. The SMART option allows setting the LEDs to GPU or CPU temperature, or FPS. The Audio portion will sync to your music level, or can even change it to sync with gain or bass - something I have not seen before. Last but not least, another new one for me is the ability to sync it to your health in a game. What happens is when you lose health in a game, the LED colors will change. It currently only lists CS:GO, but I presume other titles running off that engine would work.


60 Comments
View All Comments
Death666Angel - Tuesday, January 9, 2018 - link
"The most annoying things about this board is the lack of colors on the audio block, making it more difficult to figure out what goes where. Especially whe it's in the case and around back."It's clearly labeled and color coded on the IO shield. Though I don't know how colors or labels help inserting stuff when you can't see them (around the back). ;)
The heat thing is also very likely irrelevant. These kinds of designs have been around a while and I haven't ever heard a lot of fuss about more motherboards dying due to lack of airflow over the general board. Also, many watercooling setups have very little to no airflow over the mainboard and do fine longevity wise. :)
I totally agree on the screw recovery point. :D
Threska - Tuesday, January 9, 2018 - link
I have a case where the "back" is pointed up, so all that's visible.Dug - Monday, January 15, 2018 - link
You pick what the port does once you plug something in. It's not set in stone so the color doesn't really matter.praktik - Tuesday, January 9, 2018 - link
They really need to make the CMOS battery accessible whenever these covers/armor are used.I had one such from ASUS, my kingdom for a hatch, a hatch!!
TuffLittleUnit - Sunday, January 21, 2018 - link
^^^ THIS! I'm still using an Asus Z77 Sabertooth and when the CMOS battery ran out last year I had to use a Dremel to cut out the plastic armour to get at the battery slot.Gunbuster - Tuesday, January 9, 2018 - link
Who is ODM'ing from them? I find it doubtful they spun up their own motherboard factory...dave_the_nerd - Tuesday, January 9, 2018 - link
This.Heck. They probably subcontracted the design too.
Slash3 - Wednesday, January 10, 2018 - link
The motherboard is manufactured for NZXT by ECS. You can also order extra covers for a few of the areas in colors like red or purple. I tried to find a picture of the board without the shroud in a gallery somewhere, but there doesn't appear to actually be one in this article despite it referencing one. It's sort of all over the place.This is a picture of the board sans shroud, courtesy of Guru3D
http://www.guru3d.com/news-story/index.php?ct=news...
If that link breaks, they have a preview up on their site. Tom's has a full review up.
Slash3 - Wednesday, January 10, 2018 - link
I should also add that the picture I linked to by Guru3D is straight off of the NZXT launch page and is a 3D render. But it gives you an idea of the underlying componentry.Joe Shields - Wednesday, January 10, 2018 - link
A picture of the board without the shroud was also in the article, in the gallery...