The Biostar X370GTN Mini-ITX Motherboard Review: AM4 Goes Tiny
by Gavin Bonshor on October 23, 2017 9:00 AM EST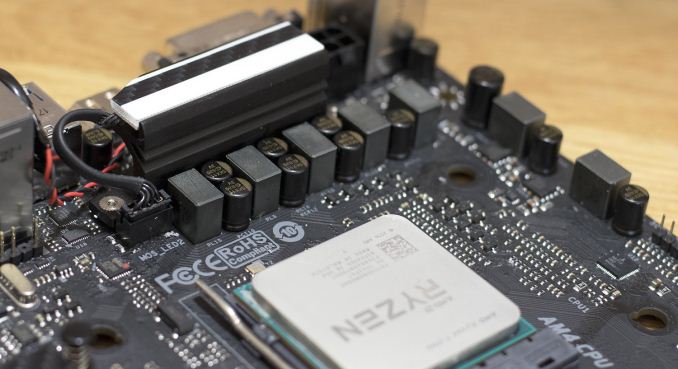
This review is on the Biostar X370GTN Mini ITX motherboard, which was the first mini-ITX motherboard released on the AM4 platform for AMD Ryzen and Bristol Ridge processors. The X370GTN joins a very short list of mini-ITX form factor AMD Ryzen compatible motherboards, but it comes in at one of the cheapest.
Other AnandTech Reviews for AMD’s Ryzen CPUs and X370/B350
The AMD Ryzen 3 1300X and Ryzen 3 1200 CPU Review: Zen on a Budget
The AMD Ryzen 5 1600X vs Core i5 Review: All Ryzen 5 CPUs Tested
The AMD Zen and Ryzen 7 Review: A Deep Dive on 1800X, 1700X and 1700
To read specifically about the X370/B350 chip/platform and the specifications therein, our deep dive into what it is can be found at this link.
Boards in the Works
- $260 - ASRock X370 Professional Gaming
- $230 - ASRock X370 Taichi
- $210 - GIGABYTE AX370-Gaming 5
- $120 - ASRock B350 Gaming K4
- $110 - Biostar X370GTN [this review]
- $98 - MSI B350 Tomahawk
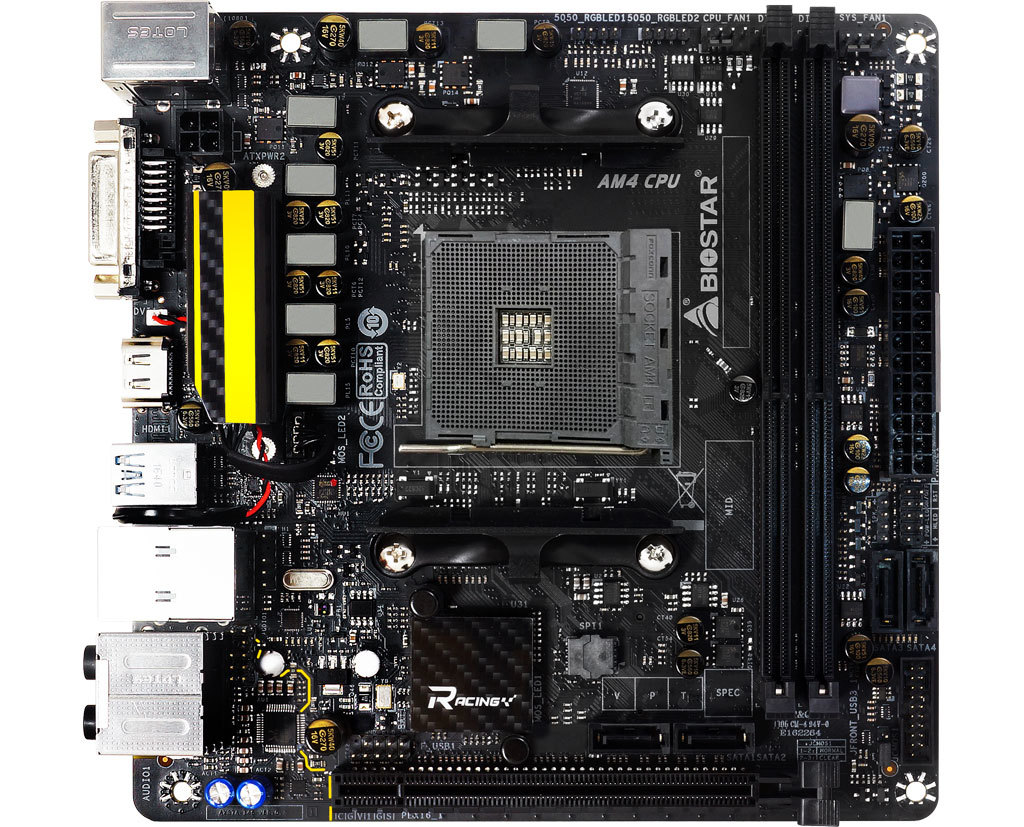
The Biostar X370GTN Overview
With smaller form factor motherboards, the cost is in paying for the privilege of a smaller, more space friendly option. This should be more prevalent in AMD's recent product portfolio, as the size of the socket offers zero favors when it comes to layout: when the socket is large, everything else has to be smaller. Biostar, known for being at the cheaper end of the market, is attempting to combine the smaller form factor with a small price compared to other mini-ITX boards on the market.
One very interesting implementation from Biostar is the Realtek RTL8118AS Gigabit controller, which Realtek calls their 'Dragon' network controller in direct competition to the Killer network controllers we see on other boards. The reason why this is interesting, aside from the controller being relatively rare on consumer motherboards, is that (we were told) this is the physically smallest network controller available for consumer use. So there is some thought behind controller choice other than cost! That being said, Biostar uses 5k solid caps rather than the 10k/12k models we see on most other motherboards, which is a clear sign of cost-cutting (despite 5k being supported in the specification manuals).
Biostar and Realtek advertise the Realtek 'Dragon' network controller as favorable for games, as it is 'optimized' to offer better performance for traffic with small data packets. We asked about the information behind this when we saw an earlier controller on a competitor's board, but the details are proprietary. Another Realtek addition on this board is the inclusion of the ALC892 audio codec which is generally found on the more budget-orientated motherboards and I’m not entirely surprised to see it used here.
The X370GTN has four SATA connectors, which is fairly standard for ITX motherboards; these ports allow the use of RAID 0, 1 and 10 arrays. In addition to the SATA ports, Biostar has included a single PCIe 3.0 x4 M.2 port on the rear of the PCB which allows for use with SATA and PCIe use. USB is aplenty, and there are also additional USB headers for front panel connectors.
Biostar has advertised that the Biostar X370GTN is designed with gamers in mind, placing inside its 'Racing' line of motherboards. For such a low-cost option, especially in a mini-ITX form factor, it will be an interesting scenario to see if the board can perform.
Biostar X370GTN Overclocking
In the west, Biostar is not as prevalent as certain other motherboard vendors in overclocking. However, based on personal testing their recent offerings, they have been showing great promise with each iteration. The idea of hammering out lots of MHz on an ITX board doesn’t exactly sound plausible, but being on the X370 chipset, users may expect at least some element of headroom to play with. It should be noted that the Biostar X370GTN only allows overclocking through the BIOS when it has been updated to at least AGESA 1006 BIOS.
The Biostar BIOS is relatively basic, which has upsides and downsides. The X370GTN is as simple to overclock as virtually any other motherboard with a changeable multiplier and basic voltage control, but it lacks some of the finer tuning of other motherboards (especially if a user wants to go for extreme, sub-zero cooling). The overclocking settings are in a screen titled O.N.E. Apparently it keeps all the core overclocking settings in O.N.E easy place.

A caveat I have with the BIOS is with regards the voltage adjustments for overclocking. The only option for adjustment is via offsets, rather than having set values. This can mean that for users already familiar with the platform, the overclocker can end up second-guessing themselves with respect the voltage that actually needs to be applied. This could potentially cause damage, even with experienced users. One way around this is to use the Ryzen Master overclocking software, which should translate a voltage value into a specific offset for the BIOS, although for experienced users this is not an ideal scenario.
Methodology
Our standard overclocking methodology is as follows. We select the automatic overclock options and test for stability with POV-Ray and OCCT to simulate high-end workloads. These stability tests aim to catch any immediate causes for memory or CPU errors.
For manual overclocks, based on the information gathered from previous testing, starts off at a nominal voltage and CPU multiplier, and the multiplier is increased until the stability tests are failed. The CPU voltage is increased gradually until the stability tests are passed, and the process repeated until the motherboard reduces the multiplier automatically (due to safety protocol) or the CPU temperature reaches a stupidly high level (100ºC+). Our test bed is not in a case, which should push overclocks higher with fresher (cooler) air.
Overclocking Results
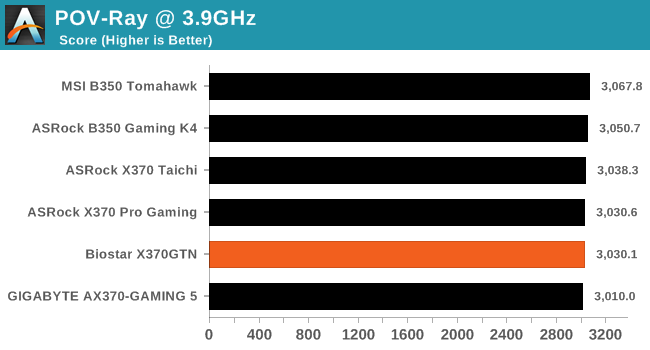
I managed to push our Ryzen 7 1700 CPU to 3.9GHz with 1.375v set according to Ryzen Master. This is actually a limitation of our processor rather than the board - regardless of voltage (within reasonable temperature), at 4.0GHz OCCT showed variable instability at all times. This is still fairly reasonable, giving some of the known limits of AMD's silicon (a steep voltage requirement around 3.9-4.2 GHz for most silicon).
I do have to mention I probably wouldn’t go much further than 3.9/4.0 GHz on this specific board with this chip anyway, even if it were capable. The small power delivery heatsinks were already getting pretty warm at load, and there was a level of personal discomfort running a sub-$110 board to such a degree. There is also only a single 4pin 12V CPU power connector, which may become a limiting factor pushing further.
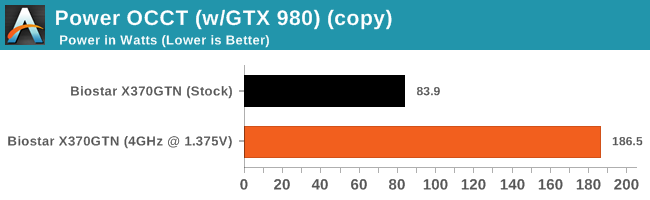
The base Ryzen 7 1700 processor we are using has a 3.0 GHz base and a 3.7 GHz turbo, and is rated at 65W. Our stock load power numbers were surprisingly low (more about that later in the review), but when overclocked to 4.0 GHz (during brief periods of stable) the overall power consumption taken at the wall was pushing above 185W.


31 Comments
View All Comments
h3ll0 - Monday, June 17, 2019 - link
I've had this board since late november 2017 and I've never encountered a single issue with it. Yes it's not made by the most well known brand, however biostar has been around just as long as Asus and other manufacturers so they must be doing something right. I have mine paired with a R5 1600 @ 3.8Ghz 1.35625V through ryzen master and 16GB 3200Mhz ram in a CoolerMaster Elite 130 with a . The one downside that is mentioned in the review is the lack of setting a fixed voltage value in the BIOS, however ryzen master works just fine. For all the people whinging about the small vrm heatsink, most VRMs don't even need a heatsink as they designed to run without one and can be rated from 85C-125C and still function just fine, the problem is when you push voltages high and have no airflow or a heatsink on them, so as long as there is either a heatsink or airflow, but ideally both, you'll be fine.