Fractal Design Define R3: A Fan Favorite Keeps the Noise Down
by Dustin Sklavos on November 11, 2011 1:22 AM EST- Posted in
- Cases/Cooling/PSUs
- mid-tower
- Fractal Design
Assembling the Fractal Design Define R3
Putting together the Fractal Design Define R3 was actually surprisingly unusual. Everything goes in the usual places and there aren't exactly any particularly strange decisions, but when it came time to install our testbed into the R3, I found that parts of the inside were ever so slightly off kilter. The interior feels like one of Corsair's designs, but one that just doesn't quite come together like Corsair's do.
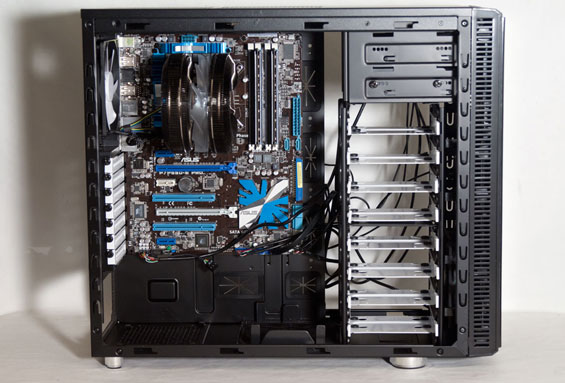
Installing the motherboard was easy enough, but unfortunately Fractal Design doesn't have any standoffs pre-mounted into the tray. What you'll notice, though, is that a standard ATX motherboard does ever so slightly overlap the grommets and mounting holes surrounding the motherboard tray. Our test board is by no means oversized, but the edge is maybe a millimeter or two beyond the edge of each grommet.
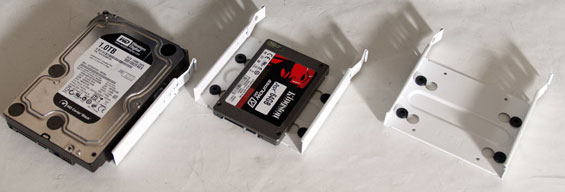
The optical drive bay and hard drive trays are also anything but toolless, but given the acoustically optimized ambitions of the R3, that's not too surprising. The R3 uses the same white steel drive trays for 3.5" and 2.5" drives that the Arc Midi does, and they fit in snugly and securely. You'll still have to screw the drives into the trays, but that's not altogether unusual. Meanwhile you'll also have to manually screw in the optical drive to mount it in the 5.25" bay, but at least the shield pops off easily enough; there's a small lever on the side that you push in, and the shield just pivots right out. Fractal Design includes thumbscrews explicitly for mounting 5.25" drives, and they work well.
Mounting our GeForce GTX 580 wasn't a huge hassle either, although the spacing on the enclosures we test always seems ever so slightly off, and I feel like there's at least a shred of human error involved there. When an enclosure doesn't include an easy way to mount the motherboard, there's usually a margin of error for getting it aligned perfectly and making sure the GTX 580's bracket doesn't wind up having to stretch. So the GTX 580 had to be gently nudged into place, but it was secure and mounted using a thumbscrew.
It's here that I'd like to point out that Fractal Design also includes an expansion slot mounted fan controller with the R3. You don't have to use it and for our testing I actually elected not to; there are only two fans in the case, and both can easily be manipulated using our motherboard's built-in fan control. Cabling the fan controller in the Arc Midi also served to muck up our installation a bit, so I opted to test the R3 using motherboard control instead. When we get to the results, you'll see this wasn't an issue.
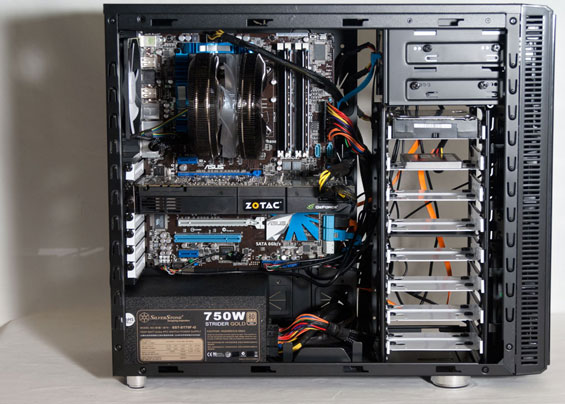
Remember when I said the interior of the R3 wound up being ever so slightly off kilter? The power supply and cabling is where that comes into play. The gap between the end of the motherboard tray and the drive cage winds up oftentimes being better for routing cables than the smallish holes in the tray, but on the flipside it results in a messier installation. The interior of the R3 may in many ways look like a Corsair case, but it doesn't work out that way in practice. The hole for the cabling to connect to the power supply is too small, and the hole that was intended for the AUX 12V line above the motherboard tray is about the right size, but runs right into the top rim of the case. As a result, the plastic plug part of the cable can't fit through the gap, or at least couldn't with our testbed; it just butts up against the inside rim of the case.


If it seems like I'm making a mountain out of a molehill, you're probably right. The interior of the R3 is still by and large well enough designed, and it's not going to be particularly difficult to install a system into it. The problem is that there are all of these little things in it that keep it from being a perfectly clean and easy installation the way the Corsair cases it resembles tend to be. If they fixed the holes in the motherboard tray by lining them up better and expanding them a bit, we'd probably have a much easier time. It's a small fix, but it would go a long way.


83 Comments
View All Comments
magnetik - Friday, November 11, 2011 - link
This might be just the case that I use for my new Sandy Bridge-E buildsharpless78 - Friday, November 11, 2011 - link
They have already upgraded the Define R3 to USB3, and there's also a upgrade kit available.tzhu07 - Friday, November 11, 2011 - link
Do they offer it for free to existing R3 owners or you pay a small cost?sharpless78 - Friday, November 11, 2011 - link
Sorry to say, it is not for free.darckhart - Friday, November 11, 2011 - link
typical. early adopters get the shaft while drumming up sales.lesbaer45 - Friday, November 11, 2011 - link
Thus life's lesson #1034: Don't be an early adopter. You'll get the shaft.V3.0 owns V1.0. Every. Damn. Time.
Sabresiberian - Friday, November 11, 2011 - link
Well, the people who bought the case earlier and like it got to use the case and enjoy it sooner, so I wouldn't exactly call that "getting the shaft".If you wait to buy something until it's perfect, you'll never buy anything, and do without. Do you want it, or not? If it serves your purpose when you buy it, it's a good thing, no matter how much better the improved version is that comes along afterward.
;)
piroroadkill - Monday, November 14, 2011 - link
Oh no, a first world problem! I have to reach around the back to plug my USB 3 device instead of having a port at the front! OH NO!icebox - Friday, November 11, 2011 - link
I need to upgrade my home nas from an aging socket A shuttle PC. I was looking at this case for the new machine.Since you tested it how do you feel it will behave with all the drive bays occupied? Will it have space for intake fans if I fill all the drive bays?
Cooling will be important for the drives and less for the motherboard / video card because it will obviously be a low power fusion / atom board.
Thanks for the great review!
slacr - Friday, November 11, 2011 - link
I use the R2 (previous generation) of this case for a HTPC/NAS/webserver/voicechatserver setup based on my old intel Q6600, currently stocked with 4 harddrives, an aging Seagate 250gb and 3 2TB samsungs.Temperatures are currently 39, 33, 33, 32
Other components run at:
CPU Temperature: +43.0°C (high = +60.0°C, crit = +65.0°C)
MB Temperature: +36.0°C (high = +45.0°C, crit = +55.0°C)
SB Temperature: +50.0°C (high = +65.0°C, crit = +95.0°C)
NB Temperature: +55.0°C (high = +65.0°C, crit = +95.0°C)
In my case i use 2 of fractals fans in the front, one hanging askew over RAM/CPU/NB/GPU and one in the back all running at 5V for a really quiet setup.
I won't hesitate to add more drives when i need them, the only issue is the older 7200 rpm 250gb drive that is running slightly on the hot side.