Lian Li's PC-V353: Lighter Than Air
by Dustin Sklavos on September 28, 2011 4:30 AM EST- Posted in
- Cases/Cooling/PSUs
- MicroATX
- SFF
- Lian Li
- Mini-Tower
Assembling the Lian Li PC-V353
Lian Li designed the PC-V353's assembly to be tackled essentially in pieces. I have historically endorsed using modular power supplies for any build (to the point where I'm mortified whenever I have to assemble a machine without a modular power supply); in the instance of the PC-V353, I'm about 5% away from making it a requirement.


The PC-V353 breaks down into roughly four parts (five if you're going to argue semantics): the motherboard tray, the drive trays, the power supply mount, and the chassis (which includes the optical drive mount). Because of the nature of the breakdown, it's really in your best interests to wire up each part as best you can before fitting it all together. Since power leads are particularly ornery, that makes a modular power supply that much more vital to assembly in a case like this.
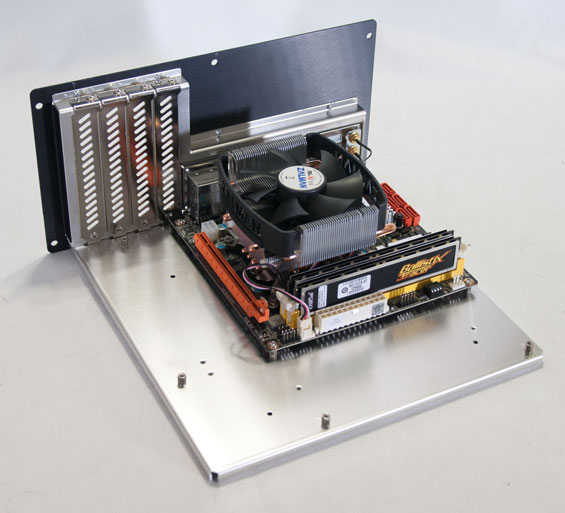
Since the motherboard tray is removable, that part was remarkably easy, though I found the relatively flimsy nature of the tray itself to be a little disconcerting. Everything did come together fine, but it's strange when you're reassuring yourself that it'll work because the rest of the case will have a little give. When I installed the GeForce GTX 580 on the tray, it looked absolutely massive.
![]()
Unfortunately, video cards with top-mounted power connectors are liable to be basically hosed when you do install them in the PC-V353, and that's the reason why there are no results for the GTX 580 in the thermal and acoustic testing: the card itself fit fine, but the power connectors were just too thick and there wasn't enough clearance. Lian Li has a cut-out in the top half of the case for routing exactly these power cables, but it didn't line up with our GTX 580, which uses NVIDIA's reference design.
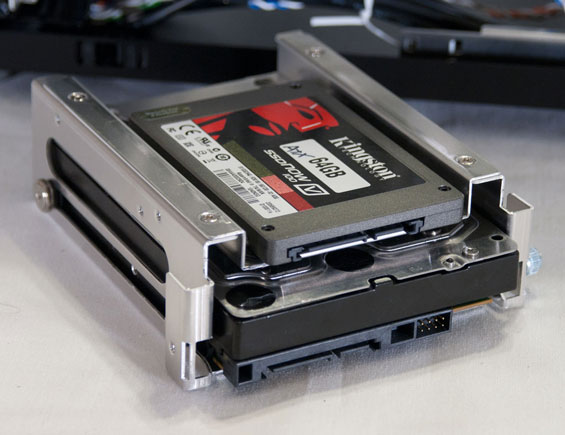
The drives all install in a fairly unique way as well: all of the screws are on rubber-lined runners, and this is true for the 2.5", 3.5" and 5.25" drive mounts. Screws are mounted into the drive first, and then for the 3.5" drive, the drive slides into the rails, and then a thumbscrew locks it into place. Instead of a thumbscrew for the 5.25" drive, it's the fascia. And for the 2.5" drive, there are basically four big holes you drop the screw side into, then push the drive "up" and it locks into place. The system is really quite clever. Again, though, you'll want to wire the drives first. Routing the 5.25" drive's cables requires some doing; you'll want to basically slide them in between the gap between the opposite 5.25" drive bay's fascia and the chassis itself.
Finally, the power supply should go in last and quarters are going to be cramped. If you've been doing this properly and used a modular power supply, your power leads will be connected to the components first so they can be routed up to the power supply at the last stop. If you've been careful, everything should come together reasonably well.
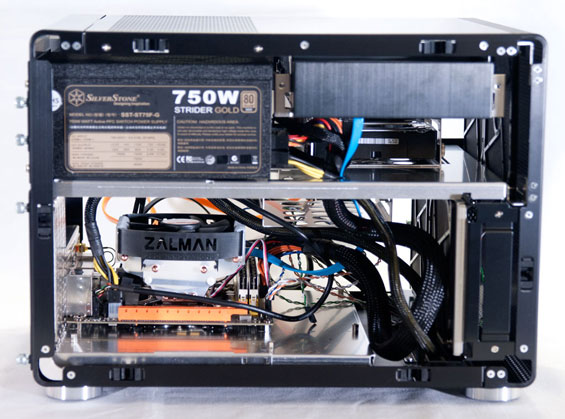
I have to be honest, I'm just not a fan of how the PC-V353 comes together. It feels like it's too unusual, and Lian Li just doesn't make the best use of empty space the way the similar SilverStone does in the Temjin TJ08-E. I have an AVADirect desktop in house that's installed in a Lian Li PC-V354, and honestly that design looks to be a little more sensible than this one. The lack of clearance for the video card's power cables makes all of that case depth feel pointless, and side mounting the optical drive just doesn't seem at all necessary. On top of that, I found the optical drive bay button doesn't line up with our test drive at all. That's not unusual with designs like these, but it makes me wonder why more enclosure designers don't just design a larger button (either externally or internally) that's able to cover the gamut of optical drive eject button placement.


57 Comments
View All Comments
wordsworm - Wednesday, September 28, 2011 - link
I can see that there is a lot more area for the motherboard, but you just used a very small one. Second, I see a 750 watt power supply is installed. Why exactly was 750 watts required? Are you installing SLI in there or something? I can't even see a video card.This review really looks half assed. Which is really lame, because I have a particular interest in small and light cases which can handle a full sized ATX board and maybe even a video card... 10kg and carry-on luggage sized are my requirements for a new machine.
I just wish you'd made a better effort for this review.
TommyAU - Wednesday, September 28, 2011 - link
Your kidding me right?6 different pages of information and that's not enough for you...
How about you be greatfull someone went to the trouble to review it in the first place and at least say thanks
wordsworm - Wednesday, September 28, 2011 - link
Does this configuration of a micro atx without a graphics card and a 750 watt power supply unit at all look like a realistic configuration? This article fails in so many ways. I really hope the author reconsiders this article and considers taking this review a bit more seriously. Maybe actually try to make a decent build for testing rather than this rather thoughtless configuration.ie., You could probably throw in an AMD E350 and complementary board, fill up the harddrive bays, and try some home server task related work at it, and then check out temperatures, etc. You know, configure it like it is meant to be configured rather than what was done. Just using the number of pages is not a useful metric to gage the quality of an article.
Dustin Sklavos - Wednesday, September 28, 2011 - link
I'll tell you what. If you want to ship me the hardware you feel would make for an ideal build for this case, I'll happily retest it.Until then, may I remind you that we standardize on this testbed for a reason. Because I'm trying to figure out what sort of difference in the end results using a smaller power supply would really have.
zerockslol - Thursday, September 29, 2011 - link
http://images.anandtech.com/galleries/1409/cardcle...What does this look like? GTFO before you flame someone who's spending their time writing reviews of hardware for us, dipshit.
lrawrl - Thursday, September 29, 2011 - link
If he actually read the review he would understand why that exact PSU was used for the review (which is different than their usual reference configuration).Also, Dustin explains that there are no results for noise and cooling with a GPU in the case because the GPU from their standard test system uses the stock Nvidia reference design and the power connectors on this model do not line up with the cut-outs on Lian-Li's case.
If wordsworm actually read the 6 PAGE review, instead of just staring at the pretty pictures and graphs he would understand this.
SquattingDog - Wednesday, September 28, 2011 - link
If you read the testing methodology, you will see that this is one of the two standard configurations AT is using in their reviews. Agreed that the part selection seems a bit odd, but it is all to keep it as uniform as possible.Etern205 - Wednesday, September 28, 2011 - link
The case supports up to mATX so you can grab a Asus ROG Gene board and a pairof GTX 560Ti in SLI.
I've mentioned the GTX 560Ti because they're short in length which is what these cases are made for.
Flagrant - Wednesday, September 28, 2011 - link
Just an FYI the height of the vid card is also very important. any heatsink pipes that go even a little higher than rest of the card will screw you up with this case. The height given at the Lian Li website is not conservative. You need to allow for thickness of mobo.Etern205 - Wednesday, September 28, 2011 - link
Just buy a card without the nonsense and you'll have no problems.Looking at one of the pics a standard GTX580 fits.