Thermaltake Level 10 GT: Monument to Excess
by Dustin Sklavos on July 26, 2011 11:50 AM EST- Posted in
- Cases/Cooling/PSUs
- Thermaltake
- Full-Tower
Assembling the Thermaltake Level 10 GT
When you get north of the $140/$150 price point you do start to see a lot of unusual case designs begin to surface. Making a bog standard ATX case is reasonably easy, but tweaking and changing designs in an effort to improve both aesthetics and performance does take some effort. Likewise, the end user should be prepared for a little more thought and work to go into his or her build.


The Thermaltake Level 10 GT's assembly is actually less daunting than it looks, but it can be rife with minor nuisances. The absolute first thing you're going to want to do is take the hinged side panel off, and that's done by just opening it and then lifting it off the hinge. It's nice for quick and dirty changes internally, but for anything remotely more involved like installing a motherboard or expansion card, it needs to come off.

Someone over at Thermaltake heard my prayers when it came to motherboard installation, because I didn't have to install a single standoff into the motherboard tray. The exact standoffs for a bog standard ATX board were already in place and ready to go; all I had to do was pop in the I/O shield (a slightly tighter fit than usual) and then screw in the motherboard. It was incredibly painless.
Installing a 5.25" drive is also reasonably easy, with the bay shields designed to pop out of the front by squeezing the sides. It's a little unsightly but not a deal breaker, and the 5.25" drive is then clamped into place using a toolless clamp on the other side of the case. As I mentioned on the previous page, I do take issue with this, because I found it to be fairly difficult to get our optical drive to feel fully secure in the bay. Installing an external 3.5" drive is also a little fraught, as you'll have to carefully maneuver two screws into the enclosure to secure it in the bay.
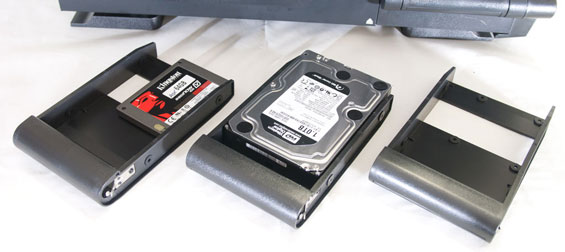
The hot-swappable 3.5" drive bays are easy enough to install into. Each tray includes rubber grommet-lined mounting holes for both 2.5" and 3.5" drives, and that's much appreciated. It highlights a reason why using drive trays in modern enclosures is such a smart idea: it makes integrating 2.5" drive support much easier.

Unfortunately, having that smooth, flat rear (heads out of the gutter, kids) around the I/O shield and expansion ports creates an issue other enclosures don't have: there needs to be a way to secure expansion card brackets while giving space to work them into place. The result is that the Level 10 GT adds an extra step: you have to remove a small plate affixed with two thumbscrews and then remove the slot covers for the expansion slots before popping in the card.
Finally, installing the power supply is fairly easy and routing cables wasn't too problematic. There's a healthy amount of space behind the motherboard tray that it can be done without too much trouble, but you're probably still going to have to squish the side panel back down and on. The only power leads the enclosure requires are a single SATA power lead for the drive bays and a molex lead for the fans; the rear fan uses its own 3-pin lead allowing it to be controlled by the motherboard. That's a detail I actually really liked: Thermaltake seemed to know exactly which fan you'd want your hardware to control.
The takeaway with assembling the Level 10 GT is simple: remove the side panels completely, and then try to approach it like a regular enclosure. It will still take a bit of time and thought, but if you're buying a $270 case that shouldn't be a problem.


46 Comments
View All Comments
geniekid - Tuesday, July 26, 2011 - link
I like the aesthetic and the design. If it were under $200, I'd seriously consider it for my next build.That said, I eagerly await your review of the SilverStone FT02 and the Fractal Design R2, both of which I think are strong contenders in the quiet and cool arena, and both of which I think are good looking.
HeroicTofu - Tuesday, July 26, 2011 - link
As an owner of the SilverStone FT02, I will say that I'm very impressed with the case. It has a very professional and sleek look to it which I so very much prefer to cases such as the CoolerMaster HAF 922 (to each their own right?). It's cooling efficiency is nuts as well. Compared to my previous case, the temps are a good 15-20 degrees cooler at full loads. Motherboard would get up to 60 degrees celsius where as in the FT02, it's rare when I see it exceed 40. It idles just 8 degrees above room temperature.geniekid - Tuesday, July 26, 2011 - link
Yes, I've read good things about the FT02 and it's my favorite in terms of looks. Unfortunately, the +$200 price tag forces me to consider the cheaper Fractal Design R3 case for my next build.SunLord - Wednesday, July 27, 2011 - link
I love my FT02B the only thing remotely lacking on it is USB3.0 but since it predates the USB3 spec it's easy to forgive. I've got it running 5 2tb drive with the hot swap brackets and a new 128g ssd it's pure awesome and mostly silent. I wish it came with a 3.5" external bay adapter given it's price so I could of mounted my card reader right when I got it but that is a minor annoyance at best.Dustin Sklavos - Wednesday, July 27, 2011 - link
Actually, SilverStone offers a USB 3.0 bracket to swap into the FT02. They sent me one along with the review unit.ggathagan - Wednesday, July 27, 2011 - link
Dustin,Did Silverstone provide a part number for that bracket?
No mention of it on their website.
Kisakuku - Wednesday, July 27, 2011 - link
Email Joel at usasales@silverstonetek.com. The replacement cable is $12 + $6 shipping. Silverstone isn't advertising this part, but they will sell it to you.IAMTHEPROCESSOR - Wednesday, July 27, 2011 - link
Ok I emailed him and I am awaiting a reply but might you tell me whats the link to your review please so I can see the usb 3.0 cable swap? Thank you!Dustin Sklavos - Wednesday, July 27, 2011 - link
The FT02 cable swap is SUPER simple. My review isn't written up yet (I literally JUST finished doing assembly and photography), but the housing is held on by two screws. You remove the housing, and then two more screws hold the USB/audio jack board in place. Remove those, slide the board out, slide the new board in, presto change-o.iamafish - Tuesday, July 26, 2011 - link
I own the FT02B, and in my long experience with cases it is by far and away the best I have opened up and played with. Sleek looks, lots of space, well designed, great fans, cooling is brilliant. The whole thing oozes quality, it's worth the asking price.This Thermaltake however is ugly as hell, I wouldn't pay bargain basement prices for something that looks like it had an accident at the car crusher.