Dropcam Echo : Home Security Meets the Cloud
by Ganesh T S on August 11, 2010 7:50 AM EST- Posted in
- Gadgets
- IP cameras
- camera
- camcorder
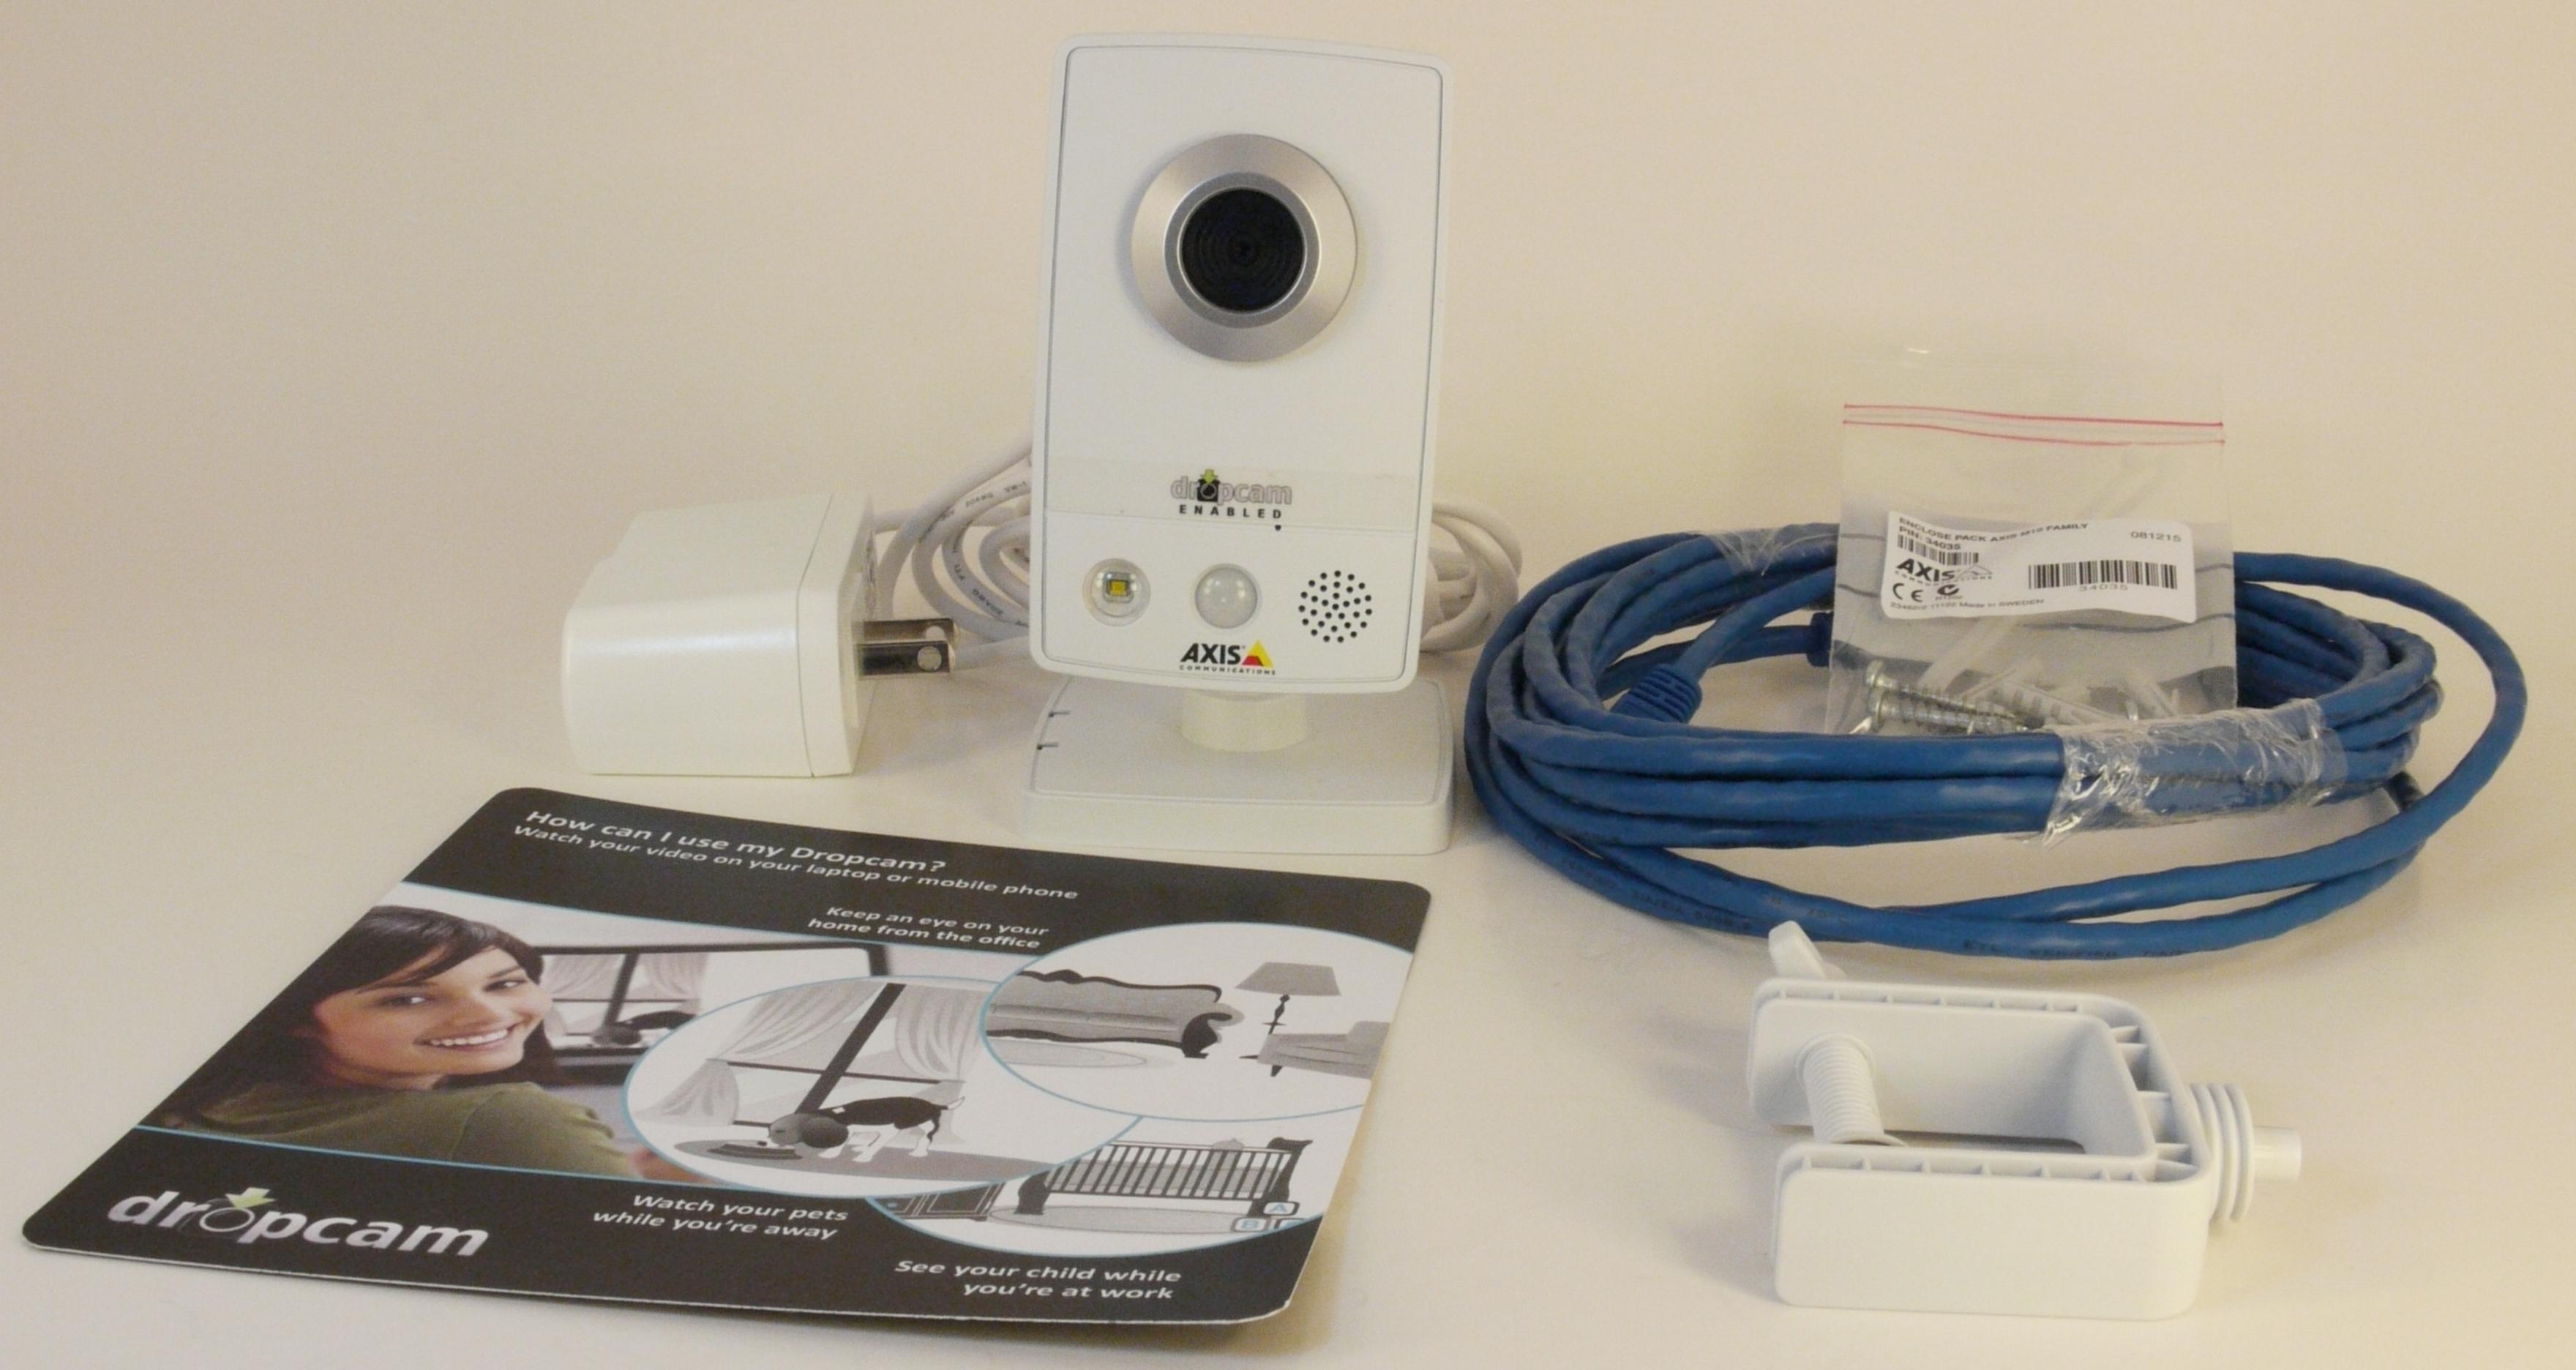
The Dropcam Echo review unit came in a spartan package. The camera itself was bubble wrapped. There were some mounting aids, a power adapter and an Ethernet cable. Similar to boxed software, the unit was accompanied by a card introducing the Dropcam Echo. The card also had a product key.
I wanted to setup the unit as a non-technical consumer, and decided to follow the directions blindly. Even though my router had a wireless MAC filter, I refrained from adding the Dopcam Echo's wireless MAC ID to the list.
The first direction was to connect the camera to the router using the supplied Ethernet cable. The introduction card directed me to visit www.dropcam.com/start as the next step. The key on the card was entered, and after this, the directions on the website were followed.
I was able to start watching the video from the camera on the site soon after entering the key, but the wireless was still left to be configured. Wireless setup was a must as the Dropcam had to be shifted to a different location, away from the router. The setup page presented me with a list of wireless networks within the reach of the camera, and upon selection of my network, prompted me to enter the network password. For a technical person like me, it was unnerving to find these details displayed and requested on a remote non-secure page, but this is the price one has to pay for a solution that is plug and play. After feedback, Dropcam has now moved these pages to a secure server.
After typing in the network password, the page directed me to lookup the status of the wireless connection by observing the nature of the glow around the lens. A full green would have implied that the wireless connection was successful, but I observed blinking red and green in sequence. Upon clicking the appropriate icon in the page, I was informed that the network password entered could have been incorrect. Failing this, I was supposed to contact Dropcam support. Fortunately, I had requested them to let me know where to find the MAC ID earlier. It turned out to be the SN at the back of the unit. With this MAC ID entered in the wireless filter, I entered the password again, and was presented with a successful wireless connection for the camera. After feedback, Dropcam has added a note about wireless MAC filters to the appropriate page.
All said, I was up and running, with the Dropcam far away from the router (still within the wireless reach) within 10 minutes. I have to say that this is probably the shortest time I have ever spent in setting up any sort of networking gadget.


24 Comments
View All Comments
papounet - Wednesday, August 11, 2010 - link
Very interesting product, yet one caveat:your security system relies on Internet being up; If you go on vacation and switch off the mains, you won't have either current for the cam, nor for Internet.
in europe, several companies are trying to lure small business into setting up IP surveillance cameras, intrusion detection and transmission onto a smartphone (on demand only, in order not to burst the data traffic cap). IP camera like the Axis) have both intrusion detection software onboard and a hardware current loop switch (which could be used for intrusion detector).
the largest issue with video surveillance as i see it: (on my remote screen ;-)) is the lack of support for the megapixel cameras such as the Axis 207MW which have been around for a decent price for some time now.
I highly suspect an artificial restriction by manufacturer of NAS on entry-level systems
I have setup a surveillance DVR 24/7 with a Qnap 219 and 2 * Axis 207MW with few issues except that the QNAP F/W for that hardware does not allow the use of the camera in megapixel res: i am stuck with 15fps 640*480 AVI recording
Yet, using curl, I was able to reach 10 fps at 1280*960 in JPG mode directly from the linux shell.
I am looking seriously into switching to synology because of their more honest way to handle additionnal camera through licenses
strikeback03 - Wednesday, August 11, 2010 - link
Sounds like they have a good start, but I wonder if this model will be sustainable in the future. If a user installed more than one of these, or if/when they produce HD models, the bandwidth usage could quickly get out of hand for tiered access plans. Perhaps for a more extensive home installation they could offer some type of a base station, either a USB device or some type of nettop, that could handle the recording functionality of local cameras. This device could integrate its own access point, so that setting up individual cameras would be as easy as plugging in over USB or ethernet for an initial setup, then putting them on location. They could also then make the mobile app location aware, so that video would only be streamed to their servers when the primary phone was away from home, or on request. Then all other video, such as when they are sleeping and not watching their phone, can be stored locally and not take up bandwidth.rcc - Thursday, August 12, 2010 - link
The camera itself handles motion detection very differently. If set to motion detection the camera doesn't output data at all, until you have a motion event. Sounds like this is one of the features they disablled so they could charge you for continual recording.One of the advantages of IP cameras in general, and one of the things that makes them a bit more expensive that Analog cameras, is that there is a fair amount of intelligence built into the cameras for functions like this.
Axis makes many decent IP cameras, this one is near the bottom of their line, as expected given the price point that people will want.
Since drop cam is not making the camera, I think they should concentrate on the "cloud" end of things, and setup, and let the consumer pick from a range of cameras.
jmke - Wednesday, August 11, 2010 - link
Cut power & internet connection; if possible from a street service panel accessible to anyone with a large cutter.Rick83 - Wednesday, August 11, 2010 - link
And wake everyone who has a UPS in the entire block?Because figuring out which internet connection goes where isn't that easy.
And I expect the same for electricity.
And then you have to hope that there isn't a backup battery and backup wireless internet connection....
Probably not worth the hassle for a quick enter and grab....
Roland00 - Wednesday, August 11, 2010 - link
But since it operates on wifi, and wifi is a very select range of frequencies usually 2.4 ghz or 5 ghz and sometimes 3.6 ghz, wouldn't it be possible to "overload" those bands in a short range with something that produces enough frequency noise.Thus anything that isn't using cables won't be able to communicate. Doesn't matter if the ip cameras are storing there info locally or to the cloud, if you can't talk to the router than the effectively can't communicate.
mados123 - Wednesday, August 11, 2010 - link
This was on one of those CSI episodes where they jammed the signal. WiFi jammers do exists like any other wireless signal blocking.http://www.chinavasion.com/product_info.php/pName/...
rcc - Thursday, August 12, 2010 - link
As I recall, that camera also has an Ethernet port, and works off POE if Dropcam supports it.Hook up the POE switch, router, and modem to a decent UPS and you are ready to go through basic power outages. If you are really concerned about someone cutting your Internet connection, Talk to one of the companies that provides video over 3G cell phone networks. Pretty pricey tho.
strikeback03 - Thursday, August 12, 2010 - link
Would something like this even be valid evidence? Even if you had this camera running and recording an area where something was swiped, assuming the criminal took basic precautions such as covering their face and any other distinguishing marks all you would get from a VGA video is a basic idea of their size. Anything that is going to help bring a criminal to justice is going to come from more traditional investigation.I would imagine the use of this is more as a nannycam, or for example if holes are being dug in your yard and you want to see if it is the neighbor's dog, or a situation like the author described.
rcc - Thursday, August 12, 2010 - link
Look at the bright side. Reviewing the footage (byteage?) would show the forensics guys where to look for more evidence.