TheaterBlog: Installing the Starfield Ceiling
by Anand Lal Shimpi on March 18, 2008 12:00 AM EST- Posted in
- Anand
This post is long overdue. The original plan was to have the theater watchable by the end of 2007, obviously that didn't happen. Then I figured it'd be done by February. Yeah, so much for that. Now it's looking more like a May thing :)
CES threw a wrench in my theater plans because I came back with a weird bird flu or something that knocked me out for a good two weeks. Then I spent the rest of January and February playing catch up thanks to being out due to CES-flu, and the past few weeks I've been traveling so once again, I haven't had much time to deal with theater stuff.
That being said - a lot has happened since the last update:
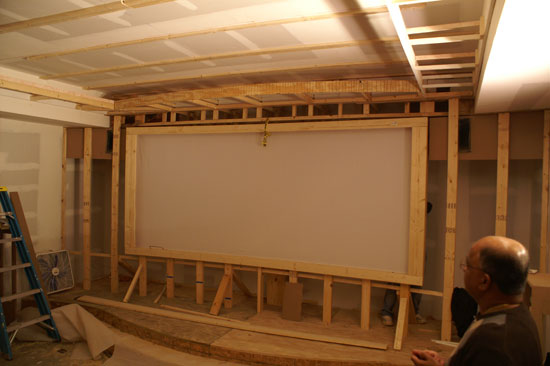
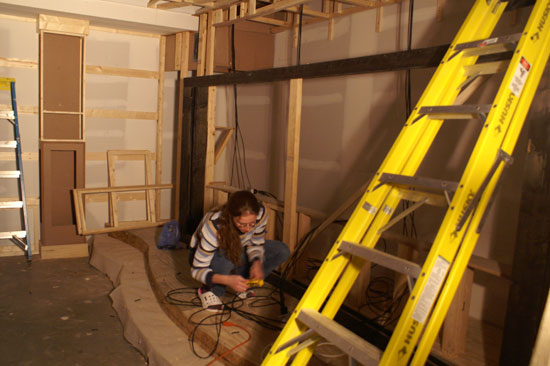
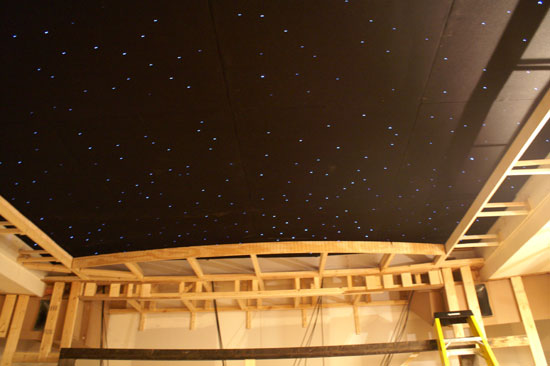
In the picture above you'll see the false wall (and my dad's head), the light tray around the room, oh and the screen frame is also up. The screen measures around 11' wide (2.35:1 aspect ratio) and in this picture is outfitted with some cheap fabric I got at a local fabric store near my house, just so I have something to test the projector/lens setup on. My actual screen fabric is safe upstairs, away from the mess and construction of the theater. You'll notice the wooden strips running along the ceiling - those are used for mounting the starfield ceiling panels, which is the topic of today's TheaterBlog post.
The starfield ceiling is up and fully functional, I built it in the same way that SandManX did in his thread over at AVS.
I started by asking all of my friends what their favorite star systems were. Believe it or not, most people didn't have a favorite. I did get two answers. Derek (our GPU guy) really has a thing for the milky way, and a very old friend liked the andromeda system. I couldn't find a sparse enough star map of the milky way, and I could find one of the Andromeda system, so Andromeda it was.
I divided the ceiling into 16 squares of roughly 44" x 40", and each one of those squares was then divided into 12" x 12" sections (roughly). The rule of thumb is no more than 4 "stars" per square foot so I tried to keep it at that.
In Photoshop I created a map of the ceiling and scaled the Andromeda system to it. It looked good.
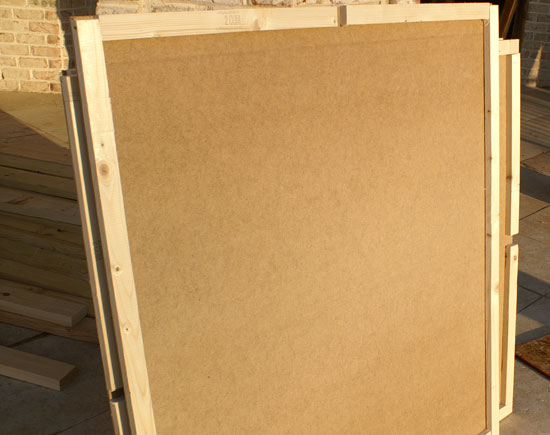
I went to Home Depot and snagged these 1/4" thick sheets of panel board, they would eventually be wrapped in fabric and have stars poking through them. The sheets came in 8' x 4' sizes and I had them cut to the right size at Home Depot to avoid me doing any more crooked cutting.

The raw panel, already cut, and divided into 12" x 12" squares
I took my Photoshop map of Andromeda and I made marks on all of the ceiling panels. I had two friends (Manny and Lyle) helping me drill holes through the panels to feed the fiber optic cabling through. Lyle thought my method of trying to accurately map Andromeda onto these panels was silly and that I should just randomly drill holes in each panel. I told him that if I did that the panels would inevitably have some sort of grid-like pattern to them and it'd be really obvious what I did.
It turns out I should've listened to Lyle. After we got all of the panels drilled, I looked back at the SMX thread and realized that he had way more stars per panel than I did. I fed fibers through one panel and also felt that the sky would be a little too sparsely populated. I took my Photoshop image and expanded the Andromeda system. The big bang theory at work.
After drilling these extra holes I realized that I was still a little short on the number of stars per panel, so finally I just randomly drilled holes like Lyle suggested from the start. Shuddup.
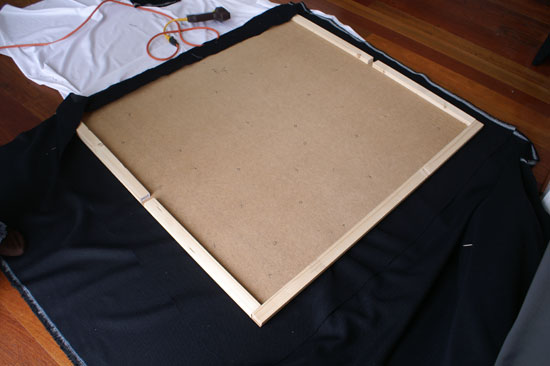
A framed panel
The panels had to be drilled and framed. I used 2" x 1" strips of wood to frame the panels; this would give them strength, give me something to staple fabric to and give me a way of attaching them to the ceiling.
With the panels trimmed out I sprayed them with some 3M spray-on adhesive and wrapped them with black Guilford of Maine fabric. I pulled the fabric taught and stapled it to the frame. My mom is way more patient and better at this sort of stuff than I am, so she helped out a lot. Manny and I made one panel and wasted several square feet of GoM, my mom managed to do things far more efficiently (she's pretty much better than me at everything except for matters of technology, thankfully, otherwise I'd be out of a job). If I had to do it again I'd use a lot more 3M glue on the panels as I think I went a little too light on them (maybe a little more than 2 full cans for the entire ceiling should be sufficient).
Wrapping the panel in GoM
With the panels framed and wrapped it was time to put stars in the sky. There wouldn't be any lights in the ceiling, just fiber optic cabling taking light from a couple of LED light engines placed elsewhere in the room, and routed through the ceiling. Like most of the obscure stuff for this project, I ordered the fiber optic cabling and LED light engines from the most sketch looking website online - but people on AVS seemed to vouch for it so I tried it out.
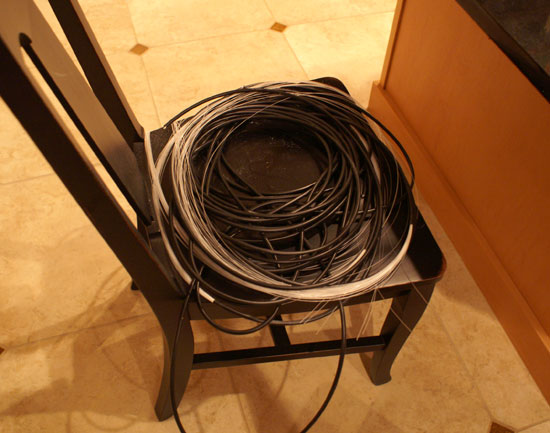
Fiber
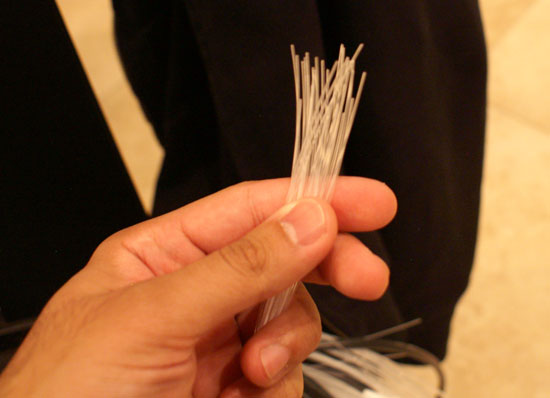
These cables only glow at the ends, shine light in one end and the opposite end will glow
Each cable held 32 individual fibers, so that meant one cable run to each panel and up to 32 stars per panel. I ordered a few hundred feet of horribly overpriced fiber and measured out four lengths and cut a total of 16 cables. All of the fiber would run to the front of the room, behind the screen wall where it'd get fed into one of two light engines.
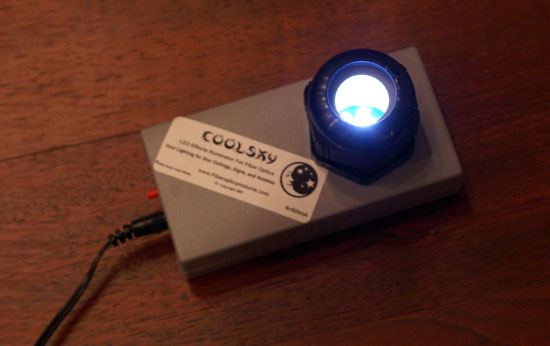
The light engine, it's just LEDs in a dimmable box - you stuff the fiber in the hole and tighten the ring clamp to secure. The light engine itself isn't very well made, the clamp isn't strong enough, I'll need to augment it with some trusty duct tape to keep the fiber in place.
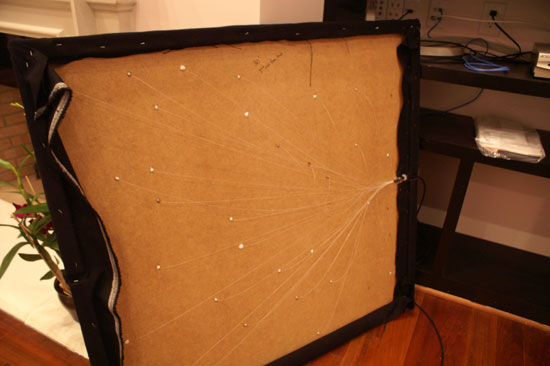
Poking the fibers through the holes wasn't hard at all, I made sure to leave a good several inches sticking out of each panel because I was going to vary the amount that pokes through in order to create stars of different intensities.
My dad's hand, helping me feed the fiber through the panels - pretty much all of my friends and family helped at one point or another in making these panels (thanks guys :))
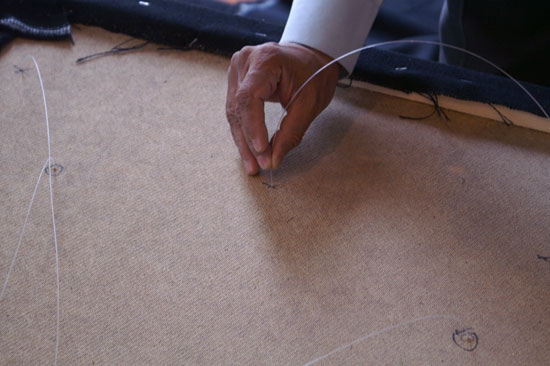
A closeup, I glued the fiber in place once it'd been fed through. I tried tack glue and low heat glue gun, the former worked better but it took far too long to dry. The low heat glue gun would melt the fiber if I didn't let the glue cool a bit before touching the fiber itself.
A single, completed panel
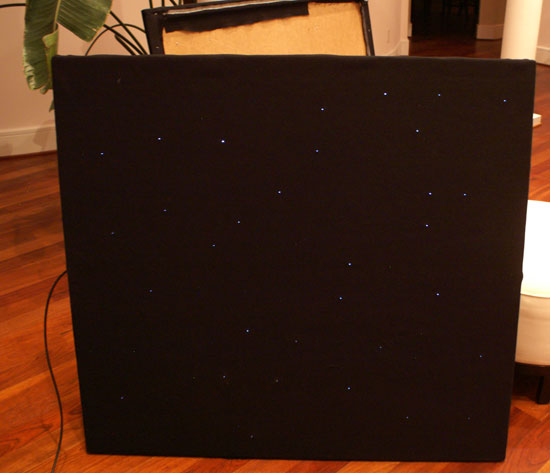
Lit up
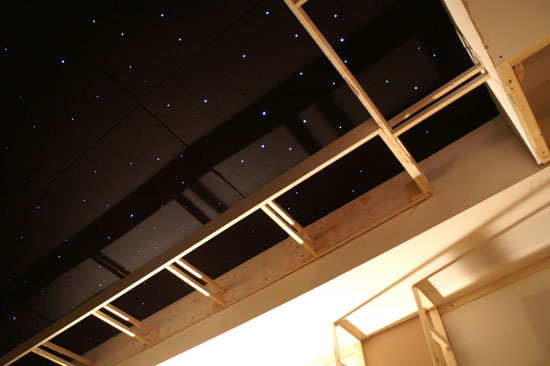
With all of the panels made the next step was to nail them to the ceiling. We used finishing nails, which disappeared nicely into the GoM fabric creating a clean layout. I had help from some of the folks framing the rest of the basement in putting them up:
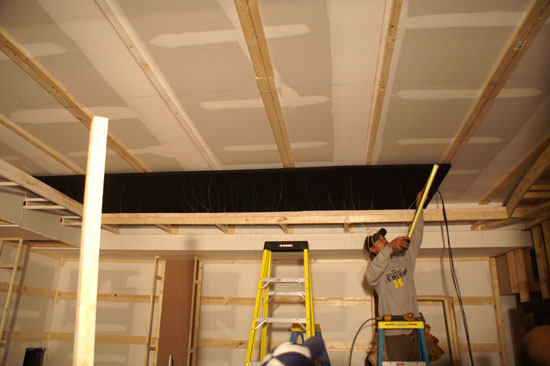
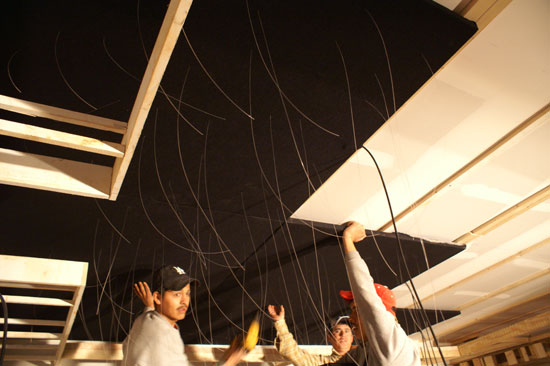
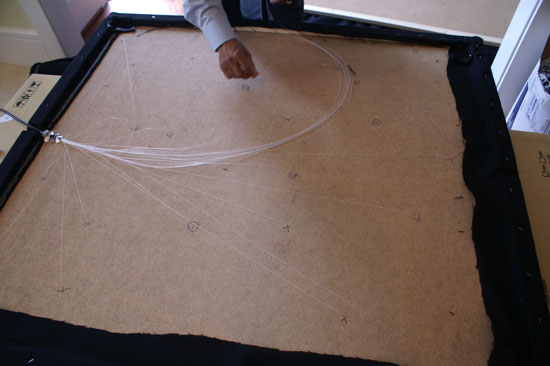
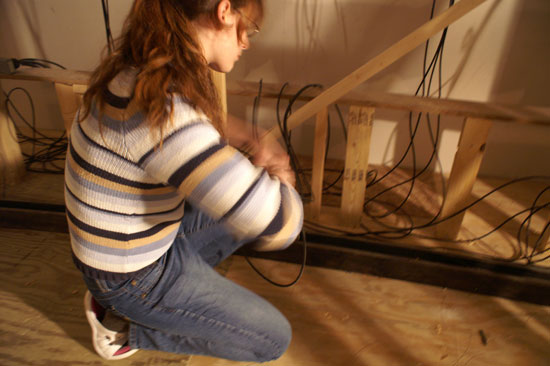
The panels went up real quick and I got to test out the effect before covering up the ceiling. Joy (an amazingly good friend of mine, with a knack for arts and crafts) helped me with making a lot of the panels. Here she is preparing the cables to be inserted into the light engine:
Those cables dangling in the background are from the ceiling, they'll run behind the screen and into the light engines
When I turned it on for the first time I really expected it to turn out terrible, but it worked out much better than expected.
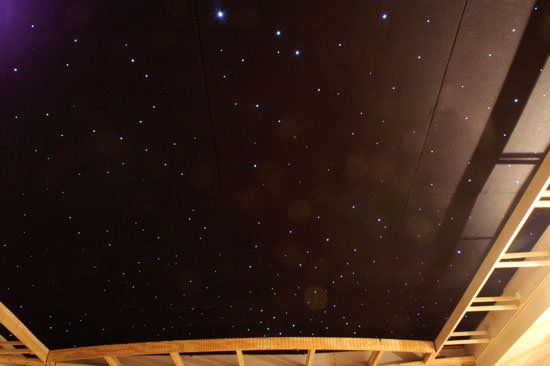
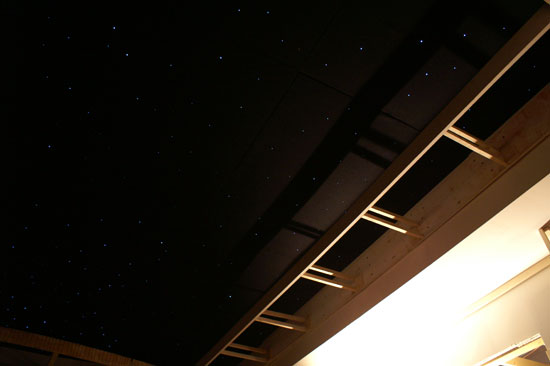
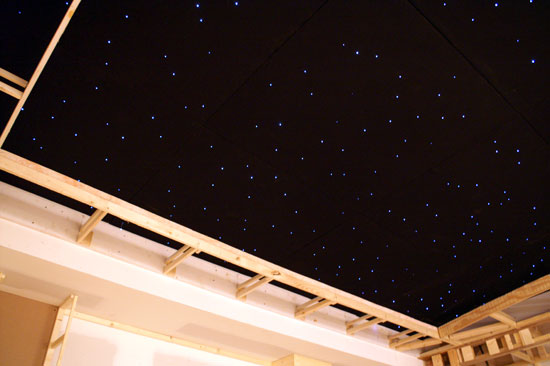
As soon as the ceiling was up I wrapped it in plastic to keep dust away from it. I've got a dedicated power outlet for the light engines so they can be turned on/off remotely and independently from everything else in the room. The effect is pretty subtle and isn't distracting at all; when a movie is playing it should be a pretty seamless addition to the theater.


27 Comments
View All Comments
cdl1701 - Wednesday, March 26, 2008 - link
That is the problem on my end anyway.lumina - Wednesday, March 26, 2008 - link
Wow, that's a lot of work and a large payroll to cover to make this effect.For those who don't have endless money and labor to accomplish this project, I have a wonderful solution that has an Installation time of about 2 Minutes, it's plug and play.
With this product, it projects 1000's of MOVING pinspots of light, along with a MOVING 3D nebula that can be turned on or off.
The Cost savings going with our BlissLight Laser Starfield Projector would be thosands of dollars!
If you want to see our Starfield Ceiling Projector please visit us at www.luminatechnical.com
you can email me direct at sales@luminatechnical.com or visit our website to look at photos, watch movies and download brochures.
zuluwarrior0760 - Saturday, March 22, 2008 - link
The bluish appearance of the stars is due to the color temperatureof the LED illuminator.....getting true white or warm
white out of them is very hard.
The quality of the color of the stars will be DRASTICALLY enhanced if you use a small halogen illuminator
Look at the tiny MR16 units at www.visual-lighting.com
I've done three star ceilings for myself and friends and the halogen trounces the led units in terms of color.....
Ratinator - Thursday, March 20, 2008 - link
I really like the starfield ceilingWas curious if you had considered laying a layer of GoM to cover the seams to try for a seamless look? Then again, once it is dark in the room, the seams are most likely not visible.
(I can imagine this would be difficult to do and could potentially screw up what you had already accomplished.)
Great work and love the blog.
stevekgoodwin - Wednesday, March 19, 2008 - link
You know you need these left/right of the main screen when you're playing Guitar Hero/Rock Bandhttp://www.cls-led.com/catalog/catalog.asp?pageId=...">http://www.cls-led.com/catalog/catalog.asp?pageId=...
More seriously, I've just put RGB LED strip lighting behind the splashback in my kitchen (do you call the wall above your kitchen bench the splashback in the States? You know, the tiled/glass/stainless steel bit). The entire wall glows, it's really cool, the colours cycle etc. The company above does the same sort of thing (disclaimer: I think I've used the same products but rebadged differently, haven't used that company specifically).
The best bit is seeing the look on my friend's faces when I hand them the remote control for the wall. :-)
With your star lighting, I'd consider having multiple light sources, and then have them synchronously controlled, so different stars can fade in and out. Done with enough controllers, you could then dial in the right mix of F, G and K stars to suit the type of movie you're watching (eg The Black Hole vs 2001: A Space Odyessey).
http://en.wikipedia.org/wiki/Main-sequence">http://en.wikipedia.org/wiki/Main-sequence
geogaddi - Wednesday, March 19, 2008 - link
lolz!
crimson117 - Tuesday, March 18, 2008 - link
That looks really good! It'll look even better when the rest of the room is complete and the lights are dimmed...Is the star ceiling curved upwards or are my eyes playing tricks on me?
icthy - Tuesday, March 18, 2008 - link
I love it. But I'm confused, when you stay star system, do you mean constillation? Personally, I'd pick Orion or maybe Taurus plus the Pleades.EODetroit - Tuesday, March 18, 2008 - link
You need to put some color in them! Red, Orange, lots of Yellow, and a few Blues. Just a tinge, they should look white to anyone not paying attention. Then it will be a lot better.IceBreakerG - Tuesday, March 18, 2008 - link
Nice job Anand. That looks really really good, and is giving me a bunch of ideas as well. I don't have my own house yet, but I'm getting close to getting one I think. Still not sure what I want exactly, but I'd love to have a theater room like that. That looks awesome. Can't wait to see it when it's done. Interim blog posts are very much appreciated though, I like seeing how it's built.